Tired of the same old manicure and looking for some fresh inspiration for spring? You want a design that’s playful, stylish, and perfectly captures the cheerful vibe of the season.
Bee nail designs are a popular manicure trend celebrated for their playful and cheerful aesthetic that captures the spirit of spring and summer. These designs, ranging from simple bumblebee accents to intricate honeycomb patterns, symbolize nature, productivity, and the joy of warmer seasons, making them a go-to choice for a fresh, stylish look.
Leveraging tested frameworks and data-driven insights, this guide will walk you through everything you need to know. You will discover 11 stunning designs, from beginner-friendly accents to expert-level art, that you can create at home.
Why Are Bee Nail Designs the Sweetest Trend for 2026?
It’s no surprise that bee nail designs are buzzing with popularity. This enduring trend is more than just a cute pattern; it’s a celebration of nature and the arrival of warmer, sunnier days. As a form of spring nail art designs, bee-themed nails perfectly capture the essence of gardens blooming and the outdoors coming back to life. The entity bee nail art represents spring and symbolizes productivity, making it a meaningful as well as fashionable choice. The classic yellow and black color combination is instantly recognizable and adds a pop of cheerful color to any look. In professional portfolios, we see this trend evolving each 2026, with nail technicians incorporating sophisticated elements like sunflower nail art, intricate honeycomb patterns, and realistic dripping honey effects. Creating these looks requires thin brushes and uses dotting tools, but the results are a beautiful nod to nature that feels both whimsical and chic.
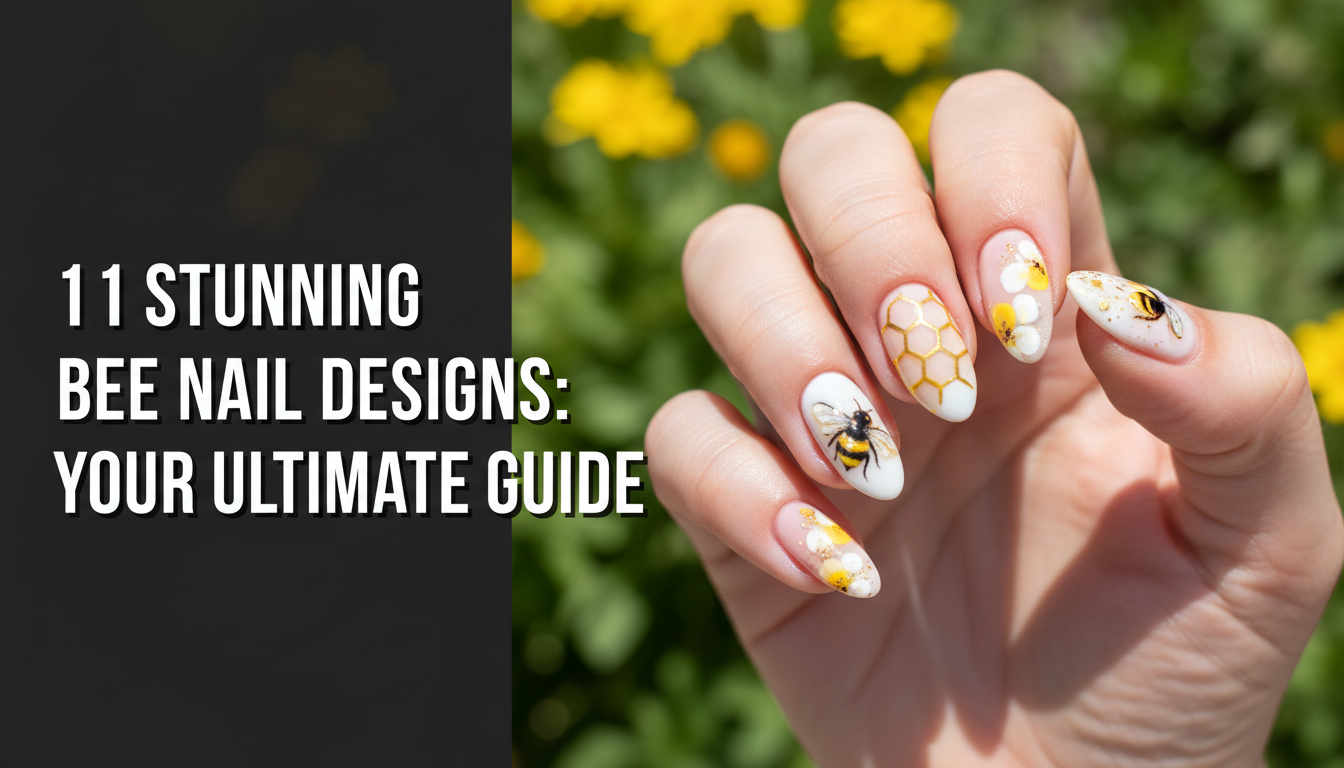
11 Stunning Bee Nail Designs to Try This Spring
Now for the fun part! We’ve curated a gallery of the 11 most stunning bee nail art ideas, complete with everything you need to recreate them at home. This list provides options for every skill level, from a simple bee nail tutorial for complete beginners to advanced micro-painting techniques for seasoned artists. Whether you’re working with short natural nails or long acrylics, you’ll find a design that inspires you. Each tutorial will break down the exact products, tools, and steps to help you achieve a salon-quality manicure.
1. Create a Simple Bumblebee Accent Nail

Pin this cute & easy idea to your ‘Spring Nails’ board!
Products & Tools Used
- Nude or light pink gel polish for the base color
- Bright yellow gel polish (e.g., a “pollen” shade)
- Opaque black gel polish for stripes and details
- White gel polish for the wings
- A fine-tipped dotting tool or the end of a bobby pin
- A thin liner brush for nail art
- Glossy no-wipe top coat
Application/Styling Steps
- Prepare cuticles and buff the nail surface for a smooth canvas. Apply your base coat and cure.
- Apply two thin coats of your nude base color, curing after each layer.
- Using your dotting tool, place a single, medium-sized dot of yellow polish where you want the bee’s body. Cure it.
- With your thin liner brush and black polish, paint stripes—two simple horizontal lines—across the yellow dot.
- Use the very tip of the brush to add two small white dots or teardrop shapes on the side for wings.
- Seal top coat over the entire nail to protect your cute bee design and cure for a final time.
Pro-Tip: For perfectly crisp lines, flash cure the black stripes for just 10-15 seconds before adding the next one. This prevents the colors from bleeding together, a common issue for beginners.

2. Master the Classic Yellow and Black Honey Bee

Save this timeless honey bee nail art to your manicure inspiration board!
Products & Tools Used
- A vibrant, opaque yellow and black nail art gel polish set
- A sheer white or clear polish for the base
- A touch of brown or black blooming gel (optional, for a ‘fuzzy’ effect)
- An ultra-fine detail brush (often called a ‘striper’ or ‘micro’ brush)
- A small dotting tool
- A high-shine top coat
Application/Styling Steps
- Apply and cure your sheer white or clear base coats. This makes the bee colors pop.
- Using your detail brush and yellow polish, draw an oval for the bee’s body and a small circle above it for the head. Cure.
- For a fuzzy look (optional), apply a tiny amount of blooming gel over the yellow body, then dot black polish into it and let it spread slightly before curing.
- For a sharp look, use the detail brush to paint stripes of black across the yellow body. Add a black stinger at the bottom.
- With a clean brush and white polish, paint two teardrop shapes for the wings, attached to the top of the body. For intricate bee wings, you can add tiny black veins with the very tip of your brush. Cure.
- Seal the entire design with a glossy top coat and cure.
Pro-Tip: To achieve anatomical bee accuracy on a small scale, focus on the proportions. The body should be about twice the size of the head, and the wings should overlap slightly. This small detail makes the art look more professional.

3. Design an Elegant Gold Honeycomb Pattern

Pin this chic honeycomb nail art for your next elegant manicure!
Supplies Needed
- A base color of your choice (e.g., matte black, sheer nude, or white)
- A highly-pigmented metallic gold nail polish
- Method A (Easy): A honeycomb nail stamping plate, scraper, and stamper
- Method B (Advanced): A very long, thin striper brush
- A matte or glossy top coat
Step-by-Step Directions
- Apply and cure your chosen base color. If using a matte top coat, apply and cure it now before the art. If using a glossy finish, wait until the end.
- For Method A (Stamping):
a. Apply the gold polish over the honeycomb design on your stamping plate.
b. Scrape the excess polish off with the scraper tool at a 45-degree angle.
c. Quickly press the stamper onto the plate in a rolling motion to pick up the design.
d. Transfer the design to your nail by rolling the stamper across the surface. - For Method B (Freehand):
a. Using your long striper brush and gold polish, draw a series of parallel diagonal lines across the nail.
b. Clean your brush and draw another set of parallel diagonal lines going in the opposite direction, creating a diamond grid.
c. Finally, connect the points of the diamonds with short, horizontal lines to form the hexagon shapes. - Allow the gold polish to dry completely. If you used a glossy top coat, seal the design now and cure.
Lesson Learned: In my experience, stamping polish is thicker than regular polish. If you’re using a standard metallic polish for stamping, you need to work very quickly as it dries faster on the plate.

4. Achieve the Realistic “Dripping Honey” Effect

Pin this sweet dripping honey effect for a unique nail art look!
Supplies Needed
- A clear or nude base
- A clear top coat for mixing
- An opaque, sunny yellow polish
- A tiny drop of brown or orange polish (optional, for amber tones)
- A nail art palette or piece of foil
- A dotting tool and a thin liner brush
Instructions
- Apply and cure your base color. For a classic look, a French manicure base works beautifully.
- On your palette, mix your “honey.” Combine about 3 parts clear top coat with 1 part yellow polish. Add a minuscule touch of brown/orange if desired, and mix until you have a translucent, golden nectar aesthetic.
- Using your liner brush, paint a wavy line near your cuticle area to define the top edge of the honey.
- Load your dotting tool with the honey mixture. Place a larger dot where you want a drip to start, then gently drag it downwards to create the drip shape. Make the drips varied in length and thickness.
- For a 3D effect, cure the first layer of drips, then go back and add more of the honey mixture on top to build dimension.
- Finish with a high-gloss top coat over the entire nail to make it look wet and shiny.
Pro-Tip: Don’t cure the main drip layer immediately. Let the nail sit for 5-10 seconds (right side up) to let gravity pull the mixture down naturally, creating a more authentic honey + drip shape.

5. Design for Cute Bee Nails on Short Nails

Yes, you can rock bee nails on short nails! Pin this idea now.
What You Need
- A light, space-opening base color (like pastel yellow or baby blue)
- Tiny bee nail decals or stickers (easiest method)
- OR: The same polishes and micro-brushes from the tutorials above
- A pair of fine-tipped tweezers for placing decals
- A durable top coat
Steps
- Apply and cure your light base color. Lighter colors tend to make short nails appear wider and cleaner.
- The key is placement. Instead of centering the design, place your tiny bee in an off-center position, like near the cuticle or in a top corner. This uses negative space to your advantage.
- For Decals: Use tweezers to gently peel a bumble bee nail sticker from its backing. Place it on the nail and press down firmly.
- For Hand-Painting: Use the absolute smallest dotting tool and brush you have. Create a “micro-bee” using the same steps as Tutorial #1, but keep every element tiny.
- Apply two layers of top coat, making sure to “cap” the free edge of the nail. This is crucial for preventing chips on natural bee nails.
Pro-Tip: For short bee nails, think in terms of a “sprinkle” rather than a large feature. A few tiny, scattered bees across all nails can look chicer and less crowded than one large bee on an accent nail.

6. Paint a Whimsical Daisy and Bee Garden Scene

Bring a spring garden to your fingertips! Pin this bee and flower nails idea.
Supplies Needed
- A sky blue or pastel green base color
- Opaque white and yellow polish for the daisy
- Black polish for the bee
- A dotting tool with multiple sizes
Instructions
- Apply and cure your sky blue “sky” base color.
- To create the daisy, take a medium dotting tool and your white polish. Place 5-6 dots in a circle to form the petals.
- Before curing, use a clean, thin brush to gently drag the center of each dot inwards. This creates a more petal-like shape. Cure.
- With a small dotting tool, place a yellow dot in the center of your petals. Cure.
- On an adjacent nail (or the same one), create a tiny bee using the method from Tutorial #1.
- For a “flying” effect, you can use a micro-brush to draw a tiny dotted line from the bee towards the flower.
- Seal the entire garden nail theme with a glossy top coat and cure.
Pro-Tip: For a more dynamic bee and flower nails scene, vary the size of your daisies. A large one in the foreground and a smaller one in the background creates a sense of perspective, even on a small nail.

7. Create Elegant, Minimalist White and Gold Bee Nails

For a touch of class, pin these minimalist white and gold bee nails.
What You Need
- A high-quality, opaque white gel polish
- A metallic gold liner gel polish with a built-in thin brush
- A sheer, shimmery gold polish for the wings (optional)
- A glossy top coat
Steps
- Apply two coats of your opaque white polish for a perfect, streak-free base. Cure each coat.
- Using the gold liner gel, carefully draw outlines of the bee’s body and head. Do not fill it in; let the white base show through. This is your negative space bee art.
- Draw the outlines of the two wings.
- For extra detail, you can fill in the wings with a sheer, shimmery gold polish. Cure the entire gold design.
- Apply your glossy top coat, making sure the surface is perfectly smooth over the gold lines.
Pro-Tip: Before you start with the gold liner, gently wipe the tacky layer off the white base with an alcohol wipe. This provides a smoother, non-sticky surface for the liner brush to glide over, resulting in much cleaner lines.

8. Try an Advanced Hand-Painted Botanical Honeybee

Challenge your skills! Pin this expert tip for a stunning hand-painted bee.
Art Supplies
- A full set of gel paint (not polish) in yellow, black, brown, and white, which is thicker and more like acrylic paint.
- An extremely fine “000” detail brush.
- A matte top coat.
- A creamy off-white or light beige base color.
Technique Steps
- Apply your base color and a layer of matte top coat. A matte surface provides “grip” for the paint, much like paper.
- Lightly sketch the bee’s outline using a light brown paint diluted with a bit of top coat.
- Block in the main yellow areas of the body. Don’t worry about perfection.
- Begin the shading and highlighting bees process. Mix a tiny bit of brown into your yellow and add shadows to the underside of the bee’s body segments. Mix white with yellow to add highlights to the top.
- Use the very tip of your brush and black paint to create the fuzzy texture with tiny, individual hair-like strokes. This is a key micro-painting technique.
- For the wings, use a white paint thinned with top coat to create a transparent effect. Add the veins with a very light hand using thinned black or grey paint.
- Once the entire masterpiece is cured, seal it with another layer of matte or glossy top coat.
Pro-Tip: Work in multiple, thin, cured layers. Paint the body and cure. Paint the head and cure. Add shading and cure. This prevents mistakes from ruining the entire piece and builds realistic depth.

9. Encapsulate 3D Bee Charms in Acrylic or Gel

Take your nails to the next dimension! Pin this 3D bee nails tutorial.
Supplies Needed
- Clear builder gel or clear acrylic powder and monomer
- Tiny 3D honey bee nail charms
- Gold foil flakes or encapsulated bee glitter
- A gel brush or acrylic brush
- A nail file and buffer
Application Steps
- Prep the nail and apply your base layer (e.g., a nail tip or a thin layer of builder gel). Cure if using gel.
- Apply a thin, “sticky” layer of builder gel where you want to place the art. Do not cure.
- Using tweezers, place the bee charm and sprinkle the gold foil flakes onto the wet gel. Arrange them as desired. Flash cure for 10 seconds to hold them in place.
- Now, encapsulate the entire design. Apply a generous layer of clear builder gel or a bead of clear acrylic over the whole nail, making sure the charm is completely covered and the nail has a smooth arch (apex).
- Cure fully (for gel) or let air dry (for acrylic).
- The surface will be lumpy. Use your nail file to refine the shape and smooth the surface until the nail is perfectly shaped and the charm is visible but can’t be felt.
- Buff the nail smooth, cleanse with alcohol, and apply a final glossy top coat.
Pro-Tip: Choose your charms wisely. For encapsulation, flatter metal charms work much better than bulky, rhinestone-heavy ones. They require less product to cover and are easier to file smooth.

10. Rock a Chic Matte Black and Yellow Design

Go for a modern edge. Pin this matte bee nails look.
Products & Tools Used
- An opaque black polish
- A vibrant yellow polish
- A high-quality matte top coat
- A thin detail brush
Application Steps
- Paint your nails as desired. A great combination is to paint the index, middle, and pinky fingers black, and the thumb and ring finger yellow. Cure.
- On the yellow accent nail, use your detail brush and black polish to paint a bee. You can do a simple silhouette or a striped bee. Cure.
- This is the magic step. Instead of a glossy top coat, apply a thin, even layer of your matte top coat over all nails.
- Cure fully. The nails will come out of the lamp with a velvety, non-reflective matte finish.
- Cleanse with alcohol to reveal the true matte effect.
Pro-Tip: A popular technique is a “matte and glossy” combo. After matting the entire nail, use a thin brush and a glossy top coat to trace just the bee design. Cure it. The bee will be shiny while the background remains matte, creating a subtle, high-end textural contrast.

11. Embody Royalty with a “Queen Bee” Crown Design

Unleash your inner royal. Pin this stunning queen bee nails idea.
What You Need
- A dark, regal base color (e.g., navy blue, black, or deep purple)
- Gold metallic liner polish
- Tiny gold nail art rhinestones
- Nail gem glue
- A wax-tipped tool for picking up gems
Steps
- Apply and cure your dark base color.
- Using your gold liner polish, draw a small, delicate crown shape near the cuticle of your accent nail.
- You can either paint a tiny gold bee sitting on the crown or use a pre-made queen + bee decal. Cure the gold paint.
- Place tiny dots of nail gem glue where you want the rhinestones (e.g., on the points of the crown).
- Use your wax-tipped tool to pick up the rhinestones and place them onto the glue. Cure fully under the lamp.
- Carefully apply top coat around the gems (not over them, as it can dull their sparkle) and across the rest of the nail.
Pro-Tip: For a perfectly symmetrical crown, lightly draw it first with a white chalk pencil, which can be wiped away easily. Once you’re happy with the shape, trace over it with the permanent gold liner gel.

Key Takeaways
- Preparation is Paramount: Always start with properly prepped nails (clean, buffed, base coat applied). This is the most crucial step for a long lasting nail art design and prevents chipping.
- Thin Layers are Your Friend: Whether using regular or gel polish, apply multiple thin coats instead of one thick coat. This ensures even drying/curing and prevents smudges and bubbles, especially with highly pigmented yellow polish.
- The Right Tools for the Job: A thin liner brush for stripes and a dotting tool for bodies and flower centers will make creating cute honey bee nails dramatically easier than using the bottle brush.
- Top Coat Seals the Deal: Always finish with a quality top coat (glossy or matte) and be sure to “cap” the free edge of your nail. This protects your hand painted art from wear and tear.
- Don’t Be Afraid to “Cheat”: For intricate designs like the honeycomb pattern or for perfect bees on short nails, high-quality nail decals or stamping plates are a fantastic, professional-looking alternative to freehand painting.
FAQs About bee nail designs
How to do bee nail art?
The easiest way to do bee nail art is by using a dotting tool and a thin brush. First, use the dotting tool to create a yellow oval for the body. After curing, use a thin brush to paint two black stripes across the body and add two small white dots for wings. This simple method is perfect for beginners and creates a recognizable cute bee design in just a few steps.
What colors do you need for bee nails?
The essential colors for classic bee nails are a vibrant yellow and an opaque black. You will also need a small amount of white for the wings. For more complex designs, you might add a sheer amber for dripping honey effects, gold for queen bee nails, or sky blue for a background with daisy nail designs.
Are bee nails in style for spring 2026?
Yes, bee nails are very much in style and are considered a classic spring nail trend. They perfectly capture the season’s themes of nature, new life, and cheerful colors. Each year, nail artists reinterpret the trend with new techniques like matte bee nails or minimalist bee art, keeping it fresh and popular for both spring and summer.
Can you do bee nails on short nails?
Absolutely, you can do beautiful bee nails on short nails. The key is to use smaller designs and strategic placement. Opt for a tiny bee on an accent nail, place it off-center to utilize negative space, or use very small bee nail decals. This prevents the design from looking crowded and makes short bee nails look chic and intentional.
How do you make a honeycomb nail design?
You can create a honeycomb pattern using a stamping plate or by freehand painting. For the easiest method, use a honeycomb nail stamping plate with a metallic polish. For a freehand approach, use a long, thin striper brush to draw two sets of intersecting diagonal lines, then connect the points with small horizontal lines to form hexagons.
How to use bee nail decals?
To use bee nail decals, first apply and fully cure your base color. Use tweezers to gently peel the decal from its backing and place it on the nail. Press it down firmly from the center outwards to remove any air bubbles. Finish by applying two thin layers of a top coat to seal the decal completely and prevent peeling.
What is the best yellow for bee nails?
The best yellow for bee nails is a highly pigmented, sunny, or ‘bumblebee’ yellow. Look for a polish that offers opaque coverage in two thin coats to avoid a thick, goopy application. For dripping honey effects, a translucent “jelly” amber or yellow polish is a better choice to achieve that see-through, realistic look.
How do you fix smudged stripes on a bee?
To fix smudged stripes, dip a small, clean nail art brush in 100% acetone and very carefully trace along the edge of the smudge to clean the line. This technique requires a steady hand. To prevent smudges, always make sure your yellow base layer is completely cured and dry before you attempt to paint stripes with black polish.
Stickers vs hand-painted bees: which is better?
Stickers are better for beginners or for achieving a quick, perfectly uniform look. They are a great solution for easy nail art for shaky hands. Hand-painting offers more creative freedom and is a hallmark of professional bee nail art, allowing for custom sizes, shading, and artistic styles like the botanical illustration style, but it requires more skill and practice.
How do I ask my nail tech for bee nails?
When asking your nail tech for bee nails, it’s best to bring inspiration photos. Show them a picture of the exact style you want, whether it’s simple bee nails, acrylic bee nails with 3D charms, or a complex hand-painted bee. Use descriptive words like “cute and simple,” “elegant and minimalist,” or “realistic and detailed” to help them understand your vision.
Final Thoughts on Your Bee-autiful Manicure
From a simple bee nail accent to a full-blown, hand-painted masterpiece, this guide has shown that the world of bee nail designs is open to everyone. Whether you choose the quick satisfaction of a stamping plate or the artistic challenge of micro-painting techniques, the key is to have fun and embrace the cheerful spirit these designs embody. This 2026, let your nails be a celebration of nature’s hardest workers.
With these 11 stunning ideas and step-by-step tutorials, you now have everything you need to create a manicure that’s sure to get people buzzing.
Which bee nail design are you excited to try first? Share your favorite in the comments below
Last update on 2026-03-04 / Affiliate links / Images from Amazon Product Advertising API


