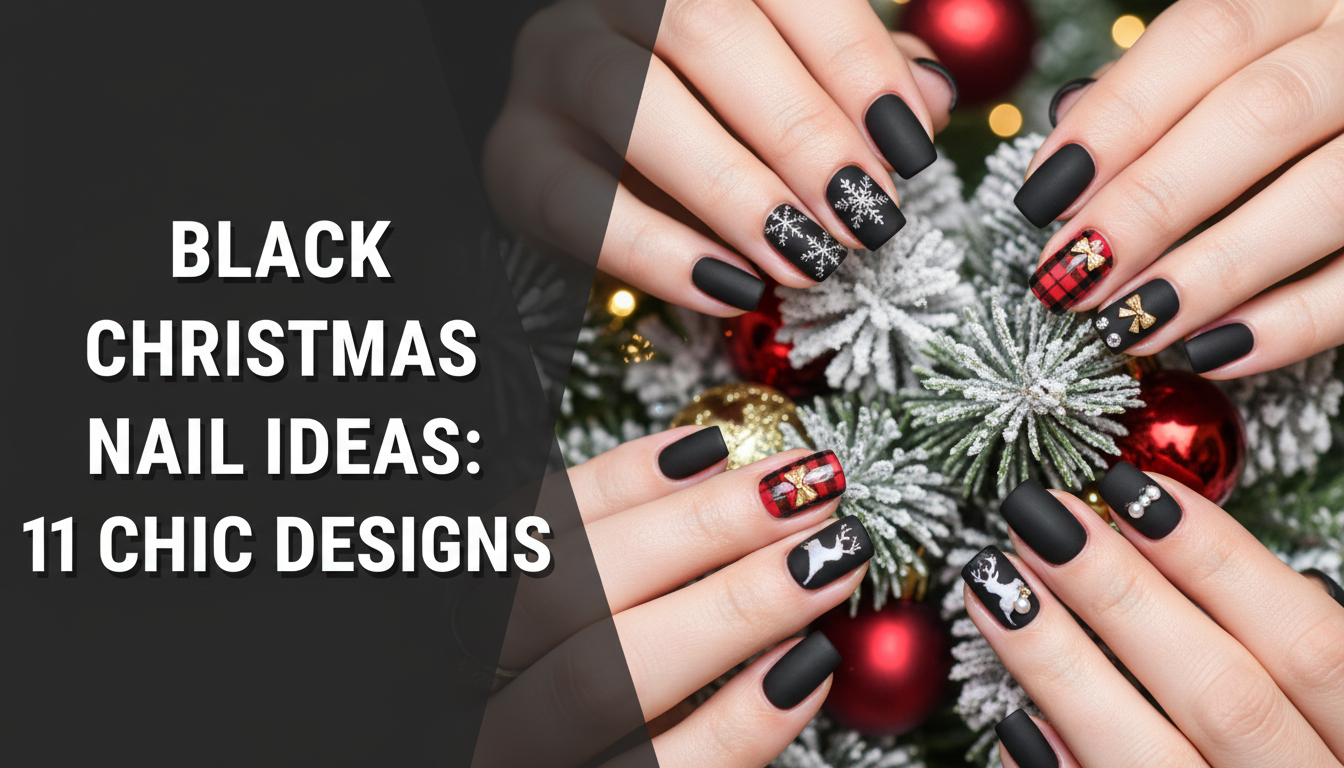
Struggling to make your dark aesthetic feel festive? It’s a common challenge to want black christmas nail ideas that feel celebratory without sacrificing your chic, sophisticated style for traditional reds and greens. You want elegance and edge, not just another holiday cliché.
Black nails are an incredibly chic and festive option for Christmas when elevated with sophisticated accents like metallic foils, glitter, and textural finishes. Pairing a deep black base with elements such as delicate gold snowflakes, a sparkling silver gradient, or a modern matte effect transforms the color into a perfect statement for any holiday event in 2026. This is your guide to mastering the look.
Drawing from current Instagram trends and insights from certified nail artists, this guide proves that black is one of the most versatile holiday colors. We will explore 11 elegant designs, complete with professional tips to achieve a flawless, long-lasting manicure. Get ready to discover how to make dark christmas nails your new festive signature.
How Can You Make Black Nails Festive for Christmas?
The idea that holiday nails must be red, green, or white is a thing of the past. Black serves as the perfect canvas—a “little black dress” for your fingertips—that allows festive details to truly shine. The secret to transforming a simple black holiday manicure into something magical lies in contrast and texture. By introducing elements that catch the light, you can create a look that feels both moody and merry. Think of it as a winter night sky; the darkness makes the stars and lights appear even brighter. This is the core principle behind festive black nail art.
The most effective way to elevate black for the holidays is by incorporating metallics. A touch of gold or silver foil immediately adds a layer of luxury and warmth. Likewise, a sparkly glitter gradient or a dusting of holographic powder can capture the twinkle of Christmas lights. Finishes also play a crucial role; a matte black base creates a velvety, sophisticated backdrop for a single glossy accent or a delicate, hand-painted design. Ultimately, making black nails festive is not about changing the color, but about accessorizing it with the spirit of the season.
11 Chic Black Christmas Nail Ideas for a Stunning Festive Look
Ready for some inspiration? We’ve curated 11 stunning and completely achievable black christmas nail designs that redefine holiday elegance. Each idea is more than just a picture; it’s a mini-tutorial complete with the products you’ll need, step-by-step instructions, and a pro-tip to ensure salon-quality at home results. Whether you prefer a minimalist look or a full-on glamorous statement, you’ll find the perfect design to take to your nail technician or try as a DIY project. These styles prove that a dark christmas nails look can be the most memorable of the season.
1. Create an Elegant Black and Gold Snowflake Accent Nail

Pin this elegant black and gold christmas nail idea for your next holiday party!
Products & Tools Used
- High-pigment black nail polish (gel or a long-lasting lacquer)
- Metallic gold nail art polish or gold leaf flakes
- A very fine-tipped nail art brush (striper brush)
- High-gloss, quick-dry top coat
- Base coat for nail health
Application/Styling Steps
- Prepare your nails by filing them into an almond shape, buffing the surface, and applying a base coat.
- Apply two thin coats of the jet black polish, allowing each to dry completely (or cure under a UV lamp if using gel).
- Using the fine-tipped brush and gold polish, paint a small asterisk (*) on the ring finger accent nail.
- Design the snowflake by adding smaller lines and dots branching off the main asterisk lines.
- Once the gold design is dry, seal all nails with a generous layer of high-gloss top coat for a durable finish.
Pro-Tip: For perfectly symmetrical snowflakes, use a nail stamping kit. They come with pre-etched designs, allowing you to stamp a flawless black snowflake nails design with metallic polish every time.

2. Design Chic Black French Tips with a Silver Glitter Line

Save this black french tips idea for a modern, minimalist holiday look!
Products & Tools Used
- A sheer nude or pale pink polish for the base
- Jet black nail polish
- A nail art liner brush with silver glitter polish
- French tip guide stickers (optional, but recommended)
- A high-gloss top coat
Application/Styling Steps
- Prepare your nails and apply one to two coats of the sheer nude base polish. Let it dry completely.
- If using, place the French tip guide stickers on each nail to create a clean line for your tip.
- Carefully paint the tip of each nail with the black polish. Apply a second coat if needed for opacity. Remove the guide sticker while the polish is still slightly wet to ensure a sharp line.
- Once the black tips are dry, take the silver glitter liner and outline the smile line where the black and nude polish meet.
- Finish with a high-gloss top coat to smooth everything out and add a salon-grade shine.
Pro-Tip: For a negative space design twist, apply the French tip guides to your bare nail, paint the black tip, and then add the silver line just below it, leaving the rest of the nail natural before applying a top coat. This is a very chic and modern take.

3. Apply a Luxurious Matte Black with a Glossy Accent

A matte black holiday look is always in style. Pin this for a touch of understated elegance!
Products & Tools Used
- A high-quality jet black nail polish
- A matte-finish top coat
- A high-shine, glossy top coat
- Base coat
Application/Styling Steps
- Prepare your nails as usual and apply a base coat.
- Paint two coats of black polish on all nails, ensuring a streak-free application. Let them dry completely.
- On all nails except for your chosen accent finger (e.g., the ring finger), apply a thin, even layer of the matte top coat.
- On the accent finger, apply the high-shine glossy top coat.
- You can also reverse this, making most nails glossy and one accent nail matte for a different but equally sophisticated effect.
Pro-Tip: Matte polish can show fingerprints or oils. To refresh the look, simply wipe the nail with a lint-free cloth and a bit of rubbing alcohol. This will restore the velvety matte black finish instantly.

4. Create a Sparkling Black Glitter Gradient Manicure

Perfect for New Year’s Eve! Pin this black glitter gradient idea for a show-stopping look.
Products & Tools Used
- A glossy black nail polish
- Fine silver or holographic loose glitter
- A small piece of a cosmetic sponge
- A clear polish or glitter base
- A thick, glossy top coat
Application/Styling Steps
- Apply your black base coats and let them dry completely.
- For easy cleanup, paint liquid latex on the skin around your nail.
- On a flat surface, mix a small amount of the loose glitter with a few drops of clear polish.
- Dab the cosmetic sponge into the glitter mixture.
- Gently stamp the sponge onto your nail, concentrating the pressure at the cuticle and lightly dabbing as you move up the nail to create the faded effect.
- Layer the glitter until you are happy with the gradient. Peel off the liquid latex.
- Seal the design with one or two layers of a thick, glossy top coat to smooth out the glitter texture. This process demonstrates encapsulated glitter.
Pro-Tip: For a reverse gradient, apply the glitter at the tip of the nail and fade it down towards the cuticle. This can make short nails appear longer.

5. Style Minimalist Black Nails with a Single White Star

For the minimalist at heart, pin this simple black star nail art idea.
Products & Tools Used
- Onyx black nail polish
- A highly pigmented white nail art polish
- A fine-tipped detail brush and a small dotting tool (or a toothpick)
- Glossy top coat
Application/Styling Steps
- Apply two coats of your black nail polish and let them dry fully.
- To design the star, use the dotting tool to place five small white dots in a circle on your chosen accent nail.
- Use the fine-tipped brush to connect the dots, dragging the polish from each dot towards the center to form the points of the star.
- Clean up any edges with a brush dipped in acetone for a crisp shape.
- Let the star dry completely, then seal the design with a glossy top coat.
Pro-Tip: If hand-painting is too challenging, tiny white or silver star-shaped nail stickers or decals provide the exact same look with zero effort. This is a great time-saving hack.

6. Design Edgy Black Nails with Silver Chrome Powder

Unleash your inner rockstar this holiday with this black chrome nails look.
Products & Tools Used
- Black gel polish
- A no-wipe gel top coat
- Silver or holographic chrome nail powder
- A small, soft silicone applicator or eyeshadow sponge
- UV/LED nail lamp
Application/Styling Steps
- Apply your black gel polish base coats, curing each layer under the UV/LED lamp as directed.
- Apply a thin layer of the no-wipe gel top coat and cure it for only half the recommended time (e.g., 30 seconds instead of 60). The surface should be firm but slightly tacky.
- Dip your silicone applicator into the chrome powder, picking up a small amount.
- Vigorously buff the powder onto the nail surface. The mirror effect will appear as you rub. Continue until the entire nail is reflective.
- Dust off any excess powder and seal the design with another full layer of the no-wipe top coat, making sure to cap the free edge. Cure for the full recommended time.
Pro-Tip: The key to a flawless chrome finish is an absolutely smooth base. Any bumps or imperfections in the polish underneath will show through the chrome, so ensure your base application is perfect.

7. Paint a Cozy Black and Red Buffalo Plaid Design

Nothing says cozy Christmas like plaid! Pin this black and red plaid nail idea.
Products & Tools Used
- A vibrant Christmas red polish
- An opaque black polish
- A sheer black or gray polish (or make your own)
- A long, thin striper brush
- Matte or glossy top coat
Application/Styling Steps
- On your accent nails, paint two coats of the red polish as your base. On the other nails, paint two coats of black polish.
- Once the red is dry, use the striper brush and opaque black polish to paint two thick vertical stripes and two thick horizontal stripes, creating the main grid.
- In the red squares where the black lines do not cross, use the sheer black/gray polish to paint thinner lines, creating the interwoven effect.
- Let the entire design dry for at least 15 minutes before the final step.
- Finish with your choice of a matte top coat (for a flannel look) or a glossy top coat.
Pro-Tip: If you don’t have a sheer black polish, create your own by mixing one drop of opaque black polish into a small puddle of clear top coat. This gives you perfect control over the transparency for the plaid effect.

8. Style Deep Black Velvet Cat Eye Nails

Get the luxe look with this black velvet nails idea for a sophisticated holiday season.
Products & Tools Used
- A layer of regular black gel polish (optional, for depth)
- Black magnetic (cat eye) gel polish
- A nail art magnet wand (often comes with the polish)
- No-wipe gel top coat & UV/LED lamp
Application/Styling Steps
- Apply and cure a base coat. For extra depth, apply and cure one coat of regular black gel polish first.
- Apply a thick coat of the black magnetic gel polish, but DO NOT CURE IT YET.
- To get the “velvet” look, hold the magnet flat over the nail for 10-15 seconds to activate all the particles. For a “cat eye” line, hold the edge of the magnet wand diagonally across the nail for 10-15 seconds.
- Once you have the desired effect, immediately cure the nail under the UV/LED lamp to lock the magnetic particles in place.
- Seal with a no-wipe top coat and cure one last time.
Pro-Tip: For an even more dynamic “galaxy” effect, use two magnets simultaneously, holding them at opposite corners of the nail to push and pull the magnetic particles into unique patterns.

9. Decorate with Black and White Minimalist Christmas Trees

A touch of Scandi-chic for your nails! Pin this black and white minimalist christmas trees idea.
Products & Tools Used
- Onyx black polish
- Opaque white polish
- A fine-tipped striper brush
- Matte and/or glossy top coat
Application/Styling Steps
- Paint your accent nail (e.g., ring finger) with two coats of white polish. Paint the rest of your nails with two coats of black polish.
- Let all nails dry completely.
- On the white nail, use the black polish and a striper brush to paint a simple vertical line for the trunk.
- Starting from the top of the trunk, design the tree by painting a continuous zigzag line that gets wider as you move down.
- Let the design dry, then seal your accent nail with a glossy top coat. For extra pop, consider using a matte top coat on the black nails.
Pro-Tip: To keep the lines perfectly straight, don’t try to draw them slowly. Use a confident, quick motion. You can also use thin nail striping tape to mask off the lines for a perfect geometric tree.

10. Accentuate with Black Nails and Gold Leaf Flakes

Pure luxury. Pin this stunning black nails with gold leaf look for an opulent holiday vibe.
Products & Tools Used
- A deep black nail polish
- A pot of nail art gold leaf flakes
- A pair of fine-tipped tweezers
- A thick, salon-grade gel top coat is highly recommended for a smooth finish
Application/Styling Steps
- Paint your nails with two coats of black polish and let them dry almost completely, but still be slightly tacky.
- Using the tweezers, gently pick up small pieces of gold leaf and place them randomly on the nail.
- Use a clean finger or a silicone tool to gently tap the flakes down so they lay flat against the nail surface.
- Don’t worry about perfect placement; the random, fractured look is part of the appeal.
- Seal the design with two thick layers of a gel top coat, making sure all the edges of the gold leaf are fully encapsulated. This prevents chipping and creates a perfectly smooth finish.
Pro-Tip: For a more subtle look, crush the gold leaf flakes into even smaller pieces before applying. You can also mix them directly into your top coat for a suspended glitter-like effect.

11. Create a “Dark Academia” Black Marble Effect

For a look that’s both moody and sophisticated, pin this black marble nails tutorial.
Products & Tools Used
- A glossy black polish
- An opaque white polish
- A metallic gold polish
- A very fine detail brush
- A clear top coat and a small brush for acetone
Application/Styling Steps
- Apply your two base coats of black polish and let them dry completely.
- Apply a thick layer of clear top coat, but DO NOT let it dry. This wet layer is what you will work on.
- Using the detail brush, draw a few random, squiggly lines of white polish across the wet top coat.
- Quickly draw a few gold lines next to the white ones.
- Dip a clean brush in a small amount of acetone and lightly tap the lines. The acetone will cause the colors to “bloom” and spread, creating the soft marble effect.
- Once you’re happy with the pattern, allow it to air dry for a few minutes before sealing with another layer of quick-dry top coat.
Pro-Tip: A special product called “blooming gel” can be used instead of a wet top coat. It’s specifically designed to make colors spread and is a key tool for creating easy, salon-quality at home marble and watercolor effects.

Key Takeaways
- Contrast is Key: The easiest way to make black nails look festive is by contrasting them with metallics. Black and gold christmas or black and silver nails are timeless, elegant combinations.
- Texture Adds Dimension: Don’t just think about color. A mix of matte vs glossy finishes, a black glitter gradient, or a black velvet nail effect can create a sophisticated, holiday-ready look without any complex designs.
- An Accent Nail is Enough: You don’t need to create an intricate design on all ten nails. A single, well-executed accent nail—like a black snowflake nail or a plaid pattern—makes a powerful and chic statement.
- Technique Matters More Than Tools: Professional effects like black chrome nails or black marble nails are achievable at home, but they require specific techniques (using a no-wipe top coat or a blooming gel) more than expensive tools.
- A Quality Top Coat is Non-Negotiable: Dark polishes show chips easily. A long-lasting, high-quality top coat is essential to seal your design and keep your black holiday manicure looking flawless through every party.
FAQs About Black Christmas Nail Ideas
Are black nails okay for Christmas?
Absolutely, black nails are a chic and fashionable choice for Christmas. When styled correctly, they serve as a sophisticated, elegant backdrop for festive accents like gold, silver, glitter, and classic holiday patterns. They are a modern alternative to traditional red and green, perfect for holiday parties and formal events, and align with winter fashion trends for 2026.
How do you make black nails look festive?
The key to making black nails look festive is to add contrast and texture. Incorporate elements like a sparkly black glitter gradient, delicate gold leaf flakes, or hand-painted white snowflakes. Even a simple switch to a matte black finish with a single glossy accent nail can create a look that is both moody and celebratory.
What colors go best with black for Christmas nails?
For a classic festive look, gold and silver are the best colors to pair with black. Gold adds warmth and luxury, while silver provides a cool, icy sparkle. White is perfect for creating high-contrast minimalist designs like stars or snowflakes. For a cozier, traditional feel, a black and red plaid pattern is also a popular holiday choice.
Should I use a matte or glossy black polish for the holidays?
Both matte and glossy finishes are excellent choices, and the decision depends on the desired effect. A glossy finish is classic, reflects light from holiday decorations, and makes accents like glitter pop. A matte finish offers an understated, velvety, and modern sophistication that makes simple designs look incredibly chic and intentional. A mix of both is also very on-trend.
Can I do these black Christmas nail designs on short nails?
Yes, almost all of these designs can be adapted for short nails. For simple black christmas nails for short nails, minimalist designs like the single star, a glitter gradient starting from the cuticle, or the matte/glossy texture play work especially well. For patterns, consider doing them on a single accent nail to avoid overwhelming a smaller canvas.
Final Thoughts
Embracing black christmas nail ideas is a declaration of modern holiday elegance. As we’ve seen, black is not the absence of festive spirit but a canvas for it. With the right accents—be it the shimmer of gold leaf, the sparkle of a glitter gradient, or the textural play of matte vs glossy finishes—you can create a look that is deeply personal and perfectly celebratory. This holiday season, don’t be afraid to step away from the traditional and let your nails become the ultimate chic accessory. Which design will you try first to match your holiday outfits?
Last update on 2026-02-19 / Affiliate links / Images from Amazon Product Advertising API


