Have you ever given up on a cute braid because your layers just wouldn’t cooperate? You see stunning braid hairstyles for short hair online, but trying to recreate them ends with slipping strands and frustrating flyaways. It’s a common challenge that makes beautiful braids feel impossible for anyone with a bob, lob, or pixie cut.
Braiding short hair is entirely possible with the right techniques and styles; the key is choosing braids that work with shorter lengths, properly prepping the hair for better grip, and using specific methods to tuck in ends securely. This ensures the style is both beautiful and long-lasting without causing damage.
Leveraging tested frameworks and data-driven insights, this guide breaks down the barriers to braiding short hair. We will establish the core principles of successful short-hair braiding. You’ll discover 11 gorgeous, achievable styles with step-by-step instructions, transforming your frustration into confidence.
Why Do Most Braid Hairstyles for Short Hair Seem Impossible?
The core frustration with trying to create braid hairstyles for short hair stems from a few common problems. Shorter hair, by its nature, has less length and weight to hold a braid in place, leading to the dreaded slipping braids that fall out within hours. Layers and different lengths cause short hair sticking out of the weave, creating a messy look rather than a chic one. This is because the attribute of ‘shortness’ requires specialized braiding techniques to prevent common problems like hair breakage and those unraveling ends. Many tutorials are designed for long hair, failing to address these unique challenges. This guide, however, is built specifically to solve these issues, focusing on tension management and styles that are designed to secure shorter strands effectively, ensuring a beautiful and durable result without compromising hair health.
11 Stunning Braid Hairstyles for Short Hair (& How to Do Them)
Finding inspiration is easy, but finding actionable instructions for short hair braids is where the challenge begins. This section provides a comprehensive list of 11 diverse and stunning styles, ranging from easy braids for short hair to do yourself to more intricate updos. Each style is mapped to suit specific short hair lengths, from a pixie to a lob, and includes the specific styling products needed to achieve a polished, long-lasting look. We’ll cover everything from a classic crown braid to trendy short box braids, with clear, step-by-step guidance and expert pro-tips to ensure your success.
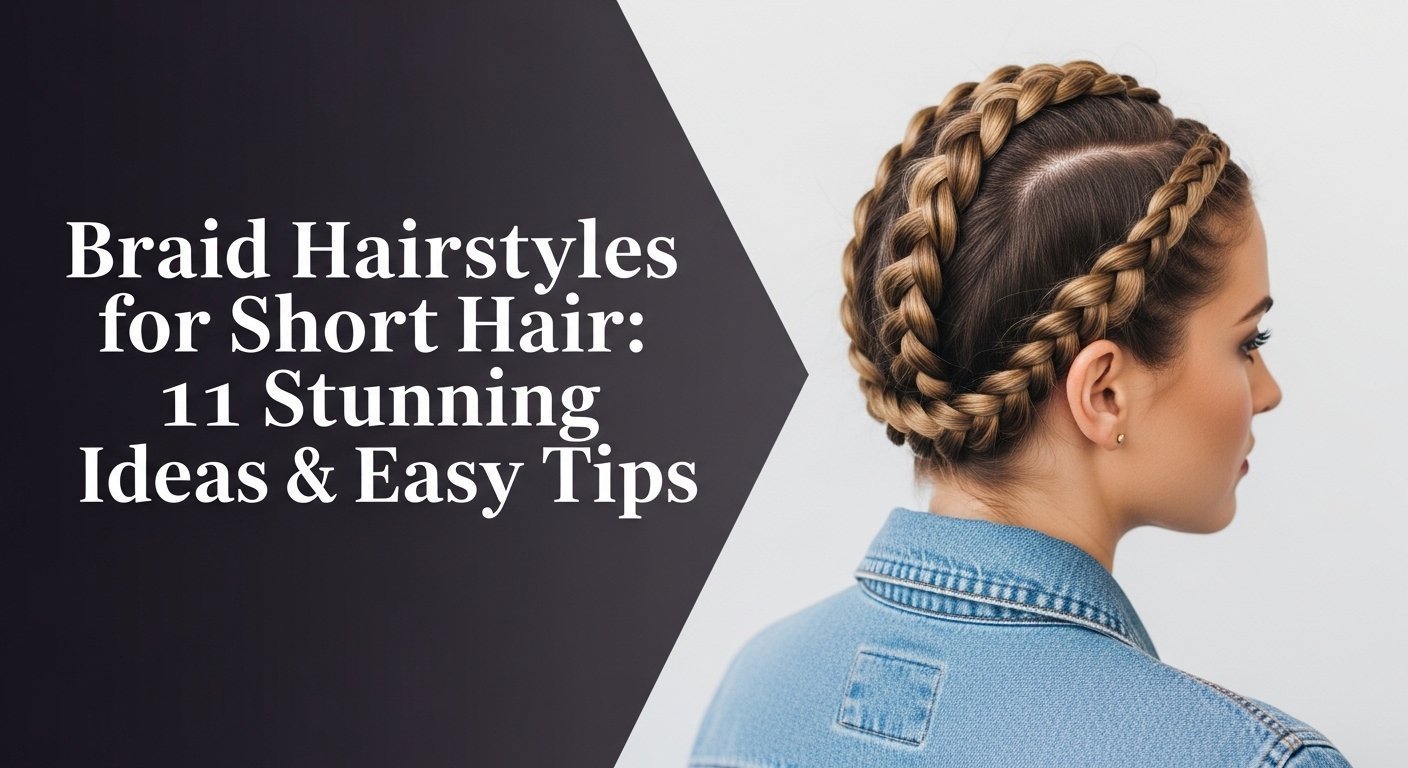
1. Weave a Classic Crown Braid for an Elegant Updo

Pin this stunning updo for your next formal event!
A crown braid transforms even a short bob into a sophisticated short hair updo, making it perfect for a wedding or formal event. The key for short hair is to create a “faux” crown with two separate braids, which requires bobby pins and hairspray for a secure hold.
Products & Tools Used
- Rat Tail Comb: For creating a clean center part.
- Clear Hair Elastics: Small elastics that are easy to hide.
- Strong Hold Bobby Pins: Look for pins that match your hair color for a seamless look.
- Texturizing Spray or Dry Shampoo: To give fine or clean hair some grit and hold.
- Flexible Hold Hairspray: To tame flyaways without making hair crunchy.
Application/Styling Steps
- Prep and part your hair down the middle. Apply texturizing spray to give your strands some grip.
- Braid each side. Starting just behind the ear, create a simple three-strand braid on one side of the part and secure with a clear elastic. Repeat on the other side.
- Gently pull on the edges of each braid to “pancake” them, creating a fuller, more bohemian look.
- Wrap the first braid up and over the top of your head, like a headband, and pin it securely on the opposite side. Tuck the end under the other braid to hide it.
- Wrap the second braid across, tucking its end underneath the first braid and pinning it in place.
- Mist with hairspray to control any short hair sticking out.
Pro-Tip: In my experience as a stylist, the key to a successful crown braid on short hair is tension management. Braid tightly enough to be secure, but not so tight that it causes scalp tension. When you “pancake” the braid, hold the end securely and pull gently from the top downwards.

2. Create a Chic Side Braid to Sweep Back Bangs

The perfect quick & easy style! Pin this for your next busy morning.
This is one of the best side braid hairstyles because it’s both functional and stylish. A French braid short hair style effectively solves the problem of bangs or layers falling into your face. This quick and easy braid works best with a texturizing product to give shorter strands the grip they need.
Products & Tools Used
- Styling Pomade or Wax: A small amount provides the grip needed to catch short hairs.
- Bobby Pins: To secure the end of the braid discreetly.
- Fine-tooth Comb: For creating a sharp, deep side part.
- Light Hold Hairspray: To tame flyaways.
Application/Styling Steps
- Part your hair deeply to one side.
- Take a small triangular section of hair at your hairline on the side with more hair. Apply a tiny amount of pomade to your fingertips.
- Section this piece into three small strands.
- Begin a French braid, crossing the side strands over the middle one. With each crossover, add a small new piece of hair from the hairline.
- Keep the braid tight and close to the scalp to grip all the short layers.
- Once the braid reaches just behind your ear, stop adding new hair and finish with a regular three-strand braid for about an inch.
- Secure the end of the braid with two crisscrossed bobby pins, hiding them underneath the rest of your hair.
Pro-Tip: For a bolder look that ‘pops’, try a Dutch braid instead. A Dutch braid is the reverse of a French braid—you weave the side strands under the middle strand instead of over. This makes the braid sit on top of the hair, highlighting the braid pattern.

3. Style Protective Short Box Braids in a Bob

Love protective styles? Pin this short box braids bob for your next salon visit!
Short box braids are a fantastic option for protective styling. This style protects short natural hair, especially 4c hair, and enables a low-maintenance, chic bob look. Opting for a shorter length reduces weight and tension on the scalp compared to longer box braids hairstyles, and choosing knotless braids offers an even more natural-looking, flatter base.
Products & Tools Used
- Kanekalon Braiding Hair: One or two packs, depending on desired thickness.
- Edge Control: A strong-hold formula to lay edges for a sleek finish.
- Rat Tail Comb: For precise sectioning.
- Hair Moisturizer or Leave-in Conditioner: To apply to your natural hair before braiding.
- Scalp Oil: A nourishing oil (like jojoba or tea tree) for scalp health.
- Small Rubber Bands or a Lighter: To seal the ends.
Application/Styling Steps
- Start with clean, stretched, and moisturized short natural hair.
- Use the rat tail comb to part a small, neat square section (about one inch).
- Apply edge control around the base of the section for a clean look.
- Take a small piece of braiding hair and begin the braid using the “feed-in method” for a more natural, flatter base (key for knotless braids).
- Braid down until you reach the desired bob length.
- Seal the ends by either tying a small rubber band, or quickly burning the ends with a lighter (for experienced users only; caution is advised).
- Repeat the process for your entire head, ensuring all braids are a consistent length.
Pro-Tip: The health of your hair is determined by your scalp. To prevent braid itch and promote growth, use a lightweight scalp oil every 2-3 days. Apply it with your fingertips between the parts, not on the braids themselves, to maintain a healthy scalp microbiome.

4. Braid Double Dutch Braids for a Sporty Look

Your perfect gym hairstyle! Pin this so your hair stays put during any workout.
Also known as boxer braids, this Dutch braid tutorial shows how to create a style that is ideal for physical activity. Its structure, which involves braiding “under” instead of “over,” prevents short layers from escaping, offering a secure hold that lasts through any workout.
Products & Tools Used
- Styling Gel or Mousse: To give hair a sleek finish and control flyaways.
- Rat Tail Comb: For a perfectly straight center part.
- Clear Hair Elastics: To secure the ends.
- Water Spray Bottle: To lightly dampen hair for better control.
Application/Styling Steps
- Part your hair cleanly down the center from forehead to nape. Clip one side away.
- On the loose side, lightly mist with water and apply a small amount of gel.
- Take a small section at the front hairline and divide it into three.
- Begin a Dutch braid by crossing the outer strands under the middle strand.
- Continue braiding down towards your neck, adding small, even sections of hair to the outer strands before you cross them under. Keep the braid tight to the scalp.
- When you run out of hair to add at the nape, continue with a regular three-strand braid.
- Secure the end with a clear elastic. Repeat on the other side.
Pro-Tip: For short hair, the little hairs at the nape are the first to cause unraveling ends. After securing your braid with an elastic, take a bobby pin and discretely pin the short tail of the braid upwards, tucking it into the main part of the braid to keep it secure. This is a damage-free way to prevent breakage from overly tight elastics at the very ends of your hair.

5. Try a Half-Up Half-Down Braid for a Casual Vibe

Effortlessly chic! Pin this easy half-up style for your go-to weekend look.
Half up half down braids for short hair offer a versatile and casual look. This style complements natural waves or short curly hair perfectly, and it creates volume while keeping hair neatly off the face. You can customize it with a simple twist, a fishtail, or a classic three-strand braid.
Products & Tools Used
- Sea Salt or Texturizing Spray: To enhance waves and add volume.
- Bobby Pins or a Small Claw Clip: To secure the braid.
- Light Hold Hairspray: For a soft finish.
Application/Styling Steps
- Prep your hair by spritzing with sea salt spray to enhance its natural texture. If your hair is straight, create loose waves with a curling wand first.
- Section the top half of your hair, from your temples to the crown of your head.
- Braid this top section loosely. You can do a simple three-strand braid, a fishtail, or even just twist the hair.
- Stop braiding at the back of your head, where you want the style to sit.
- Secure the braid with either crisscrossed bobby pins or a stylish small claw clip.
- Gently pull on the braid to loosen it for a more messy, relaxed feel.
Pro-Tip: If you have very thin hair, this style can sometimes look flat. Before braiding, sprinkle a small amount of volumizing powder at the roots of the top section. This will provide instant lift and help the braid look thicker and fuller, addressing the common
lack of volumeissue.

6. Master the Delicate Waterfall Braid

So romantic! Pin this waterfall braid tutorial for a beautiful, intricate look.
Many people wonder, “Can you do a waterfall braid on short hair?” The answer is yes. This short hair waterfall braid tutorial breaks down the seemingly complex style into simple steps. A waterfall braid creates a beautiful cascading effect, but it requires a steady hand and a technique to neatly manage the dropped strands on shorter hair.
Products & Tools Used
- Smoothing Serum: To ensure strands are sleek and easy to work with.
- Fine-tooth Comb: For clean sectioning.
- A Small, Discreet Bobby Pin: To secure the end.
Application/Styling Steps
- Apply a small amount of smoothing serum to your tresses to tame frizz.
- Take a 2-inch section of hair near your part at the front.
- Section this into three equal strands, just like a French braid.
- Start the braid: cross the back strand over the middle, then the front strand over the middle.
- Here’s the key step: cross the back strand over the middle again. Now, completely drop the front strand so it “falls” down.
- Pick up a new piece of hair right next to the one you just dropped. This becomes your new front strand.
- Cross this new front strand over the middle. Repeat this process: cross the back over, drop the front, pick up a new piece.
- Continue this pattern horizontally across your head. When you’ve gone as far as you like, finish with a small, regular braid and secure it behind your ear with a bobby pin.
Pro-Tip: The biggest challenge with a waterfall braid on short hair is that the “fallen” pieces can look messy. As an expert stylist, I recommend taking a curling wand and adding a very slight bend to the end of each fallen strand after you’re done. This makes them look intentional and polished, not like hair that’s simply sticking out.

7. Rock a Braided Mohawk for an Edgy Style

Unleash your inner rockstar! Pin this braided mohawk for a bold new look.
One of the edgiest braided mohawk hairstyles for short hair, this look is a powerful way to make a statement. This unisex style creates the illusion of a mohawk without any cutting and requires a strong-hold gel to keep the sides perfectly sleek. It works exceptionally well for both men and women with short hair.
Products & Tools Used
- Strong Hold Gel or Pomade: Essential for slicking back the sides.
- Rat Tail Comb: For creating the precise sections for the “mohawk.”
- Hair Elastics: To secure the end of the braid.
- Hard Bristle Brush: To smooth the sides.
Application/Styling Steps
- On dry or damp hair, use your comb to part two clean, parallel lines from your front hairline to the nape of your neck, creating a 2-3 inch wide center section.
- Clip the center section up and out of the way.
- Apply a generous amount of strong hold gel to one of the side sections. Use a hard bristle brush to slick the hair down and back tightly. Repeat on the other side.
- Unclip the center section. Starting at the front, begin a Dutch braid (crossing strands under the middle) down the center of your head.
- Keep the braid centered and tight. As you braid, you can gently pull on the edges to make it look wider and more pronounced.
- Once you reach the nape, secure the braid with an elastic.
Pro-Tip: To amplify the edgy look, add hair rings or cuffs along the length of the central braid. This adds a metallic accent that draws attention to the braid pattern and enhances the mohawk effect, showcasing a
professional techniquefor accessorizing braids.

8. Add a Simple Braid to a Short Hair Ponytail

Elevate your basic ponytail! Pin this quick trick.
This simple “style hack” is a 2-minute upgrade to a standard short-hair ponytail. The single braid enhances a basic ponytail by adding an unexpected point of interest. This look works best with a bit of texturizing spray to prevent the small braid from loosening throughout the day.
Products & Tools Used
- Hair Elastic: For the ponytail.
- Small Clear Elastic: For the small braid.
- Texturizing Spray: To give hair some body.
- Bobby Pin: (Optional) for hiding the elastic.
Application/Styling Steps
- Take a one-inch section of hair from just above one ear and create a simple three-strand braid. Secure it with a small, clear elastic.
- Leave this braid out and gather the rest of your hair into a low ponytail. Secure it with a hair elastic.
- Now, incorporate the small braid into the ponytail.
- (Optional) Take a small strand of hair from the underside of the ponytail, wrap it around the hair elastic to conceal it, and secure the end with a bobby pin pushed into the base.
Pro-Tip: Instead of a regular braid, try a fishtail braid for the accent piece. It looks more intricate but is still easy to do. This small change makes the style look much more deliberate and is a great way to practice a new braiding technique on a manageable section of hair.

9. Create Tiny Accent Braids for a Bohemian Look

Get the perfect boho festival vibe! Pin this cute and easy accent braid idea.
For a touch of festival style, bohemian braids short hair are the perfect choice. These subtle accent braids are arguably the easiest style on our list. They complement loose, wavy hair beautifully and can be easily enhanced with accessories like beads or colorful thread for a personalized touch.
Products & Tools Used
- Small Hair Beads or Embroidery Thread: (Optional) for decoration.
- A Bead Threader: If using beads.
- Small Clear Elastics: To secure the ends.
Application/Styling Steps
- Style your hair as you normally would (this look is great with natural waves or curls).
- Choose a very small, random section of hair—either framing your face or hidden underneath.
- Create a simple three-strand braid.
- If adding a bead, use a threader to slide it onto the end of the braid.
- Secure the end of the braid with a tiny, clear elastic just below the bead or at the end of the braid.
- Repeat 2-4 times in different, asymmetrical spots throughout your hair.
Pro-Tip: To add thread without causing hair breakage, take a long piece of embroidery floss, fold it in half, and loop it around the base of the small section before you start braiding. Incorporate the two strands of thread into two of the three hair strands. When you finish the braid, wrap the remaining thread tightly around the end and tie a knot to secure it.

10. Braid a Sleek, Deep Side Part Cornrow

For a look that’s sharp and chic. Pin this sleek cornrow idea.
A single, sleek cornrow offers a modern and sharp look for those with short hair. Unlike a simple side braid, a short hair cornrows style highlights a sharp haircut by being braided flat against the scalp. This technique requires edge control or gel to achieve its signature, ultra-clean precision.
Products & Tools Used
- Metal Pin Tail Comb: For creating an ultra-precise part.
- Strong Hold Pomade or Edge Control: For the sleek finish and to catch every hair.
- Bobby Pin: To secure the tail of the braid.
Application/Styling Steps
- Use the metal pin of your tail comb to create a deep, sharp side part.
- Parallel to your main part, create a second part about half an inch away. This creates the channel for your cornrow. Clip the rest of your hair away.
- Apply pomade or edge control along the entire channel to ensure all hairs are smoothed down.
- Take a tiny section at the front hairline and begin a tight braid against the scalp. As you braid, add small, even pieces of hair from inside the channel only. This is what makes it a cornrow.
- Continue until you run out of hair in the channel. Finish with a small regular braid.
- Tuck the tail of the braid behind your ear and secure it with a bobby pin.
Pro-Tip: The secret to a flawless cornrow on short, slippery hair is product control. Apply a line of edge control with the end of your comb before you start braiding. Then, as you pick up each new section, lightly coat your fingertips in more product. This prevents the dreaded
short hair sticking outand creates that salon-perfect finish.

11. Fake a Fishtail Braid on a Short Bob

Looks complicated, but it’s so easy! Pin this faux fishtail hack.
A traditional fishtail braid can be difficult on short, layered hair. This “pull-through” hack achieves the intricate look of a fishtail by using a series of clear elastics. This method cleverly prevents the style from unraveling, solving the short length limitations problem.
Products & Tools Used
- Multiple Small Clear Elastics: You’ll need 5-10 of them.
- Volumizing or Texturizing Powder: For grip and massive volume.
- Scissors: To cut the elastics out at the end.
Application/Styling Steps
- Gather a section of hair for your braid (this works great as a half-up style).
- Create a tiny, low ponytail and secure it with a clear elastic.
- About an inch below that elastic, add another one to the same ponytail.
- Gently create a hole in the hair between the two elastics and flip the tail of the ponytail up and through the hole.
- Tighten the lower elastic. You will see the first “stitch” of the faux fishtail appear.
- Add another elastic an inch down, create a hole above it, and repeat the “flip and pull” motion.
- Continue this process down the length of the hair. When finished, gently pull on the edges of each section to pancake the braid and make it look full and messy.
Pro-Tip: A true fishtail constantly unravels on short hair because the short layers lack the tensile strength to hold the weave. This elastic hack works because each section is independently secured, creating a stable structure. Once the style is complete, you can carefully use small scissors to snip the elastics for a completely seamless look.
Key Takeaways
- Preparation is Everything: Braids hold better on “dirty” or prepped hair. Use texturizing spray or mousse to give your short strands the grip they need to prevent slipping braids.
- Tension is a Balance: Braid tightly enough to secure short layers, but never so tight that it pulls on your scalp. Proper tension management is the key to a damage-free style and traction alopecia prevention.
- Choose the Right Style: Styles like Dutch braids, cornrows, and tight side braids are better at containing short layers than looser styles like traditional fishtails.
- Master the “Tuck”: The secret to a polished look is hiding the short ends. Use bobby pins to tuck the tail of your braid under another section of hair for a seamless finish.
- Products are Your Best Friend: Don’t underestimate the power of a good edge control, pomade, or styling gel. They are essential for taming flyaways and catching those pesky short hair sticking out.
- When in Doubt, Fake It: Don’t struggle with complex weaves. Use clever hacks like the “pull-through ponytail” to create the look of a fishtail braid without the frustration.
FAQs About Braid Hairstyles for Short Hair
How short can your hair be to get braids?
Most stylists agree that hair needs to be at least 2-3 inches long for most braid types. For intricate styles like short box braids or cornrows that require a good grip, 3-4 inches is often better. This length ensures there is enough hair to create a stable base and prevent the braid from slipping out or causing excessive tension on the follicle.
How do you make braids stay in short hair?
The key is hair preparation and using the right products. Braid on hair that isn’t freshly washed, or add texturizing spray for grip. Use a pomade or gel during braiding to control flyaways and secure short layers. Finally, finish with a flexible hold hairspray to lock everything in place and prevent unraveling ends.
Are braids good for short natural hair?
Yes, braids can be an excellent protective style for short natural hair. They help with growth retention by minimizing daily manipulation and breakage. Styles like short box braids or small cornrows protect delicate ends. However, it’s crucial to ensure they are not installed too tightly to prevent traction alopecia.
What is the easiest braid for short hair?
A simple three-strand accent braid or a side French braid are typically the easiest. An accent braid involves a very small section of hair and can be placed anywhere. A side French braid is great for beginners because you can see what you’re doing in the mirror and it’s effective for keeping bangs out of your face.
How do you hide short ends in braids?
Tucking and pinning is the most effective method. Once you finish a braid, you can use a bobby pin that matches your hair color to discreetly pin the short tail underneath a larger section of hair. For updos like a crown braid, you can tuck the end of one braid underneath the start of another.
Can you do knotless braids on 2 inch hair?
It’s very challenging and generally not recommended. Knotless braids require a small base of natural hair to start the braid before feeding in extensions. On 2-inch hair, there isn’t enough length to create a secure, healthy base without causing significant tension and potential hair breakage. Most braiders require at least 3-4 inches for healthy knotless installations.
How do you deal with short hair sticking out of braids?
A strong hold pomade or edge control is your best tool. Apply a small amount to your fingertips as you braid to smooth down each section. For existing flyaways, you can run a small amount of product over the surface of the finished braid or use a clean toothbrush with hairspray to press them down.
How long do braids last on short hair?
This depends on the braid type and your hair texture, but generally, they last for a shorter time. A simple side braid might only last a day. Tighter styles like cornrows or short box braids can last from 1 to 3 weeks, but you may experience more frizz or slippage sooner than you would with long hair.
Which is better for short hair: French vs Dutch braid?
Both are great, but they offer different looks. A French braid (weaving over) creates a flatter, smoother look that is good for sleek styles. A Dutch braid (weaving under) creates a raised braid that ‘pops’ and looks thicker, making it excellent for creating volume or for statement styles like boxer braids.
How do you maintain short hair braids at night?
Protecting them is crucial to prevent frizz and unraveling. Wear a silk scarf or bonnet to bed. This reduces friction against your pillowcase, which can cause flyaways and loosen the braids. For styles like box braids, you can also apply a light scalp oil before bed to maintain scalp health.
Final Thoughts on Your New Braided Styles
The idea that beautiful, intricate braids are only for long hair is a myth. As we’ve explored, braid hairstyles for short hair are not only achievable but offer a stunning range of possibilities, from chic updos to edgy mohawks. The key to success lies in choosing the right style for your length, preparing your hair to create grip, and mastering a few simple techniques to secure ends and control flyaways. By focusing on hair health through proper tension management, you can enjoy these styles without worry.
You now have the tools and professional techniques to stop struggling and start styling. With a bit of practice and the right products, you can confidently create any of these looks.
What’s been your biggest challenge with braiding short hair, and which of these styles will you try first?
Last update on 2026-03-13 / Affiliate links / Images from Amazon Product Advertising API


