Tired of the same old glittery holiday nails? Finding that perfect festive look that’s chic, not cheesy, can be a real challenge. You want something that captures the holiday spirit but also feels modern and stylish.
Christmas Bow Nail Art is a decorative manicure that uses the ribbon-tied bow motif to create a festive, elegant look that aligns perfectly with 2026‘s trending Coquette and Balletcore aesthetics. This design has evolved from simple painted ribbons to intricate 3D creations, offering a sophisticated way to celebrate the season.
Drawing from established best practices and current trend analysis, this guide provides everything you need. You will discover 11 stunning designs, complete with step-by-step tutorials for every skill level. Get ready to master the perfect holiday manicure.
Are Christmas Bow Nails The Ultimate Coquette Look For 2026 Holidays?
Absolutely. The Christmas bow nail trend is exploding in 2026 precisely because it bridges the gap between classic holiday tradition and the delicate, feminine Coquette aesthetic. While bows have always been a festive staple, their current popularity is driven by the Balletcore movement, which emphasizes soft ribbons, dainty details, and a general air of gracefulness. This isn’t just about painting a simple present bow anymore.
The modern Christmas bow nail art has evolved significantly. It ranges from subtle, hand-painted micro-bows on a sheer pink base to complex, textural 3D gel bows that add a touch of luxury. This versatility allows the design to be interpreted in a way that feels both timelessly festive and perfectly aligned with the latest, most sought-after nail styles. It’s the ideal way to participate in holiday cheer while showcasing a sophisticated understanding of current fashion trends.
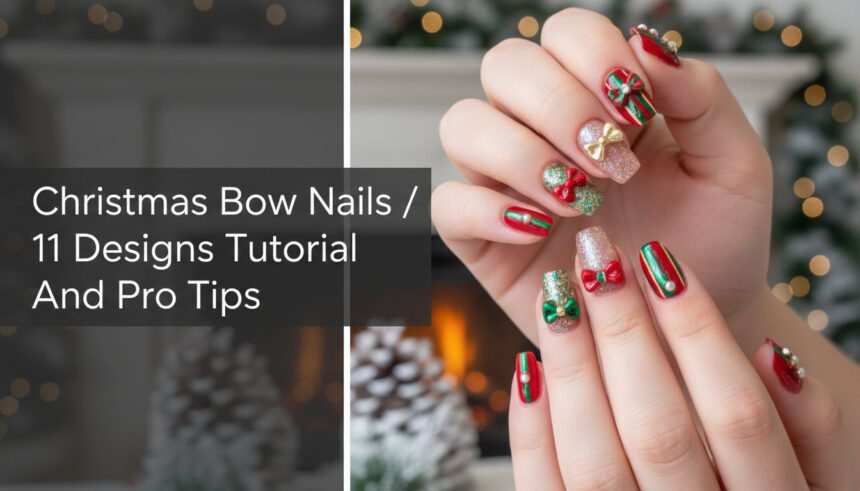
11 Stunning Christmas Bow Nail Designs Tutorial And Pro Tips For March 2026
Ready for some inspiration? We’ve curated 11 of the most beautiful Christmas bow nail designs, complete with actionable steps and pro tips. This list is structured to provide ideas for every skill level, from total beginners using high-precision nail decals to advanced artists looking to master hand-painting techniques with gel polish. Each design is based on expert nail art principles, ensuring they are not only stunning but technically achievable.
1. The Dainty Coquette Micro-Bow (The Balletcore Ribbon)

Pin this genius hack to your ‘Coquette Nail Inspo’ board!
Products & Tools Used:
- Sheer milky white or pale pink gel polish (use the highest quality pigment available)
- Highly pigmented red or black gel polish for the fine lines (essential for crisp, non-bleeding lines)
- 000 size fine line brush (the smallest possible brush for micro-details)
- Non-wipe glossy top coat
Application/Styling Steps:
- Prepare the nail and apply 2 coats of the sheer base polish, curing fully between coats.
- Dip the 000 brush very lightly into the pigmented bow color, ensuring the brush is not overloaded.
- Using the ‘Four Dot Method,’ place two tiny dots for the outer edges of the first loop and two for the second.
- Carefully drag the polish inwards from the outer dots toward the center, forming the symmetrical ribbon loops.
- Draw the tiny tails straight down from the center knot, ensuring they are extremely thin and delicate.
- Flash cure the design for 10 seconds to lock the placement before finishing.
- Seal with a thin layer of glossy top coat, capping the free edge completely.
Pro-Tip: If your polish bleeds, try mixing a tiny drop of matte top coat into your colored polish to thicken the pigment and control the flow.

2. The Classic Present Bow Accent Nail (Waterslide Decal Method)

Save this clever organization idea!
Products & Tools Used:
- High-quality Christmas bow waterslide decals (ensure the edges are very thin)
- Opaque base polish (classic white or metallic silver)
- Clean, lint-free cotton pad and a small dish of water
- Thin tweezers or silicone tool for decal placement
- Thick, durable non-wipe top coat (essential for encapsulation)
Application/Styling Steps:
- Apply and cure the base color on the accent nail, ensuring the surface is smooth and dry (or has a cured inhibition layer removed).
- Cut the desired bow decal close to the edges.
- Submerge the decal in lukewarm water for 15-20 seconds, until it slides easily off the backing paper.
- Use tweezers to carefully slide the decal onto the nail surface, positioning it immediately.
- Once placed, gently press the decal flat using a silicone tool or a dry cotton pad to eliminate any air bubbles or water.
- CRITICAL: Allow the decal to dry completely (2-3 minutes) before applying top coat.
- Apply a generous layer of durable top coat, ensuring the entire decal is encapsulated, and cure fully.
Pro-Tip: If your decal wrinkles, use a soft silicone tool to push the edges flat while the top coat is still wet, then flash cure quickly.

3. The Maximalist 3D Velvet Bow (Textural Elegance)

Save this beautiful 3D nail art tutorial!
Products & Tools Used:
- Pre-made flocked or velvet bow charms (or 3D sculpting gel and flocking powder)
- Strong adhesive medium (recommended: non-acidic primer and clear Builder Gel or sculpting gel)
- UV/LED curing lamp
- Pointed silicone tool or tweezers for placement
- Deep, opaque base color (e.g., black, deep burgundy, or forest green)
Application/Styling Steps:
- Prepare the nail and apply the cured base color, ensuring the inhibition layer (sticky layer) is removed if using a regular top coat elsewhere.
- Apply a small, precise bead of clear Builder Gel to the exact spot where the center of the 3D bow will sit.
- Using tweezers, gently press the pre-made bow charm into the Builder Gel adhesive.
- CRITICAL LONGEVITY STEP: Flash cure for 10-15 seconds to anchor the charm.
- Once anchored, use a small detail brush dipped in Builder Gel to “seal” the base edges of the bow to the nail, creating a small protective ramp without getting gel onto the decorative velvet part.
- Perform a full cure (60-120 seconds, depending on the lamp). Do not apply top coat over the velvet texture.
Lesson Learned: Always ensure the bow charm base is clean before application; any dust or oil will compromise the gel adhesion.

4. The Metallic Gift Wrap Ribbon Bow (Chrome Powder Technique)

Save this clever organization idea!
Products & Tools Used:
- Base color (preferably deep green, red, or black)
- Black or white non-wipe top coat (essential for chrome adhesion)
- Chrome Powder (gold, silver, or rose gold)
- Detail brush (00 size)
- Optional: Matte top coat (applied before the bow design for maximum contrast)
Application/Styling Steps:
- Apply the cured base color, followed by a matte top coat, and cure completely. Remove any sticky layer.
- Using the detail brush and the black or white non-wipe top coat, carefully paint the entire bow shape and ribbon lines.
- Cure the painted lines for EXACTLY the recommended time (often 10-20 seconds) until it is still warm and slightly tacky, but not wet.
- Immediately rub the chrome powder onto the tacky bow lines using a silicone tool or sponge applicator until the mirror effect is achieved.
- Dust off all excess chrome powder using a soft, dry brush.
- Seal the entire design with a non-wipe glossy top coat and cure fully.
Pro-Tip: The key to perfect chrome powder application is curing the line art for the precise amount of time recommended by your top coat brand. If it’s under-cured, the powder clumps; if it’s over-cured, the powder won’t stick.

5. The Elegant Negative Space Bow (Minimalist Holiday)

Pin this simple, chic nail art idea!
Products & Tools Used:
- Clear base coat or a nude sheer polish that matches your skin tone
- Highly pigmented red or black fine-line polish
- Detail brush (00 size)
- Nail clean-up brush and acetone (for refining the outline)
- Glossy top coat
Application/Styling Steps:
- Apply and cure the sheer nude base coat to create a smooth canvas.
- Using the detail brush and highly pigmented polish, draw the outline of one bow loop (start by creating an upside-down ‘V’ shape).
- Mirror the process on the opposite side to complete the second loop outline, leaving the center of the nail empty.
- Connect the loops with a tiny outlined rectangle for the knot and draw the ribbon tails as thin, open lines.
- Use the clean-up brush dipped in acetone (or alcohol for gel) to sharpen any wobbly lines and ensure the negative space is perfectly clear.
- Cure the design and seal with a glossy top coat.
Pro-Tip: The success of negative space relies entirely on the cleanliness of your outlines. Use a highly saturated polish and keep your clean-up brush close for immediate corrections.

6. The 3D Raised Bow Using Builder Gel (DIY Volumetric Effect)

Pin this genius hack to your ‘DIY 3D Nail Art’ board!
Products & Tools Used:
- High-viscosity clear or white Builder in a Bottle (BIAB) or 3D sculpting gel
- Fine, stiff silicone sculpting tool or detail brush
- Cured base color (glossy red recommended)
- UV/LED lamp
- Optional: Clear dipping powder for added strength
Application/Styling Steps:
- Ensure the base color is cured and topped with a glossy top coat. If applying over the tacky inhibition layer, ensure the base is a fully cured color layer.
- Scoop a small bead of sculpting gel onto the nail where the center of the bow will be.
- Use the silicone tool to pull and shape the bead into two symmetrical loops, mimicking the flow of a ribbon. Do not flatten the gel; the goal is height and volume.
- Shape a small sphere for the central knot and attach it to the center of the loops.
- Draw the 3D ribbon tails downward from the center, again keeping the gel relatively thick.
- Flash cure frequently (10 seconds) to set shapes as you work, preventing the gel from leveling out.
- Perform a final, long cure (120 seconds). Do not apply top coat over the 3D element unless it will be tacky; wipe the cured element with alcohol if necessary.
Lesson Learned: Work quickly and in small sections; high-viscosity gels will self-level, so flash-curing is non-negotiable for maintaining sharp 3D shapes.

7. The Snow-Dusted Glitter Bow (Textural Detail)

Pin this elegant winter nail idea!
Products & Tools Used:
- Icy blue or deep navy pigmented gel polish
- Ultra-fine white or translucent dipping/glitter powder (must be fine enough to not look bulky)
- Detail brush (00 size)
- Fan brush (for dusting off excess powder)
- Thick, clear top coat (optional, depending on desired texture)
Application/Styling Steps:
- Apply and cure the base color (can be a glittery white or a solid color).
- Using the detail brush, paint the entire bow shape and ribbon lines using a layer of the icy blue gel polish.
- DO NOT CURE. While the blue gel is still wet, liberally sprinkle or scoop the fine white powder over the wet gel polish, ensuring the entire bow is covered.
- Cure the nail fully (60-120 seconds).
- Use the dry fan brush to gently dust off all excess powder from the surrounding nail area. The powder will only adhere to the cured gel shape, creating the ‘snow-dusted’ effect.
- OPTIONAL: If using flocking powder, do not top coat. If using fine glitter, you can choose to leave it slightly textured or gently seal around the bow with top coat.
Pro-Tip: For the most dramatic ‘snow’ effect, choose a matte base polish. The contrast between the matte base and the slight sheen of the texture powder on the bow maximizes the visual appeal.

8. The Holiday Houndstooth and Bow Combo (Pattern Integration)

Save this clever organization idea!
Products & Tools Used:
- Black and white nail stamping polish (high viscosity required)
- Houndstooth pattern nail stamping plate
- Opaque red polish (gel or lacquer)
- Detail brush (00 size)
- Stamper and scraper tool
Application/Styling Steps:
- Prepare the nail for stamping and apply a white or black base coat, curing fully.
- Apply the stamping polish to the houndstooth plate, scrape, and roll the stamper over the pattern to pick it up.
- Carefully roll the stamper onto the accent nail to transfer the houndstooth pattern and cure/dry completely.
- Using the detail brush and the red polish, paint a solid, contrasting bow shape directly over the houndstooth pattern (the contrast makes line work easier).
- Use a dotting tool to create a small white dot in the center of the red bow for an added detail.
- Seal the entire design with two thin layers of top coat, ensuring the stamped pattern is fully encapsulated.
Pro-Tip: When painting over a stamped pattern, use a thick polish for the bow to ensure the red color is opaque in a single coat and doesn’t lift or bleed the underlying pattern.

9. The French Tip Ribbon Tails (Elegant Placement)

Pin this simple, chic nail art idea!
Products & Tools Used:
- Gel or lacquer for a classic white French tip line
- Deep red or burgundy fine line gel polish
- Long, thin 00 liner brush
- Clean-up brush and solvent
- Glossy top coat
Application/Styling Steps:
- Complete the French manicure (base coat, nude base, and the crisp white tip), curing/drying fully.
- Using the 00 liner brush and the deep red polish, draw a small, filled-in knot shape (a tiny rectangle or dot) near the center of the nail bed.
- From the knot, draw two long, thin, symmetrical ribbon tails that flow down toward the free edge, ensuring the line is perfectly clean and flowing.
- If desired, add small ‘V’ cuts at the very end of the tails to mimic fabric.
- Perform a full cure and seal the entire nail with a high-shine top coat.
Pro-Tip: This design works best when the knot is placed slightly off-center toward the cuticle or on the side of the nail bed, giving the tails a more natural, flowing movement.

10. The Glittery Bow Outline (Shimmer Effect)

Save this beautiful 3D nail art tutorial!
Products & Tools Used:
- Solid, opaque base color (white or deep red recommended)
- Highly dense, fine gold or silver glitter polish (ensure the polish itself is very thick)
- Fine line brush (00 size)
- Dotting tool (for the central knot)
- High-shine top coat
Application/Styling Steps:
- Apply and cure the opaque base color.
- Using the glitter polish on the fine line brush, lightly unload excess polish before starting the line work.
- Draw the outline of the bow loops and tails, trying to keep the lines as thin as possible while allowing the glitter particles to form a visible shimmer line.
- Use the dotting tool dipped in the glitter polish to create a dense, shimmering dot for the center knot.
- If the glitter lines are not opaque enough, allow to dry/cure and apply a second, very thin layer of glitter polish directly over the outline.
- Seal the design with a smooth top coat.
Lesson Learned: Glitter polish often has a thick consistency, which actually makes it easier to control when drawing fine lines compared to thin, low-pigment cremes.

11. The Classic Red & Green Half-Bow (Symmetry Challenge)

Save this clever organization idea!
Products & Tools Used:
- Highly pigmented true red gel polish
- Highly pigmented deep forest green gel polish
- Detail brush (00 size)
- Base color (preferably white or nude for maximum color pop)
- Glossy top coat
Application/Styling Steps:
- Apply and cure the base color.
- Using the detail brush, paint the first bow loop (the red half) in the upper corner of the nail near the cuticle area. Ensure the shape is clean and curved.
- Clean the brush completely and repeat the process immediately adjacent to the first loop using the deep green polish, ensuring the inner edges touch cleanly to form the center seam.
- Use a dotting tool and one of the colors to create the center knot where the two colors meet.
- Draw the ribbon tails downward, using either red, green, or splitting the tail design with both colors.
- Cure and seal with a top coat.
Pro-Tip: Focus intensely on the central dividing line between the red and green loops; this is where symmetry is most visible in this design. Use a thin line of metallic gold polish to separate the two colors if you struggle with the clean join.

Key Takeaways: Your Quick Guide to Perfect Christmas Bow Nails
Here is your pro-mani checklist for achieving the perfect festive bows, summarizing the most crucial points for beauty and longevity.
- Best for Beginners: Start with Waterslide Decals (Idea #2). They guarantee high precision and symmetry without requiring fine motor skills. Always encapsulate decals with a robust top coat for longevity.
- Best for Durability (3+ Weeks): Opt for Gel Polish and Builder Gel (Ideas #6, #3). Anchor 3D charms with a bead of sculpting gel and flash-cure before the final cure to prevent lifting.
- Achieving Symmetry: Use the Four Dot Method for hand-painting or apply a thin, temporary guide line before drawing the actual bow shape (Idea #11).
- The Trend Factor: Integrate soft pinks, creams, and thin lines for the high-demand Coquette/Balletcore aesthetic (Idea #1, #5).
- Texture Contrast: Use Matte Top Coat as a base and then paint the bow design with glossy or chrome polish for maximum visual pop (Idea #4).
FAQs About christmas bow nails
How do I ensure my hand-painted Christmas bows are perfectly symmetrical?
Achieving perfect symmetry requires prep work and specialized tools. Use a small dotting tool to mark the four outermost corners of your bow loops first. This gives you a mirrored guide. Then, use a fine 000 liner brush to drag the polish inwards to connect the dots, ensuring both loops meet cleanly in the center.
What is the best method for attaching 3D Christmas bow charms to prevent them from lifting?
Avoid using regular nail glue; it will lift quickly. The most effective adhesive for 3D elements is a high-viscosity clear Builder Gel or sculpting gel. Apply a small bead, press the charm firmly into it, flash cure for 10-15 seconds to lock the position, and then fully seal the base edges of the charm with the builder gel before the final 120-second cure.
Are waterslide nail decals or stamping plates better for detailed bow designs?
Waterslide decals (like Idea #2) are generally better for intricate bow details. They offer higher resolution and cleaner edges, which is crucial for tiny, complex bow shapes. Stamping is faster for repeating patterns, but decals provide superior detail quality for the specific bow motif.
Why does my bow design chip off the free edge so quickly?
Premature chipping is usually due to improper sealing. To maximize longevity, ensure you “cap the free edge” with the top coat on both the color layer and the final top coat layer. This means wrapping the brush tip slightly under the free edge of the nail to seal the entire polish sandwich.
Can I use regular polish to paint small Christmas bows, or do I need gel polish?
You can use regular lacquer, but highly pigmented gel polish or stamping polish is strongly recommended for fine details. Standard polish often bleeds or requires multiple thin coats to achieve opacity, increasing the risk of smudging and making clean line work significantly harder.
Final Thoughts
The art of the Christmas bow nail is the perfect synthesis of festive tradition and 2026’s Coquette elegance. Whether you choose the quick precision of decals or the high durability of sculpted gel, mastering the bow motif is easier than you think when you prioritize symmetry and sealing. Don’t let the detail intimidate you—start with a simple outline and build your skills from there.
Which of the 11 bow designs are you trying first this holiday season? Let us know in the comments below
Last update on 2026-03-04 / Affiliate links / Images from Amazon Product Advertising API


