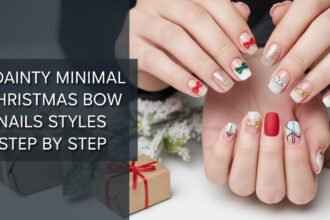
Struggling to achieve that perfect, high-end holiday manicure at home? You see stunning burgundy bow nails online, but worry yours will end up looking unprofessional or chip before the party even starts. It’s a common frustration to want festive perfection but feel limited by your tools or technique.
Burgundy Bow Nails are the quintessential elegant holiday look because they combine the sophisticated depth of the color with the classic, festive appeal of the bow motif. This nail art design offers high visual impact that can be tailored with luxurious textures like velvet, high-shine gloss, or dimensional 3D charms for a truly custom feel.
Drawing from trending designs and the proven techniques of professional manicurists, this guide demystifies the entire process. You will discover 11 distinct, elegant ideas and gain the exact step-by-step knowledge to master them. Get ready to create a durable, salon-quality burgundy bow manicure that lasts through every holiday event.
Are Burgundy Bow Nails the Most Elegant Look of 2026 Holiday Season?
As the holidays approach, there’s a collective search for a look that’s both festive and undeniably chic. Enter burgundy bow nails. This nail art design has surged in popularity, becoming the go-to choice for those seeking sophisticated holiday style. But why this specific combination? The deep, wine-inspired burgundy color is a classic symbol of luxury and warmth, making it a perfect fit for the winter season. When paired with the delicate and traditional bow motif, the design strikes a perfect balance between celebratory fun and high-fashion elegance.
Curated from the top looks seen on social media and adapted from techniques used by professional manicurists globally, the ideas in this guide are more than just inspiration. They are a roadmap to mastering this trend. We’ll tackle the two most sought-after (and often challenging) variations: the plush, textural velvet finish and the high-impact, dimensional 3D charm. By breaking down each design into actionable steps, we promise you can achieve a flawless, long-lasting manicure that looks like you just stepped out of a high-end salon.
11 Elegant Ideas To Master Velvet, 3D Charms, and Deep Red Finishes
Here is your definitive gallery of the most elegant burgundy bow nail designs for the 2026 holiday season. Each idea is presented not just as inspiration, but as a complete mini-tutorial. All techniques have been vetted based on professional standards for safe application, aesthetic balance, and optimal longevity, ensuring your festive manicure endures from the first toast to the final countdown.
1. The Luxurious Velvet Matte Finish with a Tiny Bow

Pin this luxurious velvet hack to your ‘High-End Holiday Mani’ board!
This design combines the trendy, fuzzy texture of velvet with a sophisticated, minimalist bow for a look that feels both cozy and high-fashion. The key is using flocking powder to create that authentic plush effect.
Products & Tools Used:
- High-pigment Burgundy Gel Polish (requires UV cure)
- Matte Top Coat (must cure to a smooth finish)
- Burgundy Flocking Powder (nylon or rayon for softness)
- Tiny Detail Brush (size 000 for the bow)
- Black or Gold Gel Polish (for the bow motif)
Application Steps for Velvet Texture:
- Prep the nail thoroughly, apply base coat, and cure under UV/LED lamp.
- Apply two thin coats of the Burgundy Gel Polish, curing each coat fully.
- Apply a final, thin layer of top coat (non-wipe recommended, but do NOT fully cure). If using a wipe-off top coat, cure for about 10 seconds to leave a slight tackiness.
- Immediately and generously sprinkle the burgundy flocking powder over the sticky surface. Gently pat it down with a clean finger.
- Cure the nail again fully (60 seconds recommended).
- Use a soft, clean fan brush to gently dust off the excess powder, exposing the plush velvet texture.
- Using the detail brush and black polish, paint a tiny, symmetrical bow design on one accent nail (this area will remain glossy/matte, without velvet). Cure.
Pro-Tip: Velvet texture sacrifices longevity; protect the surrounding edges with a thin layer of top coat applied carefully with a detail brush around the powder area, but never over the velvet itself.

2. Sculptural 3D Resin Charms for Maximum Dimension

Save this high-impact 3D charm guide for your next glam look!
For a bold, high-impact statement, nothing beats a sculptural 3D bow. The secret to making it last through holiday festivities without snagging is a professional adhesion technique using builder gel.
Products & Tools Used:
- Burgundy Gel Polish (high shine finish)
- Quality, Lightweight White Resin 3D Bow Charms
- Thick Viscosity Builder Gel (or specialized nail art adhesive resin)
- UV/LED Curing Lamp
- Small Wax Tool or Tweezers (for charm placement)
Step-by-Step Directions for Charm Adherence:
- Complete the base color application and cure fully. Wipe the inhibition layer (sticky residue) if using a soft gel.
- If the charm has a very glossy back, gently file it with a fine grit buffer to create texture for better adhesion.
- Apply a small bead of thick builder gel (or resin) slightly larger than the charm’s base onto the exact placement spot on the nail. Do NOT cure yet.
- Use tweezers or a wax tool to gently place the 3D bow charm onto the bead of gel, pressing down lightly until the gel wells up around the edges of the charm’s base.
- Use a detail brush dipped in a tiny bit of rubbing alcohol to clean up any excess gel that might have leaked onto the charm’s top surface.
- Flash Cure (10 seconds) to lock the charm in place. Then, full cure (60 seconds).
- Apply a non-wipe top coat around the entire perimeter of the charm to encapsulate the base and seal all edges seamlessly, ensuring a smooth transition to the nail surface. Cure again.
Lesson Learned: Snagging is usually caused by insufficient sealing around the charm’s base. Use enough builder gel to create a smooth slope from the nail up to the charm, avoiding sharp edges.

3. Burgundy Cat Eye Design with a Glitter Bow Accent

Pin this dimensional Cat Eye look for your next holiday party!
Combine two major trends with this design: the reflective, dimensional cat eye effect and a delicate glitter bow. This look offers incredible depth and movement, perfect for holiday parties.
Products & Tools Used:
- Burgundy Cat Eye Magnetic Gel Polish (highly pigmented)
- Specialized Dual-Tip Nail Magnet Tool
- Silver Glitter Bow Decals or Stickers
- High-Quality, Non-Wipe Gel Top Coat
- UV/LED Curing Lamp
Application Steps for Cat Eye Effect:
- Apply base coat and cure. Apply two thin coats of the magnetic gel polish, curing the first coat fully.
- Apply the final coat of magnetic polish. Do NOT cure this coat.
- Immediately hover the magnet tool diagonally over the nail (without touching) for 10-15 seconds. Watch the pigment particles move to form the reflective stripe.
- Cure immediately for 60 seconds to lock the magnetic effect in place.
- Apply the silver glitter bow decal to the desired accent nail, pressing firmly to adhere.
- Seal the entire nail (including the decal) with the non-wipe top coat, ensuring the decal edges are fully covered to prevent lifting. Cure for 60-120 seconds.
Pro-Tip: For the best cat-eye effect, ensure the magnet is very strong and work quickly, treating one nail at a time, as the pigment will settle back if left too long before curing.

4. The Minimalist Hand-Painted Ribbon Bows on a Matte Base

Save this sophisticated hand-painted tutorial for an elegant look!
Elegance often lies in simplicity. This design uses a modern matte burgundy finish as the canvas for delicate, hand-painted white ribbon bows, proving that you don’t need dimension for high impact.
Products & Tools Used:
- Highly Pigmented Burgundy Polish (standard or gel)
- Quality Matte Top Coat
- White or Gold Opaque Polish (for the bow art)
- Ultra-Fine Detail Brush (size 00 or 000)
- Dotting Tool (optional, for the center knot)
Application Steps for Symmetrical Bows:
- Apply base and color coats, then seal with the matte top coat. Ensure the matte coat is fully dry/cured before proceeding.
- Dip the fine detail brush lightly into the white/gold polish. Remove excess paint by wiping the brush against the bottle neck.
- For Symmetry: Start by placing a tiny dot at the center where the knot will go. Draw two small, mirrored triangles outwards from the dot, forming the bow loops.
- From the center dot, draw two thin, slightly curved lines (streamers) pointing down towards the free edge.
- If necessary, use the fine brush and a small amount of non-acetone remover to immediately clean up any wobbly lines before the polish dries.
- Once satisfied, apply a single dot of clear top coat (or gel top coat and cure) only over the painted bow art to protect the fine lines, or leave the bow raw matte for a seamless look.
Lesson Learned: Apply a matte top coat over the base color before painting, as the matte surface provides “grip” and prevents the detail paint from bleeding or running, making it easier to create crisp lines.

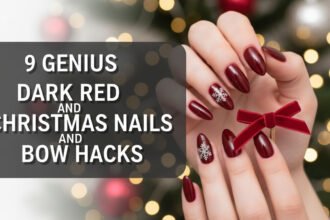
5. Deep Maroon and Gold Chrome Tips

Save this chic Gold Chrome look for effortless holiday glamour!
Modernize the classic red-and-gold Christmas palette with this chic design. The smooth, mirror-like finish of gold chrome powder provides a stunning contrast to a deep, warm maroon base.
Products & Tools Used:
- Deep Maroon Gel Polish (or highly pigmented standard polish)
- Gold Chrome Powder (fine pigment dust)
- Specialized Non-Wipe Top Coat (crucial for chrome adherence)
- Silicone or Eyeshadow Applicator (for rubbing the powder)
- Gold Foil Bow Decals (small, thin stickers)
Application Steps for Chrome Tips:
- Apply base coat and two coats of maroon color, curing/drying fully. Apply a final non-wipe top coat and cure for the exact recommended time (usually 30 seconds) to leave a perfect tacky surface.
- Use the applicator to lightly rub the gold chrome powder onto the nail tip or the desired area for the micro-French tip until it becomes reflective. Dust off excess.
- Apply the gold foil bow decal to the cuticle area of the accent nail, pressing firmly with a silicone tool to remove air bubbles.
- Apply a generous layer of regular top coat to encapsulate the bow decal and seal the chrome layer completely. Cure/Dry.
Pro-Tip: Chrome powder must be rubbed onto a partially cured non-wipe top coat. If the top coat is too cured (rock hard), the powder won’t stick; if it’s too wet, the powder will streak. Experiment with curing times (30-45 seconds is usually optimal).

6. High-Shine Glossy Press-On Set for Quick Festive Fix

Save this fast festive fix! Press-ons are perfect for quick changes.
Need a flawless holiday manicure in minutes? High-quality press-on nails are the perfect solution, offering intricate designs without the time commitment. The key to making them last is all in the preparation.
Products & Tools Used:
- High-Quality Burgundy Bow Press-On Nail Set (must include pre-applied bows/decals)
- High-Strength, Long-Lasting Nail Glue
- Alcohol Wipe or Nail Dehydrator
- Mini Nail File and Buffing Block
Step-by-Step Directions for Max Wear:
- Prep is Key: Use the file to gently buff the natural nail surface to create texture. Clean the nail plate thoroughly with an alcohol wipe or dehydrator until the nail is dull and dry—this removes oils that cause lifting.
- Select the correct size press-on nail for each finger; if slightly too wide, file the sides of the press-on to match your nail bed exactly.
- Apply a small amount of glue to both the back of the press-on and your natural nail. Avoid the cuticle area.
- Press the press-on firmly to the natural nail at a 45-degree angle, starting slightly under the cuticle edge, and hold for 30 seconds.
- Once all nails are applied, avoid water exposure for at least 1 hour.
Pro-Tip: For maximum wear time (7-10 days), use a liquid glue. If you only need 1-3 days of wear, use adhesive tabs included in the kit for easier removal.

7. Almond Shape with a Delicate Off-Center Bow

Pin this perfect bow placement for almond shaped nails!
The tapered, elegant almond nail shape requires thoughtful placement to maintain its sophisticated lines. A small, off-center bow enhances the nail’s length and adds a touch of delicate charm without overwhelming the shape.
Products & Tools Used:
- Glossy Burgundy Gel or Standard Polish
- Fine-Tip Eyeliner Brush (optional, for precise placement)
- Small, Flat-Backed Silver Bow Charms (or decal)
- Specialized Nail Art Adhesive (gel or liquid)
- Ruler or Visual Aid (for proportional estimation)
Application Steps for Perfect Placement:
- Ensure your almond shape is filed symmetrically and apply your glossy burgundy base and top coat.
- Determine Proportion: On the tapered almond shape, the bow should be small—no wider than 40% of the nail width at the base—to enhance the perceived length.
- Off-Center Placement: Choose the accent nail (ring or middle finger). The most elegant placement is slightly off-center, 1-2mm from the cuticle line toward the side wall.
- Apply a small dot of adhesive (builder gel or glue) at the chosen spot. Use the fine-tip brush to lightly spread the adhesive area just large enough for the charm’s base.
- Use tweezers to place the bow charm. Ensure the charm is oriented perfectly straight along the length of the nail.
- Gently press and cure/dry the adhesive. Seal the edges with a minimal amount of top coat applied around the bow (not over the bow itself if it is textured or metallic).
Lesson Learned: For almond and stiletto shapes, placement near the cuticle is better than placement near the tip, as it draws the eye to the longest part of the nail, enhancing the shape’s elegance.

8. Two-Tone Burgundy & Cream/White Bows

Pin this beautiful contrasting two-tone manicure!
Create a high-contrast, visually striking manicure by pairing deep burgundy with a creamy white. Alternating the colors and painting contrasting bows makes for a playful yet classic holiday look.
Products & Tools Used:
- High-Pigment Burgundy Polish (standard or gel)
- High-Opacity Cream or Bright White Polish
- Fine Detail Brush (size 00)
- Angled Clean-Up Brush and Non-Acetone Remover
- Quality Top Coat (glossy finish preferred)
Application Steps for Contrast:
- Decide on your alternation pattern (e.g., Index/Pinky Burgundy; Middle/Ring White). Apply two even coats of the base colors, curing/drying fully.
- On the white nails, use the detail brush and burgundy polish to paint a small bow silhouette near the cuticle or tip.
- On the burgundy nails, use the detail brush and the white polish to paint the same size and style of bow.
- Crucial Clean-Up: Dip the angled clean-up brush into remover and carefully clean around the cuticle line and the edges of the painted bows before they fully dry/cure.
- Once all bows are dry/cured, apply a generous layer of glossy top coat over all nails to seal and enhance the depth of the burgundy color.
Pro-Tip: White polish can be stubborn. To ensure your white bow pops cleanly against the burgundy base, use a highly opaque white polish designed for nail art rather than a standard sheer white polish.

9. Coffin Shape with Full Coverage Decals

Save this easy full-coverage decal technique for flawless detail!
The large, flat surface of a coffin-shaped nail is the perfect canvas for intricate, full-coverage patterns. Water slide decals allow you to achieve a highly detailed bow design with minimal artistic skill.
Products & Tools Used:
- Deep Crimson Burgundy Standard or Gel Polish
- Full-Coverage Water Slide Bow Decals (or vinyl stencils)
- Small Bowl of Water
- Tweezers and Cotton Swabs
- Quick-Drying or Quick-Curing Top Coat
Application Steps for Decals:
- Apply two coats of the burgundy base and seal with a top coat. Ensure the top coat is dry/cured, but it should still retain a tiny bit of tackiness if using gel.
- Cut the water decal to the approximate size of the nail bed, slightly smaller than the full edge.
- Dip the decal into the bowl of water for 10-15 seconds until the design easily slides off the paper backing.
- Carefully slide the decal onto the nail, using a wet cotton swab to gently maneuver it into the correct position. Smooth out any wrinkles.
- Once perfectly placed, firmly press the decal down with a soft, lint-free wipe to absorb all moisture.
- Apply a generous layer of top coat, ensuring the entire decal is fully encapsulated (especially the edges) to prevent lifting. Cure/Dry.
Pro-Tip: Water decals are very thin and prone to tearing. Always use tweezers and a gentle, wet cotton swab for placement, and ensure the nail base is completely dry before application for best results.

10. Glitter Fade Base with Single Charm

Save this sparkly glitter fade idea for maximum holiday glamour!
For a look that’s festive but not overwhelming, combine a glitter fade with a single, minimalist bow charm. The gradient effect adds sparkle and dimension while the single charm acts as an elegant focal point.
Products & Tools Used:
- Sheer or Semi-Opaque Burgundy Polish (standard or gel)
- Fine Rose Gold or Silver Glitter Polish (high density pigment)
- Makeup Sponge or Fan Brush (for gradient application)
- Small White Bow Charm (resin or metal)
- Builder Gel or Strong Nail Glue
Application Steps for Glitter Fade:
- Apply base coat and one thin layer of the burgundy polish. Cure/dry.
- Apply a small amount of the glitter polish to the edge of a makeup sponge.
- Gently dab the glitter sponge onto the nail, starting at the cuticle line and fading the density toward the tip, creating a gradient effect. Repeat once cured/dried for more density if desired.
- Once the glitter fade is complete, apply a clear top coat to smooth the texture, then cure/dry.
- Secure the single white bow charm directly over the densest part of the glitter (near the cuticle) using a small amount of builder gel or strong nail glue. Cure/dry completely.
Pro-Tip: If using standard polish, wait 5-10 minutes for the polish to fully dry before attempting the charm application; this prevents the pressure from disturbing the glitter fade underneath.

11. Classic Glossy Maroon Finish with Pearl Accents

Pin this timeless maroon look for year-round elegance!
For a truly timeless aesthetic, pair a deep, glossy maroon with classic pearls. A single, small pearl placed at the knot of a simple bow adds a touch of sophistication that is perfect for any holiday gathering.
Products & Tools Used:
- High-Pigment Maroon Nail Polish (standard or gel)
- Pre-made Bow Decal (black or white) OR Detail Brush
- Small, Flat-Backed Pearl Nail Art Embellishments (approx. 1mm)
- Quality Top Coat (high gloss)
- Tacky Adhesive/Top Coat or Nail Glue
Application Steps for Pearl Bows:
- Apply base coat and two thin coats of maroon polish, wrapping the free edge. Cure/dry fully.
- Apply the bow decal or hand-painted bow to the desired accent nail.
- While the top coat or decal adhesive is still tacky (or using a small dot of glue), place the small flat-backed pearl directly onto the center knot of the bow motif.
- Cure/dry fully. If using a large pearl, follow the builder gel technique from H3:2 to ensure secure placement.
- Finish with a thick, high-gloss top coat over the entire nail, carefully sealing the edges of the bow and the pearl base without covering the top dome of the pearl.
Lesson Learned: Maroon is often mistaken for burgundy. If your goal is a warmer, slightly browner deep red, search specifically for ‘maroon’ or ‘oxblood’ polishes to avoid purple undertones.

Key Takeaways: Your Quick Guide to Mastering Festive Burgundy Nail Art
Feeling inspired? Here is a quick summary of the most critical professional techniques to ensure your burgundy bow nails are a stunning success.
- The 4 Must-Know Secrets for Perfect Burgundy Bow Nails:
- Color Depth and Health: Always use a base coat (two coats highly recommended) to prevent deep burgundy pigments from temporarily staining the nail plate, ensuring a clean removal.
- Texture Mastery: For the Velvet Finish, only apply flocking powder to a tacky (but not wet) base and never cover the texture with top coat. For 3D Charms, use builder gel and encapsulate the edges fully to prevent snagging.
- Placement and Proportion: When applying bows, keep the motif proportional to the nail shape (smaller on almond/oval; larger on coffin/square). Place the bow slightly off-center near the cuticle for the most elegant, elongated appearance.
- The Long-Wear Tip: ‘Capping’ the free edge of the nail with every coat (base, color, top) is the single most effective professional technique for preventing premature chipping during the busy holiday season.
People Also Ask About Burgundy Bow Nail Longevity and Application
How long should I cure gel polish for a dark burgundy shade?
Curing time is slightly extended for highly pigmented dark polishes like burgundy. While 30 seconds may work for light colors, aim for a full 60 seconds under a minimum 48W UV/LED lamp. Undercuring dark pigments is a primary cause of lifting and can increase the risk of developing chemical sensitivities.
Is it better to use a hand-painted bow, a decal, or a 3D charm for durability?
3D Charms secured with builder gel offer the highest durability (up to 2-3 weeks), provided they are properly encapsulated. Hand-painted bows sealed under a top coat are the next best option. Decals are the easiest but tend to lift first, typically offering 7-10 days of wear.
Will deep red or burgundy nail polish stain my natural nails?
Yes, dark, highly saturated pigments like deep burgundy or maroon can temporarily stain the natural nail plate if applied directly. To prevent this, always apply two layers of a high-quality base coat or a dedicated stain-blocking base coat before applying the rich color.
What is the best way to safely remove 3D bow charms without damaging the nail?
Never forcibly peel or file off a 3D charm attached with builder gel or strong resin. Gently file down the bulk of the builder gel around the charm first, then apply acetone-soaked cotton to the remaining material (avoiding the skin). Allow the acetone to break down the adhesive before gently scraping the charm away.
Final Thoughts
You now possess the visual inspiration and the technical expertise required to master the elegant burgundy bow nail trend for the 2026 holiday season. Whether you choose the plush texture of velvet, the high-impact dimension of a 3D charm, or the clean sophistication of a hand-painted ribbon, remember that preparation and proper sealing are the keys to long-lasting success. With the right tools and techniques, you can achieve salon-quality results that will endure every holiday event.
Which of the 11 elegant burgundy bow looks will you try first for Christmas 2026? Share your favorite idea in the comments below
Last update on 2026-03-15 / Affiliate links / Images from Amazon Product Advertising API