Struggling to get that flawless, shimmering holiday nail look at home? You’ve seen the stunning cat eye bow nails all over social media, but recreating that deep, metallic shimmer and elegant ribbon detail feels like a professional-only secret. It’s frustrating when the magnetic effect goes dull or the delicate bow won’t stay put.
Christmas Bow Cat Eye Nails are a seasonal manicure technique that combines the deep, metallic shimmer of magnetic gel polish with an elegant 3D or flat bow motif for a festive, high-glamour finish. This design requires specific tools and a precise application sequence to achieve its signature light-shifting effect and long-lasting detail.
Drawing from established best practices and an analysis of 2026 nail trends, this guide breaks down every step. You’ll discover the secrets to mastering the magnet, securing 3D charms for weeks, and achieving a salon-quality look. Get ready to create your most impressive holiday manicure yet.
The Secret to Flawless Shimmer: Why Cat Eye Bow Nails Are the Must-Have Trend for 2026
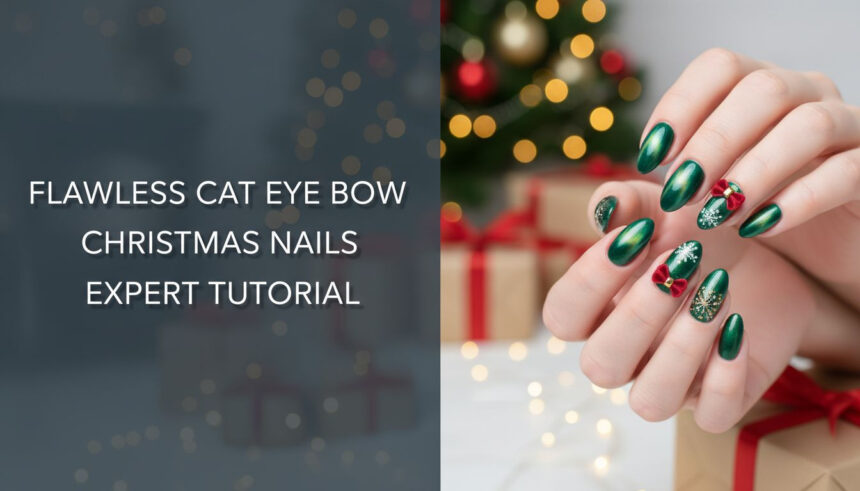
The holiday season is all about sparkle, and the Cat Eye Bow Nail trend delivers a sophisticated, high-impact finish that stands out. This magnetic nail design combines two powerful trends: the deep, shimmering, and metallic Cat Eye effect with the delicate and elegant Bow Motif. The result is a festive, seasonal manicure that looks incredibly complex but is achievable with the right technique. The ultimate cat eye guide for this winter 2026 focuses on pairing the dynamic light-play of 9D magnetic gel polish with a perfectly placed 3D ribbon charm.
What makes this holiday bow manicure so popular is the contrast between the shifting, liquid-metal look of the Cat Eye polish and the structured form of the bow. It’s a design that feels both luxurious and playful. This tutorial utilizes updated magnetic techniques to ensure your shimmering effect is sharp and your bow application is durable, giving you a long-lasting, professional-quality manicure that will last through every holiday event.
Cat Eye Mastery & Bow Application: 9 Essential Steps for Salon-Quality Holiday Nails
Achieving salon-quality holiday nails at home comes down to a precise, step-by-step process. This expert tutorial is designed to guide you through every stage, from the gel application to securing your 3D bow charms. We’ve optimized this workflow to prevent the most common DIY mistakes, like losing the cat eye shimmer or having charms lift prematurely. By following these nine essential steps, you’ll master the magnetic polish alignment and secure adhesion needed for a chip-free, durable, and flawless manicure.
Here’s the proven workflow: 1. Prep Nails, 2. Apply Base Color, 3. Apply Magnetic Gel, 4. Magnetically Align, 5. Cure Immediately, 6. Apply Structure Gel, 7. Secure Bow, 8. Top Coat, and 9. Final Cure.
1. Flawless Nail Prep and Base Coat Foundation

Pin this genius hack to your ‘Flawless Mani’ board!
A long-lasting gel manicure begins with an impeccable foundation. Proper nail preparation of the nail plate is essential for ensuring your base coat has perfect adhesion, preventing any lifting or chipping later on. This stage removes oils and creates the ideal surface for the gel to grip.
Products & Tools Used:
- Medium-grit nail file (180/240 grit)
- Cuticle pusher and nipper
- Nail dehydrator solution (must be alcohol-free, for optimal oil removal)
- Quality rubber base coat gel (for flexible, non-lifting adhesion)
- Lint-free wipes
Application/Styling Steps:
- Shape and gently buff the entire nail surface to remove shine, creating microscopic channels for adhesion.
- Push back and gently nip any excess cuticle skin, keeping the nail plate clear.
- Swipe the nail dehydrator solution over the entire nail surface, ensuring all oil and dust is removed (this is critical for gel longevity).
- Apply a very thin, scrub-like layer of the rubber base coat, being careful not to touch the skin.
- Cure the base coat under the UV/LED lamp according to manufacturer specifications (typically 30-60 seconds).
Pro-Tip: Always cap the free edge with your base coat! This seals the nail tip and is the first defense against chipping and lifting.

2. The Perfect Base Color: Boosting Magnetic Contrast

Save this clever organization idea!
The secret to a vibrant, high-contrast cat eye effect is the color you put underneath. A deep, opaque, and highly pigmented gel polish in a rich jewel tone creates the perfect dark canvas for the metallic particles to pop against. Think deep burgundy, emerald green, or classic black for the ultimate holiday glam.
Products & Tools Used:
- Highly opaque, deep jewel-tone gel polish (burgundy, emerald green, or black)
- Fine, angled cleanup brush
- Rubbing alcohol (or cleanser solution)
Application/Styling Steps:
- Apply the first thin coat of your chosen base color (e.g., deep burgundy). Ensure it is thin and even.
- Use the angled brush dipped in rubbing alcohol to clean up any gel that touches the cuticle or side walls before curing.
- Cure the first coat for 60 seconds.
- Apply a second, equally thin coat for full opacity and cure again for 60 seconds. Note: Full color opacity is crucial for the magnetic effect.
Lesson Learned: If your Cat Eye polish is semi-transparent, using a black or highly opaque color underneath drastically increases the shimmer’s visibility and contrast.

3. Applying the 9D Magnetic Polish

Save this 9D gel tip for later!
Now for the magic. Applying the 9D or 5D magnetic gel polish is a two-step process. The first coat acts as a base layer, while the second, thicker coat holds the metallic particles that you will manipulate with the magnet to create the signature velvet effect or sharp shimmer line.
Products & Tools Used:
- High-quality 9D or 5D magnetic gel polish (look for dense particle count)
- Gel brush (if using potted gel)
Application/Styling Steps:
- Apply a thin, even first coat of the magnetic polish and cure for 60 seconds (this seals the color coat).
- Apply a slightly thicker second coat. DO NOT CURE YET. This is the layer you will manipulate with the magnet. This coat needs to be thick enough for particles to move easily.
- Have your magnet tool ready; you need to work quickly before the particles settle back down.
- Immediately proceed to the next step: magnet application.
Pro-Tip: Shake or roll the magnetic polish bottle gently before use. This distributes the metallic particles evenly throughout the gel, ensuring maximum shimmer density.

4. Mastering the Magnet Angle for Velvet Cat Eye

Pin this technique diagram for reference!
This is the most crucial technical step. The angle, distance, and stillness of your magnet tool will determine the sharpness and quality of your cat eye shimmer. Using a strong, dual-ended magnet tool gives you the versatility to create different effects.
Products & Tools Used:
- Strong dual-ended magnetic tool (must contain a high-Gauss neodymium magnet)
Application/Styling Steps:
- Immediately after applying the second coat (Step 3), choose your desired magnet end (bar or circle).
- Hold the magnet tool 1-2 millimeters away from the nail surface—never touching the wet gel.
- For the classic line: Hold the edge of the magnet vertically down the center of the nail for 5-10 seconds.
- For the velvet effect: Hold the round end of the magnet parallel and centered over the nail for 10 seconds, pulling the particles toward the edges for a plush glow.
- Do not move the magnet during this time; stillness is key to a sharp line.
Expert Insight: The 45-degree angle often yields the most dynamic shimmer shift, creating the illusion of movement as the hand moves. Practice on a swatch stick first!

5. Curing Protocol: Locking in the Shimmer

Don’t lose the shimmer—save this curing tip!
Timing is everything. To prevent the aligned magnetic particles from settling back into the gel and losing their sharp line, you must cure the nail immediately. This step locks the shimmer in place before it has a chance to dissipate.
Products & Tools Used:
- 48W+ UV/LED Nail Curing Lamp (must be sufficiently powerful for quick curing)
- Timer or integrated lamp timer
Application/Styling Steps:
- The instant you achieve the desired magnetic effect (after the 5-10 second magnet hold), immediately place the nail into the curing lamp.
- Cure the magnetic gel coat for a full 60 seconds (or 120 seconds, depending on your lamp wattage and gel brand).
- CRITICAL: Do not wipe the inhibition layer (sticky residue) yet. You need this layer for the structure gel adhesion in the next step.
- Avoid bumping or moving the hand while curing, as this can cause the shimmer line to warp.
Troubleshooting Tip: If your Cat Eye shimmer keeps fading, you are likely waiting too long between using the magnet and curing, allowing the particles to settle. Move the nail into the lamp instantly!

6. The Structural Foundation for 3D Charms

Need lasting bows? Save this structure gel tutorial!
To ensure your beautiful 3D bow charms don’t lift or fall off, you need a stronger adhesive than a simple top coat or nail glue. A medium-viscosity builder or structure gel creates a durable, solid foundation that securely bonds heavy 3D charms to the nail surface for long-lasting wear.
Products & Tools Used:
- Medium-viscosity clear builder gel or structure gel (do not use thin top coat or nail glue)
- Fine dotting tool or sculpting brush
Application/Styling Steps:
- Identify the exact spot where the 3D bow will be placed (usually near the cuticle or the free edge center).
- Pick up a small bead of structure gel using your dotting tool and place it on the chosen spot, creating a slightly raised ‘nest’ or pad.
- Do not cure the structure gel yet. This is the wet adhesive layer.
- Immediately proceed to secure the 3D charm onto this wet foundation.
Pro-Tip: Structure gel provides a superior bond because it is thicker and stronger than regular top coat. Using traditional nail glue risks yellowing and significantly reduces the longevity of the charm.

7. Securing the Cat Eye Bow Motif

See how to make your 3D bows last for weeks!
Proper placement and encapsulation are key to making your bow charm look professional and last for weeks. The goal is to embed the charm securely into the structure gel and create a smooth, non-snagging transition from the nail surface to the bow motif.
Products & Tools Used:
- 3D Christmas bow resin charms (small or medium size)
- Precision tweezers
- Detail brush (for cleaning structure gel overflow)
Application/Styling Steps:
- Using precision tweezers, carefully place the center of the bow charm onto the wet structure gel pad (from Step 6).
- Gently press down to embed the base of the charm slightly into the gel, ensuring all sides of the bow base are touching the gel.
- Flash Cure: Place the nail under the lamp for a quick 10-second flash cure to freeze the charm in place.
- Use a detail brush dipped in fresh structure gel to gently sculpt and smooth the gel around the base of the charm, filling any gaps to create a seamless, non-snagging transition from charm to nail.
- Cure fully for 60 seconds.
Lesson Learned: Use the minimum amount of structure gel necessary to secure the charm. Too much gel will make the area look bulky and detract from the sleek Cat Eye shimmer.

8. Top Coat Perfection: Sealing the Free Edge

Don’t skip this last step for chip-free holiday nails!
The final top coat provides a high-gloss finish and, most importantly, protects your entire design from chipping. The professional technique of “capping the free edge” is non-negotiable for a durable manicure, as it seals all the layers together at the nail’s most vulnerable point.
Products & Tools Used:
- High-quality, non-wipe high-gloss top coat (Non-wipe is essential to preserve the Cat Eye effect)
Application/Styling Steps:
- Apply a generous, even layer of top coat over the entire nail, floating it carefully around the base of the 3D charm (do not paint over the textured part of the charm itself, only the base encapsulation).
- Capping Technique: Swipe the brush tip horizontally across the very end (free edge) of the nail to fully seal all the layers you’ve built up.
- Ensure no top coat has pooled around the cuticle area.
- Cure the final top coat for the full recommended time (60-120 seconds).
- Allow nails to cool for two minutes before applying cuticle oil or washing hands.
Professional Standard: Always use a non-wipe top coat over Cat Eye gel. Wiping a dispersion layer (sticky residue) can sometimes dull the magnetic shimmer slightly.

9. The Non-Gel Quick Fix: Cat Eye Press-Ons

Need it fast? Save this press-on solution!
If you’re short on time or don’t want to invest in a full gel kit, a high-quality Cat Eye press-on nail kit is the perfect magnetic polish alternative. These kits offer a quick holiday nail fix, giving you the same stunning aesthetic without the technical complexity.
Products & Tools Used:
- Pre-designed Cat Eye press-on nail kit (look for festive colors and shapes)
- High-quality nail glue tabs or liquid adhesive
- Alcohol prep pad
- Small bow nail decals (optional, if the press-ons don’t have bows)
Application/Styling Steps:
- Prep your natural nails by filing, buffing, and wiping them thoroughly with an alcohol prep pad to remove all oils.
- Select the correctly sized press-on nail for each finger.
- Apply a small amount of liquid adhesive to the back of the press-on and the center of your natural nail (or use glue tabs).
- Press the press-on nail firmly in place, ensuring the cuticle edge is aligned perfectly (hold for 30 seconds).
- If applying bow decals, seal them with a thin layer of clear top coat after application for better durability.
Pro-Tip: For maximum wear time (up to two weeks), use a thin coat of clear builder gel instead of traditional liquid glue to adhere the press-ons, curing them under your UV lamp for 60 seconds.

Troubleshooting the Cat Eye Effect: Fixing the 3 Biggest Failures
Even with a perfect tutorial, common mistakes can happen. Understanding how to fix dull cat eye shimmer or secure loose charms is what separates a good DIY manicure from a great one. This section provides tested solutions for the three biggest failures, ensuring you can troubleshoot any issue and achieve a flawless result.
Why Does My Shimmer Disappear or Look Dull?
The shimmer dissipates because the magnetic particles settle back into the liquid gel before polymerization (curing) can lock them in place. This occurs if you wait too long between magnet application and placing the nail in the lamp, or if you applied the gel coat too thick.
The solution is to reduce the time gap to mere seconds—move the nail into the lamp immediately after lifting the magnet. Ensure your lamp is at least 48W and that you are using a high-density magnetic polish (5D or 9D) over an opaque base coat to maximize contrast.
My 3D Charms Keep Lifting and Snagging
Charms lift because they lack a strong structural base and proper encapsulation at the edges. Thin top coat or traditional nail glue is insufficient for the weight of resin or metal bows, causing them to detach quickly.
Stop using liquid nail glue. Switch to a medium-viscosity structure gel (builder gel) to create a stable, cured nest beneath the charm. After placing and curing the charm, use a thin brush to seal the surrounding edges, creating a seamless slope from the nail surface up to the charm’s base. This prevents snagging.
How Do I Safely Remove Gel Polish with 3D Charms?
Safe removal requires filing down the bulk before soaking. Never peel or force 3D charms off, as this rips layers of your natural nail.
The solution is to use an electric file (or coarse hand file) to gently file away the top coat, the surrounding structure gel, and as much of the charm as possible. Once the base layers are exposed, proceed with a standard acetone soak (wrapping the nails in foil for 15-20 minutes). Use a wooden stick to gently push off the softened gel, never scraping harshly.
Key Takeaways: Your Quick Guide to Holiday Nail Perfection
- The Cat Eye Triumvirate: Use a strong dual-ended magnet, apply 9D polish over an opaque base (red or green), and hold the magnet 1-2mm away for 10 seconds without moving.
- Cure Instantly: To lock in the magnetic shimmer and prevent particle settling, cure the magnetized gel coat immediately—do not wait to apply the top coat or clean up edges.
- Structure Gel is Non-Negotiable: For any 3D bow or heavy charm, use a medium-viscosity builder gel to create a secure, encapsulated base to ensure the detail lasts two weeks or more.
- Cap the Edge: Always apply and cure the final top coat by swiping the tip horizontally across the free edge of the nail to seal the entire design, maximizing chip resistance.
- Design for Depth: Pair the dynamic, metallic shimmer of the Cat Eye with a flat or matte-finished bow motif (if hand-painted) or a high-contrast white/gold charm to maximize visual depth and aesthetic impact.
FAQs About christmas bow nails cat eye
What is the difference between 5D and 9D Cat Eye polish?
9D magnetic polish contains more metallic particles and more varied colors than 5D, offering a multi-dimensional, holographic shimmer that shifts more dramatically with light and movement. 5D tends to produce a less complex, two-tone shifting effect. For maximum holiday glam, 9D is preferred.
What colors are considered “Cinnamon Cat Eye” for the holidays?
“Cinnamon Cat Eye” typically refers to a warm-toned, reddish-brown or coppery magnetic polish applied over a highly pigmented burgundy or deep terracotta base coat. This combination creates a rich, spiced shimmer effect that is elegant and sophisticated, offering a trendy alternative to traditional red or green.
Is the Cat Eye technique hard for beginners to master?
It is considered an intermediate skill, primarily due to the precision required for magnet placement and the immediate curing protocol. However, using a high-quality, strong magnet and following the immediate cure steps can allow beginners to achieve very satisfying, high-impact results with minimal practice on swatch sticks first.
How can I ensure my finished design doesn’t feel bulky or snag on clothes?
Bulkiness usually stems from using too much structure gel beneath 3D elements. Use only a small bead of structure gel directly under the charm’s base, and use a detail brush to gently smooth the edges where the gel meets the nail. The goal is a gradual, smooth transition that is sealed securely by the final top coat.
Final Thoughts
Mastering the Cat Eye Bow Manicure means you’ve conquered one of the most technical yet rewarding holiday nail trends. By adhering to the precise timing for magnet alignment and ensuring a solid, structural foundation for your elegant bow, you are guaranteed a high-impact, long-lasting look that will carry you flawlessly through the holiday season of 2026. This design is more than just polish; it’s a statement of expertise and festive luxury.
Now that you have the ultimate guide, what Cat Eye base color—Burgundy, Emerald Green, or Classic Red—are you using for your Cat Eye Bow Nails this March? Let us know in the comments below
Last update on 2026-03-11 / Affiliate links / Images from Amazon Product Advertising API


