Struggling to keep your festive manicure looking perfect? It’s frustrating when that beautiful 3D gold bow you spent so much time on pops off right before the holiday party. You’re not alone in facing this common challenge with Christmas nails with a gold bow.
The secret to securing 3D nail charms is using a viscous, clear builder gel applied to the nail before placement, followed by an immediate flash cure to lock the charm in place for long-lasting wear. This professional technique ensures your festive design stays put.
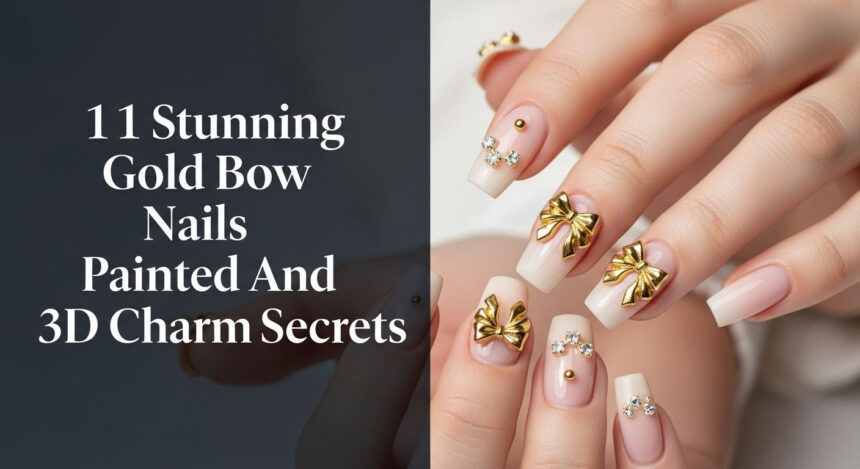
Drawing from the tested adhesion protocols of licensed nail artists, this guide reveals the secrets to flawless gold bow nail art. You’ll discover 11 stunning designs and master both painted precision and durable 3D charm application. Get ready to create a holiday look that lasts.
Are Your 3D Gold Bow Charms Falling Off? The Festive Manicure Problem Solved
It’s the most common festive nail art frustration: you create a stunning 3D gold bow manicure, and within days, the main attraction—the charm itself—is gone. The primary reason for this adhesion failure is using the wrong adhesive. Traditional nail glue is often insufficient for the weight and material of metal or resin 3D nail charms. According to professional testing, these glues typically only provide 3-5 days of wear.
The solution lies in adopting professional-grade materials and techniques. For a festive bow manicure that lasts throughout the holiday season, the key is using a thick, viscous builder gel. This type of gel, designed for strength and structure, creates a much stronger bond than standard glue. It effectively encapsulates the base of the charm, preventing it from snagging or lifting. This guide incorporates proven techniques used by licensed nail artists to solve this exact problem, ensuring your Christmas nails with a gold bow remain perfect.
11 Stunning Gold Bow Secrets: Painted Precision, Chrome Shine, and Lasting 3D Charms
Ready to master the art of the gold bow? This list covers 11 secrets to achieving the perfect festive look, from the high-impact dimension of 3D charms to the delicate precision of hand-painted designs. We’ll dive into expert tips on achieving perfect symmetry, selecting the right materials for a mirror-shine chrome finish, and professional application methods that guarantee durability. Whether you prefer a classic red or a trendy nude, these techniques will elevate your holiday manicure.
1. The Classic Christmas Look: Red Base with High-Durability 3D Gold Charm

Pin this genius hack to your ‘Holiday Nail Inspo’ board!
This look is timeless for a reason. The vibrant red base provides the perfect festive canvas for a high-impact metallic 3D gold bow. The secret to making this classic look last is abandoning nail glue in favor of a stronger adhesive like builder gel, which ensures your charm remains secure for 10+ days.
Products & Tools Used:
- Deep Red Gel Polish (highly pigmented, UV curable)
- No-Wipe Gel Top Coat (for sealing base layers)
- Viscous Builder Gel or Rhinestone Adhesive (high strength for charms)
- Gold Bow Charms (mini or medium size, metal alloy)
- UV/LED Curing Lamp (at least 48W)
- Wax Pencil or Fine-Tipped Tweezers (for placement)
Application Steps for Durability:
- Apply and cure your base coat and two layers of deep red gel polish, wiping off the tacky layer.
- Apply a small bead of viscous builder gel exactly where the gold charm will sit on the accent nail.
- Using a wax pencil or tweezers, gently press the charm into the builder gel, ensuring the edges are lightly embedded.
- Flash Cure the nail under the UV/LED lamp for 10-15 seconds to immediately set the charm’s position.
- Apply the full 60-120 second cure time to fully harden the builder gel adhesive.
- Seal the surrounding nail and edges of the charm base with a thin layer of top coat, being careful not to cover the face of the metallic charm.
Pro-Tip: Always apply a thin layer of top coat around the charm’s base, not over the face of the charm itself, to prevent it from dulling and snagging.

2. The Subtle Approach: Nude Base with Micro Hand-Painted Bows for Perfect Symmetry

Save this clever organization idea!
For a more minimalist and elegant holiday look, a nude base with delicate, hand-painted gold bows is the perfect choice. The challenge here is achieving perfect symmetry, but a simple professional technique using a dotting tool as a guide makes it surprisingly easy to create crisp, balanced bows every time.
Products & Tools Used:
- Milky Nude Polish or Gel (for base color)
- Highly Pigmented Gold Gel Polish or Acrylic Paint (for bow detail)
- Fine Line Nail Art Brush (000 size, synthetic bristles)
- Dotting Tool (smallest tip size)
- Non-Wipe Top Coat (mandatory for sealing detail)
Step-by-Step Directions for Symmetrical Bows:
- Apply and cure your base and nude color layers completely.
- Dip the smallest end of your dotting tool into the gold color and place a small dot for the exact center of the bow.
- Clean the dotting tool. Reload it and place two more dots equidistant from the center dot, forming the outer points of where the two bow loops will end.
- Dip the fine liner brush into the gold polish, using minimal product to avoid bleeding.
- Starting from the center dot, pull the brush outward and curve it gently back inward to connect with one of the outer guide dots, forming the first loop outline. Repeat for the second loop.
- Paint the tails by dragging two thin lines diagonally downward from the center point.
- Cure the design immediately, then seal with a final layer of non-wipe top coat.
Pro-Tip: Using acrylic paint instead of thick gel polish for the gold detail allows for faster air-drying and less risk of the color bleeding during application.

3. Mirror Shine Secrets: How to Achieve the Gold Chrome Bow Accent

Save this high-shine technique to your ‘Advanced Nail Art’ board!
The mirror-like shine of a gold chrome bow is a trending look that offers unmatched metallic impact. This technique requires specific products and precise timing. The secret is burnishing high-quality gold chrome powder onto a no-wipe gel top coat that has been cured just long enough to become tacky but not fully hardened.
Products & Tools Used:
- Base Color Polish/Gel (cured completely)
- Black or White Gel Polish (for painting the bow outline/shape)
- No-Wipe Gel Top Coat (MANDATORY: must be non-cleansing finish)
- High-Quality Gold Chrome Powder
- Silicone or Foam Eyeshadow Applicator (for rubbing the chrome)
- Soft Dusting Brush (for removing excess powder)
Step-by-Step Directions for Chrome Finish:
- Apply your base color and cure fully. Paint the outline of your bow design using black or white gel polish and cure fully.
- Apply a thin layer of the No-Wipe Gel Top Coat only over the painted bow design.
- Crucial Step: Cure the No-Wipe Top Coat for only 30-45 seconds (manufacturer dependent) until it is still warm and slightly tacky, but not fully hardened.
- Immediately and vigorously rub the Gold Chrome Powder onto the tacky surface using the applicator until a smooth mirror finish appears.
- Use the dusting brush to gently remove all excess chrome powder from the rest of the nail surface.
- Seal the entire design with a final, generous layer of No-Wipe Top Coat and cure for a full 60 seconds to lock in the chrome.
Pro-Tip: If your chrome looks dusty or grainy, your top coat was cured too long (too hard). If the chrome slides off entirely, your top coat was cured too little (too wet). Timing is everything for the perfect mirror effect.

4. The Coquette Aesthetic: Milky Pink Base with Tiny 3D Micro Charms

Pin this elegant coquette look immediately!
The Coquette aesthetic, which emphasizes hyper-feminine and delicate details, is a major trend for the 2026 holiday season. Translate this look to your nails with a soft, milky pink base adorned with micro gold bow charms and tiny pearl accents. This style is all about subtlety and careful placement.
Products & Tools Used:
- Milky Pink or Translucent Nude Gel Polish (for soft base)
- Micro Gold Bow Charms (under 4mm size preferred)
- Tiny White Pearl Charms or Studs
- Rhinestone Adhesive Gel (clear, non-yellowing)
- UV/LED Lamp
- Fine-Tipped Tweezers
Application Steps for the Coquette Look:
- Apply and cure a milky pink base coat. Ensure the surface is smooth and free of defects.
- Apply small, targeted dots of rhinestone adhesive gel where each micro-bow and pearl accent will be placed (often clustered near the cuticle or free edge).
- Using tweezers, carefully place the micro-bows and pearls, arranging them closely but allowing each element to retain definition.
- Flash cure the entire cluster for 10 seconds to hold the delicate pattern.
- Use a detail brush to gently flow a small amount of adhesive around the edges of the charms to reinforce them without creating bulk.
- Finish with a final 60-second full cure and a high-shine top coat to seal the rest of the nail.
Pro-Tip: The key to the Coquette look is subtlety and scale. Use the smallest charms possible and keep the base color sheer or milky rather than opaque to maintain the delicate aesthetic.

5. Jewel Tones: Deep Forest Green Base with High-Impact Gold Glitter Bow

Save this alternative Christmas color scheme!
Move beyond traditional red with a sophisticated, deep forest green base. This rich jewel tone provides a stunning contrast for a bow created with dense, sparkling gold glitter polish. The key to this look is achieving a smooth, glossy finish over the naturally rough texture of the glitter.
Products & Tools Used:
- Deep Forest Green Cream Polish or Gel
- Highly Pigmented Gold Glitter Polish (dense particle size)
- Fine Line Brush or Stamping Plate (for bow outline)
- High-Shine Top Coat (mandatory for smoothing glitter)
Step-by-Step Directions for Glitter Bow:
- Apply and cure two coats of the deep forest green base color, ensuring full opacity.
- Using the fine line brush, paint the outline of the desired bow shape on the accent nail using a contrasting cream polish color (or directly using the glitter polish if it is thick).
- Immediately fill the outlined shape entirely with the dense gold glitter polish, using a dabbing motion to pack the glitter tightly and achieve maximum opacity.
- Cure the glitter polish fully. If necessary, apply a second layer of glitter for complete coverage.
- Apply two layers of a thick top coat over the entire nail, curing fully between each layer. This smooths out the rough texture of the glitter and prevents snagging.
Pro-Tip: Glitter polish is notorious for feeling bumpy. Applying two separate layers of a thick, leveling top coat (cured fully each time) is the secret to a high-gloss, smooth finish over chunky glitter designs.

6. The Cozy Combo: Integrating the Gold Bow with Sweater Nail Texture

Save this cozy winter look for March!
Combine two popular winter trends into one cozy manicure. The “sweater nail” technique creates a raised, matte texture that mimics a knit sweater. Placing a glossy, painted gold bow on top of this texture creates a stunning contrast that is perfect for the colder months.
Products & Tools Used:
- Base Color Gel Polish (Beige, Gray, or Off-White)
- Matching Colored Acrylic Powder or Clear Dipping Powder
- Matte Top Coat (for overall matte finish)
- Highly Pigmented Gold Gel Polish (for the bow)
- Fine Liner Brush (for painting the bow and sweater lines)
Step-by-Step Directions for Sweater Texture:
- Apply and cure your base color. Finish the nail with a Matte Top Coat and cure fully (the nail should feel completely matte and smooth).
- Using the same base color gel polish, use your fine liner brush to paint the raised knitwear pattern (usually small vertical lines, dots, or braids) onto the cured matte nail. Do NOT cure this pattern.
- While the gel pattern is still wet, generously sprinkle the matching acrylic powder over the entire nail until the wet gel is completely covered. Tap off the excess powder.
- Cure the nail fully (60 seconds) with the powder still adhered to the wet gel.
- Once cured, paint your Gold Bow design on top of the textured sweater pattern using your Gold Gel Polish.
- Carefully apply a glossy top coat only to the gold bow and cure. The contrast between the matte sweater texture and the glossy metallic bow will be stunning.
Pro-Tip: For the gold bow placed over the sweater texture, opt for a painted bow (2D) rather than a 3D charm. The texture of the sweater design already provides enough dimension, and a flat gold detail will sit more smoothly.

7. Elegant Contrast: Burgundy Base with Gold Foil and Polish Bow

Pin this sophisticated holiday alternative!
Create a luxurious and elegant manicure by pairing a deep burgundy or oxblood base with delicate gold foil flakes. A crisp, hand-painted gold bow on top of this textured background adds a final touch of sophistication for a perfect holiday party look.
Products & Tools Used:
- Deep Burgundy/Oxblood Polish or Gel
- Gold Foil Flakes (thin, cosmetic grade)
- Base Gel or Builder Gel (for adhering foil)
- Metallic Gold Nail Polish (for painting the bow)
- Fine Detail Brush
Step-by-Step Directions for Foil Integration:
- Apply and cure two layers of the burgundy base color.
- Apply a thin layer of base gel or builder gel over the cured color coat (do not cure yet).
- Using tweezers or a silicone tool, gently dab small pieces of the gold foil onto the wet gel surface for random placement. Cure fully.
- Smooth the surface with a thin layer of top coat and cure. Lightly buff if needed to remove sharp foil edges.
- Paint your symmetrical gold bow design directly over the smooth, foil-embedded surface using a metallic gold polish or gel.
- Seal the entire design with a final glossy top coat, ensuring the bow edges are fully encapsulated.
Lesson Learned: Ensure you smooth down the gold foil completely before painting the bow, or the bow’s lines will be uneven and asymmetrical due to the underlying texture.

8. Strategic Placement: French Tip with the Gold Bow at the Cuticle

Save this chic placement guide!
Elevate a timeless French manicure by adding a small, strategically placed gold bow. Placing the bow at the cuticle line (the lunula) adds an unexpected and chic detail that works beautifully, especially on shorter nails where a large design might feel overwhelming.
Products & Tools Used:
- Clear/Milky Base Coat and Top Coat
- White or Nude Tip Polish/Gel (for the French tip smile line)
- Micro Gold Bow Decal or Hand-Painted Gold Gel
- Precision Application Tool (dotting tool or tweezers)
Step-by-Step Directions for Cuticle Placement:
- Execute your perfect French manicure, applying the milky base, the tip color, and curing fully.
- Seal the French tip design with a non-wipe top coat and cure.
- If using a decal: Apply a thin layer of top coat (uncured) or clear builder gel to the exact center of the cuticle line (lunula).
- Place the smallest gold bow decal or charm precisely in the center of the wet adhesive. If hand-painting, use the fine liner brush to paint a symmetrical bow at this center point.
- Flash cure the nail for 10 seconds to secure the decal/paint.
- Finish by applying cuticle oil around the nail, avoiding the bow design itself.
Pro-Tip: Bow size is critical here. For a classic French look, the bow should be a micro size (3-5mm) to complement the delicate line of the tip and avoid overwhelming the cuticle area.

9. Low Effort, High Impact: The ‘Floating’ Gold Bow Decal Quick Fix

Pin this genius 15-minute bow hack!
Need a festive look in a hurry? Gold bow nail decals are the ultimate quick fix. These thin, flat stickers or water slides provide the look of a perfectly painted bow with minimal effort and time, making them the perfect solution for beginners or last-minute manicures.
Products & Tools Used:
- Base Color Polish (standard or gel)
- High-Quality Gold Bow Nail Decals (water slide or adhesive stickers)
- Tweezers
- Water and Small Dish (if using water slide decals)
- High-Shine or Quick-Dry Top Coat
Step-by-Step Directions for Decals:
- Apply and fully dry/cure your base color and top coat (if using standard polish, ensure it is completely dry).
- For Water Slide Decals: Cut the desired bow decal close to the edge. Submerge the piece in a small dish of water for 10-20 seconds until the decal slides easily off the paper backing.
- Using tweezers, slide the decal onto the nail in the desired position and gently smooth out any bubbles or wrinkles.
- Wait 30 seconds for the decal to fully adhere and dry to the nail surface.
- Apply two generous layers of top coat over the entire nail, ensuring the edges of the decal are completely sealed to prevent lifting.
- Cure or allow to fully dry.
Pro-Tip: Always smooth the decal down with a silicone tool or a dry finger wrapped in lint-free material before applying the top coat. Any small bubble or wrinkle will immediately cause the top coat to chip and the decal to lift.

10. Sculpted Dimension: Achieving a Two-Tone Gold Painted Bow

Save this advanced painting technique!
For those with advanced painting skills, creating a two-tone gold bow adds incredible depth and dimension to a flat design. By using a deeper antique gold for the base and a bright, light gold for highlights, you can create the illusion of shadow and light, making the painted bow appear sculpted.
Products & Tools Used:
- Dark Base Color (Navy, Black, or Deep Burgundy)
- Deep/Antique Gold Gel Polish (for the base shadow color)
- Bright/Light Gold Gel Polish (for the highlight color)
- Fine Liner Brush
- Palette or Mixing Surface
Step-by-Step Directions for Dimension:
- Apply and cure your dark base color.
- Using the deep antique gold polish, paint the outline and fill in the entire bow shape, ensuring perfect symmetry. Cure for 30 seconds.
- Dip your fine liner brush lightly into the bright gold highlight polish, wiping off most of the excess.
- Carefully paint a thin line of the bright gold along the outer edges of the bow loops (the parts that would naturally catch the light).
- Apply tiny highlights of the bright gold to the center knot of the bow to give it a rounded appearance.
- Cure the highlight layer fully (60 seconds) and seal the entire nail with a high-shine top coat.
Pro-Tip: The key to subtle shading is ensuring the highlight color is almost dry on your brush. Start your highlight line at the loop edge and flick the brush inward to create a gradient effect, mimicking natural shadow.

11. The Ultimate Secret: Safe and Damage-Free Removal Protocol for 3D Charms

Pin this critical safety step!
What goes on must come off—safely. Improper removal of 3D charms secured with builder gel is a leading cause of nail plate damage. The secret is to never pry or pop the charm off. You must first break the thick adhesive seal by filing before soaking in acetone.
Products & Tools Used:
- Coarse Nail File (100/180 grit)
- Acetone (100% pure is best)
- Foil Wraps or Soak-Off Bowl
- Cotton Balls or Pads
- Cuticle Oil
Step-by-Step Directions for Safe Charm Removal:
- File Down the Charm: Using the coarse side of your file, gently but firmly file the top of the 3D charm and the builder gel seal surrounding its base. Do not file your natural nail. The goal is to break the seal and thin out the hard adhesive layer.
- Soak the Nail: Saturate a cotton ball with 100% acetone, place it directly over the filed charm and nail, and wrap tightly with foil, ensuring the acetone is concentrated on the adhesion area.
- Wait Time: Allow the nail to soak for 15-20 minutes. The acetone needs sufficient time to penetrate the thick builder gel.
- Scrape Gently: After soaking, the charm should lift easily. If not, scrape the softened gel residue gently with a wooden stick or metal pusher. Do not pry the charm off. Repeat the soaking process if necessary.
- Nourish: Once removed, wash your hands immediately and generously apply cuticle oil and hand cream to counteract the drying effects of the acetone.
Pro-Tip: Never attempt to pry a secured 3D charm off your nail. Prying causes physical damage to the nail plate, potentially leading to painful lifting or breakage. File the adhesive down until it is thin enough for the acetone to dissolve.

Key Takeaways: Your Quick Guide to Durable Gold Bow Nail Art
- 1. Charm Longevity is Adhesive-Dependent: For 3D charms to last 10+ days, skip traditional nail glue and use a highly viscous builder gel or professional rhinestone adhesive, ensuring a full cure.
- 2. Master the Chrome Timeline: The mirror shine effect requires burnishing gold chrome powder onto a no-wipe top coat that is cured for the exact manufacturer-specified time (usually 30-45 seconds) to achieve optimal tackiness.
- 3. Achieve Symmetry with Guide Dots: When hand-painting bows, use a dotting tool to place the center knot and the outer edge points of the loops first; this guarantees symmetry before you connect the lines with your fine liner brush.
- 4. Safe Removal is Non-Negotiable: To remove 3D charms without nail plate damage, you must file down the thick builder gel adhesive around the base before soaking in acetone.
- 5. Contrast is Key for Impact: Pair your metallic gold bow (especially chrome or glossy finishes) with a contrasting base color or texture, such as a deep red base or a matte sweater texture, for the highest festive visual appeal.
People Also Ask About Gold Bow Nail Techniques and Products
How long should I cure builder gel to secure 3D charms?
The builder gel used for 3D charms requires a full cure time of 60 to 120 seconds under a UV/LED lamp, depending on the wattage, after an initial 10-15 second flash cure to set the charm’s exact position. Always follow the specific gel manufacturer’s instructions.
Can I use gold chrome powder on regular nail polish or only gel?
Gold chrome powder must be applied over gel polish, specifically a cured no-wipe gel top coat. Standard nail polish lacks the crucial tacky inhibition layer needed for the fine powder particles to adhere and create the desired mirror-like, smooth metallic finish.
What is the ‘Coquette Aesthetic’ in relation to Christmas nail art?
The Coquette Aesthetic emphasizes delicate, hyper-feminine, and charming elements, positioning the gold bow as a central motif. For Christmas nails, this translates to micro-bows, milky pink or nude bases, and complementary accents like pearls or soft glitter, creating an elegant, subtle festive look.
Should I paint the gold bow with metallic polish or use a decal for beginner practice?
A high-quality gold bow decal or water slide sticker is the best choice for beginners due to the low skill requirement and minimal time investment. Hand-painting perfect symmetrical bows requires precision tools and a significant amount of practice.
Final Thoughts
The secret to mastering “gold bow nails” this 2026 lies not just in choosing a stunning color pairing but in nailing the technique—whether you choose the speed and dimension of 3D charms or the precision of a hand-painted chrome accent. By employing professional adhesion secrets like builder gel and understanding the specific curing process required for chrome, you ensure your festive manicure remains flawlessly beautiful and durable throughout the holiday season. Now that you have the 11 secrets to perfection, which color pairing—the classic red, the elegant nude, or the trendy sweater texture—will you try first? Share your final bow look in the comments
Last update on 2026-03-03 / Affiliate links / Images from Amazon Product Advertising API


