Dreaming of sipping from a mug that perfectly captures your unique style and tells a story? Perhaps you’ve admired beautifully crafted pottery online or in artisan markets and wondered if you could create something similar, even without a pottery wheel. The journey of transforming humble clay into a functional work of art can feel daunting, especially with questions swirling about where to start, which techniques to master, or how to ensure your creation is both stunning and safe for everyday use. Many aspiring potters grapple with finding comprehensive inspiration combined with clear, actionable guidance, leading to frustration before the first lump of clay is even wedged.
It’s a common challenge: you crave that unique, handmade touch in your kitchen or as a thoughtful gift, but the world of ceramics seems complex, filled with jargon and specialized equipment. Concerns about materials, the permanence of your design, or even whether your finished mug will be food-safe can quickly turn excitement into apprehension. Without a clear roadmap that blends creative clay mug ideas with easy-to-understand hand-building techniques, it’s easy to feel overwhelmed and unsure of how to bring your pottery vision to life.
This ultimate guide offers 11 genius clay mug ideas and simple hand-building techniques, perfect for beginners, allowing you to craft stunning, food-safe pottery without a wheel, transforming raw clay into personalized, functional art. We’ll explore diverse designs and provide clear, step-by-step instructions, drawing from years of personal crafting experience and studio practice to demystify the process and inspire your inner potter to create custom pieces.
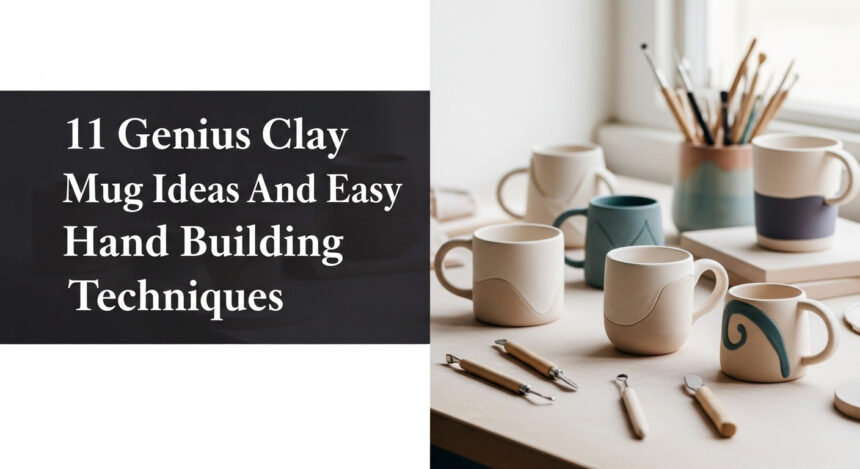
Unleash Your Inner Potter: 11 Genius Clay Mug Ideas & Easy Hand Building Techniques
Craving unique, handmade mugs? This guide offers 11 genius clay mug ideas and simple hand-building techniques, perfect for beginners. Learn to craft stunning, food-safe pottery without a wheel, transforming clay into personalized art. The allure of handmade mugs lies in their unique character and the creative expression they offer, allowing you to move beyond mass-produced items and create something truly your own. This guide validates your desire for creative expression and unique items, providing a comprehensive blend of visual inspiration and clear, step-by-step guidance for 11 distinct mug ideas. These easy hand building techniques prove that you don’t need a pottery wheel to create beautiful DIY ceramic mugs, directly addressing common beginner anxieties. From textured surfaces to ergonomic handles, each idea focuses on accessible methods, ensuring your final product is both beautiful and potentially food-safe, reflecting your unique artistic vision through these beginner pottery projects.
Your Blueprint for Creativity: 11 Hand-Built Clay Mug Ideas from Start to Finish
Ready to transform your creative visions into tangible hand built pottery mugs? This section serves as your practical guide, introducing a collection of distinct mug ideas, each paired with detailed, actionable instructions on how to create them. We’ve tested and refined each idea for beginner success, drawing on expert ceramic principles and practical lessons learned to ensure functional and aesthetically pleasing outcomes. We’ll cover everything from material choice to crucial finishing steps, demonstrating that stunning results are achievable even for novice potters. From the robust slab mug tutorial to the charming pinch pot ideas, you’ll discover techniques to make coiled clay mug designs, custom mug designs, and ensure your DIY clay craft leads to food safe ceramic mugs with creative mug handles and beautiful finishes using pottery techniques for beginners.
1. Classic Slab-Built Cylindrical Mug

Pin this classic design to your ‘DIY Pottery’ board!
The classic slab-built cylindrical mug is an ideal starting point for beginners, offering a sturdy, symmetrical form that highlights precision. This slab built mug relies on uniformly rolled sheets of clay to create its structure, resulting in clean, predictable lines. Often crafted from stoneware clay for durability and food safety, it typically features a simple strap handle for a functional and elegant aesthetic. Essential tools like a rolling pin and guide sticks ensure evenness, which is crucial for preventing cracks during the drying and firing process of these simple pottery mugs.
Materials Needed:
- 2 lbs of Cone 6 stoneware clay for durability and food safety
- Pottery rolling pin with guide sticks (1/4 inch thickness)
- Fettling knife or sharp cutting tool
- Rubber rib tool for smoothing
- Needle tool for scoring
- Small bowl of slip (clay mixed with water to a creamy consistency)
- Canvas-covered board for working surface
Step-by-Step Directions:
- Prepare Your Slab: Wedge clay thoroughly to remove air bubbles. Roll out a uniform slab, approximately 1/4 inch thick, using guide sticks for evenness.
- Cut Body & Base: Using a template or ruler, cut a rectangular slab (e.g., 10×4 inches for the body) and a circular base (e.g., 3-inch diameter).
- Form the Cylinder: Gently curve the rectangular slab into a cylinder. Score and slip one short edge, then join it to the other short edge, pressing firmly to create a strong seam. Smooth the seam with a rubber rib.
- Attach the Base: Score and slip the bottom edge of the cylinder and the top edge of the circular base. Carefully align and press the cylinder onto the base, ensuring a tight seal. Smooth the join on both inside and outside.
- Create & Attach Handle: Roll out a small slab or coil for the handle. Shape it into a comfortable strap handle. Score and slip both ends of the handle and the corresponding areas on the mug body. Press firmly and blend the joins.
- Refine & Dry: Smooth all surfaces, edges, and joins. Cover the mug loosely with plastic and allow it to dry slowly and evenly to a leather-hard state, then completely bone dry (7-14 days).
Pro-Tip: Always use guide sticks when rolling slabs to ensure consistent wall thickness; this is crucial for preventing cracks during drying and firing.

2. Organic Pinch Pot Mug with Textured Exterior

Save this charming pinch pot idea to your ‘Handmade Gifts’ board!
The organic pinch pot mug is a fantastic way to embrace the natural beauty of clay, creating a unique shape with a beautifully textured exterior. This easy clay craft uses the pinch pot technique, starting from a single ball of clay and gradually shaping it with your fingers. The natural indentations and unique character of hand-formed clay contribute to its rustic appeal, making each pinch pot mug distinct. You can intentionally leave fingerprints for an organic feel or use tools to add specific patterns, creating a truly textured pottery piece.
Materials Needed:
- 1.5 lbs of medium-plasticity stoneware clay (easy to shape)
- Sponge for smoothing
- Loop tool or dull knife for trimming
- Small bowl of water
- Optional: Texture tools (stamps, leaves, fabric)
Step-by-Step Directions:
- Form a Ball: Wedge clay into a perfect, uniform ball, about the size of a large orange.
- Create the Pinch Pot: Press your thumb into the center of the ball, leaving about 1/2 inch at the bottom. Begin pinching the clay between your thumb and fingers, slowly rotating the ball.
- Build the Walls: Continue pinching and rotating, gradually thinning and raising the walls of the mug evenly. Aim for about 1/4 to 3/8 inch thickness. Gently widen the mouth as you go.
- Shape & Refine: Once desired height and width are achieved, gently smooth the rim and outside walls with a damp sponge. You can intentionally leave fingerprints for an organic texture or use tools to add patterns.
- Add a Handle (Optional): Roll a small coil of clay. Gently shape it into a comfortable handle loop. Score and slip both ends of the handle and the mug where it will attach. Press firmly and blend.
- Slow Dry: Cover loosely with plastic and allow to dry slowly to prevent cracking, then completely bone dry.
Lesson Learned: When pinching, focus on rotating the clay consistently and pinching from the bottom up. This prevents thin spots at the rim and ensures an even base.

H3: 3. Coiled Textured Mug with Spiral Details

Pin this unique coiled design for your next pottery project!
The coiled textured mug showcases a distinctive spiral detail, offering a rustic and artisanal appeal. This coiled clay mug is built by layering coils of clay, allowing for a customizable shape and a unique tactile surface. Depending on how much you blend the coils, you can create a seamless finish or emphasize the distinct layers for a wonderfully textured ceramic. This hand building with coils technique provides excellent control over form as you build, and it’s particularly suited for creating a creative clay mug with a strong, integrated handle.
Materials Needed:
- 1.5-2 lbs of grogged stoneware clay (good for coiling, holds shape well)
- Slab roller or rolling pin for the base
- Rubber kidney rib for smoothing joins
- Needle tool for scoring
- Slip (clay + water)
- Water in a small bowl
Step-by-Step Directions:
- Prepare the Base: Roll a small slab of clay (1/4 inch thick) and cut a circular base (e.g., 3-4 inch diameter).
- Roll Coils: Take a piece of clay and roll it into a long, even coil, about 1/2 inch thick.
- Attach First Coil: Score and slip the edge of your base. Attach the first coil by coiling it around the base’s perimeter. Press firmly and blend the coil onto the base.
- Build Up Walls: Score and slip the top of the first coil. Add the next coil, pressing it firmly onto the one below. You can either smooth the coils together completely for a seamless look or leave them distinct for texture.
- Shape as You Go: As you add coils, gently shape the mug by pulling the coils outward or inward to create your desired form. Ensure walls are consistent.
- Create & Attach Handle (Coiled): Form a thicker coil, shape it into a comfortable handle. Score and slip the ends of the handle and the mug body, blending firmly.
- Refine & Dry: Smooth the rim. Cover the mug and allow for slow, even drying until bone dry.
Pro-Tip: When working with coils, periodically compress and smooth the inside and outside with a rubber rib to strengthen the joins and prevent later cracks, even if you want visible coils on the exterior.

H3: 4. Sculptural Leaf Handle Mug

Pin this artistic mug handle idea to your ‘Pottery Inspiration’ board!
A sculptural leaf handle mug elevates a simple form into a piece of artistic pottery, with the handle becoming a focal point. This approach allows you to create unique ceramic handles that are both functional and decorative. By shaping soft, pliable clay into an intricate leaf design, complete with realistic veins and a graceful curve, you can achieve a truly nature inspired mug. The key is to ensure the sculptural mug handle integrates naturally with the mug’s body, providing an ergonomic grip while showcasing the beauty of a creative clay mug idea.
Materials Needed:
- Mug body (pre-formed, leather-hard, e.g., a simple slab or pinch pot mug)
- Small amount of soft, pliable stoneware clay for sculpting
- Clay modeling tools set (various sizes for detailing)
- Needle tool for scoring
- Slip (clay + water)
- Small real leaf (optional, for reference or impressing)
Step-by-Step Directions:
- Form the Leaf Shape: Roll a small piece of soft clay into a flat oval. Gently shape it into a basic leaf outline.
- Add Detail & Curve: Use your modeling tools to carefully incise realistic leaf veins and texture onto the clay. Gently curve the leaf to mimic a natural, ergonomic handle shape that fits your hand.
- Prepare Mug for Attachment: Ensure your mug body is at the leather-hard stage. Determine the best attachment points for the leaf handle, considering balance and comfort.
- Score & Slip: Thoroughly score and slip the attachment points on both the leaf handle and the mug body.
- Attach Securely: Press the leaf handle firmly onto the mug, wiggling gently to ensure good contact. Blend the joins carefully with a small modeling tool or wet finger, ensuring no gaps.
- Refine & Dry: Make any final adjustments to the leaf shape or texture. Cover the mug and allow it to dry very slowly and evenly, as intricate handles are prone to cracking during drying.
Pro-Tip: When creating sculptural handles, consider the weight distribution. A larger, more intricate handle might require a slightly wider base on the mug for stability.

H3: 5. Wide Rim Soup or Tea Mug

Save this versatile wide-rim mug idea to your ‘Kitchen Pottery’ board!
A wide rim soup or tea mug prioritizes functionality and comfort, offering ample capacity and a unique drinking experience. This functional ceramic mug is designed with a distinctly wide, flat rim, perfect for resting crackers or enjoying large servings of your favorite beverage. Crafted from durable stoneware clay, it often features a robust body and a sturdy handle for an easy, comfortable grip. Achieving a perfectly flat and smooth wide rim mug is key to its aesthetic and ergonomic appeal, making it a truly comfortable drinking mug for both soups and teas.
Materials Needed:
- 2-2.5 lbs of durable stoneware clay (high-fire, for functional use)
- Pottery wheel (optional for base/body) or slab roller
- Metal rib for smoothing
- Fettling knife
- Needle tool
- Slip and water
- Small level or ruler for checking rim
Step-by-Step Directions:
- Form the Body: Create a wide, open-form cylinder or slightly bell-shaped vessel using either slab building (joining a large rectangle for the body, then adding a base) or a wide pinch pot technique. Aim for ample capacity.
- Prepare the Rim: Once the body is leather-hard, carefully even out the top edge. Roll a thin coil or small slab to attach as the wide rim.
- Attach the Rim: Score and slip the top edge of the mug body and one edge of your prepared rim piece. Press them together firmly, blending the join on both the inside and outside.
- Flatten & Level Rim: Gently flatten the rim to the desired width (e.g., 1 inch). Use a clean, damp sponge and a metal rib to smooth and compress the rim, ensuring it’s perfectly flat and level. Check with a small level.
- Create & Attach Handle: Form a strong, comfortable handle (strap or pulled). Score and slip the attachment points, pressing firmly and blending the joins for maximum strength.
- Slow Dry & Fire: Dry very slowly, covered loosely, until bone dry. Bisque fire, then apply food-safe glaze and glaze fire to recommended stoneware temperatures.
Pro-Tip: Achieving a perfectly flat and level wide rim requires patience. Continuously check with a small level and use a smooth, damp rib to compress and even out the clay as it stiffens.

H3: 6. Carved Geometric Pattern Mug

Pin this elegant carving technique to your ‘Ceramic Decoration’ board!
A carved geometric pattern mug offers a sophisticated, modern touch to hand-built ceramics, creating captivating tactile and visual appeal. This textured mug design relies on precise carving into leather-hard clay, allowing you to create intricate repeating patterns. The interplay of light and shadow across the deeply incised lines transforms a simple mug form into modern ceramic art. Using a pottery carving tool set allows for diverse designs, from subtle textures to bold, intricate geometric pottery that makes each decorative hand built mug truly unique.
Materials Needed:
- Mug body (pre-formed, leather-hard)
- Pottery carving tool set (various sizes and shapes)
- Ruler and pencil (for planning geometric patterns)
- Compass (optional, for circles)
- Damp sponge for cleanup
- Soft brush for dust removal
Step-by-Step Directions:
- Prepare the Surface: Ensure your mug is at the leather-hard stage – firm enough to hold its shape but soft enough to carve easily. Smooth the surface with a damp sponge.
- Plan Your Design: Lightly sketch your geometric pattern onto the mug with a pencil. Start with simple lines or shapes, then build complexity. Consider repetition and symmetry.
- Begin Carving: Using a fine-tipped carving tool, carefully incise your design into the clay. Control the depth and consistency of your lines. For textured areas, use a broader tool or repetitive marks.
- Clean as You Go: Periodically use a soft, damp brush or sponge to remove clay crumbs and dust from your carved areas to maintain crisp lines.
- Refine Details: Once the main pattern is carved, go back with smaller tools to refine edges, deepen lines, or add intricate details.
- Handle Attachment: Attach your chosen handle (e.g., a simple strap handle) to the mug, ensuring not to disturb your carved design. Score, slip, and blend securely.
- Slow Dry & Fire: Allow the carved mug to dry very slowly and evenly to prevent cracks, as carving can create stress points. Bisque fire, then apply clear food-safe glaze and glaze fire.
Pro-Tip: For clean, crisp carved lines, work when the clay is firm leather-hard. If it’s too wet, the lines will be mushy; too dry, and it will be difficult to cut cleanly.

H3: 7. Hand-Painted Underglaze Design Mug

Pin your favorite underglaze patterns here!
A hand-painted underglaze design mug allows for vibrant artistic expression, permanently sealed beneath a protective layer of clear glaze. This technique transforms a bisque-fired mug into a smooth canvas, ready for your artistic touch. Using underglaze paints, you can create intricate, colorful patterns, botanical motifs, or whimsical scenes, ensuring that your ceramic painting ideas stand out. After firing, a clear, food-safe glaze is applied, which not only protects the vibrant underglaze colors but also renders the artistic ceramic mug food-safe and durable for daily use.
Materials Needed:
- Bisque-fired clay mug (smooth, clean surface)
- Underglaze paints in various colors (e.g., AMACO Velvet Underglazes)
- Fine-tipped paint brushes and larger brushes
- Palette or small containers for mixing
- Clear, food-safe glaze (for final coating)
- Pencil (for light sketching)
Step-by-Step Directions:
- Prepare Mug: Ensure your bisque-fired mug is clean and dust-free. Lightly sketch your design onto the mug with a pencil if desired; the pencil lines will burn off in the kiln.
- Apply Underglaze: Using your brushes, apply the underglaze colors to your design. Apply 2-3 coats of each color for opaque, vibrant results, allowing each coat to dry slightly before applying the next.
- Detailing: Use fine-tipped brushes to add intricate details, outlines, or shading to your design.
- Dry Underglaze: Allow the underglaze to dry completely. It will appear dull and matte.
- Apply Clear Glaze: Once the underglaze is dry, carefully apply 2-3 coats of clear, food-safe glaze over the entire mug, including the underglaze. Avoid dripping or pooling.
- Glaze Fire: Fire the mug to the temperature recommended by your underglaze and clear glaze manufacturers (typically Cone 04 for bisque, then Cone 5/6 for stoneware glaze fire).
Pro-Tip: Underglazes appear dull before firing. Always do a test tile with your underglaze and clear glaze combination to see the true fired color, as colors can shift.

H3: 8. Stacked/Segmented Mug with Contrasting Clays

Pin this advanced technique for a truly unique mug!
A stacked/segmented mug with contrasting clays offers an architectural and bold aesthetic, demonstrating advanced hand-building skills. This segmented clay mug is built by joining distinct sections of different clay bodies, such as light stoneware and dark terracotta, to create a striking visual and textural contrast. The key to this unique mug construction is meticulous scoring and slipping to ensure strong, seamless joins between segments, preventing cracks during drying and firing. This architectural ceramic mug creates a modern, layered effect that distinguishes it from more traditional designs.
Materials Needed:
- 1 lb of light stoneware clay (e.g., white or buff)
- 1 lb of darker stoneware clay (e.g., terracotta or dark brown)
- Slab roller or rolling pin with guide sticks
- Fettling knife or cutting tool
- Rib tools (metal and rubber)
- Needle tool
- Slip (made from both clays, or a neutral common slip)
- Water
Step-by-Step Directions:
- Prepare Slabs: Roll out two separate slabs of contrasting clays, each 1/4 inch thick.
- Cut Segments: Cut uniform rectangular or tapered segments from each slab. For example, two from the light clay, one from the dark. Ensure corresponding edges are perfectly matched.
- Join First Segment: Score and slip the mating edges of your first two segments. Carefully align and press them together firmly, blending the seam on both the inside and outside with a rib tool.
- Add Subsequent Segments: Continue to score, slip, and join subsequent segments, meticulously blending each seam to ensure a strong, seamless bond between the different clays.
- Form & Add Base: Once the main body is assembled, shape it into your desired mug form. Cut a base from one of your clays, score and slip it onto the bottom, blending securely.
- Create & Attach Handle: Construct a simple strap or pulled handle from one of the clays (or a blend). Score and slip the handle to the mug body, ensuring the attachment points are strong.
- Slow Dry & Fire: Due to the different clays and multiple joins, very slow and even drying is critical to prevent cracking. Cover loosely and dry for at least 2 weeks. Bisque fire, then apply clear food-safe glaze and glaze fire.
Pro-Tip: When joining different clay bodies, ensure their shrinkage rates are compatible to minimize stress and prevent cracking during drying and firing. Research your chosen clays beforehand.

H3: 9. Air-Dry Clay Decorative Mug (Not Food-Safe)

Pin this adorable air-dry clay craft idea for home decor!
An air-dry clay decorative mug offers an accessible and fun craft project for home decor, requiring no kiln for hardening. This no kiln pottery is perfect for creating whimsical designs, pencil holders, or small decorative clay crafts. While it’s easy to work with and allows for immediate gratification, it’s crucial to understand that air dry clay is not food safe for drinking. After sculpting, painting, and applying a waterproof sealant, this beginner air dry clay project results in a charming piece that adds a personal touch to any room.
Materials Needed:
- 1-2 lbs of non-toxic air dry clay
- Basic clay tool set (modeling tools, roller)
- Water in a small bowl
- Acrylic paints or markers (for decoration)
- Clear waterproof sealant or varnish (e.g., Mod Podge Outdoor, acrylic spray)
- Fine sandpaper (optional, for smoothing after drying)
Step-by-Step Directions:
- Form the Mug Body: Use either a pinch pot, coil, or slab technique (as described in previous ideas) to create your desired mug shape. Air dry clay is forgiving, so experiment!
- Add Details & Handle: Sculpt any decorative elements (e.g., small mushrooms, flowers, textures). Form and attach a handle using scoring and slipping (though less critical for air-dry clay, it ensures a stronger bond).
- Smooth & Dry: Smooth all surfaces with damp fingers or a sponge. Place the mug in a well-ventilated area away from direct sunlight or heat to dry thoroughly. This can take 24-72 hours or more, depending on thickness and humidity.
- Refine (Optional): Once completely dry, you can lightly sand any rough spots.
- Decorate: Paint your dried mug with acrylic paints, using multiple thin coats for best coverage. Allow paint to dry.
- Seal for Durability: Apply 2-3 coats of a clear waterproof sealant or varnish, allowing each coat to dry completely. This will provide some water resistance and durability, but the mug will not be food-safe or suitable for liquids.
Important Note: While air-dry clay is great for decorative crafts, it is generally NOT food-safe or waterproof. Always use a proper kiln-fired clay and food-safe glazes for functional drinking mugs.

H3: 10. Ergonomic Thumb Rest Mug

Save this ergonomic design for ultimate mug comfort!
An ergonomic thumb rest mug is meticulously designed for user comfort, enhancing the natural grip and stability of the mug. This functional mug design integrates a sculpted thumb rest seamlessly into the handle or upper body, creating a truly comfortable ceramic mug. Crafted from durable stoneware clay, the goal is a well-balanced form that feels natural in the hand, minimizing strain. This hand built mug comfort allows for a unique tactile experience, turning an everyday object into a thoughtfully designed piece of pottery.
Materials Needed:
- 1.5-2 lbs of stoneware clay
- Basic pottery tool set (needle tool, loop tool, rib)
- Slip and water
- Your own hand for testing comfort
Step-by-Step Directions:
- Form the Mug Body: Create a mug body using any hand-building technique (slab, pinch, coil). Ensure it’s sturdy and well-balanced.
- Create the Handle: Form a strap or pulled handle, making it a bit wider or thicker where the thumb rest will be.
- Roughly Attach Handle: Score and slip the handle to the mug body at the leather-hard stage. Blend the joins, but don’t finalize the thumb rest yet.
- Sculpt the Thumb Rest: While the clay is still pliable, hold the mug as you would to drink. Use your thumb to gently indent and sculpt a comfortable resting place directly on top of the handle, or on the mug body just above the handle’s top attachment.
- Refine Ergonomics: Continuously test the feel with your hand, adjusting the curve and depth of the thumb rest until it feels natural and supportive. Use small modeling tools or your finger to smooth and refine the shape.
- Finalize Joins: Once the thumb rest is perfect, go back and ensure all handle joins are meticulously blended and strong.
- Slow Dry & Fire: Dry slowly and evenly until bone dry. Bisque fire, then apply food-safe glaze and glaze fire to appropriate stoneware temperatures.
Lesson Learned: A truly ergonomic design is iterative. Don’t be afraid to sculpt, test, and reshape the thumb rest multiple times while the clay is still workable. Your hand is the best design tool for comfort!

H3: 11. Minimalist Glazed Mug with Clean Lines

Pin this elegant minimalist mug for timeless style!
A minimalist glazed mug with clean lines embodies sophisticated simplicity, focusing on precision of form and a flawless finish. This minimalist clay mug prioritizes a sleek, geometric body and an understated handle, making the pure aesthetic the central element. Achieving a flawlessly smooth, single-color matte or glossy glaze is crucial, as any imperfections will be highlighted. Crafted from smooth, fine-grained stoneware clay, this modern ceramic design demands meticulous smoothing and precise construction, resulting in elegant and timeless hand built minimalist pottery.
Materials Needed:
- 1.5 lbs of smooth, fine-grained stoneware clay
- Slab roller or rolling pin with accurate guide sticks
- Flexible metal rib and rubber rib
- Fettling knife and needle tool
- Slip and water
- Fine sandpaper (for pre-glaze smoothing)
- High-quality, single-color food-safe glaze (matte or glossy)
Step-by-Step Directions:
- Precision Slab Preparation: Wedge clay meticulously. Roll out a perfectly even slab (1/4 inch) using precise guide sticks. Ensure the slab surface is immaculate.
- Cut & Join Body: Using a ruler and fettling knife, cut a precise rectangle for the mug body and a perfect circle for the base. Score and slip the vertical seam, then join and blend seamlessly using a metal rib, ensuring the cylinder is perfectly vertical.
- Attach Base: Score and slip the base to the cylinder, joining and blending with extreme care to achieve a flawless transition.
- Smooth & Refine: Use flexible metal ribs and damp sponges to meticulously smooth all interior and exterior surfaces. Remove any imperfections. Ensure the rim is perfectly even and smooth.
- Create & Attach Handle: Design a simple, understated handle (e.g., a thin strap or a subtle integrated finger-hole). Score and slip with precision, blending the joins cleanly, ensuring it complements the minimalist form.
- Slow Dry & Bisque Fire: Dry very slowly and evenly. Once bone dry, bisque fire.
- Glaze Application: After bisque firing, lightly sand any remaining imperfections. Apply your chosen single-color, food-safe glaze with extreme care, ensuring even coverage and no drips. Dip or spray application is ideal for a smooth finish.
- Glaze Fire: Glaze fire to the recommended temperature for your chosen clay and glaze.
Pro-Tip: For truly clean lines and smooth surfaces, meticulously smooth the clay at every stage, from plastic to leather-hard. Even tiny imperfections will be amplified by a solid glaze.

Key Takeaways: Your Quick Guide to Crafting Clay Mugs
Creating unique, functional, and beautiful clay mugs through hand-building techniques is an incredibly rewarding journey. It allows for profound personal expression and produces items of lasting value. As you embark on or continue your pottery adventure, remembering a few core principles will ensure your success and enjoyment.
- Choose the Right Clay: For durable, food-safe mugs that will stand the test of time, stoneware clay is the go-to choice, requiring kiln firing for proper vitrification and safety. If your project is purely decorative, air-dry clay offers a fun, no-kiln alternative, but it’s important to remember it’s generally not suitable for liquids or food.
- Master Hand-Building Basics: The beauty of hand-building is its accessibility. Techniques like pinch pot, slab building, and coiling are fundamental and allow for a wide range of forms and textures without the need for a pottery wheel. These methods emphasize direct connection with the material and foster intuitive sculpting skills.
- Prioritize Strong Joins: The longevity and structural integrity of your mug heavily depend on how well its parts are connected. Always score and slip diligently when attaching handles, bases, or segments. This crucial step, along with proper compression, creates a robust, seamless bond that prevents cracking during the rigorous drying and firing processes.
- Dry Slowly: Patience is a virtue in pottery, especially during drying. Uneven or rapid drying is a leading cause of cracks and warping. Covering your greenware mug loosely with plastic and allowing it to dry slowly and evenly over several days or even weeks helps equalize moisture loss, ensuring a structurally sound piece ready for the kiln.
- Food Safety is Key: For any mug intended for drinking, food safety is paramount. This means selecting food-safe glazes and firing your mug to the exact temperature recommendations for your chosen clay and glaze. Proper firing ensures the clay becomes vitreous (non-porous) and that the glaze forms a durable, non-leaching surface. Always verify the safety ratings of your materials.
FAQs About clay mug ideas
Here are some common questions people ask about creating their own clay mugs, from initial design ideas to final safety considerations.
What is the easiest way to make a clay mug for beginners?
The pinch pot method is generally considered the easiest for beginners. It involves shaping a ball of clay directly with your hands, requiring minimal tools and offering an intuitive, organic approach to forming a mug. Slab building is also very beginner-friendly once you master rolling even slabs.
Can I make a clay mug without a pottery wheel?
Yes, absolutely! Many beautiful and functional clay mugs are created using hand-building techniques like slab construction, pinch pots, or coiling, which require no pottery wheel. These methods offer immense creative freedom and are perfect for beginners.
Is air dry clay food safe for mugs?
Generally, no. Air dry clay is not porous and cannot withstand liquids reliably without cracking or deteriorating over time. It is not designed to be food-safe or waterproof for drinking. It’s best used for decorative mugs or other non-functional items only, even with sealants.
How do I prevent my clay mug from cracking?
Prevent cracking by ensuring consistent wall thickness throughout the mug, scoring and slipping all joins securely, and most importantly, allowing the mug to dry slowly and evenly. Covering it partially with plastic helps control moisture loss gradually.
What kind of clay is best for making functional mugs?
Stoneware clay is widely recommended for functional mugs because it fires to high temperatures, making it vitreous (non-porous), durable, and inherently food-safe when paired with food-safe glazes. Earthenware can also be used, but typically requires more robust glazing to ensure it is waterproof.
Final Thoughts
Embarking on the creation of your own clay mugs is a deeply satisfying endeavor, blending artistic vision with practical skill. Each handmade mug carries a piece of your creativity, transforming simple clay into a functional art piece that can bring joy to your daily rituals. Embrace the journey of learning and experimentation, understanding that the unique qualities of handmade pottery are its greatest strength. Whether you aim for a minimalist design, a textured organic form, or a mug with a sculptural handle, the techniques and ideas explored here empower you to craft truly personalized ceramics. The satisfaction of holding a mug you’ve shaped with your own hands, knowing it’s both beautiful and safe, is unparalleled.
Which of these 11 clay mug ideas are you most excited to try first, and what unique design will you add to make it your own? Share your pottery dreams in the comments below!
Last update on 2026-03-13 / Affiliate links / Images from Amazon Product Advertising API


