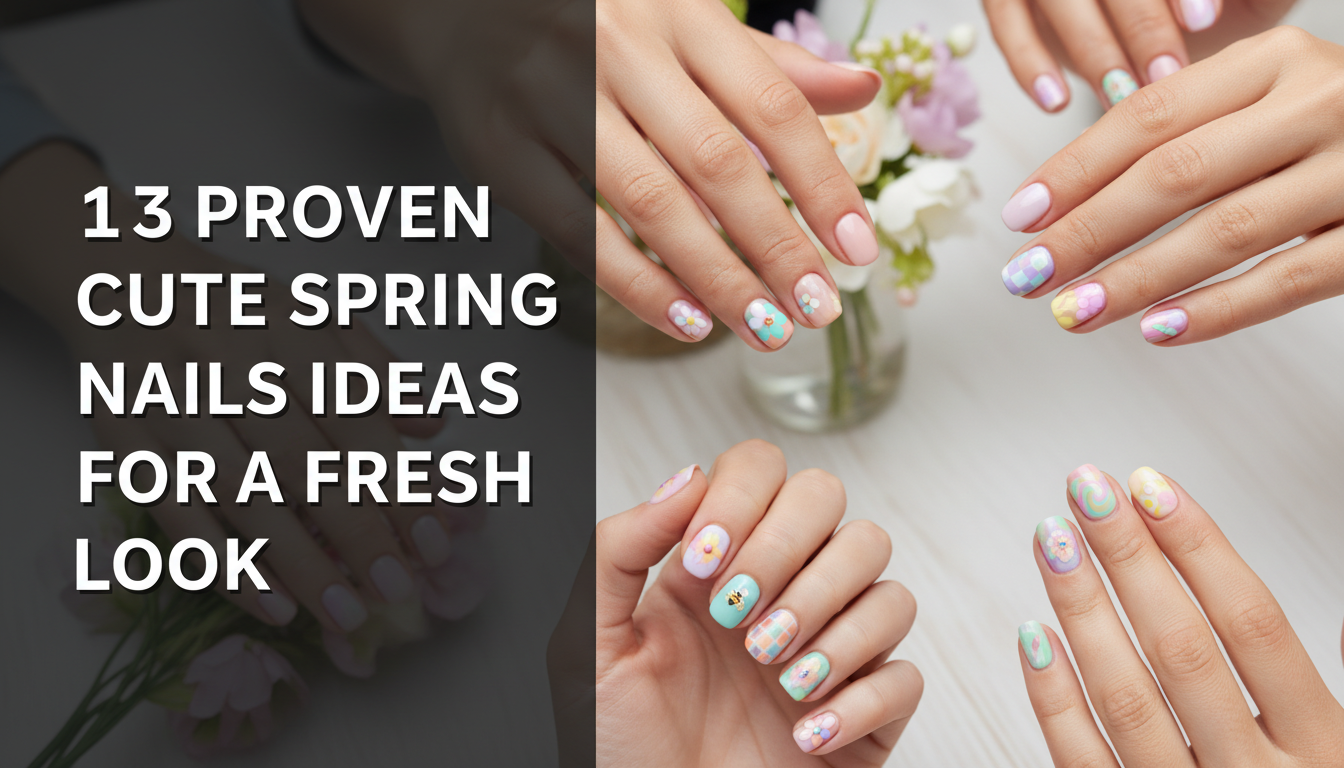
Struggling to find the perfect nail design to welcome the new season? You’re looking for fresh, stylish, and undeniably cute spring nails, but endless scrolling leaves you with more confusion than inspiration.
Cute spring nails for 2026 embrace a spectrum of soft pastels, delicate florals, minimalist designs, and playful accents, offering a fresh and vibrant look perfect for the season’s renewal. These trends focus on charm, elegance, and easy-to-achieve aesthetics suitable for various nail lengths and shapes.
Drawing from established best practices and current design patterns, this guide presents 13 proven ideas to refresh your look. You will discover actionable steps for achieving the most sought-after styles of the season. Let’s dive into the designs that will define your spring style.
Embrace Spring’s Radiance: Your Ultimate Guide to Cute Spring Nails 2026
As the world outside begins to bloom, it’s the perfect time to let your personal style reflect the season’s vibrant energy. This guide is your ultimate resource for discovering the most enchanting spring nail ideas for 2026. We’ve curated a collection of proven designs that capture the essence of spring, from the soft whisper of pastel colors to the joyful declaration of floral patterns. Whether you prefer a classy spring nails look or something more playful, these ideas are designed to inspire. We’ll explore how different attributes like color, art, and nail shapes—such as short spring nails or elegant almond shaped spring nails—work together to create a look that is uniquely you. Get ready to find your next favorite manicure and embrace the fresh, adorable, and radiant aesthetic of spring.
13 Proven Cute Spring Nails Ideas for a Fresh 2026 Look
Finding the perfect cute spring nail designs can feel like searching for a four-leaf clover. You want something fresh, stylish, and achievable. This curated list of 13 proven ideas is designed to end that search. Here, we break down the most popular spring nail trends, offering everything from easy spring nails you can do at home to more intricate spring nail art ideas for your next salon visit. Each idea maps out how different elements, like pastel nail colors and specific nail art tools, combine to create a stunning final look. This section will fulfill the promise of delivering actionable inspiration, moving you from simply viewing ideas to creating your own beautiful fresh spring nail styles.
1. Pastel Ombre Spring Nails

Pin this seamless pastel ombre spring nail look to your “Nail Inspo” board!
Pastel ombre nails are the epitome of spring, combining two of the season’s biggest trends: soft colors and graceful transitions. This easy spring nail art uses a gentle gradient effect, blending complementary pastel nail colors like lavender and mint for a dreamy, cloud-like finish. The look is especially stunning on almond shaped spring nails, where the shape enhances the elongated color flow. This design is often created using gel nail polish to achieve the smoothest blend, making it a popular request for a fresh spring manicure.
What You Need:
- Base Coat: Long-lasting, chip-resistant formula.
- Pastel Gel Polishes: Two complementary shades (e.g., lavender and mint green) known for smooth application.
- Makeup Sponge: Small, dense, non-latex sponge for blending.
- Top Coat: High-gloss, non-wipe gel top coat.
- UV/LED Nail Lamp: 48W or higher for efficient curing.
- Nail File & Buffer: Fine-grit for shaping and smoothing.
- Rubbing Alcohol & Lint-Free Wipes: For cleansing.
How to Create This Look:
- Prep Nails Thoroughly: File and shape nails to a clean almond or oval shape, gently push back cuticles, and buff the surface for adhesion. Cleanse with rubbing alcohol.
- Apply Base Coat: Apply a thin layer of base coat and cure under the UV/LED lamp for 30-60 seconds.
- Create Ombre Gradient on Sponge: On a small piece of foil, brush a line of each pastel gel polish side-by-side, slightly overlapping where they meet.
- Dab onto Nails: Gently dab the makeup sponge onto the polish on the foil, then lightly press and dab the sponge onto your nail, moving it slightly up and down to blend the colors.
- Cure Each Layer: Flash cure for 10-15 seconds, then repeat steps 3-4 for 2-3 coats until desired opacity and blend are achieved, curing each layer.
- Apply Top Coat & Final Cure: Finish with a generous layer of high-gloss top coat, ensuring full coverage, and cure for 60 seconds (or according to lamp instructions). Cleanse any tacky layer.
Pro-Tip: For the most seamless ombre spring nail blending techniques, ensure your gel polishes are not too thick. Apply thin, even coats and use a clean brush to gently feather the colors together at the transition point before dabbing with the sponge.

2. Dainty Floral Accent Spring Nails

Save this dainty floral spring nail design for your next manicure!
Nothing says spring quite like flowers, and dainty spring nails with floral accents are a timeless choice. This look focuses on creating delicate floral spring nails using simple tools, making it one of the best ideas for easy DIY cute spring nail designs at home for beginners. The charm of blossom nail art lies in its subtlety, often featuring tiny, hand-painted flowers or easy-to-use nail decals on a sheer or milky base. This design is perfect for short natural nails, providing a practical yet beautiful way to celebrate the season.
What You Need:
- Sheer Base Polish: Milky white or clear polish.
- White Gel Polish/Acrylic Paint: For flower petals.
- Pale Yellow Gel Polish/Acrylic Paint: For flower centers.
- Fine Detail Nail Art Brush: Size 00 or smaller.
- Dotting Tool: For precise centers.
- Top Coat: High-gloss or matte finish.
- UV/LED Lamp (if using gel):
- Rubbing Alcohol & Lint-Free Wipes:
How to Create This Look:
- Prep and Base Coat: After basic nail prep, apply 1-2 thin coats of sheer milky white base polish. Cure if using gel.
- Paint Petals: Dip your fine detail brush into the white paint/polish. Create 5 small, slightly curved strokes in a circle to form a daisy petal on your chosen accent nails. Repeat for 1-2 flowers per nail.
- Add Centers: Using a dotting tool, place a small dot of pale yellow in the center of each white flower.
- Optional Leaves/Stems: With a touch of light green, add tiny leaves or stems if desired for extra detail.
- Seal with Top Coat: Once designs are dry (or cured), apply a layer of top coat to protect your design and add shine/matte finish. Cure if using gel.
Pro-Tip: For the most delicate florals, ensure your brush is not overloaded with polish. Practice on a piece of paper first to get the feel for tiny strokes. Using nail art brushes with synthetic bristles allows for sharper lines and easier cleaning.

3. Minimalist French Tip Spring Nails

Pin this chic minimalist spring French tip idea!
The classic French manicure gets a modern, spring-appropriate update with this minimalist design. Minimalist spring nails are all about clean lines and subtle details. This look reimagines the traditional white tip with a delicate line of pastel nail polish, creating what is known as micro French tips spring. This style is perfect for those who want classy short spring nails that are both sophisticated and on-trend. The use of a sheer base and a pop of color on the tip provides a classy look that is versatile enough for both work and play, especially on a clean square nail shape.
What You Need:
- Clear Base Coat: Or a sheer nude/pink polish.
- Pastel Nail Polish: A light spring color like baby blue, pale yellow, or soft pink.
- Fine Striping Brush: Or a very thin nail art brush.
- Top Coat: High-gloss for a crisp finish.
- Nail Polish Remover & Small Clean-up Brush: For perfecting lines.
How to Create This Look:
- Prep and Base: Apply your chosen base coat (clear or sheer nude) and allow it to dry completely.
- Prepare Striping Brush: Dip your fine striping brush into the pastel polish, wiping off excess for a thin line.
- Draw the Tip: Starting from one side of your nail, near the free edge, draw a very thin, slightly curved line across to the other side. Aim for a delicate, barely-there tip.
- Clean Up (Optional): If needed, dip a small clean-up brush in remover to sharpen any uneven edges.
- Seal with Top Coat: Once the pastel tips are dry, apply a high-gloss top coat to seal the design and add shine.
Pro-Tip: For perfectly crisp micro French tips spring, use a very fine nail art brush and ensure your base coat is completely dry. Drawing the tip in one swift, steady motion can help avoid shaky lines.

4. Playful Daisy Dot Spring Nails

Pin this playful daisy dot spring nail idea for a touch of fun!
For a look that’s pure joy and incredibly simple to create, these playful spring nail designs are a perfect choice. Using just a dotting tool, you can create adorable daisies against a backdrop of vibrant hues like sky blue. This is a fantastic example of easy nail art that looks impressive and is especially fitting for cute spring nails for teens school appropriate. The technique involves using dots to create both the petals and the center of the daisies, making it a fun and accessible way to achieve a bright daisy nails look without needing advanced painting skills.
What You Need:
- Base Color: A vibrant spring shade (e.g., sky blue, soft green).
- White Nail Polish: For daisy petals.
- Bright Yellow Nail Polish: For daisy centers.
- Dotting Tool Set: With various sizes.
- Top Coat: For shine and protection.
How to Create This Look:
- Base Coat Application: Apply 2 thin coats of your chosen vibrant base color. Allow to dry completely.
- Create Petals: Using a medium-sized dotting tool dipped in white polish, create 5-6 small dots in a circle to form a daisy shape on your desired nails. You can place a few scattered daisies or focus on one accent nail.
- Add Centers: With a smaller dotting tool dipped in bright yellow polish, place a single dot in the center of each white daisy.
- Seal and Shine: Once all dots are dry, apply a generous layer of top coat to smooth and protect the design.
Pro-Tip: For perfect, round dots that don’t drag, ensure your dotting tool has enough polish but isn’t dripping. Redip for each dot if necessary. Experiment with different dotting tool sizes for varied petal effects.

5. Shimmering Chrome Accent Spring Nails

Capture the glow! Pin these shimmering chrome spring nails!
Are chrome spring nails still trendy? Absolutely, but for spring, the trend leans towards subtle, shimmery accents rather than full-on metallic. These shimmery spring nails feature a delicate iridescent pearl chrome effect applied over a nude or pastel gel polish base. This creates a sophisticated glow that catches the light beautifully. The chrome powder spring application can be focused on an accent nail, along the cuticle for a “reverse French” look, or as a sheer wash over the entire nail. It’s a modern way to add a touch of glamour to your spring manicure.
What You Need:
- Nude or Pastel Gel Polish: Your chosen base color.
- No-Wipe Gel Top Coat: Crucial for chrome adhesion.
- Iridescent Chrome Powder: Pearl or soft pastel shade.
- Eyeshadow Applicator/Silicone Tool: For rubbing in powder.
- Soft Dusting Brush: To remove excess powder.
- UV/LED Nail Lamp:
How to Create This Look:
- Prep and Base Color: After nail prep, apply 2 coats of your nude or pastel gel polish, curing each layer.
- Apply No-Wipe Top Coat: Apply a thin, even layer of no-wipe gel top coat and cure for 30-45 seconds (timing is crucial; it should be tacky but not wet).
- Rub in Chrome Powder: Using an eyeshadow applicator or silicone tool, gently rub a small amount of chrome powder onto the tacky top coat. For accents, focus on specific areas like the cuticle or tip.
- Dust Off Excess: Use a soft dusting brush to gently remove any loose chrome powder.
- Seal with Top Coat: Apply another layer of no-wipe top coat to encapsulate the chrome and cure for 60 seconds.
Pro-Tip: The key to a flawless chrome powder spring application is applying the powder to a perfectly cured (but still slightly tacky) no-wipe top coat. If it’s too wet, it won’t adhere; if too dry, it won’t shine evenly. Experiment with curing times based on your lamp.

6. Watercolor Bloom Spring Nails

Let your spring nails bloom! Pin this watercolor nail art inspo!
For a truly artistic and romantic look, watercolor nail art spring designs offer an ethereal beauty that is hard to match. This technique uses blooming gels or alcohol inks to create soft, diffused floral patterns that mimic a watercolor painting. These delicate spring nail designs are often seen in Korean nail art spring styles, known for their soft and dreamy aesthetic. The beauty of this abstract spring nails look is that it’s unique every time; the way the watercolor creates blends is organic and fluid, resulting in a one-of-a-kind manicure.
What You Need:
- Clear Base Gel Polish: Or a sheer nude/white base.
- Watercolor Gel Polishes/Alcohol Inks: Various pastel shades (pink, peach, green).
- Clean-up Brush: Or a small detail brush.
- Rubbing Alcohol (for inks) or Clear Gel Top Coat (for gels): For spreading/blending.
- Matte or Glossy Top Coat:
- UV/LED Nail Lamp:
How to Create This Look:
- Prep and Base: Apply your clear or sheer base gel and cure.
- Apply Color Dots: Place small dots of your chosen watercolor gel polishes or alcohol inks onto the nail. Don’t cure the gel at this stage.
- Blend and Bloom: If using gels, dip a clean-up brush into clear gel top coat (or rubbing alcohol for inks) and gently dab or feather the edges of the dots to create a blurred, watercolor effect. The colors will spread and blend.
- Cure: Once satisfied with the bloom effect, cure the gel under your UV/LED lamp.
- Seal: Finish with a matte or glossy top coat to protect and seal the design, then cure.
Pro-Tip: For authentic watercolor nail art spring effects with gel, work quickly with your blending brush before the gel self-levels too much. With alcohol inks, use tiny drops and let them react, then blend sparingly.

7. Geometric Pastel Pattern Spring Nails

Get sharp! Pin these geometric pastel spring nails for modern elegance.
Combining the softness of pastels with the sharpness of clean lines, geometric spring nails offer a modern and chic alternative to florals. This style works exceptionally well as spring nail art for short square nails, where the straight edges of the nail complement the geometric shapes. The design can be as simple or complex as you like, from a single diagonal line to intricate patterns of triangles and blocks. Using fine striping tape is the secret to achieving perfectly crisp lines, making this a great option for those who love precision in their minimalist spring nail designs.
What You Need:
- Base Color: A light pastel shade (e.g., peach, nude pink).
- Accent Colors: 2-3 contrasting pastel polishes (e.g., mint, lavender, blue).
- Fine Striping Tape: Or a very thin nail art brush.
- Tweezers: For applying/removing tape.
- Top Coat: Matte or glossy.
How to Create This Look:
- Base Coat: Apply your base pastel color and let it dry completely.
- Apply Striping Tape: Once dry, use tweezers to carefully apply thin strips of tape in your desired geometric patterns (e.g., triangles, diagonal lines). Press down firmly to prevent polish from bleeding.
- Paint Accent Colors: Paint the areas defined by the tape with your accent pastel colors.
- Remove Tape: While the accent polish is still wet (crucial for crisp lines), carefully remove the striping tape with tweezers.
- Dry and Top Coat: Allow the design to fully dry, then apply a top coat to seal and protect your geometric masterpiece.
Pro-Tip: For the cleanest geometric spring nail designs, ensure your base color is completely dry before applying tape. Remove the tape while the accent polish is still wet to prevent chipping and messy lines.

8. Glazed Donut Spring Nails

Craving this shimmer? Pin these glazed donut spring nails!
The glazed donut nails trend spring edition is all about a subtle, healthy-looking sheen. These shimmery spring nails are a step up from a simple nude manicure, offering a pearlescent finish that looks effortlessly chic. The look is achieved by applying a sheer, milky pink or nude gel polish and then burnishing it with a fine white or iridescent chrome powder. The result is not glittery or metallic but a luminous, ‘glazed’ effect that makes it one of the most requested simple spring nails with a high-fashion twist.
What You Need:
- Sheer Milky Pink/Nude Gel Polish: Or a similar translucent base.
- No-Wipe Gel Top Coat: Essential for chrome adhesion.
- White or Iridescent Chrome Powder: For the pearlescent effect.
- Eyeshadow Applicator/Silicone Tool:
- Soft Dusting Brush:
- UV/LED Nail Lamp:
How to Create This Look:
- Prep and Base Color: After nail prep, apply 1-2 thin coats of your sheer milky pink gel polish, curing each layer.
- Apply No-Wipe Top Coat: Apply a thin layer of no-wipe gel top coat and cure for 30-45 seconds (it should be slightly tacky).
- Rub in Chrome Powder: Using an applicator, gently rub a small amount of chrome powder onto the cured top coat until you achieve the desired pearlescent sheen.
- Dust Off Excess: Lightly brush away any excess powder with a soft brush.
- Seal with Top Coat: Apply another layer of no-wipe top coat to seal the chrome, then cure for 60 seconds.
Pro-Tip: The secret to perfect glazed donut spring nails is to use a very sheer, almost translucent base color. This allows the chrome powder to give a luminous glow rather than an opaque metallic finish.

9. Vibrant Butterfly Spring Nails

Flap into fashion! Pin these vibrant butterfly spring nails!
Embrace transformation with vibrant spring nails featuring beautiful butterfly motifs. This design is a perfect example of spring nail art incorporating fruits or animals, adding a playful and symbolic touch to your look. You can achieve this style using detailed nail stickers for a quick and perfect application, or by trying hand-painted micro details spring for a more artistic, custom finish. This look is particularly striking on longer coffin spring nails, which provide a larger canvas for the intricate wing designs.
What You Need:
- Clear Base Coat: Or a light nude polish.
- Vibrant Nail Polishes/Gel Paints: (e.g., bright blue, yellow, orange, black for details).
- Butterfly Nail Decals/Stickers: (for easier application) OR Fine Detail Nail Art Brush.
- Top Coat: Glossy finish.
- Tweezers (for decals):
- UV/LED Lamp (if using gel):
How to Create This Look:
- Prep and Base: Apply 1-2 coats of your clear or light base polish. Cure if using gel.
- Apply Decals (Option A): If using decals, apply them carefully using tweezers to your accent nails. Gently press down and smooth out any air bubbles.
- Hand-Paint Butterflies (Option B): If hand-painting, use your fine detail brush and vibrant polishes to paint butterfly wing shapes. Start with the main colors, then add black outlines and intricate details. Cure each color layer if using gel.
- Seal with Top Coat: Once the design is complete and dry (or cured), apply a generous layer of top coat to protect the intricate details and add shine.
Pro-Tip: For the most seamless vibrant butterfly spring nails using decals, ensure your top coat fully encapsulates the sticker to prevent lifting. If hand-painting, work in thin layers and allow each color to dry (or cure) before adding the next to prevent muddying.

10. Modern Abstract Swirl Spring Nails

Unleash your inner artist! Pin these modern abstract swirl spring nails!
For a contemporary take on spring nail art, minimalist abstract spring nails offer a chic and artistic vibe. This modern spring nails style involves creating free-flowing swirls and lines with a curated palette of pastel colors, often on a clear or nude base. The beauty of these playful patterns is their imperfection; each nail is a unique piece of art. The technique is similar to how watercolor creates blends, but with more defined lines, offering a perfect balance between soft colors and modern design.
What You Need:
- Clear Base Coat: Or a sheer nude/white polish.
- Pastel Gel Polishes/Nail Art Paints: (e.g., pale pink, sage green, muted gold).
- Fine Detail Nail Art Brush: Or a toothpick/dotting tool.
- Top Coat: Matte or glossy.
- UV/LED Lamp (if using gel):
How to Create This Look:
- Prep and Base: Apply your clear or sheer base coat and cure if using gel.
- Apply Color Dots/Lines: Place small dots or thin lines of your chosen pastel colors randomly on the nail.
- Swirl: Using a fine detail brush or a toothpick, gently swirl and drag the colors together to create abstract patterns. Don’t overmix; let the colors flow.
- Cure (if using gel): If using gel, cure after you’re happy with the swirl design.
- Seal: Apply a matte or glossy top coat to finish and protect your abstract art.
Pro-Tip: For truly modern abstract swirl spring nails, don’t aim for perfection. Let the colors organically blend and move. Less is often more with abstract designs; start with a few dots and build up if desired.

11. Minimalist Negative Space Spring Nails

Embrace the subtle! Pin these minimalist negative space spring nails!
One of the most sophisticated trends is minimalist spring nail designs with clear polish, also known as negative space nail art spring. This style celebrates the beauty of the natural nail by leaving parts of it unpolished, creating a design that is both airy and chic. The look is often achieved with simple lines, dots, or geometric shapes in a single pastel color against the bare nail. It’s an incredibly versatile and classy short spring nails option that speaks volumes with its subtlety and is a perfect example of delicate nail artwork spring.
What You Need:
- Base Coat: Clear, for protection.
- Pastel Nail Polish: A single light shade (e.g., soft lavender, baby pink).
- Fine Detail Nail Art Brush/Pen: For drawing lines/dots.
- Top Coat: Glossy.
- Nail Polish Remover & Clean-up Brush: For precision.
How to Create This Look:
- Prep and Base: Apply a clear base coat to prepped nails to protect them. Let dry completely.
- Create Designs: Using your fine detail brush or nail art pen, carefully draw thin lines, small dots, or simple geometric shapes onto the nail, leaving intentional areas of your natural nail visible.
- Clean Up: Immediately use a clean-up brush dipped in remover to perfect any lines or remove mistakes.
- Seal: Once your design is completely dry, apply a glossy top coat to seal and protect your minimalist look.
Pro-Tip: For flawless minimalist negative space spring nails, less is more. Focus on clean, crisp lines and shapes. If using a nail art pen, gently press for consistent flow.

12. Delicate Butterfly Wing Tip Spring Nails

Grace your fingertips! Pin these delicate butterfly wing tip spring nails!
This artistic design offers a unique twist on both French manicures and butterfly motifs. These delicate spring nail designs feature the upper curve of a butterfly wing painted along the tip of the nail, creating an elegant reverse french spring tips effect. The design often incorporates a soft gradient of pastel colors to mimic the natural beauty of butterfly wings. It’s a style that requires precision and hand-painted micro details spring, resulting in a truly bespoke and eye-catching look that is both whimsical and sophisticated.
What You Need:
- Sheer Nude Gel Polish: Or a similar translucent base.
- Pastel Gel Polishes: Two complementary shades (e.g., peach and light blue).
- Fine Detail Nail Art Brush: For outlining and filling.
- Top Coat: Glossy.
- UV/LED Nail Lamp:
How to Create This Look:
- Prep and Base: Apply 1-2 thin coats of sheer nude gel polish and cure each layer.
- Outline Wing Shape: Using your fine detail brush and one pastel gel color, carefully outline the upper curve of a butterfly wing on the tip of your nail, slightly curving down into the sides.
- Fill and Blend: Fill in the outlined area with the same color. Before curing, add a touch of the second pastel color and gently blend where they meet to create a subtle gradient effect.
- Add Details (Optional): Once cured, you can add tiny black dots or lines for more realistic wing details using a very fine brush.
- Seal with Top Coat: Finish with a high-gloss top coat and cure for 60 seconds.
Pro-Tip: Achieving delicate butterfly wing tip spring nails requires a steady hand and patience. Work one nail at a time, and if hand-painting, cure each color layer before moving to the next to prevent bleeding and ensure crisp lines.

13. Ombre Cloud Spring Nails

Dreamy skies on your fingertips! Pin these ombre cloud spring nails!
Capture the beauty of a bright spring day with these dreamy spring nail designs. This look provides beautiful spring nail inspiration from nature, featuring soft, fluffy clouds against a sky-blue base. The cloud shapes are created using a dabbing technique with a sponge and white gel polish, resulting in a gentle, diffused look similar to an ombre effect. It’s a whimsical and creative take on cute spring gel nails that is both calming and cheerful, perfect for welcoming the sunny days ahead.
What You Need:
- Sky Blue Gel Polish: Or a similar light blue shade for the base.
- White Gel Polish: For the clouds.
- Small Makeup Sponge/Stippling Brush: For dabbing and blending.
- No-Wipe Gel Top Coat:
- UV/LED Nail Lamp:
How to Create This Look:
- Prep and Base Color: Apply 2 thin coats of sky blue gel polish, curing each layer.
- Create Clouds: Put a small amount of white gel polish onto a palette. Lightly dab your sponge or stippling brush into the white polish, then gently dab it onto your nail in irregular, soft-edged cloud shapes, especially towards the tips or sides. The dabbing motion will create a diffused, cloudy effect.
- Optional Second Layer: For more opaque clouds, repeat the dabbing process.
- Cure & Top Coat: Cure the white cloud designs, then apply a no-wipe gel top coat and cure for 60 seconds.
Pro-Tip: For truly ethereal ombre cloud spring nails, ensure your sponge or brush isn’t oversaturated with white polish. Light, gentle dabs are key to achieving the soft, diffused look of clouds.

Key Takeaways: Your Quick Guide to Cute Spring Nails
This guide provided a comprehensive look at the top cute spring nails ideas for the season. Here are the main takeaways to help you choose and create your perfect spring look.
- Embrace Pastels & Florals: Cute spring nails are defined by soft pastel colors and delicate floral patterns, offering timeless and fresh aesthetics.
- Actionable DIY & Salon Options: Whether you’re a beginner or seeking advanced styles, there are easy spring nail art techniques and complex designs to create spring nails at home or request professionally.
- Modern Trends Incorporate Texture & Shine: Trends like shimmering chrome accents and glazed donut spring nails add a contemporary and luxurious touch to classic spring nail looks.
- Nail Shape Matters: Popular nail shapes such as short spring nails (practical) and almond shaped spring nails (elegant) significantly influence the overall appeal of any design.
- Precision Tools are Key: Investing in nail art tools like fine detail brushes and dotting tools is crucial for achieving professional spring nail artist tips and intricate designs.
- Experiment with Creative Techniques: From watercolor bloom spring nails to minimalist negative space, don’t shy away from unique spring nail art techniques to express your individual style.
- Prioritize Nail Health for Lasting Beauty: A basic nail care routine including proper prep and top coat application ensures your cute spring nails stay vibrant and chip-free longer.
FAQs About cute spring nails
Here are answers to some of the most common questions about achieving the perfect spring manicure.
What are cute spring nail ideas?
Cute spring nail ideas encompass a variety of fresh, playful, and elegant designs, often featuring soft pastel colors, delicate floral patterns, or minimalist geometric accents. Popular choices include pastel ombre, dainty daisies, subtle chrome details, and modern abstract swirls. These designs aim to capture the essence of renewal and freshness associated with the spring season, offering versatility for different preferences and skill levels.
How to do simple spring nail art at home?
To create simple spring nail art at home, start with properly prepped nails and a good base coat. Easy techniques include applying polish with a dotting tool for simple floral patterns or polka dots, using striping tape for clean geometric lines, or layering sheer pastel polishes for a subtle wash of color. Finishing with a quality top coat is crucial for protecting your design and ensuring longevity.
What are trending spring nail designs for short nails?
Trending spring nail designs for short nails often focus on minimalist styles, micro French tips, subtle glazed finishes, and delicate single-nail accents. These designs prove that short nails can still make a big impact. Think vibrant solid pastels, negative space designs, or small hand-painted details like tiny hearts or single blooms, which complement the practicality of shorter lengths.
Which nail shapes are best for spring 2026?
For spring 2026, popular nail shapes include almond, oval, and short square, reflecting a preference for natural, elegant, and practical styles. Almond and oval shapes lend themselves beautifully to soft designs and elongate the fingers, while short square offers a chic, modern edge that is low-maintenance and versatile for various spring nail art.
Are pastel nails still popular for spring?
Yes, pastel nails remain incredibly popular for spring due to their inherent connection to the season’s gentle aesthetic and refreshing color palette. Soft hues like lavender, mint green, baby blue, and pale pink continue to dominate spring nail trends. They provide a versatile base for intricate designs or can be worn as elegant, standalone colors.
How to make spring nails last longer?
To make spring nails last longer, ensure thorough nail preparation by cleaning, filing, and buffing the nail plate before polish application. Use a quality base coat to prevent chipping and staining, apply thin and even layers of polish, and seal your design with a durable top coat, wrapping the free edge. For gel manicures, proper curing times are essential for longevity.
What are some unique spring nail ideas?
Unique spring nail ideas can involve unconventional color combinations, abstract art, textured finishes, or unexpected motifs like watercolor effects or delicate butterfly wing tips. Consider designs that incorporate negative space, subtle chrome accents that catch the light, or hand-painted micro details that offer a bespoke and artistic touch beyond traditional florals.
How much do spring nails cost at a salon?
The cost of spring nails at a salon varies widely depending on the salon’s location, the type of service (e.g., regular manicure, gel, acrylic), and the complexity of the nail art. A basic manicure can start around $25, while a gel set with intricate, hand-painted spring nail art could range from $60 to over $100. Always confirm pricing with your nail technician beforehand.
What are the latest spring nail trends?
The latest spring nail trends for 2026 emphasize a blend of classic elegance and modern playfulness, featuring popular styles such as minimalist French tips, glazed donut finishes, and delicate floral accents. Expect to see a continued rise in chrome details, sophisticated pastels, abstract patterns, and designs that incorporate negative space, offering fresh takes on seasonal beauty.
What is the difference between spring and summer nail colors?
Spring nail colors typically lean towards softer, more muted pastels and fresh, airy tones, reflecting new beginnings and delicate blooms. In contrast, summer nail colors often transition to brighter, bolder, and more vibrant hues like neons, corals, and electric blues, mirroring the intensity of summer sun and energetic outdoor activities.
Final Thoughts on Cute Spring Nails
As we wrap up our exploration of 13 proven cute spring nails ideas for a fresh 2026 look, it’s clear that the season of renewal brings with it an abundance of inspiration for your fingertips. From the delicate charm of pastel ombre spring nails to the playful whimsy of vibrant butterfly spring nails, each design offers a unique way to express your personal style and embrace the beauty of spring. We’ve delved into everything from achieving shimmering chrome accents to mastering the subtle elegance of minimalist negative space spring nails, providing you with the knowledge and steps to recreate these trending spring nails at home or confidently request them at your salon.
Remember, the key to stunning cute spring nails lies not only in the design itself but also in a proper basic nail care routine and choosing quality products. By leveraging the expert spring nail techniques and insights shared, you’re now equipped to experiment with different spring nail art approaches, ensuring your manicure is not just beautiful, but also long-lasting. Whether you gravitate towards dainty floral accents or prefer the modern edge of geometric pastel patterns, let your creativity bloom.
Which of these cute spring nail ideas are you most excited to try this season? Share your favorites in the comments below
Last update on 2026-04-05 / Affiliate links / Images from Amazon Product Advertising API