Feeling like you need professional-level skills to rock a fun Halloween manicure? If you’ve struggled with shaky hands or designs that look nothing like the tutorial, you’re not alone. The frustration of spending hours on a smudged, messy manicure is enough to make anyone give up.
The easiest way to create Halloween nails for beginners is to use simple tools and iconic designs. Start with a base color like black or orange, then use a dotting tool or a toothpick to create simple ghosts, pumpkins, or spiderwebs. Always finish with a quick-dry top coat to seal the design and prevent smudging. This method is truly beginner-friendly.
Based on tested at home methods and professional secrets, this guide strips away the complexity. You’ll discover 9 genuinely easy to copy designs that look amazing without requiring a steady hand or expensive equipment. Get ready to transform your nails from boring to boo-tiful in minutes.
How Do You Create Easy Halloween Nails for Beginners At Home?
Creating a festive manicure for Halloween doesn’t have to be an intimidating process reserved for those with artistic talent. The key to achieving fun and spooky DIY halloween nails is to lean into simple techniques that deliver a big impact. Forget complex, free-hand drawing; we’re focusing on foolproof methods using basic tools. Many feel they can’t succeed because of shaky hands or a lack of creative ideas, but that’s where choosing the right design makes all the difference. These tutorials are specifically designed to be beginner friendly halloween nails that you can proudly do at home.
This guide is built on easy-to-follow designs that have been tested at home to ensure they are achievable for everyone. We will focus on using simple implements you probably already own, like toothpicks, alongside affordable nail art staples like a dotting tool. You’ll also learn expert tips to tackle common beginner problems like smudging your art or ensuring you get a long lasting manicure that survives all your spooky season fun.
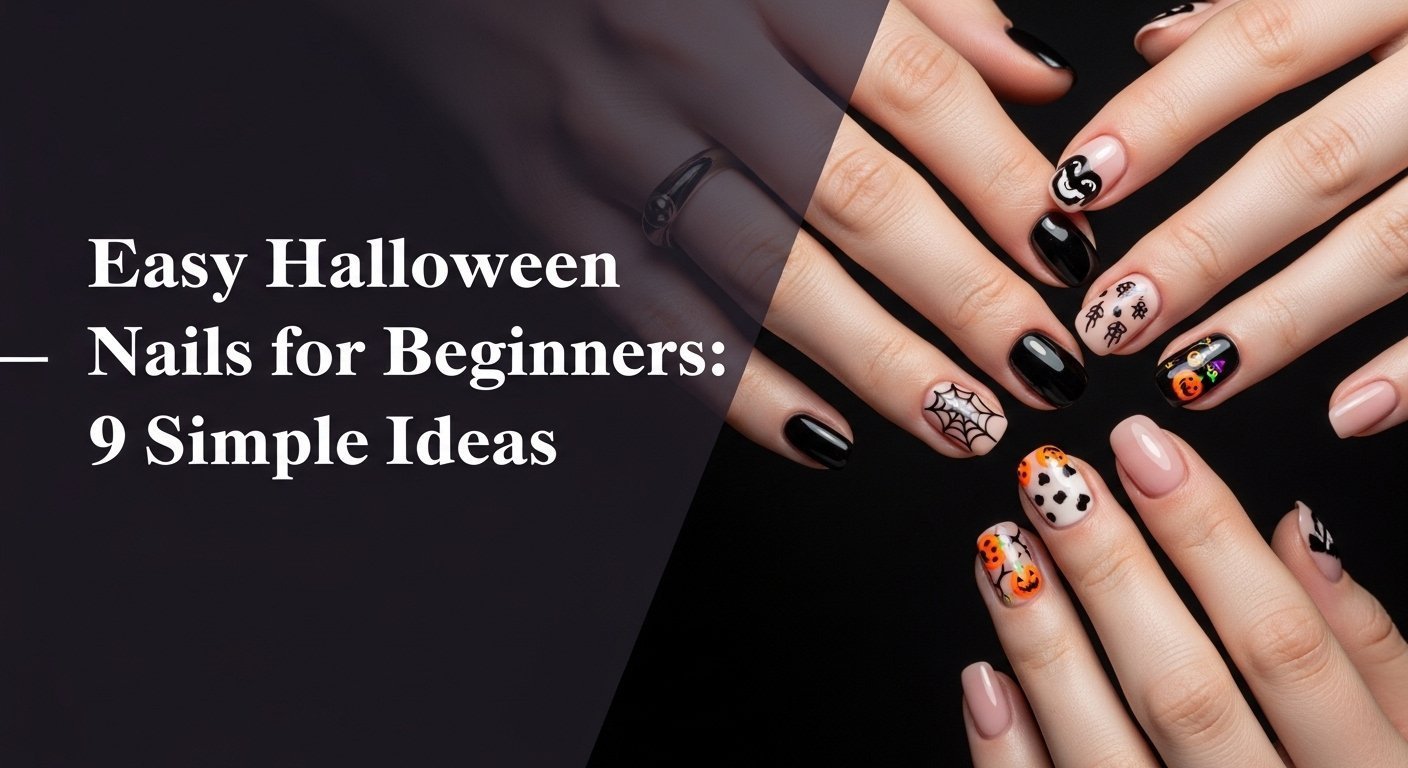
9 Simple Halloween Nail Ideas You Can Actually Do Yourself
Ready to get started? Here are nine beginner halloween nail designs that prove you don’t need to be a nail tech to create a stunning nail art tutorial result. Each of these ideas features a different iconic Halloween theme and uses core tools like nail polish, a top coat, and sometimes a simple striper brush or even just nail stickers. We’ll cover everything from a cute and minimalist ghost to a classic Jack-O’-Lantern, showing you how to create these looks with a clear, step by step approach.
1. Create Cute & Simple Ghost Nails

Pin this adorable ghost design for a last-minute Halloween mani!
This is one of the most popular cute and easy ghost nail designs because it requires no drawing skills. The ghost shape is just a simple, imperfect blob, making it a perfect choice for minimalist spooky nails for beginners or anyone with unsteady hands. Whether you choose a dramatic black or a chic nude + ghost combination, this look is foolproof.
Products & Tools Used
- Black or Nude Nail Polish (as a base)
- Opaque White Nail Polish
- Black Nail Polish
- Fine-tipped dotting tool or a toothpick
- Glossy quick dry top coat
Application Steps
- Apply two coats of your chosen base color (black or nude) and let it dry completely.
- Pour a small drop of white polish onto a piece of foil. Dip your dotting tool or the end of a toothpick into the white.
- Dab a small, slightly elongated blob onto your accent nail to create the ghost’s body. Let it be slightly imperfect for a floaty look.
- Once the white is tacky-dry, dip the very tip of your tool or toothpick into black polish and draw two tiny dots for eyes.
- Seal your design with a generous layer of top coat to smooth everything out and add shine.
Pro-Tip: Don’t have a dotting tool? The ball on the end of a bobby pin works perfectly for creating the ghost body and eyes. This is a classic no tools needed hack.

2. Paint a Classic Jack-O’-Lantern Accent Nail

Save this easy pumpkin nail idea for your next Halloween party!
Knowing how to paint pumpkins on nails is a must for Halloween, and this Jack o lantern design is iconic. The bold black + orange combination is instantly recognizable. The key is to think of the face not as a drawing, but as a collection of simple shapes—triangles and a zig-zag line—making this easy halloween nails step by step tutorial super achievable.
Products & Tools Used
- Bright Orange Nail Polish
- Black Nail Polish
- Thin striper brush or a fine-tipped permanent marker (for a hack)
- Glossy Top Coat
Application Steps
- Paint two coats of bright orange polish on your accent nail. Let it dry completely.
- Pour a small drop of black polish onto foil. Dip the very tip of your striper brush into the black.
- Draw two small triangles for the eyes. Don’t worry about perfection; spooky pumpkins are often uneven.
- Create a small triangle for the nose below the eyes.
- For the mouth, draw a simple zig-zag line.
- Seal the design with a thick top coat once the black is fully dry to prevent smearing.
Pro-Tip: For ultimate control, try a stippling technique. Instead of drawing lines for the face, use the tip of your brush to create a series of tiny connected dots. This gives you more time to correct your placement and is great for shaky hands.

3. Design an Easy Spiderweb Accent Nail

Pin this simple spiderweb design for a touch of spooky elegance!
Learning how to make a spider web on nails is a game-changer for easy spooky nails. This elegant black + white spiderweb design looks intricate but is actually just a series of lines. The process is methodical: draw the “spokes” first, then connect them. This breaks it down into a simple pattern rather than a difficult freehand drawing, making it perfect simple halloween nail art.
Products & Tools Used
- Black (or Orange, or Nude) Nail Polish
- White Nail Polish
- Extra-long, thin striper brush
- Glossy Top Coat
Application Steps
- Paint two coats of your chosen base color and allow it to dry completely.
- Dip your long striper brush in white polish. Starting from one corner of your nail, draw three or four straight lines radiating outwards, like the spokes of a wheel.
- Clean your brush and re-dip. Now, connect the spokes by drawing small, slightly curved “C” shapes between them.
- Repeat with another set of curved lines further out if you have space.
- Let the white dry for a few minutes, then apply a top coat to smooth and protect the design.
Pro-Tip: Create a negative space spiderweb. Use a clear base coat, draw the web with black polish, and then add a matte top coat. This creates a super chic, low-key spooky look that’s very trendy.

4. Master the Minimalist Blood Drip Manicure

Need a last minute idea? Pin this scary-simple blood drip nail art.
This simple blood splatter nail art tutorial is all about a clever technique. Instead of trying to paint a drip shape, you simply “dot and drag.” This method gives you complete control over the blood + drips effect, resulting in a scary but stylish look. The combination of vivid red + blood splatter over a clean nude base is graphically stunning and deceptively easy.
Products & Tools Used
- Nude or Clear Nail Polish
- A deep, blood-red Nail Polish
- A dotting tool or toothpick
- Glossy Top Coat
Application Steps
- Apply two coats of your nude polish or a clear base coat. Let dry completely.
- Dip your dotting tool into the red polish. Near the tip of your nail (like a French manicure), place 3-4 dots spaced apart.
- Working one drip at a time, place a larger dot where you want the drip to end.
- Then, drag a thin line of polish from that dot up to the tip of your nail, connecting it to the “French tip” line.
- Vary the length of the drips on each nail.
- Seal with a super glossy top coat to give it a wet, freshly dripped look.
Pro-Tip: For a truly gruesome effect, use two shades of red. Create the main drip with a bright red, then add a tiny dot of a darker, almost-black red at the top of the drip line to create depth and shadow.

5. Create Spooky Frankenstein Stitches

Pin this Frankenstein-inspired idea for a fun, ghoulish look!
This spooky design is perhaps the easiest of all easy diy halloween nails because it’s made entirely of straight lines. The iconic Frankenstein + green color scheme is instantly recognizable. This is a fantastic option for simple halloween nails for school because it’s more graphic and fun than scary, and it requires no complex shapes or curves.
Products & Tools Used
- A “Frankenstein” green, grey, or purple Nail Polish
- Black Nail Polish
- A thin striper brush
- Optional: Matte Top Coat
Application Steps
- Paint two coats of your chosen base color. Let it dry completely.
- Using your striper brush and black polish, draw a straight line across your nail. It can be horizontal, vertical, or diagonal.
- Now, draw small, short lines across the main line to create the “stitches.” Space them out unevenly.
- Repeat on as many nails as you like.
- Let the black polish dry, then seal the design. A matte top coat looks especially cool with this design.
Pro-Tip: Don’t limit yourself to green! Try this design with a pale grey base and black stitches, or a nude base with red stitches for a completely different spooky vibe. Dry brushing a little grey polish near the stitch line can also create a cool, aged effect.

6. Make an Effortless Candy Corn Gradient

Save this sweet candy corn colors idea for a classic Halloween look.
Learning how to do ombre halloween nails with the classic candy corn colors is easier than you think. The secret to the smooth gradient blending is a simple makeup sponge. This technique looks advanced, but it’s a beginner guide staple. The most important step is to protect your skin from the polish to solve the messy cuticles problem before you even start.
Products & Tools Used
- White Nail Polish
- Orange Nail Polish
- Yellow Nail Polish
- A disposable makeup sponge
- Liquid latex or tape for cuticles
- Glossy Top Coat
Application Steps
- Paint a solid base of two coats of white polish and let dry. This makes the other colors pop.
- Apply liquid latex or tape around your nail on the skin to make cleanup easy.
- On the flat surface of your makeup sponge, paint a thick stripe of white, then orange, then yellow, slightly overlapping each one.
- Quickly, while the polish is wet, dab the sponge directly onto your nail. Rock it back and forth slightly to blend the colors.
- Repeat the dabbing process 2-3 times to build up the opacity.
- While the polish is still wet, peel off the liquid latex. Clean up any remaining mess with a brush and acetone.
- Seal with a generous top coat.
Pro-Tip: If you don’t want to do a gradient, you can paint simple stripes. Paint the whole nail yellow. Then paint the top two-thirds orange. Then paint the top third white. It’s a simple, no-tool alternative!

7. Apply Spooky Bat Silhouette Stickers

The ultimate hack for easy Halloween nails! Pin this sticker idea.
This is the ultimate no tools needed hack. Learning how to use nail stickers for halloween is a game-changer for anyone who feels they have zero artistic ability. The stickers vs hand-painted debate is simple for beginners: stickers provide perfect, crisp bat + silhouettes every time. They are applied over your base color and sealed with a top coat for a look that appears professionally done.
Products & Tools Used
- Your favorite base color Nail Polish (a sunset gradient looks amazing)
- Bat-shaped nail stickers or decals
- A pair of tweezers
- A silicone tool or your fingertip
- Two layers of Top Coat
Application Steps
- Paint your base color and let it dry completely. A slightly tacky surface can help the sticker adhere.
- Using tweezers, carefully peel a bat sticker from its backing sheet. Avoid touching the sticky side with your fingers.
- Place the sticker onto your nail in the desired position.
- Use a silicone tool or your fingertip to firmly press the sticker down, especially around the edges, to remove any air bubbles.
- Immediately apply a thick layer of top coat. Let it dry for a minute.
- Apply a second layer of top coat to ensure the sticker edges are fully encapsulated and won’t peel up.
Pro-Tip: If your sticker has a clear edge that is visible after applying top coat, you can use a technique called “meltdown”. Use a tiny bit of acetone on a very fine brush and gently trace around the edge of the sticker. This can help dissolve the edge for a seamless look, but practice on a fake nail first!

8. Try a Simple Cat Eye Accent Nail

For a low-key but spooky vibe, pin this easy cat eye design.
These minimalist halloween nails are chic, mysterious, and surprisingly easy to create. The piercing cat + eyes are drawn over a matte + black base, which makes the color pop. The eye shape is broken down into two simple curved lines that meet at a point, a much easier method than trying to draw an almond shape in one go with a striper brush.
Products & Tools Used
- Black Nail Polish
- Neon green, yellow, or glow in the dark Nail Polish
- A dotting tool
- A thin striper brush
- Matte Top Coat
Application Steps
- Apply two coats of black polish. Let it dry completely.
- Using your dotting tool or brush, draw two almond shapes for the eyes with the green/yellow polish.
- Let the eyes dry until they are tacky.
- Dip your striper brush in black polish and draw a thin vertical slit down the center of each eye to create the pupil.
- Wait for the design to be completely dry, then apply a matte top coat for a velvety, mysterious finish.
Pro-Tip: To make the eyes really glow, apply a layer of opaque white polish in the shape of the eye first. Let it dry, then paint your neon or glow-in-the-dark color over the white. The white base will make the top color appear much brighter.

9. Rock a Gory Amputation (Negative Space) Manicure

Pin this shockingly easy gory manicure if you dare!
This is the ultimate design for beginners because “mistakes” are encouraged! The messier the torn edge, the more realistic these easy scary nails look. This design uses the concept of negative space, where part of the nail is left bare, creating a stark and modern contrast with the red + blood color. It’s particularly great for easy halloween nails for short nails.
Products & Tools Used
- A clear Base Coat
- A deep, blood-red Nail Polish
- A small, flat nail art brush (or the bottle brush)
- Optional: Dark brown or black polish
- Glossy Top Coat
Application Steps
- Apply one or two coats of a clear base coat to your bare nail and let it dry. This is your negative space.
- Paint the top half or two-thirds of your nail with the red polish.
- Before it dries, use a dry, clean brush (or wipe the polish bottle brush on the neck of the bottle) and dab or drag along the edge of the red polish to make it look torn and uneven.
- For an extra gory touch, add a tiny speck of dark brown or black polish right at the edge.
- Seal with a glossy top coat to make it look wet and fresh.
Pro-Tip: This design is perfect for short nails because the negative space at the base of the nail can create the illusion of a longer nail bed. Don’t be afraid to make the red “torn” edge a bit jagged.

Key Takeaways: Your Quick Guide to Easy Halloween Nails for Beginners
- Start with Simple Tools: You don’t need a professional kit. A toothpick or the end of a bobby pin can work as a dotting tool, and nail stickers are a foolproof hack for complex shapes.
-
A Good Top Coat is Essential: A quick dry top coat is your best friend. It smooths out minor bumps, adds a professional-looking shine, and, most importantly, prevents the smudging of your hard work.
-
Work in Thin Layers & Let Them Dry: The number one beginner mistake is applying thick coats of polish. Paint thin layers and allow each one to dry completely. This prevents bubbles and dramatically speeds up your total manicure time.
-
Don’t Fear Mistakes: Designs like Frankenstein’s stitches or the amputation manicure look even better with slightly messy, uneven lines. Embrace imperfection as part of the spooky aesthetic.
-
Protect Your Skin Beforehand: For messy techniques like the candy corn gradient, apply liquid latex or tape around your cuticles. This will save you from a frustrating cleanup process.
-
A White Base Makes Colors Pop: When using neon, pastel, or glow in the dark colors, always apply a layer of opaque white polish first. This creates a bright canvas and makes your design colors look vibrant instead of streaky.
People Also Ask About Easy Halloween Nails for Beginners
What are the easiest Halloween nail designs for a total beginner?
The absolute easiest designs are those that use dots, simple lines, or stickers. A simple ghost (a white blob with two black dots), Frankenstein stitches (straight black lines on a green base), or a minimalist blood drip are all incredibly forgiving and require almost no artistic skill. Using pre-made nail stickers is the most foolproof method of all.
Can I do Halloween nails without any special tools?
Yes, you absolutely can do Halloween nails without professional tools. A toothpick is a perfect substitute for a fine-tipped dotting tool for making eyes or small details. The end of a bobby pin works for larger dots. You can even use the corner of a cut-up makeup sponge for gradient effects.
How do you fix a mistake or smudge in your nail art?
The best tool for fixing mistakes is a small, flat brush dipped in acetone. This is often called a cleanup brush. You can use it to precisely wipe away any polish that gets on your cuticles or to sharpen a messy line. For a smudge in the middle, it’s often best to wait for it to dry, gently buff the spot smooth, and then reapply a dab of polish over it.
How do I make my DIY Halloween nails last longer?
Proper prep and a quality top coat are the keys to a long lasting manicure. Start by wiping your clean, bare nails with rubbing alcohol to remove oils. Always use a base coat. After applying your design, “wrap the tip” by running your top coat brush along the free edge of your nail. This helps prevent chipping.
How do you make a spider web on your nails easily?
The easiest method is to draw the ‘spokes’ first, then connect them. Using a thin striper brush with white polish, draw 3-4 lines radiating from one corner of your nail. Then, simply connect those lines with small, curved ‘C’ shapes. Don’t try to draw the whole web freehand.
What are the best colors for Halloween nails?
Classic Halloween colors are a great starting point. You can never go wrong with a combination of black + orange. Other essential colors include white (for ghosts and webs), a deep blood red, a “Frankenstein” green, and a witchy purple. A nude polish is also great for negative space designs.
How do you do blood splatter nails without making a huge mess?
Use a dotting tool and a ‘dot-and-drag’ technique instead of actual splattering. Place a dot of red polish where you want a drip to end, then use a fine brush or toothpick to drag a thin line upwards from the dot to your nail tip. This gives you full control and a realistic drip effect without the mess.
Is it better to use nail stickers or hand-paint designs?
For beginners, nail stickers are almost always better for complex shapes. Stickers vs hand-painted comes down to time and skill. Stickers guarantee a perfect, crisp shape like a bat or witch hat every time. Hand-painting offers more creativity but requires a steadier hand and practice.
How can I make my nail art look good on short nails?
Designs that use negative space or are focused on the tip of the nail work best for short nails. A blood drip, a minimalist French tip with a spooky color, or a design that is placed only on one half of the nail can create the illusion of length. Avoid large, bulky designs that cover the entire nail.
How do I get a matte finish on my nails?
You need to use a specific matte top coat. After your design is completely dry, you apply the matte top coat just like a regular glossy one. It will look shiny at first but will dry down to a flat, velvety, non-reflective finish in about a minute.
Final Thoughts on Your Beginner Halloween Manicure
Creating fun, spooky, and creative nails for Halloween doesn’t require a professional nail tech or years of practice. As we’ve explored with these 9 beginner friendly halloween nails, the secret lies in choosing a simple design and mastering a few basic hacks. Whether you’re creating cute ghosts with a toothpick or a gory blood drip that embraces imperfection, you have the power to create a fantastic festive manicure right at home.
Remember to start with a clean nail, work in thin coats, and never underestimate the power of a good top coat. The most important thing is to have fun with it. This is your chance to get creative and show off your Halloween spirit.
Now that you have the ideas and the step-by-step instructions, which design will you try first for spooky season? Let us know in the comments below.
Last update on 2026-04-11 / Affiliate links / Images from Amazon Product Advertising API