Struggling to get your festival makeup to survive the heat and the hype? It’s a common story: you spend an hour creating a masterpiece, only for it to melt away before the headliner even takes the stage. That frustration of seeing your perfect glittery look turn into a smudged mess is why so many give up on creative looks altogether.
To create festival makeup that lasts, you must focus on a three-part system: skin prep, product choice, and setting technique. Start with a hydro-grip primer, use waterproof or long-wear formulas for eyes and face, and liberally apply a high-performance setting spray to lock everything in place. This sweat-proof base ensures any creative elements like glitter or gems will stay put all day.
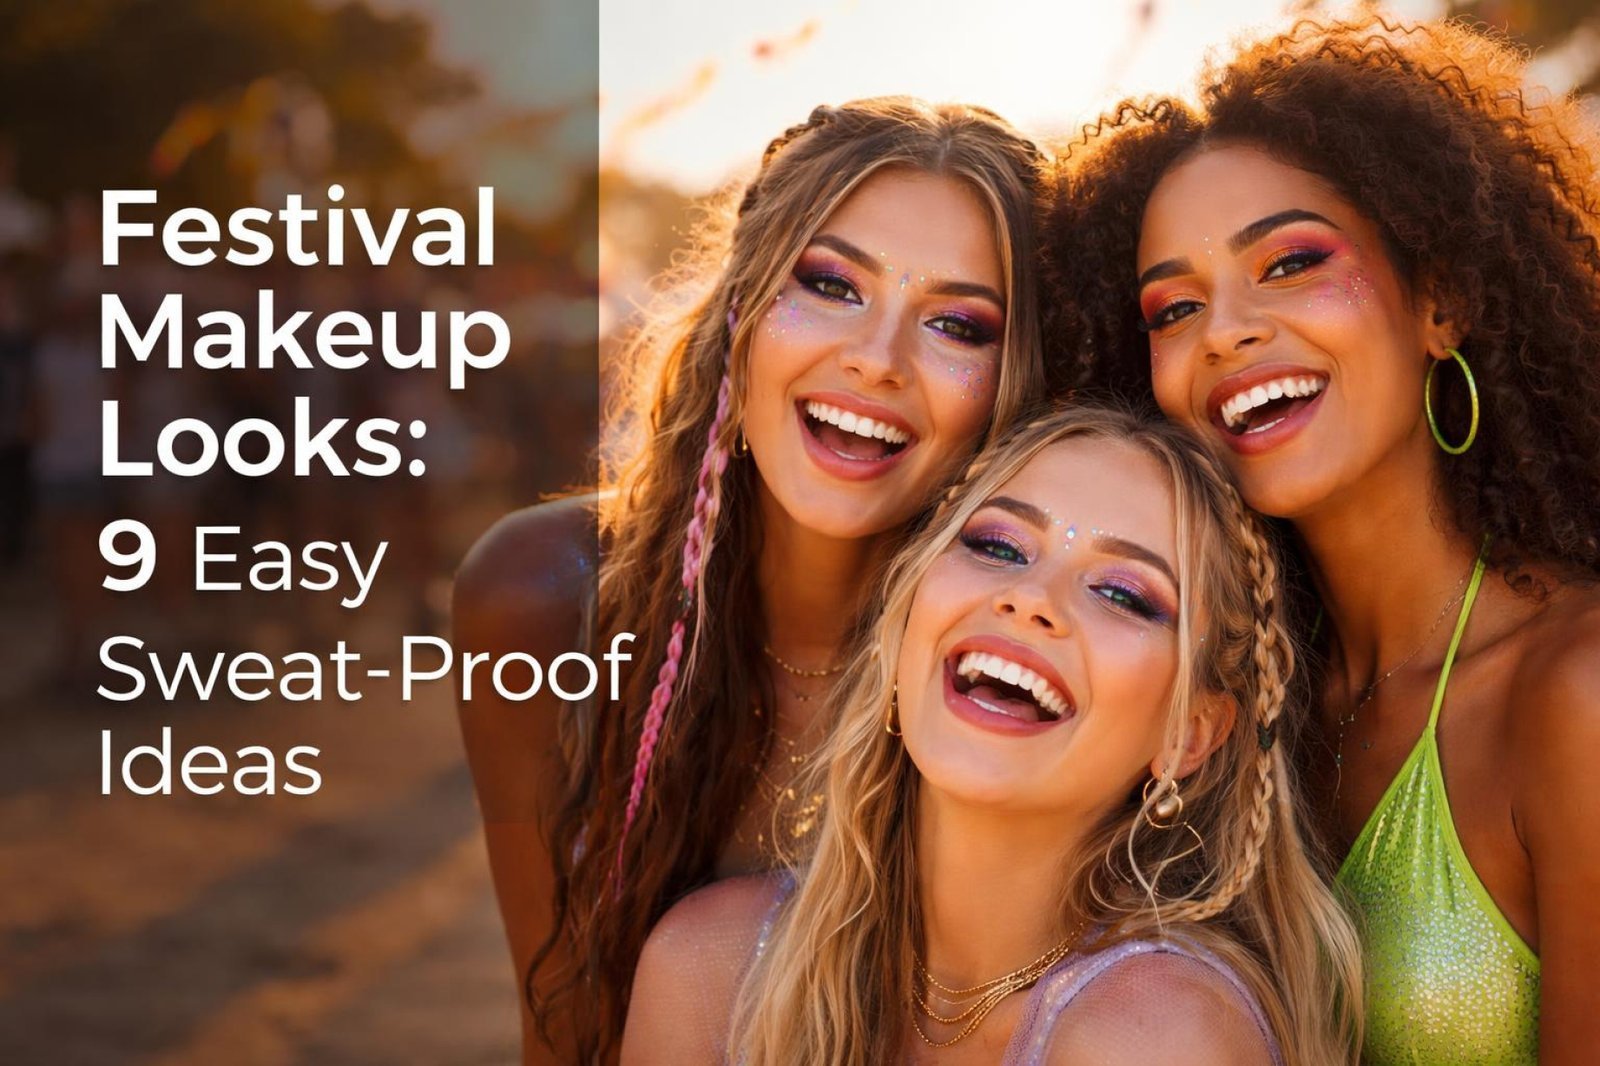
Drawing from comprehensive analysis of proven methodologies, this guide moves beyond simple inspiration. We are establishing the core principles for creating durable festival makeup looks, treating it as a specific cosmetic application designed for high-energy outdoor environments. You’ll discover nine easy, step-by-step ideas and the expert secrets to ensure your art lasts as long as the music.
How Do You Create Festival Makeup Looks That Actually Last?
The number one frustration at any outdoor event is watching your carefully applied makeup slide off your face. The key to creating long-lasting makeup isn’t about caking on more product; it’s about a strategic approach that armors your look against heat, sweat, and humidity. Think of it as building a house: without a solid foundation and framework, even the most beautiful decorations will fall apart. For music festival makeup, that foundation is a non-negotiable, three-part system: primer, product selection, and setting. A gripping primer creates a tacky base for makeup to cling to, long-wear or waterproof festival makeup formulas resist moisture, and a final seal of setting spray acts as a protective barrier. Mastering this sweat-proof makeup system is the first and most important step, ensuring any creative festival makeup ideas you try will look just as good at the end of the night as they did at the beginning. It’s crucial to always use cosmetic grade products to ensure what you’re putting on your skin is safe for all-day wear.
9 Easy Sweat-Proof Festival Makeup Looks for 2026
Now that you understand the fundamental system for creating a look that lasts, it’s time for the fun part. The best festival makeup looks are a blend of personal expression and practical application. You don’t need to be a professional artist to achieve a stunning, durable look. This curated list focuses on nine trendy yet easy festival makeup ideas that deliver maximum impact with minimal fuss. Each look is designed to be achievable for beginners and comes with a step by step festival makeup tutorial, product recommendations, and professional tips to guarantee a flawless, melt-proof finish. From subtle shimmers to bold graphics, these ideas provide the festival makeup inspo and the technical know-how to bring your vision to life.
1. Create a Floating Chromatic Eyeliner Look

Pin this mesmerizing liner look to your ‘Festival Beauty’ board!
This graphic liner look is perfect for those who want an edgy, high-fashion vibe without a ton of blending. The floating crease liner defines eyes with precision and feels modern and fresh. The key to making this waterproof festival makeup work is using a water-activated liner, which provides intense pigment and a smudge-proof finish once it fully dries, ensuring it resists sweat and won’t transfer onto your upper eyelid.
Products & Tools Used
- Water-Activated Liner Palette: Look for one with a mix of metallic and neon shades for versatility.
- Fine-Tipped Angled Brush: For precision application and sharp wings.
- Hydro-Grip Primer: To create a smooth, long-lasting canvas.
- Waterproof Mascara: To complete the look without risk of smudging.
- High-Performance Setting Spray: The crucial final step to make it humidity-proof.
Application/Styling Steps
- Prep the eyelid by applying a thin layer of eye primer and letting it set.
- Activate your chosen liner color with a drop of water or setting spray.
- Map the shape: Looking straight ahead into a mirror, use the brush to lightly sketch a line floating just above your natural crease.
- Define the line, slowly building up the opacity for a bold, vibrant look.
- Set your entire face with a generous mist of setting spray, ensuring your eyes are closed.
Pro-Tip: For an ultra-sharp wing, clean up the edge with a cotton swab dipped in micellar water. My experience shows that a silicone-based primer underneath prevents the liner from cracking after hours of wear.

2. Apply Scattered Face Gem Constellations

Save this sparkling idea for a touch of easy glam!
Arguably one of the easiest festival makeup looks for beginners, scattered face gems deliver maximum sparkle with minimal effort. This look enhances features by drawing light to the high points of your face. The secret isn’t in the placement but in the application. To ensure your rhinestones don’t fall off mid-dance, you need a reliable adhesive. This tutorial focuses on how to make your face jewels stay put for an all-day hold.
Products & Tools Used
- Self-Adhesive Face Gems: A pack with various sizes and iridescent finishes offers the most creative freedom.
- Cosmetic-Grade Lash Glue: For reinforcing any gems that lose their stickiness. This is a crucial long-wear solution.
- Wax-Tipped Pen or Tweezers: For precise and easy placement of individual gems.
- Finishing Powder (Translucent): To gently mattify the area before application for better adhesion.
Application/Styling Steps
- Complete your base makeup and eyeshadow first.
- Set your makeup, but avoid the specific areas where you plan to place the gems.
- Adhere the gems: Using tweezers, pick up a self-adhesive gem and press it firmly onto the skin. For extra hold, add a tiny dot of lash glue to the back of the gem before placing.
- Design your constellation, starting with larger gems on the high points of your cheekbones and scattering smaller ones outwards.
- Press each gem for 5 seconds to ensure it is secure.
Pro-Tip: To create a truly unique look, mix and match gem shapes and colors. Based on my testing, applying gems on top of a matte, powdered surface provides a much stronger all-day hold than applying them over a dewy foundation.

3. Rock a Bold Inner Corner Neon Pop

Pin this simple but high-impact look for your next event!
For a colorful festival makeup look that’s both trendy and surprisingly simple, a pop of neon makeup in the inner corner is unbeatable. This minimalist festival makeup option delivers a powerful statement without the need for complex blending or multiple colors. The key to making the neon pigment truly vibrant is to lay down a white base first; this requires primer to show its true color and brightens the entire eye area.
Products & Tools Used
- Neon Pigment Palette: Choose a palette with a variety of vibrant shades.
- White Eyeshadow Base or Concealer: This is the secret to making the neon makeup pop.
- Small, Dense Packer Brush: For precise application and building opacity.
- Glitter Primer (optional): A thin layer can help loose pigment adhere better and last longer.
Application/Styling Steps
- Apply a layer of white eyeshadow base or concealer to the inner corner of your eye and blend the edges.
- Pack your chosen neon pigment onto the packer brush.
- Press and pat the pigment directly over the white base. Avoid a sweeping motion to prevent fallout.
- Build the color in thin layers until you reach the desired intensity.
- Clean any stray pigment with a fluffy brush before moving on.
Pro-Tip: To transform any matte neon shadow into a liner, mix the pigment with a drop of setting spray on the back of your hand. According to color theory, placing a bright pop against an otherwise neutral face creates the strongest focal point.

4. Style a Shimmering Holographic Under-Eye

Want an ethereal glow? Pin this holographic look!
Channel an ethereal, euphoria inspired makeup vibe with a delicate wash of holographic highlighter and eye shimmer under the eyes. This is a softer, more magical take on festival sparkle that moves away from chunky glitter. This shimmering makeup look enhances features by catching the light with every turn of your head. The trick is to layer liquid and powder products to create a multi-dimensional glow that resists sweat and won’t settle into fine lines.
Products & Tools Used
- Holographic Powder Highlighter: One with a lavender, blue, or pink shift works best.
- Liquid Shimmer Eyeshadow: A sheer, iridescent shade to use as a base.
- Fluffy Blending Brush: For a soft, diffused application.
- Smudge Brush: For targeted placement of shimmer.
- Hydrating Concealer: To brighten the under-eye area without looking heavy.
Application/Styling Steps
- Prep your under-eye with a hydrating concealer, blending it out seamlessly.
- Apply a few dots of liquid shimmer eyeshadow underneath the outer half of your eye.
- Blend it immediately with your finger or a smudge brush for a sheer wash of sparkle.
- Set the concealer lightly with translucent powder, avoiding the shimmered area.
- Highlight by sweeping the holographic highlighter with a fluffy brush over the high points of your cheekbones, blending it up towards the shimmer.
Pro-Tip: Using a cream or liquid product as a base for a powder product (
iridescent layering) creates a more durable, high-impact finish. To prevent creasing, use the baking method: press a generous amount of translucent powder under the eye and let it sit for 5 minutes before dusting it away.

5. Design Delicate Gold Leaf Freckles

Add a touch of Midas to your look! Pin this boho festival makeup idea.
For a truly unique and creative festival makeup look, try these gold leaf festival makeup ideas. Creating faux freckles with flecks of gold leaf is a surprisingly simple festival makeup trick that looks incredibly intricate. It’s the perfect way to elevate a natural, sun-kissed look and complements outfit choices with a bohemian theme. The most important rule here is safety: you must use cosmetic-grade gold leaf that is safe for eyes and skin, as craft store leaf can contain other metals.
Products & Tools Used
- Cosmetic-Grade Gold Leaf Flakes: CRITICAL: ensure it is specifically made for use on skin.
- Glitter Glue or Lash Adhesive: To create a sticky base for the flakes to adhere to.
- Tweezers: For precise placement of larger flakes.
- A Dry, Fluffy Brush: To gently sweep away excess flakes.
Application/Styling Steps
- Complete your base makeup. This look works best on a natural or dewy skin finish.
- Apply tiny, random dots of lash glue across the bridge of your nose and the tops of your cheeks, where you’d naturally have freckles.
- Wait 20-30 seconds for the glue to become tacky.
- Press the gold leaf flakes onto the tacky spots using your fingertip or tweezers. Don’t be too perfect; the randomness is key.
- Secure the look with a final, light mist of setting spray from a distance.
Pro-Tip: For a more natural distribution, place a few flakes onto a fluffy brush, hold it a few inches from your face, and gently tap the brush handle. This will create a soft, scattered effect that looks more authentic.

6. Master a Sweat-Proof Sunset Glitter Eye

Save this fiery look for when you want to make a statement!
A classic glitter eye makeup look is a festival staple, but it’s also notorious for creating a mess. This tutorial for a colorful festival makeup look focuses on how to blend multiple eyeshadows and apply body glitter without it ending up all over your face. The secret weapon to fix fallout and create a smudge-proof finish is a high-quality glitter primer. It creates a sticky base that locks sparkles in place, ensuring your shimmering makeup stays on your eyes.
Products & Tools Used
- Sunset-Toned Eyeshadow Palette: With matte oranges, pinks, and purples.
- Cosmetic-Grade Fine Glitter: In gold or iridescent shades. It’s best to choose biodegradable glitter.
- Glitter Primer / Adhesive: The most important tool to fix fallout and ensure a smudge-proof finish.
- Flat Shader Brush: For packing on color and glitter.
- Fluffy Blending Brush: For creating smooth transitions between colors.
Application/Styling Steps
- Prime your eyelids. Then, with a blending brush, apply the orange matte shade into your crease as a transition color.
- Apply the pink shade onto the outer half of your eyelid with a flat shader brush.
- Apply the purple shade to the inner half, blending where the two colors meet.
- Layer a thin, even coat of glitter adhesive over your entire eyelid with your finger.
- Press the fine glitter on top of the glue using a flat brush before it dries completely. This technique locks the glitter in place.
Pro-Tip: To prevent glitter fallout during application, do your eye makeup before your face makeup. You can also apply a thick layer of translucent powder under your eyes (the baking method) to catch any stray sparkles, then simply sweep it away when done.

7. Try a ‘Clean Girl’ Minimalist Shimmer

For the minimalist at heart—pin this effortlessly chic festival look.
Not all festival looks have to be about bold color and glitter. The clean girl festival look is perfect for those who want a soft glam festival vibe that’s fresh, radiant, and incredibly quick. This minimalist festival makeup approach focuses on dewy skin, fluffy brows, and a single wash of liquid shimmer eyeshadow. Because these long-wear liquid formulas are designed to be film-forming, they are naturally more heat resistant and resist sweat better than powders, making this the ultimate easy festival makeup.
Products & Tools Used
- Long-Wear Liquid Shimmer Eyeshadow: A champagne or rose gold shade is perfect for this.
- Dewy Skin Tint with SPF: For lightweight coverage and crucial sun protection.
- Waterproof Brow Gel: To create a fluffy, laminated brow effect that stays put.
- Hydrating Lip Oil or Gloss: For a juicy, non-sticky finish.
- Cream Blush: To add a natural flush of color to the cheeks.
Application/Styling Steps
- Apply the skin tint with your fingers for a natural, seamless finish.
- Brush your brows upward with the waterproof brow gel to set them in place.
- Swipe the liquid shimmer eyeshadow across your entire eyelid and blend the edges with your fingertip. Let it dry completely.
- Tap cream blush onto the apples of your cheeks and blend.
- Finish with a generous layer of hydrating lip oil.
Pro-Tip: The key to a sweat-proof ‘Clean Girl’ look is using cream products before powder. After applying your creams, lightly powder only your T-zone to control oil while leaving the rest of the face dewy. This is a proven technique used by MUAs for red carpets.

8. Play with Under-Eye Star Stamps

Easiest festival look ever? Pin this star stamp idea now!
For truly foolproof rave makeup looks, an eyeliner stamp is your best friend. This is the ultimate hack for edgy festival looks when you have zero time or artistic skill. The stamp instantly transforms appearance and provides a sharp, graphic element with one press. The challenge isn’t applying it, but making sure the impression is crisp and becomes transfer-proof. The key is prepping the skin surface correctly.
Products & Tools Used
- Waterproof Eyeliner Stamp Pen: Choose one with a star, heart, or other fun shape.
- Translucent Setting Powder: The secret to making the stamp transfer-proof.
- Primer: An oil control primer will create the best canvas.
- Setting Spray: To lock in the final design.
Application/Styling Steps
- Complete and set your base makeup as usual.
- Prep the stamp area: Using a powder puff, press a small amount of translucent setting powder onto the exact spot under your eye where you plan to stamp.
- Dust away the excess powder. This creates a dry, matte surface for the ink to grip.
- Press the eyeliner stamp firmly onto the prepped skin for 2-3 seconds. Do not wiggle it.
- Lift the stamp directly up to reveal a crisp shape. Let it dry for 60 seconds before touching.
- Set the entire face with a final mist of setting spray.
Pro-Tip: Based on my experience, most eyeliner stamps fail because they are applied to a dewy or oily surface. The powder-prep step is a non-negotiable makeup artist secret for a sharp, smudge-proof result that lasts 12+ hours.

9. Blend a Monochromatic Color Wash

Love this cohesive vibe? Pin this monochromatic makeup trick!
Monochromatic looks are a soft glam festival favorite because they are effortlessly chic and incredibly efficient to pack. Using a single multi-use stick for your eyes, cheeks, and lips creates a harmonious and polished look in minutes. This approach coordinates with itself for a cohesive look and enables creativity through versatile application. The strategy revolves around a single high-quality cream blush or stick, proving that you don’t need a huge kit for a beautiful, colorful festival makeup look.
Products & Tools Used
- Cream Blush or Multi-Use Stick: In a vibrant coral, pink, or berry shade.
- A Fluffy, Stippling Brush: For a diffused cheek application.
- A Dense Eyeshadow Brush: For packing color onto the lid.
- Matching Lip Liner (optional): To create definition.
- Translucent Powder: To set the eyeshadow and increase longevity.
Application/Styling Steps
- Apply the cream product directly to the apples of your cheeks and blend upwards towards your temples with a stippling brush for a lifted effect.
- Tap the same product onto your lips with your finger for a stained look, or apply it directly from the bullet for more impact.
- Swipe the cream stick across your eyelids. Use a dense brush to blend it out for a soft wash of color.
- Set the eyes: To prevent creasing, press a light layer of translucent powder over the cream on your eyelids.
- Layer up the color on your cheeks and lips until you reach your desired intensity.
Pro-Tip: To make your cream-based look truly sweat-proof, use this layering technique: apply the cream blush, set it with a light dusting of translucent powder, and then apply a matching powder blush on top. This advanced baking method variation locks in color for hours.

Key Takeaways
- Sweat-Proofing is a System, Not a Single Product: The secret to long-lasting makeup is the combination of a gripping primer, waterproof product formulas, and a high-performance setting spray.
- Adhesives are Non-Negotiable for Embellishments: For face jewels or body glitter to last, you must use a dedicated cosmetic grade adhesive like lash glue or glitter primer. This is the only long-wear solution.
- Technique Trumps Product: How you apply your makeup is more important than what you buy. Using techniques like layering creams before powders and doing eye makeup first to prevent glitter fallout are professional secrets for success.
- Safety First with Glitter and Gems: Always use products specifically designated as safe for eyes and skin. Never use craft glitter or craft glue on your face to avoid irritation or injury.
- Minimalism Can Be High-Impact: You don’t need complex skills to create a stunning look. A minimalist festival makeup approach using a single pop of neon makeup or a holographic highlighter can be just as effective as a full face.
People Also Ask About Festival Makeup Looks
How do I make my festival makeup stay on in the heat?
The most effective way to make makeup last is a three-step process: prime, layer, and set. Start with a “gripping” or hydro-grip primer to help foundation adhere. Use waterproof formulas for mascara and eyeliner, and opt for long-wear cream or liquid products over powders. Finally, generously mist your face with a high-performance setting spray to create a humidity-proof barrier. This combination is a proven technique for all-day wear.
How do I apply face jewels so they don’t fall off?
For an all-day hold, apply face gems with cosmetic-grade lash glue. While many gems are self-adhesive, festival conditions require reinforcement. Complete your makeup, then apply a tiny dot of lash glue to the skin, wait 20 seconds for it to get tacky, and then press the jewel firmly in place. Always apply gems after your foundation and powders for the strongest bond.
What’s the best way to remove stubborn glitter makeup?
Use an oil-based cleanser or a dedicated cleansing balm to remove glitter safely and effectively. Apply the oil to dry skin and gently massage it over the glittery areas. The oil will break down the adhesive and encapsulate the glitter particles. Then, wipe everything away with a soft, damp cloth or cotton pad before proceeding with your normal face wash. Never scrub your skin, as this can cause irritation.
Is cream or powder eyeshadow better for festivals?
Cream or liquid eyeshadows are generally better for festivals as they are more heat and sweat-resistant. Once set, long-wear cream formulas create a film that is less likely to crease or fade than traditional powders. For maximum longevity, you can apply a cream eyeshadow as a base and then layer a matching powder shadow on top to lock it in place.
Can I wear normal makeup to a festival?
You can, but you may need to adjust your technique for it to last. Your everyday foundation can be made more durable by using a strong primer and setting spray. However, for key areas like eyes, investing in waterproof mascara and eyeliner is highly recommended. Normal makeup isn’t formulated to be a heat resistant or sweat-proof solution, so longevity will likely be an issue without these extra steps.
Final Thoughts on Your Festival Glam
Creating the perfect festival makeup look is the ultimate form of self-expression, but it shouldn’t come at the cost of worrying about smudges or fading. As you’ve seen, the key to a flawless, all-day look lies in smart techniques that prioritize longevity. By focusing on a sweat-proof base using primers and setting sprays, and choosing the right adhesives for embellishments, you give yourself the freedom to be as creative as you want to be.
Whether you opt for a minimalist festival makeup shimmer or a full-on glitter eye makeup masterpiece, the proven techniques and professional MUA tips in this guide are your blueprint for success. Remember to always use cosmetic grade, skin-safe products, and most importantly, have fun with it. Your face is your canvas.
Now that you have the secrets to a look that truly lasts, which of these festival makeup ideas will you be trying for your next event? Share your favorite look in the comments below.
Last update on 2026-03-06 / Affiliate links / Images from Amazon Product Advertising API


