Is the pressure of finding the perfect look for an upcoming nuptial celebration leaving you stressed about whether your hair will hold up or fall flat? You are not alone; styling anxiety is the number one complaint among attendees and brides alike when planning their hairstyles for wedding events. Whether you are walking down the aisle or cheering from the pews, the fear of a bad hair day is a universal struggle that requires reliable solutions.
Finding an easy yet elegant wedding hairstyle for guests or brides involves selecting styles that require minimal skill but deliver maximum impact, such as classic updos, romantic half-ups, or chic ponytails. These approachable looks prioritize simple techniques and readily available products to ensure you look polished without the need for a professional stylist. By focusing on longevity and comfort, you can achieve a stunning look that withstands humidity and hours of celebration.
Drawing from comprehensive analysis of current data and proven methodologies in bridal beauty, this guide curates high-success styles that anyone can master. We have leveraged tested frameworks and professional insights to select looks that balance sophistication with manageability. In this post, you will discover 11 achievable hairstyles complete with step-by-step tutorials to transform your wedding day confidence.
Master Your Wedding Hair: 11 Easy Hairstyles for Guests and Brides in 2026
Navigating the vast array of wedding hair inspiration can be overwhelming, especially when trying to decipher which looks are actually achievable without a professional team. The primary goal for both brides and guests is to secure a look that feels authentic, photographs beautifully, and remains comfortable throughout the ceremony and reception. Whether you have long locks, a short pixie, or curly texture, understanding the fundamental mechanics of easy wedding hairstyles is the first step toward a stress-free celebration.
This section provides a curated collection of styles designed to bridge the gap between high-fashion bridal editorials and practical, real-world application. By focusing on “easy-to-master” techniques, we address the common pain points of complexity and time constraints. From the timeless elegance of a chignon to the modern flair of a bubble braid, these guest hairstyles for wedding attendees and bridal looks ensure you can approach the big day with absolute confidence in your appearance.
11 Easy Wedding Hairstyles to Master for Guests & Brides in 2026
The secret to mastering easy wedding hairstyles lies in choosing versatile looks that work across different hair textures and roles, utilizing simple tools to create professional-level results.
Before diving into the tutorials, it is essential to understand that the distinction between bridal updo styles and wedding guest hairstyles for long hair often comes down to accessories and finish rather than the complexity of the structure. A simple wedding hair look can be elevated for a bride with a veil or pearl pins, while the same base style can serve as a chic, understated look for a guest. This section explores 11 distinct styles, breaking down the process_action_keywords required to execute them flawlessly. We have mapped these styles to specific needs—whether you need a quick wedding hairstyle for a morning ceremony or a durable option for an all-night reception.
Each subsection below acts as a mini-tutorial. We bridge the gap between inspiration and execution by listing the exact products and tools necessary to achieve the look. You will move from half up half down wedding hairstyles that offer romantic softness to structured updos that provide security, ensuring every preference and hair type is covered.
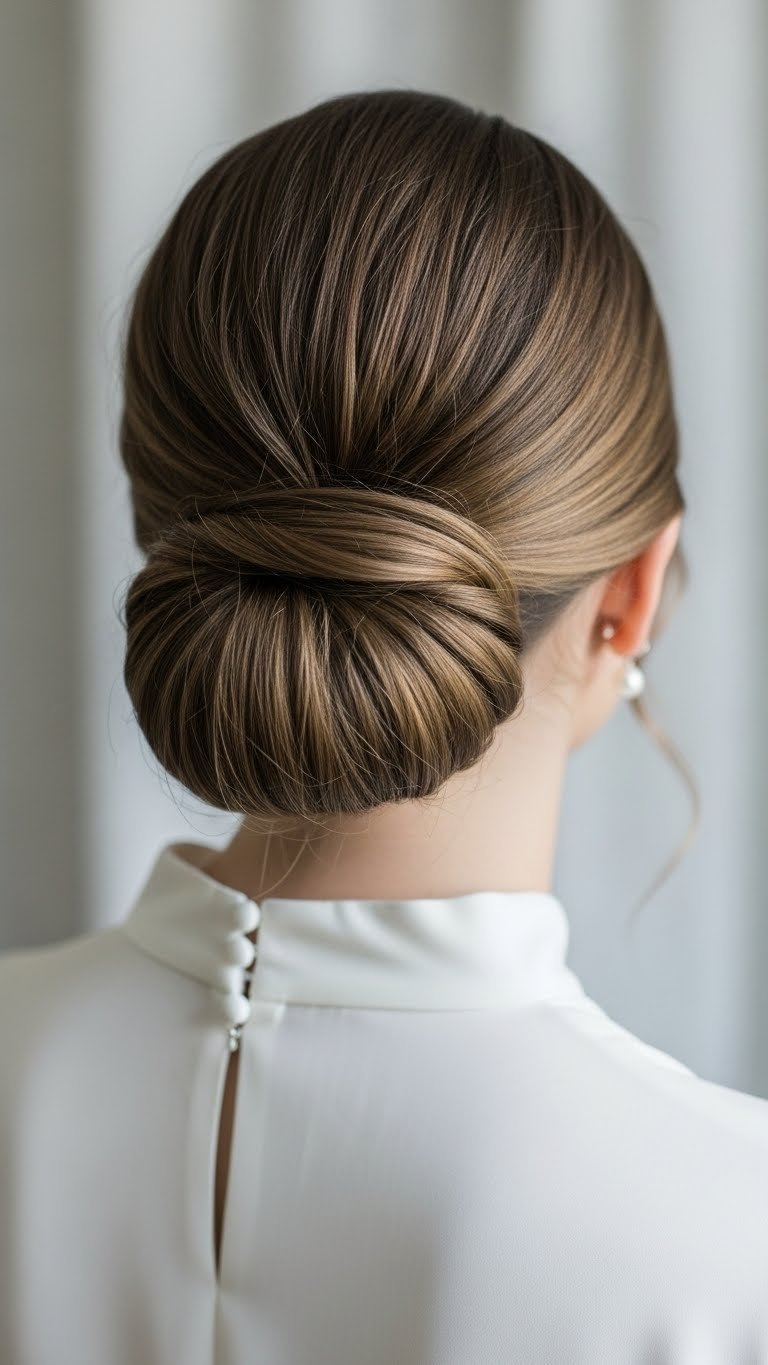
1. Create a Classic Low Chignon for Timeless Elegance
Pin this sophisticated classic low chignon to your bridal or event board!
A classic low chignon is the epitome of elegant wedding hairstyles, offering a smooth, sophisticated silhouette that works perfectly for both formal brides and guests. This timeless look keeps hair securely off the neck, making it an ideal choice for showcasing dress details or wearing in warmer weather.
To achieve this timeless bridal hair look, precision is key. While it appears intricate, the foundation is a simple low ponytail tailored into a polished shape. This style is particularly effective for medium hair wedding scenarios where length might be insufficient for high buns but is perfect for a dense, low gathering.
Products & Tools Used
- Fine-tooth comb for sleek parting
- Clear elastic hair ties that blend
- Bobby pins (various sizes, color matching hair)
- Lightweight strong-hold hairspray for frizz-free wedding hair finish
- Heat protectant spray if curling ends
- Curling iron (optional, for soft waves before styling)
Application/Styling Steps
- Prepare Hair: Start with freshly washed, dry hair. Apply heat protectant if you plan to add soft curls to the ends for extra texture.
- Low Ponytail Base: Create a low ponytail at the nape of your neck, securing it with a clear elastic. Ensure it’s smooth and centered.
- Twist & Loop: Twist the ponytail tightly, then loop it up and tuck it into the base of the ponytail, creating a small bun.
- Pin Securely: Use bobby pins to secure the bun firmly against your head, focusing on points where the bun meets the scalp.
- Smooth & Set: Gently smooth any flyaways with your fingers or a comb and generous amounts of strong-hold hairspray.
- Accessorize (Optional): Add a delicate hair accessory or small flowers for a personalized touch.
Pro-Tip: For extra volume and a more defined shape in your classic low chignon, gently backcomb the ponytail before twisting. This creates a fuller base that is easier to sculpt and secures more firmly, addressing the “fine hair wedding updo support” problem.

2. Style a Romantic Half-Up, Half-Down with Braids
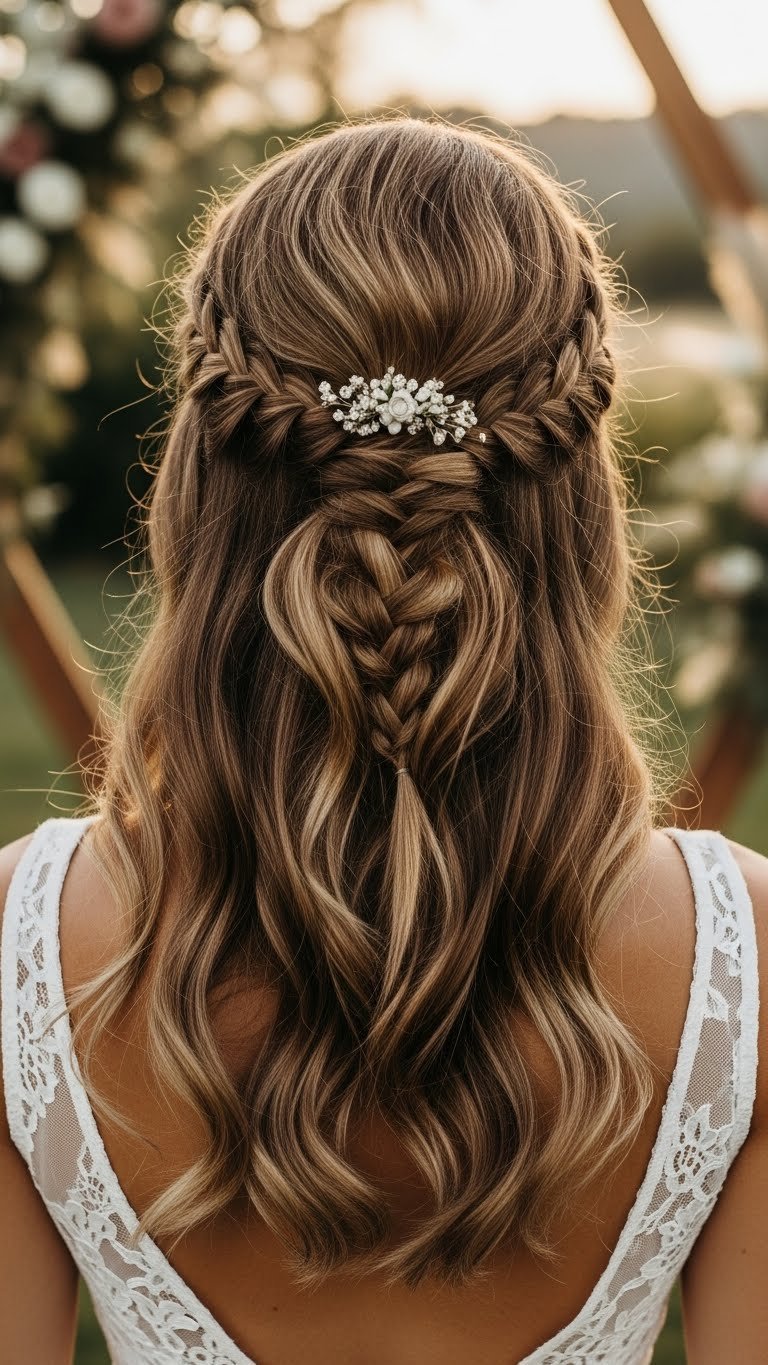
Save this enchanting half-up, half-down wedding style for your special day!
Romantic half up half down wedding hairstyles perfectly balance the formality of an updo with the soft allure of loose curls, making them a top choice for boho wedding hair. This style is incredibly versatile, suiting long hair wedding guest styles and brides alike who want to keep hair off their face while showing off length.
Moving from the structure of a chignon to a looser aesthetic, this style relies on texture. By incorporating braided wedding hair elements, you add visual interest and structural integrity that prevents the style from looking messy as the day progresses.
Products & Tools Used
- Curling wand (1-inch barrel) for soft curls
- Heat protectant spray
- Texturizing spray for added volume and grip
- Clear elastic bands
- Bobby pins
- Small decorative hair clip or fresh flowers for accessorizing
Application/Styling Steps
- Prep Hair for Waves: Apply heat protectant to dry hair. Section your hair and use a curling wand to create soft, loose waves throughout, then finger-comb to loosen them further.
- Create Braids: Take a section of hair from above each temple. Create a loose French or Dutch braid, directing it backward towards the crown.
- Secure Braids: Once each braid reaches the back of your head (around the crown level), secure it temporarily with a clear elastic.
- Join Braids: Bring both braids together at the back, slightly above the nape of your neck. You can either combine them into a single small braid or simply secure them together with bobby pins.
- Accessorize & Finish: Remove the temporary elastics. Add a small decorative clip or tuck in a few fresh wildflowers over where the braids meet. Finish with a spritz of flexible-hold hairspray.
Pro-Tip: For a truly romantic and voluminous look, spray texturizing spray generously onto your roots and mid-lengths before curling. This provides essential grip for the braids and prevents the waves from falling flat, solving the “solution for flat wedding hair” problem.

3. Achieve a Sleek High Ponytail with Hair Wrap
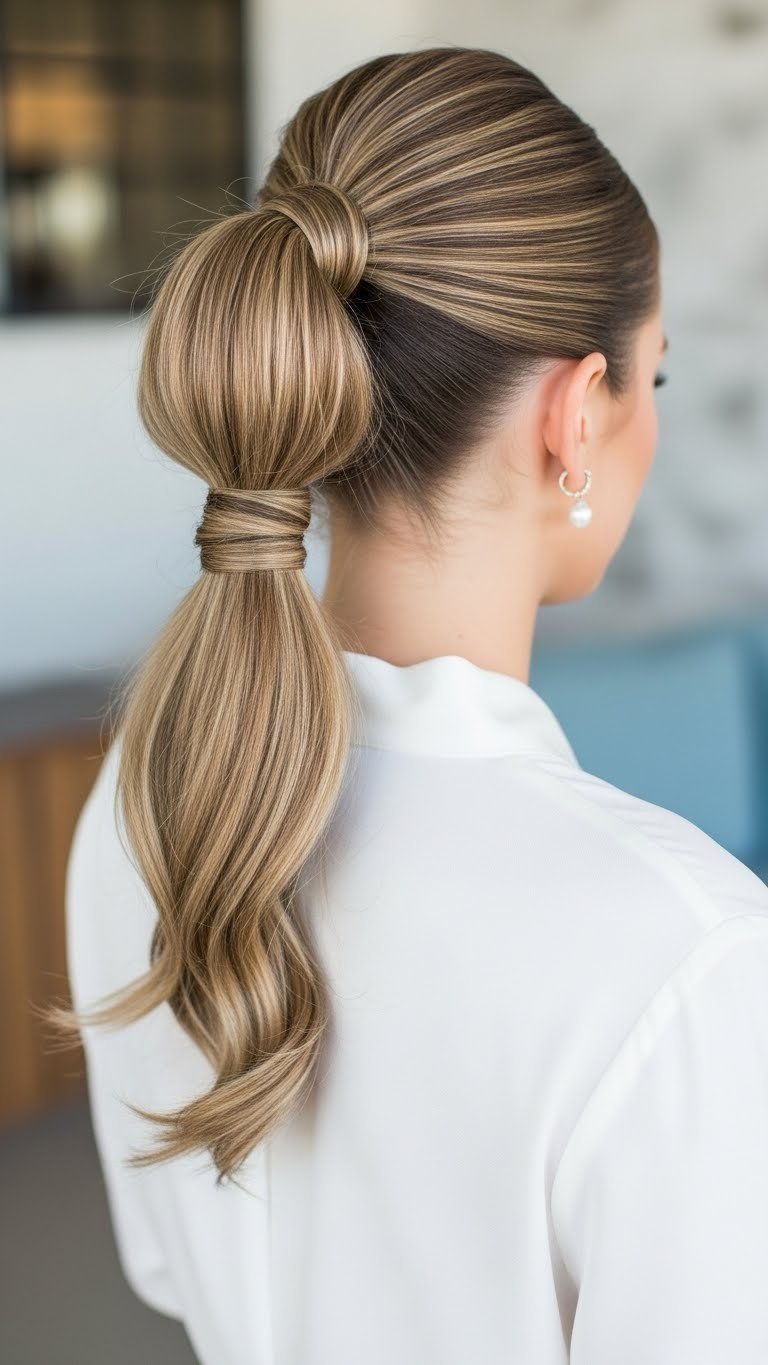
Pin this modern and chic sleek high ponytail for your next wedding event!
A sleek high ponytail is a bold, modern wedding hairstyle that instantly provides a facelift effect and creates a polished, high-fashion aesthetic. Ideal for contemporary weddings, this style keeps hair completely controlled, making it one of the best quick wedding styles for guests who need to look put-together fast.
While many view ponytails as casual, the “sleek” factor transforms this into polished wedding hair. The key is eliminating bumps and hiding the elastic, which elevates the look from gym-ready to aisle-ready.
Products & Tools Used
- Boar bristle brush for smoothing
- Strong elastic hair tie (like a bungee elastic)
- Smoothing serum or light hair oil
- Edge control product (optional, for fine baby hairs)
- Bobby pins
- Firm-hold hairspray for frizz-free wedding hair
Application/Styling Steps
- Prep Hair: Start with straight or straightened hair. Apply a small amount of smoothing serum throughout your hair to add shine and reduce frizz.
- High Ponytail: Using a boar bristle brush, gather all your hair into a high ponytail at the crown of your head. Ensure all bumps are smoothed out. Secure tightly with a strong elastic.
- Section for Wrap: Take a small section of hair (about ½ inch wide) from the underside of the ponytail.
- Wrap the Base: Carefully wrap this section of hair tightly around the elastic base of the ponytail until the elastic is completely covered.
- Secure Wrap: Secure the end of the wrapped section with a bobby pin, pushing it into the ponytail base so it’s hidden.
- Perfect & Set: Smooth any remaining flyaways with a bit more smoothing serum or edge control. Finish with a generous mist of firm-hold hairspray to lock the style in place.
Pro-Tip: For the ultimate sleek high ponytail and to combat the “sweaty wedding hair fixes” problem, apply a small amount of hair gel to your brush before gathering your hair. This helps to eliminate flyaways and ensures a super smooth, polished finish that lasts all day, even in humidity.

4. Craft a Textured Messy Bun for Effortless Charm
Try this effortless messy bun for a relaxed yet elegant wedding look!
A textured messy bun offers the perfect “perfectly undone” aesthetic, providing a solution for effortless wedding hair that feels both relaxed and intentional. This simple wedding updo is a favorite for rustic or outdoor weddings where a stiff style might feel out of place.
When you do a messy bun for a wedding, the goal is controlled chaos. Unlike a gym bun, this voluminous wedding hair style relies on strategic pinning and texturizing products to ensure it looks artful rather than accidental.
Products & Tools Used
- Hair tie (thick, fabric-covered to prevent breakage)
- Bobby pins
- Texturizing spray or volumizing powder
- Flexible-hold hairspray
- Teasing comb (optional, for extra volume)
Application/Styling Steps
- Add Texture: Apply texturizing spray or volumizing powder to dry hair, focusing on the roots and mid-lengths. Gently backcomb sections at the crown for added lift.
- Loose Ponytail: Gather hair into a loose, mid-height ponytail. Don’t pull it too tight – you want natural volume at the crown.
- Twist & Loop: Twist the ponytail loosely and then wrap it around the base to form a bun. This can be done haphazardly for a more natural “messy” look.
- Secure with Pins: Use plenty of bobby pins to secure the bun. Insert them in different directions for a firm hold, ensuring no pins are visible.
- Pull Out Strands: Gently pull out small sections of hair around the bun and around your face to create soft, wispy pieces that frame your features.
- Set the Look: Mist generously with flexible-hold hairspray to keep the textured messy bun in place without stiffness.
Pro-Tip: For a truly effortless yet elegant textured messy bun that won’t fall flat, incorporate a “bun shaper” or “hair donut” into the base. This provides a stable, voluminous foundation, solving the “solution for flat wedding hair” problem, especially for those with thinner hair.

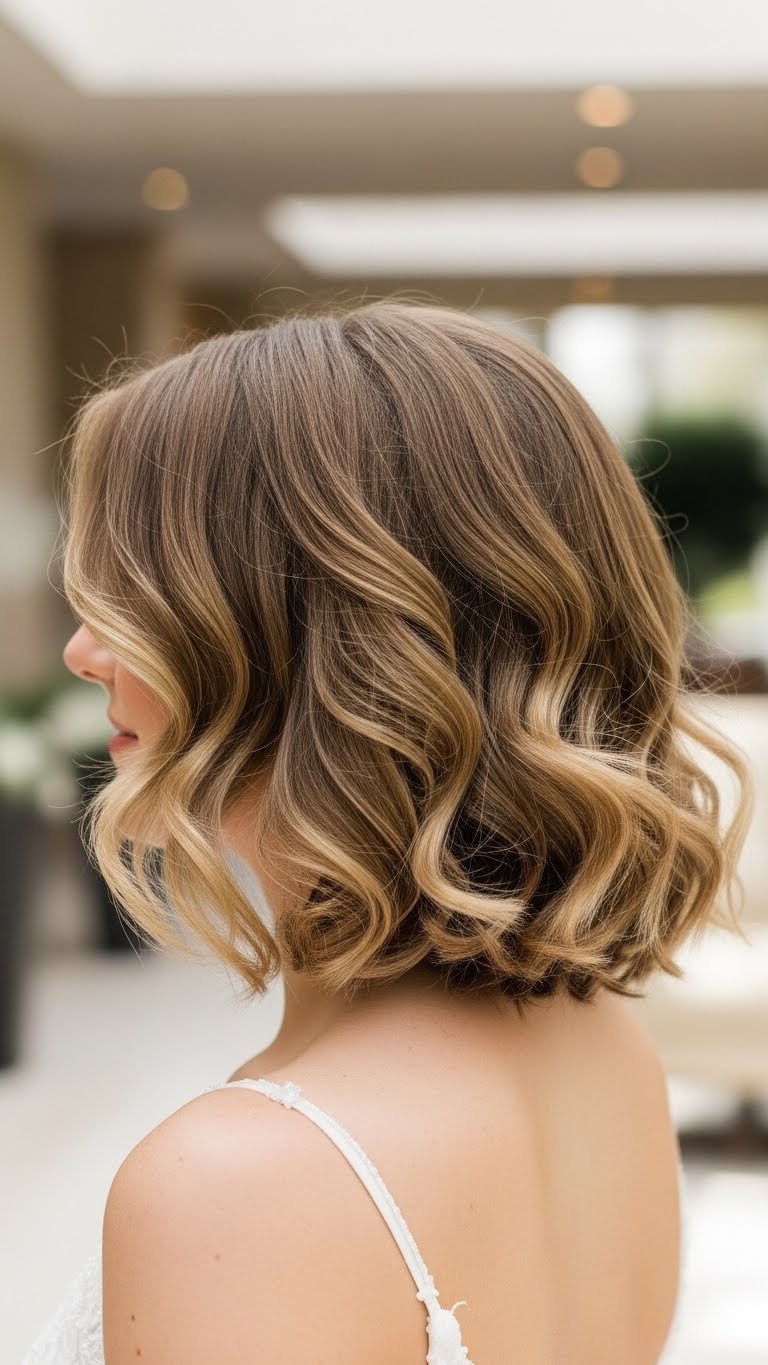
5. Glam Up with Side-Swept Waves for a Red Carpet Look
Channel your inner celebrity with these gorgeous side-swept waves for a wedding!
Side-swept waves are the quintessential glamorous wedding hair choice, evoking Old Hollywood charm while keeping hair controlled and camera-ready. This style works exceptionally well for long hair wedding styles, allowing you to wear your wedding hair down while still revealing your neckline and jewelry on one side.
Learning how to do side swept hairstyles for weddings involves a combination of structured curling and strategic pinning. The “sweep” creates an asymmetrical balance that is universally flattering and highly photogenic.
Products & Tools Used
- Curling iron (1.25-inch barrel)
- Heat protectant spray
- Sectioning clips
- Boar bristle paddle brush
- Strong-hold hairspray
- Bobby pins (large, color-matched)
- Shine serum
Application/Styling Steps
- Prep Hair: Apply heat protectant to dry hair. Create a deep side part.
- Curl Hair: Section your hair horizontally. Using the curling iron, curl 1-inch sections away from your face. Pin each curl up to cool completely for maximum hold.
- Brush Out Curls: Once all curls are cooled, gently brush them out with a boar bristle paddle brush to create soft, uniform waves.
- Side Sweep: Gather all your hair over one shoulder. On the opposite side, smooth the hair back and secure it tightly against your head with several criss-crossed bobby pins.
- Add Shine & Set: Apply a small amount of shine serum to your palms and gently smooth over the waves. Finish with a generous mist of strong-hold hairspray to ensure your side-swept waves last through the entire event.
Pro-Tip: To ensure your side-swept waves stay voluminous and don’t fall flat, especially for “thin hair wedding volume” concerns, lightly tease the roots of the hair you’re sweeping before pinning it back. This invisible lift creates a stronger foundation and adds lasting body.

6. Design an Elegant Braided Crown (Halo Braid)
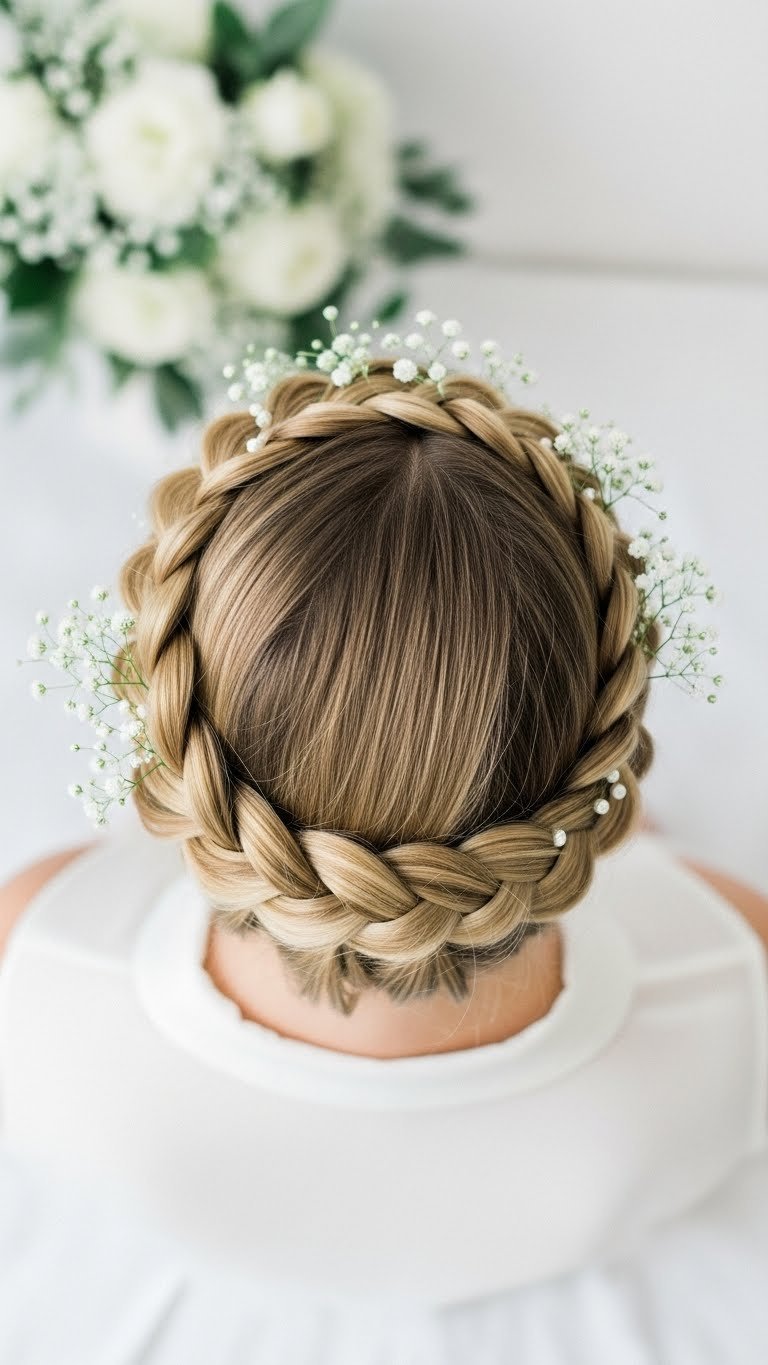
Braid your way to beauty! Save this elegant braided crown inspiration for your wedding.
An elegant braided crown, often called a halo braid, serves as a stunning protective style that keeps hair completely secure while offering a regal, ethereal vibe. Perfect for boho wedding hairstyles for long hair, this look mimics a tiara using your own locks, eliminating the need for heavy accessories.
Though it looks complex, this updo wedding hairstyle is essentially a continuous Dutch or French braid. It is one of the most reliable elegant wedding hairstyles for outdoor events because it is virtually wind-proof.
Products & Tools Used
- Hairbrush or comb
- Texturizing spray (for grip)
- Clear elastic bands
- Bobby pins (plenty, in your hair color)
- Strong-hold hairspray
- Hair accessories (optional, e.g., small flowers or pins)
Application/Styling Steps
- Prep Hair: Apply texturizing spray throughout dry hair for better grip. Create a deep side part.
- Start Braiding: Begin a Dutch braid (where you cross strands under instead of over) at your temple, following your hairline around your head. As you braid, incorporate new sections of hair from both the top and bottom.
- Continue Around Head: Continue braiding all the way around your head, maintaining even tension and incorporating all loose hair.
- Finish & Secure: Once you’ve braided all the way around and reached your starting point, finish with a regular three-strand braid for the remaining hair. Secure the end with a clear elastic.
- Tuck & Pin: Tuck the end of the braid under the beginning of your braided crown and secure it firmly with bobby pins. Use additional pins as needed to secure the entire braid.
- Set with Spray: Gently pull on sections of the braid to make it look fuller (pancaking). Finish with a generous mist of strong-hold hairspray.
Pro-Tip: To ensure your braided crown looks full and elegant, especially if you have finer hair or are worried about “thin hair wedding volume,” gently pull on the outer loops of the braid (known as ‘pancaking’) once it’s complete. This instantly creates the illusion of thicker, more luxurious braids.

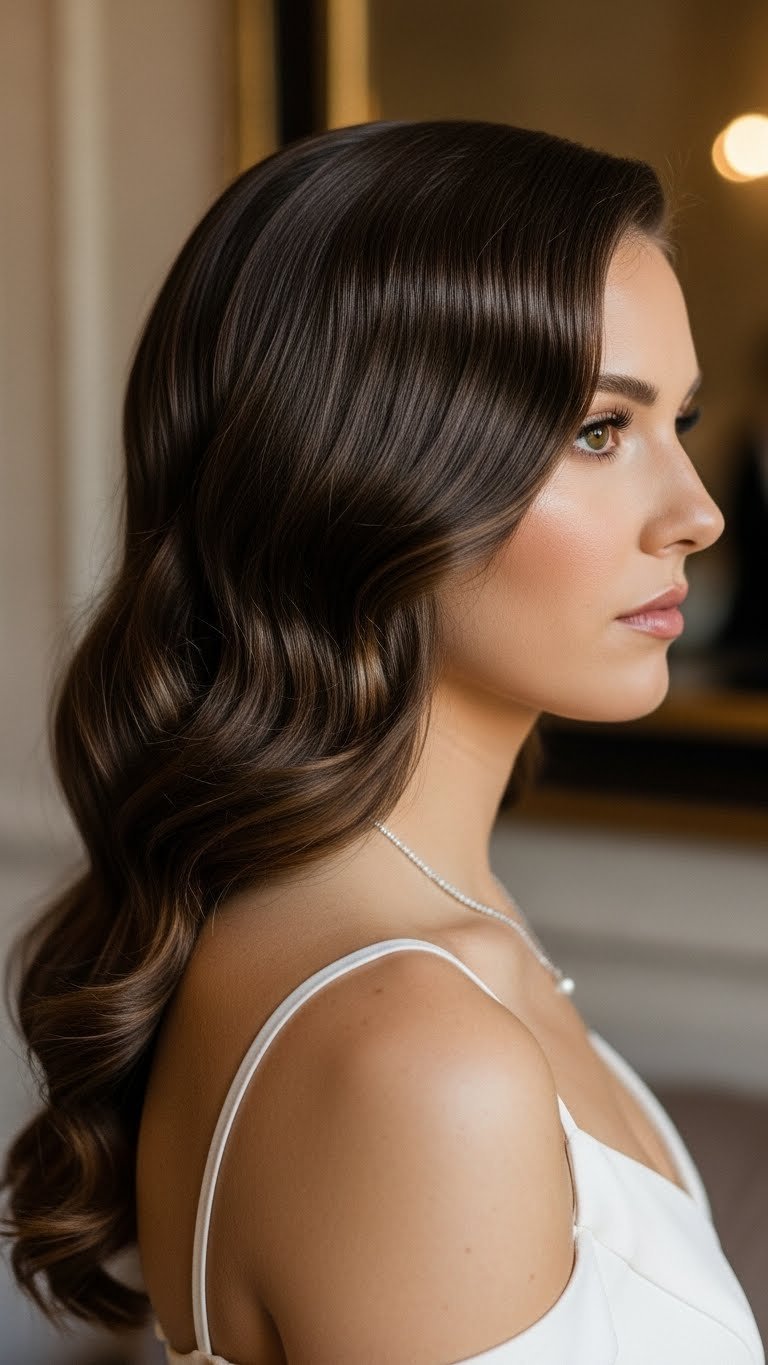
7. Rock a Voluminous Blowout with Soft Curls
Flaunt your luscious locks! Pin this voluminous blowout idea for your wedding hair goals.
A voluminous blowout with soft curls creates a high-impact, polished look that embodies classic bridal beauty and timeless glamour. This style focuses on maximizing body and movement, ideal for those who prefer wedding hair down and want to showcase healthy, shiny strands.
Unlike standard straightening, this technique prioritizes voluminous wedding hair by lifting the roots. It is one of the most versatile bridal hair looks, transitioning easily from a formal ceremony to a lively reception.
Products & Tools Used
- Volumizing mousse or spray
- Heat protectant spray
- Large round brush (2-inch diameter)
- Blow dryer with nozzle attachment
- Sectioning clips
- Large barrel curling iron (1.5-inch to 2-inch) or Velcro rollers (for setting)
- Light-hold flexible hairspray
Application/Styling Steps
- Prep Damp Hair: Apply volumizing mousse or spray evenly to towel-dried, damp hair, focusing on the roots. Mist with heat protectant.
- Rough Dry: Rough-dry your hair until it’s about 70-80% dry.
- Section & Blow Dry: Section hair horizontally. Using the round brush and blow dryer with a nozzle, lift hair at the roots and blow-dry each section upwards and away from your scalp. For each section, roll the brush down to the ends, ensuring the hair is completely dry and smooth. Roll the section around the brush and hit it with a cool shot for extra volume and set.
- Add Soft Curls (Optional): Once hair is dry, use a large barrel curling iron to create soft, flowing curls, curling sections away from your face. Alternatively, use large Velcro rollers immediately after blow-drying each section and let them cool completely.
- Finish: Gently brush out the curls with your fingers or a wide-tooth comb for a soft, blended look. Set your voluminous blowout with soft curls with a light mist of flexible hairspray.
Pro-Tip: To truly get voluminous wedding hair that lasts all day, especially in humid conditions addressing “keeping wedding hair in place all day,” incorporate velcro rollers into your routine. Roll freshly blow-dried or curled sections up and secure them while they cool. This ‘sets’ the style and adds incredible, long-lasting bounce and volume.

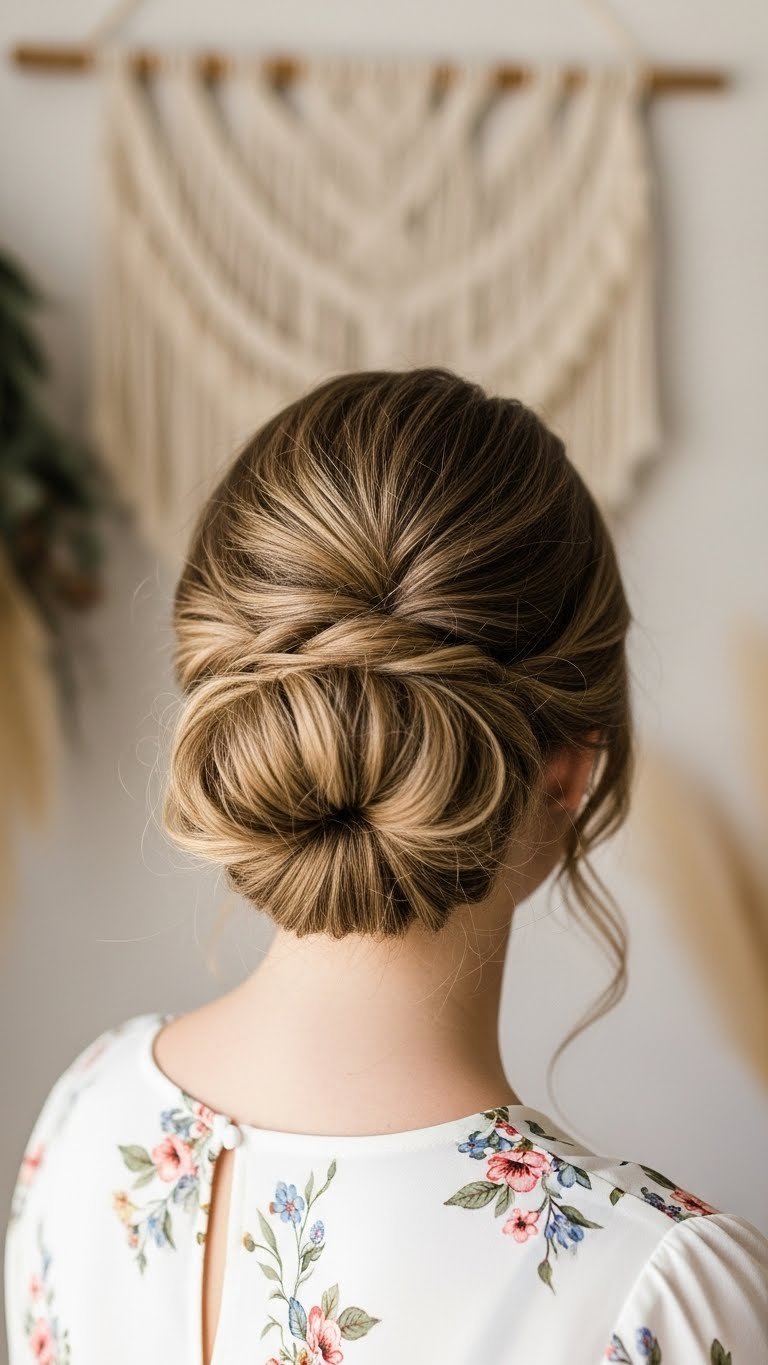
8. Master a Simple Twisted Low Bun (DIY-friendly)
Achieve elegance with ease! Pin this DIY-friendly twisted low bun tutorial.
A simple twisted low bun is the ultimate solution for DIY wedding guest hairstyles, offering a sophisticated look without complex braiding or heat styling. This style relies on basic twisting mechanics, making it accessible even if you have zero professional experience.
As an easy updo wedding option, this bun works beautifully for minimalist wedding hair. It keeps the focus on your face and outfit while ensuring your hair stays neat. It is a perfect low bun wedding style for anyone who wants to create wedding updo results in under ten minutes.
Products & Tools Used
- Hairbrush or comb
- Clear elastic hair tie
- Bobby pins (several, color-matched to hair)
- Light-hold hairspray
- Smoothing balm (optional, for sleekness)
Application/Styling Steps
- Prep Hair: Ensure hair is detangled and smooth. Apply a smoothing balm if desired for a sleek finish.
- Low Ponytail: Gather all your hair into a low ponytail at the nape of your neck and secure it with a clear elastic.
- Twist the Ponytail: Divide the ponytail into two equal sections. Twist each section individually until it forms a rope-like twist.
- Twist Together: Now, twist these two twisted sections around each other to form a single, larger twist.
- Form the Bun: Wrap the combined twist around the base of the ponytail, creating a circular bun shape.
- Secure & Finish: Tuck the end of the twist underneath the bun and secure it with several bobby pins, pushing them into the bun towards your scalp. Mist with light-hold hairspray to set the simple twisted low bun.
Pro-Tip: For the easiest and most secure simple twisted low bun, slightly dampening your hair with a mist of water or setting spray before twisting can increase pliability and hold, preventing strands from slipping, especially for “hair won’t hold curl wedding” type hair.

9. Create a Playful Bubble Braid Ponytail
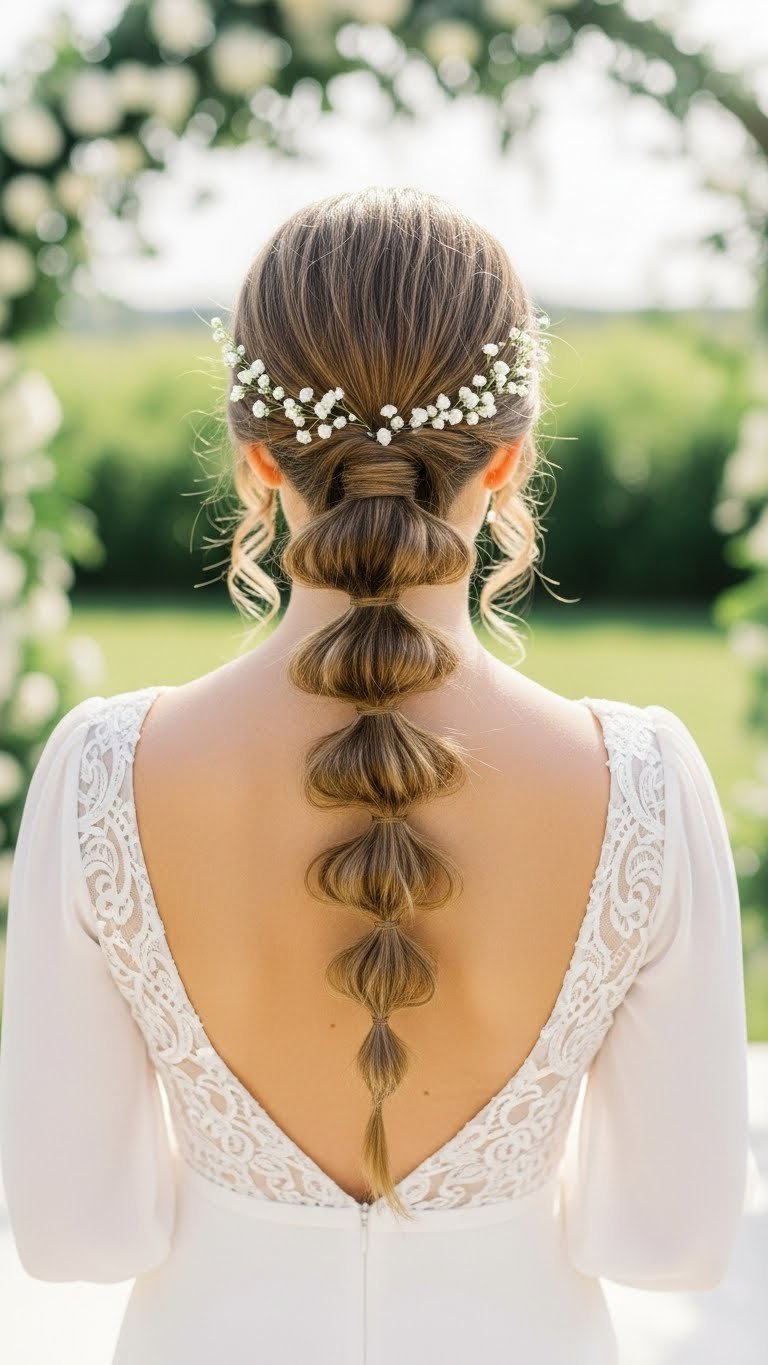
Add a touch of fun! Pin this trendy bubble braid ponytail for your wedding inspiration.
A bubble braid ponytail brings a youthful, fashion-forward energy to long hair wedding styles, transforming a standard ponytail into a structural masterpiece. This is one of the most popular trending wedding hairstyles because it adds massive volume and visual interest without complex weaving.
If you are looking for playful wedding hairstyles, this is a top contender. It is also an excellent answer for how to do ponytail wedding look queries where traditional ponies feel too plain. It works exceptionally well for guests wanting to stand out or brides seeking a unique reception look.
Products & Tools Used
- Hairbrush
- Small, clear elastic hair ties (many!)
- Volumizing powder or texturizing spray
- Light-hold hairspray
- Hair accessories (optional, e.g., small bows, pearls)
Application/Styling Steps
- Prep Hair: Start with dry hair. For added volume, apply volumizing powder or texturizing spray, particularly at the roots.
- High Ponytail: Gather all your hair into a sleek or slightly messy high ponytail and secure it with a clear elastic.
- First Bubble: Place another elastic band about 2-3 inches down from the first one, creating your first “bubble.”
- Create Volume: Gently pull on the hair between the two elastics to puff it out and create a voluminous, rounded “bubble” shape.
- Continue Bubbles: Continue placing elastic bands down the length of your ponytail, spacing them evenly (2-3 inches apart). After each elastic, gently pull the hair to create another bubble.
- Set & Accessorize: Once you’ve created bubbles down the entire length of your ponytail, mist with light-hold hairspray. You can add small hair accessories between each bubble for extra wedding flair.
Pro-Tip: To ensure your bubble braid ponytail has maximum volume and definition, especially for “thin hair wedding volume,” always gently pull outwards on the hair within each section. This technique, known as ‘pancaking,’ helps create fuller, more pronounced bubbles and makes the style look much richer.
10. Glamorize Short Hair with Accessories
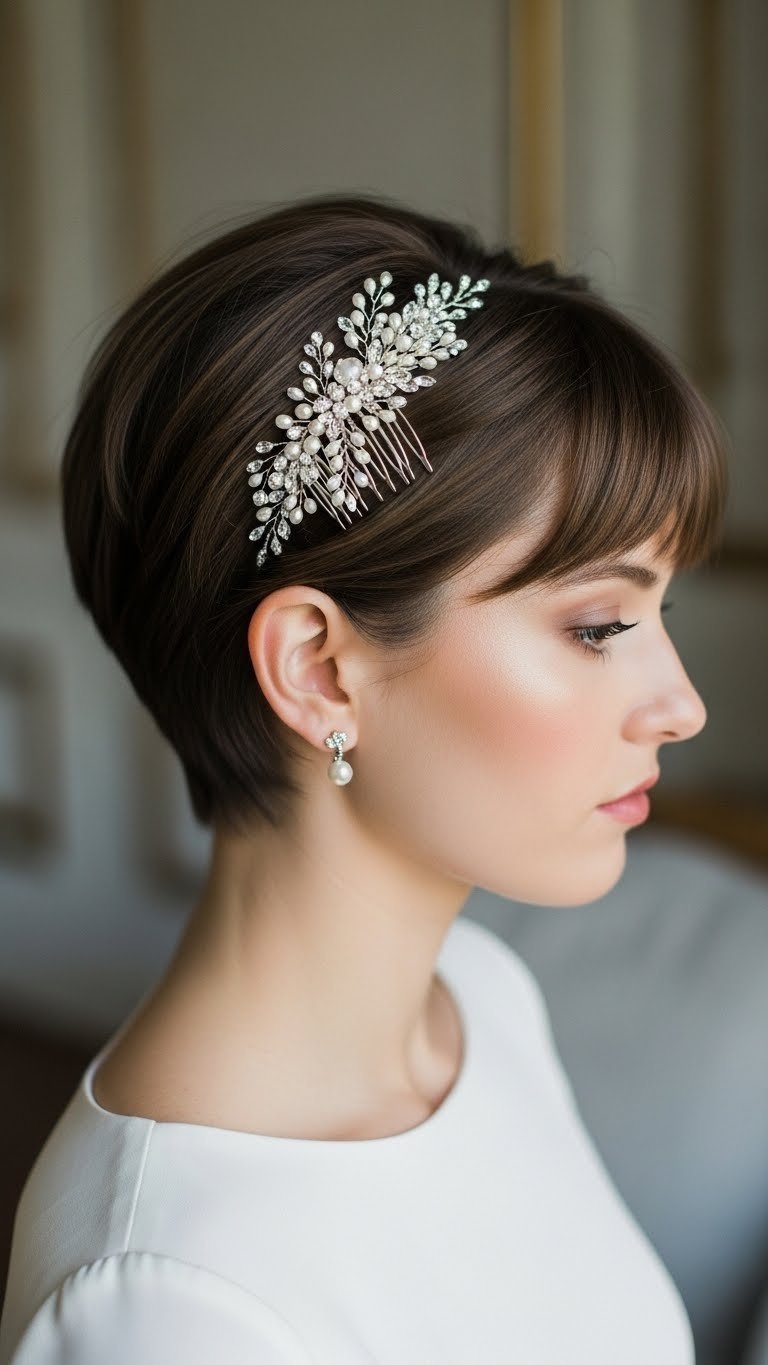
Short hair, don’t care! Pin this chic accessorized short hair idea for your wedding.
Accessorized short hair wedding styles prove that you don’t need Rapunzel lengths to achieve an elegant, formal look. By utilizing statement wedding hair accessories, you can instantly transform a daily pixie or bob into elegant short wedding hair.
The key to this look is texture and placement. Rather than struggling to force a short hair wedding guest cut into an updo, you embrace the length and let the accessory do the heavy lifting. This approach answers how to style short hair for a wedding with simplicity and grace.
Products & Tools Used
- Volumizing spray or mousse
- Texturizing spray (for bobs/lobs)
- Small curling iron or flat iron (for adding subtle bends)
- Strong-hold hairspray
- Elegant hair accessory (e.g., jeweled comb, pearl pins, delicate headband)
- Bobby pins (if securing a comb)
Application/Styling Steps
- Prep Hair: Start with clean, dry hair. Apply volumizing spray at the roots and texturizing spray throughout for grip and definition.
- Add Texture/Volume: For pixies, use a flat iron or small curling iron to add subtle bends and texture for movement. For bobs, add soft waves.
- Style: Create a side part or sweep hair back from the face, depending on your cut and the accessory chosen. Ensure the top has good lift and volume.
- Place Accessory: Position your chosen elegant hair accessory strategically. A comb can be tucked into a side-swept section, pins can accent one side, or a headband can crown the look.
- Secure: Use bobby pins to reinforce combs or clips if needed. Ensure the accessory is comfortable and firmly in place.
- Set with Spray: Finish with a strong-hold hairspray to keep your accessorized short hair perfect throughout the wedding.
Pro-Tip: When choosing an elegant hair accessory for short hair, consider the weight and how it will sit. Lighter, well-designed pieces with comb or pin attachments work best for a secure hold, preventing the “hair won’t hold curl wedding” and accessory slippage problems common with shorter styles.

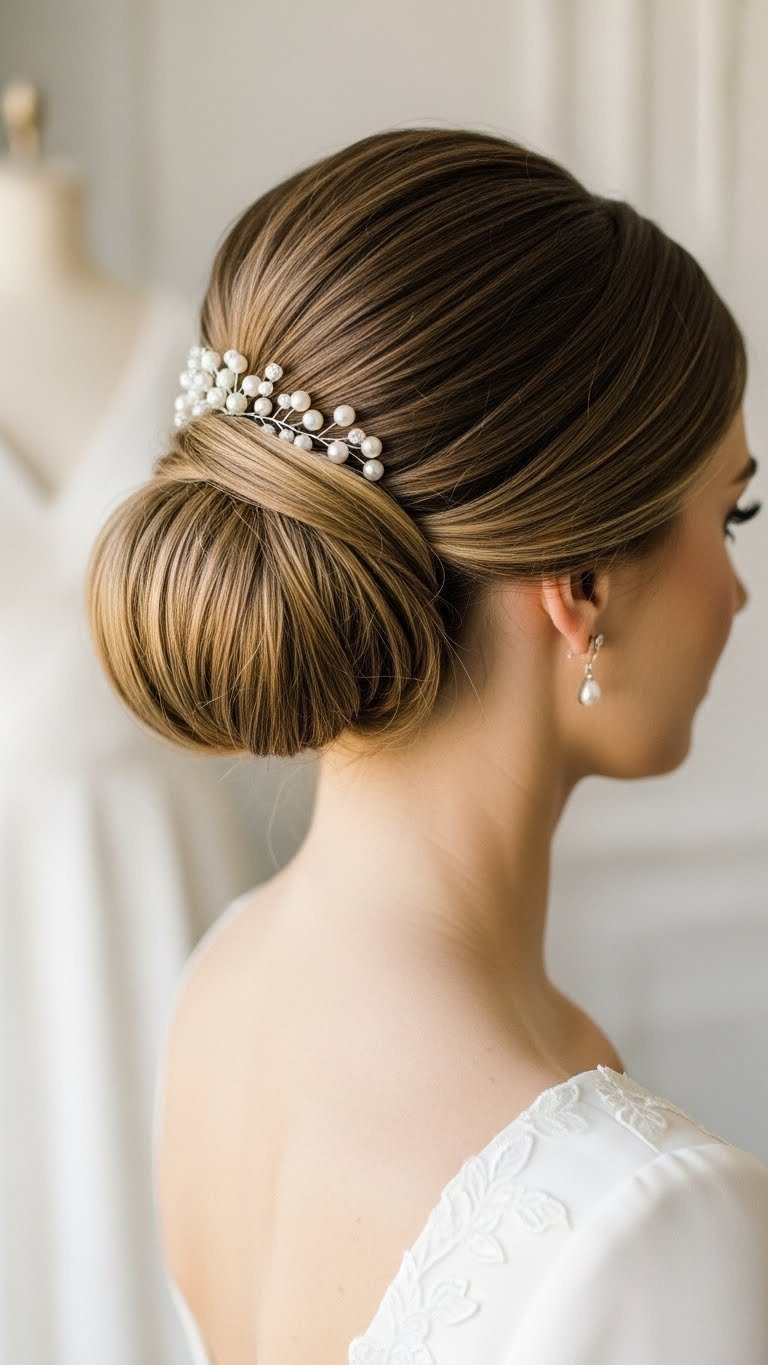
11. Elevate an Easy Updo with Pearl Embellishments
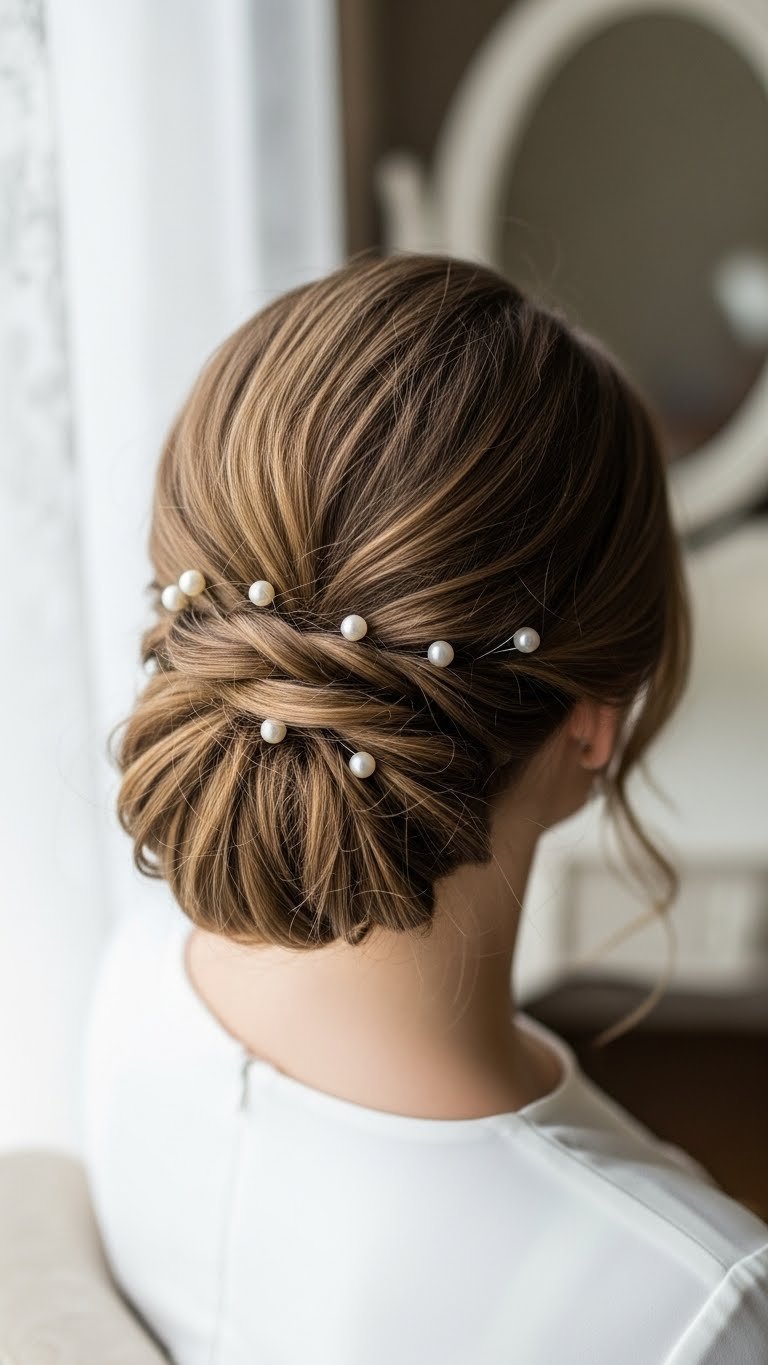
Add a touch of luxury! Save this pearl-embellished updo for your elegant wedding hair.
A pearl embellished updo transforms a basic bun into a work of art, relying on the classic beauty of pearls to create a sophisticated wedding hair statement. This style is ideal for easy updo wedding needs because the embellishments distract from any imperfections in the base style.
By integrating wedding hair accessories directly into the structure of the hair, you achieve bridal hair with pearls that looks expensive and custom-styled. It is the epitome of elegant wedding hairstyles for modern brides and formal guests.
Products & Tools Used
- Hairbrush
- Hair tie
- Bobby pins
- Pearl hair pins or other small decorative accessories
- Strong-hold hairspray
- Texturizing spray (optional, for grip)
Application/Styling Steps
- Prep Hair: Start with dry hair. Add texturizing spray if your hair is very fine to give it some grip.
- Create a Base Updo: Form a simple updo, such as a twisted low bun (as described in #8) or a slightly messy chignon. Secure it firmly with a hair tie and bobby pins.
- Place Pearls: Take your pearl hair pins and strategically place them throughout the bun or updo. You can scatter them randomly, create a pattern, or focus them around the base.
- Secure Pins: Ensure each pearl pin is pushed securely into the hair, deep enough to hold but not so much that it’s hidden. Use additional bobby pins if any pearl pins feel loose.
- Set the Style: Finish with a generous mist of strong-hold hairspray to keep both your updo and the embellishments in place throughout the event.
Pro-Tip: When using pearl embellishments or any small hair pins, apply a little hairspray directly to the pin before inserting it into your updo. This subtle trick significantly increases the grip and prevents the pins from slipping out, solving the “keeping wedding hair in place all day” problem for intricate styles.

Key Takeaways: Your Quick Guide to Wedding Hairstyles
To help you remember the essentials for achieving the perfect wedding hairstyles look, here is a quick summary of the most critical points.
- Choose “Easy” for Stress-Free Styling: Opt for easy wedding hairstyles that match your skill level and time constraints, whether you’re a bride or guest, to ensure a relaxed wedding day hair experience.
- Versatility for Every Role: Our 11 styles offer options for every role – from a classic low chignon for brides to a playful bubble braid ponytail for guests – ensuring appropriate elegance for any part of the wedding party hair.
- Prep is Paramount for Longevity: Proper hair preparation, including volumizing and heat protectant sprays, is crucial to ensuring your wedding day hair looks stay beautiful and in place from ceremony to reception.
- Accessories Elevate Any Look: Even the simplest styles, like accessorized short hair wedding or a pearl embellished updo, can be transformed with the right wedding hair accessories to match your attire or theme.
- Embrace Your Natural Texture: Many beautiful wedding hairstyles work with your hair’s natural texture; learn to enhance it for effortless, romantic wedding hairstyles that feel authentic.
- DIY is Doable with the Right Tools: With clear instructions and the right wedding hair tools and products (like those for a simple twisted low bun), you can master your own wedding day look without professional help.
- Address Hair Challenges Proactively: Utilize targeted solutions like frizz-control sprays and volumizing powders to ensure your hair holds, shines, and stays flawless, regardless of hair type or weather conditions.
People Also Ask About Hairstyles for Wedding
Navigating the etiquette and logistics of wedding hair can be tricky. Here are answers to the most common questions about styling your hair for the big day.
What hairstyle is best for a wedding guest?
The best hairstyle for a wedding guest is typically an elegant, comfortable style that complements your outfit without overshadowing the bridal party. Popular choices include simple updos, romantic half-up, half-down styles, or sleek ponytails, tailored to your hair length and the formality of the event. Ensure your choice is secure enough to last through the entire celebration.
Can I do my own wedding hair as a bride?
Yes, you can absolutely do your own wedding hair if you choose simple, elegant styles and practice extensively beforehand. Focus on easy wedding hairstyles like a twisted low bun or voluminous soft curls that you’ve mastered. Invest in high-quality wedding hair tools and products to ensure longevity and a polished finish for your special day.
How do I keep my wedding hairstyle in place all day?
To keep your wedding hairstyle in place all day, begin with proper hair preparation using texturizing sprays and heat protectants, and finish with a strong-hold, humidity-resistant hairspray. Strategic use of bobby pins, professional-grade hair ties, and even a “Pro-Tip” like backcombing for volume will reinforce your style, combating issues like “hair won’t hold curl wedding.”
What are the best wedding hairstyles for long hair?
For long hair, the options are extensive, including elegant updos like a classic low chignon, romantic half-up styles with braids, or glamorous side-swept waves. Long hair wedding styles allow for intricate detailing and impressive volume, offering versatility for both formal and casual wedding settings.
Should I wear my hair up or down for my wedding?
Deciding whether to wear your hair up or down for your wedding depends on your dress style, the weather, and your personal comfort. Updos, such as a pearl embellished updo, offer elegance and keep hair off your neck, ideal for warm climates or high-neck dresses. Downstyles like voluminous soft curls provide a romantic, flowing look that pairs beautifully with strapless gowns.
How far in advance should I book a wedding hairstylist?
It is recommended to book a wedding hairstylist 6-12 months in advance, especially during peak wedding seasons, to secure your preferred professional. This timeframe allows for hair trials, discussions about your desired bridal hairstyles, and adjustments to ensure your look is perfect for the wedding day hair.
What hairstyles suit a strapless wedding dress?
Strapless wedding dresses pair beautifully with a wide range of hairstyles, from elegant updos that highlight the shoulders and neckline, to romantic downstyles that cascade gracefully. A sleek high ponytail offers modern sophistication, while side-swept waves provide a classic, glamorous balance to the open décolletage.
How can I add volume to my wedding hair?
To add volume to your wedding hair, start with volumizing mousse or spray at the roots, then blow-dry with a large round brush, lifting at the crown. Techniques like backcombing or incorporating a textured messy bun can also create lasting lift. Finishing with a light texturizing spray will enhance fullness, addressing “thin hair wedding volume” concerns effectively.
What hair accessories are popular for weddings in 2026?
Popular wedding hair accessories in 2026 include delicate pearl pins, minimalist jeweled combs, and subtle floral accents that complement elegant or bohemian styles. These can elevate any look, from an accessorized short hair wedding to a classic low chignon, adding a touch of personalized sparkle or natural beauty without overwhelming the hairstyle.
What hairstyles for a formal wedding?
For a formal wedding, elegant and polished hairstyles such as a classic low chignon, a sleek high ponytail, or a sophisticated updo with pearl embellishments are ideal. These styles convey grace and refinement, ensuring your hairstyles for wedding complement the formality of the event and your attire.
Final Thoughts on Hairstyles for Wedding
Achieving the perfect look for a nuptial celebration doesn’t require a professional entourage or hours of stress. By mastering a few key wedding hairstyles, you can confidently approach any ceremony or reception knowing your hair reflects your personal style and elegance. Whether you choose a time-honored classic low chignon or decide to experiment with easy wedding hairstyles like a bubble braid, the most important element is your comfort and confidence.
We encourage you to practice your chosen style well in advance of the big day. Gather your wedding hair tools, test out different products, and refine your technique to ensure a smooth styling process. Remember, bridal beauty tips and expert advice are only as good as your execution, so give yourself the time to master wedding styling before the event.
Which of these easy styles will you be trying for your next event? We’d love to hear about your experience
Last update on 2026-01-17 / Affiliate links / Images from Amazon Product Advertising API