Are you scrolling endlessly through Pinterest, searching for the perfect Halloween nails only to find designs that are either too difficult for a DIY or just not you? It’s the final piece of the puzzle for your Halloween look, but finding that perfect blend of spooky, chic, and achievable can feel like a monster of a task.
You want to get into the festive spirit, but you don’t have hours to spend on complicated nail art, nor do you want to book an expensive salon appointment for a look you’ll only wear for a week. The struggle is real: you need creative, stylish ideas that you can actually bring to life, whether you’re a nail art novice or a seasoned pro.
The perfect Halloween nail design balances spooky themes with your personal style, and the best part is, you don’t need to be a professional artist to achieve a killer look. Whether you prefer cute ghosts, gory blood drips, or chic minimalist webs, there are simple DIY techniques, easy-to-use press-on nails, and clever nail art stickers that make achieving a professional look at home totally possible for 2026.
Struggling to Find the Perfect Spooky Touch for Your Halloween Look?
Finding the right nail design—one that’s festive but not overly complicated—can be a real challenge. You want something that complements your costume or adds a simple touch of Halloween spirit to your everyday look, but sifting through thousands of ideas is overwhelming. As a content strategist obsessed with seasonal trends, I’ve spent hours curating the best, most achievable Halloween nail designs from top artists and viral Pinterest boards. This list is your ultimate guide to 21 diverse, stylish, and totally doable ideas for every skill level, updated for 2026. From easy DIY tutorials to stunning press-ons that take minutes to apply, your perfect spooky manicure is just a scroll away.
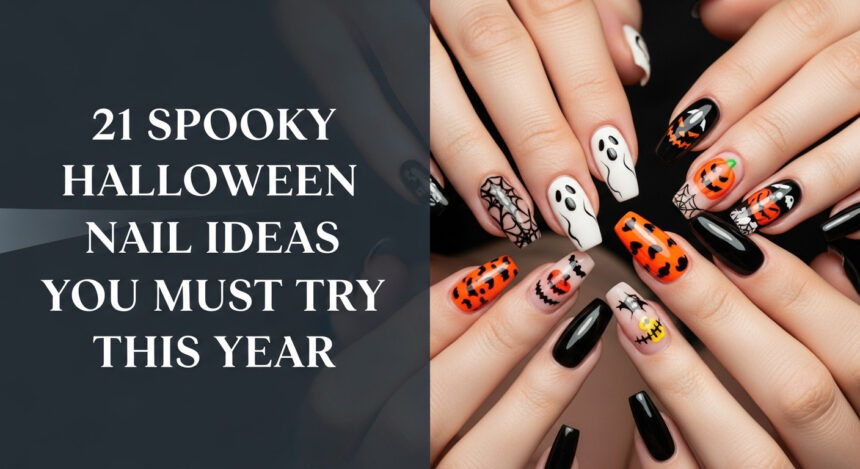
21 Spooky Halloween Nail Ideas You Must Try This 2026
Get ready to screen-shot! This list is packed with 21 distinct and exciting nail art concepts that will elevate your Halloween style. We’ve curated this collection from the latest trends seen on pro nail artist Instagrams and top-performing Pinterest pins, ensuring every idea is both stylish and popular for the season. For each design, you’ll find actionable tips and visual inspiration perfect for saving directly to your Pinterest boards.
1. Classic Ghostly French Tips

Save this idea to your ‘Spooky Season Nails’ board!
This elegant look is surprisingly easy to achieve. For the simplest method, press-on nails are your best friend.
- Materials Needed: Nude or clear base polish, white polish, black polish, fine-liner nail art brush or a dotting tool, glossy top coat.
- Step-by-Step Directions:
- Apply your nude base coat and let it dry completely.
- Using the white polish, paint a wavy, ghost-like shape at the tip of each nail, letting the bottom edge drip down slightly unevenly.
- Once the white is dry, use a dotting tool or the very tip of a fine-liner brush dipped in black polish to create two small dots for eyes on each ghost.
- Seal your design with a glossy top coat for a long-lasting finish. For perfect results with zero effort, look for a high-quality set of ghost-themed French tip press-on nails.
Pro-Tip: If your hand isn’t steady, paint the white ghost shape first, then clean up the bottom edge with a small brush dipped in acetone for a perfect curve.

2. Minimalist Spiderweb Accents

Pin this chic spiderweb look for later!
This design is all about spooky elegance. The easiest way to get flawless webs is with nail art stickers or a stamping kit.
- Materials Needed: Glossy black polish, white polish, a super-fine liner brush OR spiderweb nail art stickers, top coat.
- Step-by-Step Directions:
- Paint all nails with two coats of glossy black polish and let dry.
- Sticker Method: Carefully place a white spiderweb nail sticker on your desired accent nails (usually the ring finger). Press down firmly to smooth it out.
- DIY Method: Using a very fine liner brush and white polish, draw three or four thin lines radiating from one corner of the nail. Then, connect them with small, curved lines to create the web.
- Apply a top coat to seal the sticker or your hand-painted design and add shine.
Lesson Learned: Don’t overload your liner brush with polish. A tiny amount gives you much finer, crisper lines for a more delicate web.

3. Gory Blood Drip Manicure
The key to realistic blood drips is using the right polish and technique. A sheer, buildable red “jelly” polish works best for a translucent, fresh-blood look.
- Materials Needed: Clear or nude base polish, a sheer ruby red or burgundy jelly nail polish, a dotting tool, glossy top coat.
- Step-by-Step Directions:
- Apply your clear or nude base and let it dry.
- Using the red polish brush, apply a swipe near your cuticle.
- Before it dries, take a dotting tool, dip it in the red polish, and place a few dots along the edge of the polish near your cuticle.
- Immediately drag the dotting tool downwards from each dot to create the “drip” lines of varying lengths. The jelly polish consistency will help it settle naturally.
- Add a second layer to the drips to build up a 3D, glossy effect. Finish with a top coat.
Pro-Tip: For an extra gory “splatter” effect, dip an old toothbrush in red polish and flick the bristles towards your nails over a protected surface.

4. Chic Black Cat-Eye Nails

Pin this magical manicure for a witchy vibe!
This mesmerizing effect requires a special type of magnetic polish and a magnet wand. It’s most commonly done with gel polish for the best, long-lasting results.
- Materials Needed: Black gel base coat, black cat-eye gel polish, a nail art magnet wand, UV/LED nail lamp, gel top coat.
- Step-by-Step Directions:
- Prep your nails and apply a black gel base coat. Cure under the UV/LED lamp according to the polish instructions.
- Apply a thick coat of the black cat-eye gel polish. Do not cure it yet.
- Take your magnet wand and hold it close to the wet polish for 5-10 seconds. Hold it diagonally or vertically to manipulate the magnetic particles into a sharp line of light.
- Once you’re happy with the effect, immediately cure the nail under the lamp to lock the design in place.
- Finish with a layer of no-wipe gel top coat and cure one last time.
Pro-Tip: Experiment with different magnet shapes and angles! Holding the magnet at the tip of the nail will push the shimmer into a French tip shape, while a round magnet can create circular patterns.

5. Cute Pink Pumpkin Patch

Save this adorable pink-o-ween idea!
This sweet design is perfect for those who love Halloween but prefer cute over creepy. Nail decals are the fastest way to get perfect little pumpkins without any freehand drawing.
- Materials Needed: Pastel pink base polish, white and orange polish, a fine-liner brush or dotting tool, green polish OR pumpkin nail art decals, top coat.
- Step-by-Step Directions:
- Apply two coats of pastel pink polish to all nails.
- Decal Method: Once dry, apply tiny pumpkin decals to your accent nails. This is the easiest and neatest method.
- DIY Method: Use a dotting tool to create two overlapping dots of orange or white polish to form the pumpkin shape. Use the tip of a fine brush to add a tiny green stem.
- On the other nails, you can add a coat of fine glitter for extra sparkle.
- Finish all nails with a glossy top coat.
Pro-Tip: For a more dimensional DIY pumpkin, use a slightly darker orange to draw faint vertical lines on your pumpkin shape before the polish fully dries.

6. Matte Black Bat Silhouettes

Save this moody matte look to your Halloween Inspo board!
The matte top coat is the non-negotiable key to this chic, velvety look, instantly elevating simple black details.
- Materials Needed: Nude or sheer base polish, black polish, tiny nail art brush OR bat-shaped nail stickers/decals, and a high-quality matte top coat.
- Step-by-Step Directions:
- Apply two coats of your nude base polish and allow it to dry completely.
- Sticker Method: The easiest way to get crisp bats is to use pre-made bat nail stickers. Apply them carefully to your accent nails.
- DIY Method: Use a very fine nail art brush to paint small bat shapes. Start with a small “m” shape for the top of the wings, then add a “v” below it for the body and bottom of the wings.
- Wait for the black polish to dry completely.
- Apply one coat of matte top coat over all nails. This will instantly transform the look from glossy to a sophisticated, velvety finish.
Pro-Tip: Be patient! Make sure the black polish is 100% dry before applying the matte top coat, otherwise it can smear your delicate bat designs.

7. Wednesday Addams Inspired Nails

Pin this chic gothic look for a touch of gloom!
Precision is key for this look. A set of fine-liner nail art brushes will be your best asset for creating the sharp collar and moon shapes.
- Materials Needed: Clear or sheer nude polish, black polish, white polish, fine-liner nail art brush, dotting tool, glossy top coat.
- Step-by-Step Directions:
- For the Moon Nails: Apply your clear/nude base. Use a fine brush to carefully paint a black crescent shape along your cuticle line, filling it in.
- For the Accent Nail: Paint the nail black. Once dry, use a white polish and a fine brush to paint the two halves of the collar at the base of the nail.
- Let the collar dry, then use a dotting tool to add two or three tiny black dots for buttons down the center.
- Finish all nails with a glossy top coat.
Pro-Tip: To get a perfect crescent moon shape, use French tip guide stickers in reverse at your cuticle as a stencil for the black polish.

8. Frankenstein’s Stitches

Save this monstrously cool idea!
This is a fantastic design for beginners because imperfection actually adds to the spooky charm of the stitched-together look.
- Materials Needed: A ‘slime’ or ‘zombie’ green polish, black polish, a fine-liner nail art brush or a black nail art pen, matte or glossy top coat.
- Step-by-Step Directions:
- Paint all nails with two coats of your green polish and let it dry.
- Using a black nail art pen or a fine-liner brush, draw simple lines across your nails to be the main part of the stitch. Don’t worry about them being perfectly straight.
- Draw small, perpendicular dashes or ‘x’ shapes across the main lines to complete the stitched look. Vary the placement and direction on each nail.
- Let the black details dry completely. Finish with either a glossy top coat for a fresh look or a matte top coat for a dried-out, spookier vibe.
Pro-Tip: A black nail art pen offers much more control than a brush for drawing fine lines, making it a great tool for beginners attempting this design.

9. Spooky Aura Nails

Pin this trendy and mystical Halloween look!
The professional airbrushed aura look can be replicated at home using a simple tool: a disposable makeup sponge.
- Materials Needed: A dark base polish (black, deep purple, or navy), a bright contrasting polish (neon orange, slime green), a small piece of a makeup sponge, and a top coat.
- Step-by-Step Directions:
- Paint your nails with two coats of the dark base color and let them dry completely.
- Put a small drop of the bright polish onto a non-porous surface (like a piece of foil).
- Dab the makeup sponge lightly into the bright polish. Dab off the excess on the foil so the sponge isn’t saturated.
- Gently press and dab the sponge onto the center of your nail, concentrating the color in the middle and fading it out towards the edges. Build up the color slowly until you have a soft, glowing orb effect.
- Clean up any polish on your skin and finish with a glossy top coat.
Pro-Tip: For a more intense center, go back with a slightly smaller sponge or even a q-tip to concentrate the color right in the middle of the aura after the first layer is applied.

10. Villainous Green Velvet Nails

Save this wickedly luxurious manicure idea!
This look is achieved with a special magnetic polish, but the magnet is used differently than for cat-eye nails to create an all-over, diffused shimmer.
- Materials Needed: Green velvet magnetic gel polish (or lacquer), a nail art magnet wand, a UV/LED lamp (for gel), and a gel top coat.
- Step-by-Step Directions:
- Apply a base coat (and a black base color if recommended by your polish for extra depth). Cure if using gel.
- Apply a coat of the green velvet magnetic polish.
- Before curing, hover the magnet wand over the nail for 5-10 seconds. Instead of creating a line, hold it flat and move it around the edges to activate the particles and create a diffused, velvety shimmer.
- Cure immediately under the lamp to lock in the effect.
- Apply a glossy top coat and cure for the final time.
Pro-Tip: To avoid a dark line forming, try holding the magnet on all four sides of the nail (top, bottom, left, right) for a few seconds each. This will push the magnetic particles towards the center, enhancing the velvet-like depth.

11. Mix-and-Match Spooky Skittle Mani

Can’t decide on a design? Pin this idea to do them all!
This is all about creativity! The easiest way to achieve this look is by combining solid colors with simple nail art stickers and decals.
- Materials Needed: A collection of Halloween-colored polishes (orange, black, white, red, glitter), various Halloween nail stickers (ghosts, bats, etc.), fine brushes, and a top coat.
- Step-by-Step Directions:
- Plan your designs! Assign a different look to each nail.
- Thumb (Example): Solid glossy orange.
- Index Finger: White base with red polish splatters.
- Middle Finger: Black base with a simple ghost sticker.
- Ring Finger: Solid black glitter polish.
- Pinky Finger: White base with thin black vertical stripes painted with a liner brush.
- Let each nail dry completely before finishing with a top coat to seal in all the different designs.
Pro-Tip: To keep the look cohesive, stick to a limited color palette of 3-4 colors across all ten nails, even with different designs.

12. Cute Mummy Nails with Peeking Eyes

Pin this adorable mummy manicure!
The charm of this design is its imperfection. This makes it great for DIY beginners who don’t have a steady hand.
- Materials Needed: An off-white or light gray polish, black polish, white polish, a fine-liner brush, a dotting tool, and a top coat. You could also use tiny googly eye nail charms.
- Step-by-Step Directions:
- Paint your nails with the off-white base color and let dry.
- Using the fine-liner brush and black polish, paint thin, slightly wavy lines crisscrossing over the nail. Leave a small gap on one nail where the eyes will go.
- In the gap, use a dotting tool to make two black dots for the eyes. Once dry, add a smaller white dot on top of each black dot to make them pop.
- For an even easier method, apply tiny googly eye nail art embellishments into wet top coat instead of painting the eyes.
- Seal the design with a glossy or matte top coat.
Lesson Learned: Don’t try to make the wrap lines perfect. Letting them be a little shaky and uneven makes the mummy design look more authentic.

13. Subtle Black Crescent Moons

Save this for a touch of everyday magic!
The easiest and most consistent way to get this delicate, minimalist look is with tiny, high-quality nail stickers.
- Materials Needed: A clear or sheer pink polish, tiny black crescent moon nail stickers, and a glossy top coat.
- Step-by-Step Directions:
- Apply one or two coats of your clear or sheer base polish for a clean, healthy look. Let it dry completely.
- Using tweezers, carefully peel a crescent moon sticker and place it on your nail. You can place it near the cuticle (like a reverse moon) or floating anywhere on the nail bed.
- Press the sticker down firmly to ensure there are no air bubbles.
- Apply one or two layers of a glossy top coat to seamlessly seal in the sticker and make it look like it was hand-painted.
Pro-Tip: Double top coat is the secret to making stickers look seamless. Apply the first coat, let it dry for a few minutes, then apply the second for a plump, gel-like finish.

14. Candy Corn Ombré

Pin this sweet and classic Halloween nail idea!
The ombré or gradient effect is best achieved using a makeup sponge to dab on and blend the colors smoothly.
- Materials Needed: A white polish, orange polish, yellow polish, a makeup sponge, liquid latex or tape for skin protection, and a glossy top coat.
- Step-by-Step Directions:
- Paint a base coat of white on all nails and let it dry. This makes the colors pop.
- Apply liquid latex or tape to the skin around your nails to make cleanup easier.
- On a flat makeup sponge, paint stripes of your polish in order: yellow, then orange, then white.
- Gently dab the sponge onto your nail, moving it slightly up and down to blend the colors. Repeat until the gradient is opaque and blended to your liking.
- Peel off the liquid latex. Clean up any remaining polish on your skin with a brush and acetone.
- Finish with a generous layer of glossy top coat, which will further smooth out and blend the gradient.
Pro-Tip: Before dabbing on your nail, do a test dab on a piece of paper to see how the colors blend and to remove any excess polish from the sponge.

15. Werewolf Claws

Unleash your inner beast and save this fierce look!
The key to this look is a sharp, clean V-shape. Nail vinyls or simple striping tape can help you get a perfect line with no freehanding required.
- Materials Needed: A nude or beige base polish, a black or dark brown polish, thin striping tape or V-shaped nail vinyls, and a top coat.
- Step-by-Step Directions:
- Apply your nude base coat and let it dry completely. This is very important.
- Place two pieces of striping tape on your nail to create a sharp V-shape, with the point facing your cuticle. Ensure the tape is pressed down firmly to prevent bleeding.
- Carefully paint the area from the V-shape to the tip of your nail with the black polish.
- Immediately and carefully remove the tape while the black polish is still wet. This gives you the crispest line.
- Let the design dry, then seal with a glossy or matte top coat.
Pro-Tip: Pull the tape off in the direction of the polish (towards the tip of the nail) to avoid smudging the wet line.

16. Orange and Black Plaid Nails

Save this cozy-cute idea for a perfect Fall look!
A very thin liner brush is essential for creating clean plaid lines, but for a much easier version, plaid press-on nails are a great option.
- Materials Needed: An orange base polish, black polish, white polish, a super-fine liner brush, and a glossy top coat.
- Step-by-Step Directions:
- Paint your accent nail with two coats of orange polish. Paint the other nails orange as well. Let dry.
- On the accent nail, use the liner brush and black polish to paint two vertical lines and two horizontal lines. Don’t worry about perfection.
- Clean your brush. Now, use the white polish to paint a single, thinner line next to one of the black vertical lines and one of the black horizontal lines.
- Let the intricate design dry completely.
- Finish all nails with a glossy top coat. For a much easier version, look for plaid-patterned press-on nails.
Pro-Tip: Rest your painting hand on a stable surface to minimize shaking when drawing the long, straight lines required for the plaid pattern.

17. Pop Art Zombie Nails

Pin this bold and artsy Halloween nail idea!
A black nail art pen will give you the control needed for the thick comic-book outlines and bold details for this graphic look.
- Materials Needed: A bright green polish, a black nail art pen or fine liner brush, white polish, a dotting tool, and a glossy top coat.
- Step-by-Step Directions:
- Paint your nails with the bright green base and let dry.
- Use the black nail art pen to draw the zombie features. Think simple and graphic: two angry U-shapes for eyes, a jagged line for a stitched mouth, etc. Outline the entire nail for a true comic-book panel feel.
- Use a dotting tool and white polish to add a few highlights or reflection marks.
- Let the black and white details dry completely.
- Seal with a glossy top coat to make the colors pop.
Pro-Tip: Look up Roy Lichtenstein’s art for inspiration on how to use bold lines and simple shapes to convey expression in the pop art style.

18. Goth Girl Chrome Details

Save this edgy, textural look for your inner goth!
This is an advanced gel technique that provides a stunning 3D metallic effect. For an easier alternative, use metallic silver press-on nails with 3D details.
- Materials Needed (Advanced): Black gel polish, builder gel in a bottle, a no-wipe gel top coat, silver chrome powder with applicator, UV/LED lamp.
- Step-by-Step Directions (Advanced):
- Apply and cure two coats of black gel polish.
- Apply and cure a no-wipe top coat.
- Using builder gel, draw your 3D designs (drips, lines, crosses) on top of the cured top coat. Cure the builder gel.
- Gently rub the silver chrome powder onto the raised builder gel designs. The powder will only stick to the gel.
- Dust off the excess powder. Carefully apply a top coat only over the chrome parts to seal them without covering the black base. Cure one final time.
Pro-Tip: A little builder gel goes a long way. Use a thin liner brush to apply it for more control over your 3D shapes.

19. Blood Splatter French Manicure
The easiest way to get the perfect base for this design is with classic French manicure press-on nails, then you can add the gory splatter yourself!
- Materials Needed: Classic French manicure press-on nails OR sheer pink and white polish, a bright red polish, a stiff brush or fan brush.
- Step-by-Step Directions:
- Start with your classic French manicure base, either by applying press-ons or painting it yourself. Let it dry completely.
- Protect your work surface. Pour a small amount of red polish onto a piece of foil.
- Dip the very tips of your stiff brush into the red polish.
- Hold the brush over your nails and use your finger to flick the bristles, creating a fine splatter effect. Experiment with distance and force to vary the splatter size.
- Once the red splatter is dry, seal the design with a glossy top coat.
Lesson Learned: Less is more. Start with a very small amount of polish on the brush to avoid large, messy blobs. You can always add more splatter.

20. Royal Purple & Black Ombré

Save this vampy and magical ombré look!
Just like the candy corn ombré, a makeup sponge is your best friend for this blended look. For a flawless finish, seek out pre-made purple and black ombré press-on nails.
- Materials Needed: Black polish, royal purple polish, a makeup sponge, liquid latex, and a glossy top coat.
- Step-by-Step Directions:
- Apply liquid latex around your nails for easy cleanup.
- On your makeup sponge, paint a stripe of black polish and a stripe of purple polish right next to it, slightly overlapping them.
- Dab the sponge onto your nail repeatedly, moving it slightly to blend the colors. The first coat may look sheer; build it up with a second or third pass (re-applying polish to the sponge each time).
- While the polish is still tacky, remove the liquid latex.
- Clean up the edges and finish with a generous glossy top coat to smooth the gradient. For a flawless finish, seek out purple and black ombré press-on nails.
Pro-Tip: Applying a base coat of the lighter color (purple) before sponging can help the gradient appear smoother and require fewer coats.

21. Halloween Nails for Kids (Spooky Stickers)

Pin this super easy and fun idea for your little monster!
The absolute easiest and most kid-friendly method for fun Halloween nails is using stickers or pre-glued press-on nails designed for kids.
- Materials Needed: A non-toxic, kid-friendly nail polish in a fun color, and a sheet of cute Halloween nail stickers.
- Step-by-Step Directions:
- Paint one or two coats of a fun, non-toxic polish on the child’s nails. Let it dry completely.
- Let your child pick out their favorite stickers!
- Peel the stickers from the sheet and press them firmly onto the painted nails.
- You can apply a water-based top coat to help the stickers last a little longer, but it’s not necessary for a single day of fun.
- Alternatively, use kid-sized Halloween press-on nails that come with adhesive tabs for a no-mess, no-dry-time option.
Pro-Tip: Look for nail polish brands that are specifically marketed as “non-toxic” or “10-free” for peace of mind when painting little fingers.

Key Takeaways: Your Quick Guide to Spooky & Stylish Nails
- Embrace the Trends: Give trendy styles like Aura, Velvet, and Chrome nails a spooky twist with Halloween color palettes like black/orange or deep green.
- Classics Are Key: You can’t go wrong with timeless motifs. Ghosts, spiderwebs, pumpkins, and blood drips are always in style for Halloween.
- Don’t Fear DIY: Many impressive designs, like Frankenstein’s stitches or spooky splatters, are surprisingly easy and don’t require perfect, steady hands.
- Stickers & Press-Ons Are Your Best Friend: For intricate designs like delicate spiderwebs, character art, or a perfect French manicure base, high-quality press-on nails and nail art stickers are the fastest way to get a professional look with zero stress.
- Think Beyond Orange & Black: While classic, don’t forget to play with pinks, purples, greens, and metallics to create a unique and modern Halloween manicure.
People Also Ask About Halloween Nails
What is the easiest Halloween nail design?
The easiest Halloween nail designs involve using nail art stickers or decals. Simply paint your nails a base color like black or orange, let it dry, and then apply cute stickers like ghosts, pumpkins, or spiderwebs. Sealing it with a top coat makes it last. Another incredibly easy option is using Halloween-themed press-on nails, which require no drying time or artistic skill.
Does Spirit Halloween have nails?
Yes, Spirit Halloween typically sells a variety of Halloween-themed nails. Their selection often includes press-on nails for adults and kids with spooky designs like ghosts, skeletons, and bloody effects, as well as nail stickers and wraps. These products are perfect for adding a final, festive touch to a costume without the effort of DIY nail art.
What are the best fake nails for Halloween?
For temporary Halloween wear, press-on nails are the best choice. They are easy to apply, come in countless spooky and creative designs, and are easy to remove without damaging your natural nails. Brands like KISS and imPRESS offer special Halloween collections. For a stronger, more durable option that lasts longer, acrylic nails offer the most strength but require professional application and removal.
How can I make my Halloween nails subtle?
For a subtle Halloween look, focus on minimalist designs on a neutral or clear base. Try a single tiny black bat sticker or a crescent moon on each nail. A “skittle” manicure with muted fall colors (like deep red, olive, and mustard) or a sophisticated matte black nail with one simple spiderweb accent are also great understated options.
Final Thoughts
Now you have 21 spooky and stylish ideas to choose from! Whether you go for a cute ghost or a gory blood drip, your nails are sure to be a conversation starter. Halloween nails are a fun, temporary way to express your creativity and get into the spirit of the season. There truly is a perfect design for every style, costume, and skill level.
Which design are you most excited to try for Halloween this 2026? Let me know in the comments below
Last update on 2026-03-04 / Affiliate links / Images from Amazon Product Advertising API


