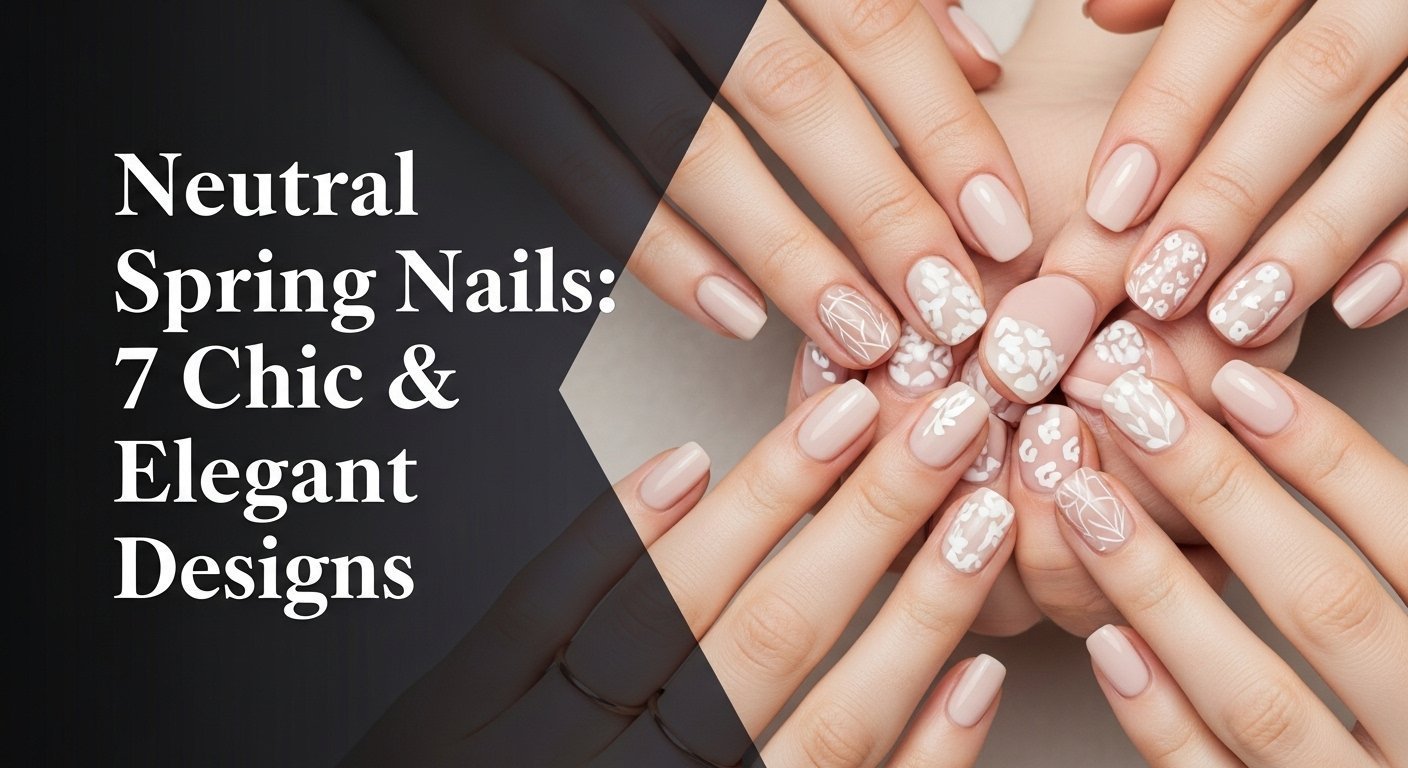
Tired of dark winter polishes but not quite ready for bold summer neons? You’re looking for that perfect in-between, an elegant and versatile manicure that feels fresh for the new season. This search for the ideal neutral spring nails is about finding a look that’s both sophisticated and modern.
The best neutral spring nails for 2026 are chic, elegant designs that feature milky, sheer, or soft pastel-undertone polishes. Popular styles include the minimalist milky manicure, subtle floral accents on a nude base, and modern micro-French tips that offer a versatile, professional look perfect for the season. This approach combines timeless elegance with fresh, on-trend details.
Drawing from comprehensive analysis of current Pinterest trends and insights from professional nail technicians, this guide establishes a new standard for spring manicures. You will discover 7 specific, replicable designs that embody the ‘quiet luxury’ aesthetic. Get ready to find your signature spring look that is both effortless and exceptionally chic.
What Are The Best Neutral Spring Nails for an Elegant Look in 2026?
The quest for the perfect spring neutral manicure is a popular one each year. As the weather warms, there’s a collective desire to move away from the deep, heavy tones of winter towards something lighter, fresher, and more optimistic. However, not everyone wants to jump straight into bright pastels or vibrant neons. This is where elegant neutral spring nails come in, serving as the perfect bridge. They offer a polished, sophisticated, and incredibly versatile option that complements the changing season and spring fashion wardrobes. For 2026, the trend leans heavily towards “less is more,” with a focus on healthy-looking nails enhanced by sheer and milky finishes, minimalist art, and modern twists on classic designs. These styles champion a natural-looking finish that is perfect for professional settings, spring events like weddings, and everyday chic elegance.
7 Chic & Elegant Neutral Spring Nail Designs for 2026
Below, we explore seven distinct and beautiful interpretations of the neutral spring nails trend. Each design is broken down with a list of necessary products and actionable, step-by-step instructions to help you create the look at home or to show your nail technician for inspiration. These nude nail designs range from the utterly minimalist to those with a subtle touch of artistry, ensuring there’s a perfect option for every style preference. We’ll cover everything from achieving the perfect milky finish to mastering the modern micro-french technique, providing manicurist tips to ensure a flawless, salon-grade result.
1. Create The Timeless Milky Sheer Manicure

Pin this “Clean Girl” nail look to your spring style board!
This look is the cornerstone of the Clean Girl aesthetic. It’s sophisticated, clean, and enhances the beauty of your natural nails rather than hiding them. The key is a translucent finish that gives a healthy, uniform look.
Products & Tools Used
- A high-quality sheer pink or milky white nail polish (e.g., OPI “Bubble Bath” or Essie “Ballet Slippers”).
- A high-gloss, long-wear formula top coat.
- Base coat designed to hide nail ridges.
- Cuticle oil with jojoba or vitamin E.
- Fine-grit nail buffer.
Application Steps
- Prep the nails by filing them into a soft almond-shaped or rounded square shape. Gently push back cuticles.
- Buff the nail surface lightly to remove oils, then cleanse with an alcohol wipe for a perfect base.
- Apply one thin layer of your ridge-filling base coat and let it dry completely.
- Layer one thin coat of your chosen milky polish. The key to avoiding streaks is a very thin application. Let it dry for 2-3 minutes.
- Apply a second thin coat to build the translucent color. Avoid thick layers. For a more opaque look, add a third coat.
- Seal the manicure with a high-gloss top coat, making sure to cap the free edge of the nail to prevent chipping.
Pro-Tip: The secret to a perfect milky manicure is ‘floating’ the brush. After the initial stroke, lift the brush slightly so it glides over the polish layer below, rather than dragging it. This prevents streaks and creates a flawless, structured manicures look at home.

2. Design Subtle Floral Accent Nails

Save this delicate spring nail art idea for your next manicure!
A neutral + floral combination is the quintessential spring look. This version keeps it modern and minimal, with tiny, delicate flowers on a clean nude spring nails base. It’s a perfect example of simple nail art that makes a big impact.
Products & Tools Used
- Your favorite classic nude polish (beige, taupe, or nude-pink).
- Opaque white polish for the petals.
- A dotting tool or the end of a bobby pin.
- A fine-tipped nail art brush (optional, for leaves).
- A high-gloss top coat.
Application Steps
- Paint two coats of your chosen neutral base color on all nails and let them dry completely.
- On your chosen accent nail (usually the ring finger), use the dotting tool to create the flower.
- Design the flower by placing five small white dots in a circle to form the petals.
- Wait for the white dots to become semi-dry. You can use the same dotting tool with a tiny amount of your base color or a gold polish to place a single dot in the center.
- (Optional) Use a fine-tipped brush and a muted green polish to paint one or two tiny leaves next to the flower.
- Let the simple nail art dry fully, then apply a layer of your glossy top coat to protect the design.
Pro-Tip: For a more modern, negative space art feel, apply the tiny floral design directly onto a clear base coat, near the cuticle or on the side of the nail. This is a trendy manicurist tip for a minimalist yet impactful look.

3. Style The Modern Micro-French Tip

Pin this chic and modern French manicure alternative!
The micro-french technique is one of the biggest spring manicure trends and a fantastic modern update on a classic. It’s perfect for those who love the elegance of a French tip but want a more subtle, contemporary feel. This look is especially flattering on short neutral nails.
Products & Tools Used
- A sheer pink or creamy nude base polish.
- A highly pigmented, opaque white polish.
- An ultra-thin nail art striping brush (the key tool for this look).
- A glossy top coat.
Application Steps
- Apply two coats of your sheer nude or pink base polish and let it dry completely.
- Pour a small drop of the opaque white polish onto a palette (a piece of foil works well).
- Dip the very tip of your ultra-thin striping brush into the white polish.
- Style the micro-tip: Brace your hand on a flat surface for stability. Starting from one side of the nail tip, gently drag the brush across to the other side in a single, smooth motion.
- Cleanse any mistakes immediately with a small brush dipped in acetone before it dries.
- Once the white tips are fully dry, seal the entire nail with a glossy top coat for a professional finish at home.
Pro-Tip: For a DIY hack, you can use the edge of a silicone makeup sponge. Paint the white polish onto the sponge’s edge, then gently press the tip of your nail into it. This creates a surprisingly crisp, thin line with minimal effort and addresses the need for an easy application.

4. Apply Minimalist Gold Foil Detailing

Add a touch of luxury to your neutral nails. Pin this idea!
A beige + gold pairing exudes understated elegance. Adding a tiny fleck of gold foil to a neutral manicure is an incredibly simple way to elevate the entire look, making it feel custom and luxurious. It works beautifully on both matte and glossy finishes.
Products & Tools Used
- A neutral base polish of your choice (works beautifully with matte or glossy finishes).
- Cosmetic-grade nail art gold foil flakes.
- A pair of fine-tipped tweezers.
- A clear top coat.
- A small, fluffy brush (like an old eyeshadow brush).
Application Steps
- Paint two coats of your neutral polish. Let it dry until it’s tacky but not fully wet. If using gel, cure the color coat but don’t wipe the tacky layer.
- Using tweezers, carefully pick up a small piece of gold foil.
- Gently apply the foil onto the tacky nail surface. You can place a single fleck, or a few small pieces in a cluster.
- Use the pad of your finger or a silicone tool to gently press the foil flat against the nail.
- Once the foil is adhered, apply a generous layer of top coat to encapsulate the foil and smooth the surface. If you have any excess foil on your skin, you can gently brush it away with the fluffy brush.
- Seal with a second layer of top coat if needed to ensure the surface is completely smooth and the foil won’t snag.
Pro-Tip: For a different look, try a matte top coat over the neutral base before applying the foil. Then, apply the foil and use a glossy top coat only over the foil itself. This matte vs glossy contrast creates a stunning, award-winning polish-worthy effect.

5. Achieve a Sheer Shimmer & Pearlescent Finish

Perfect for a spring wedding or event! Pin this elegant shimmer nail idea.
For a look that’s neutral but has a little something extra, a pearlescent or shimmery polish is the perfect choice. This is the best neutral for a spring wedding or special event. The key is to choose a polish with a micro-fine shimmer, not chunky glitter, for a sophisticated, ‘glazed’ effect.
Products & Tools Used
- A high-quality sheer shimmery or pearlescent polish.
- Alternatively, a sheer nude polish and a separate shimmer top coat.
- A glossy, plumping top coat to enhance the shimmer.
- Base coat.
Application Steps
- Prep your nails as usual, ensuring a smooth surface, as shimmer can highlight ridges.
- Apply your base coat.
- Layer your chosen pearlescent polish in two to three thin coats, allowing each coat to dry in between. Thin coats are crucial for a smooth, even shimmer distribution.
- If you are creating the look with a top coat, apply two coats of your sheer nude polish first. Let it dry completely.
- Paint one thin layer of your shimmer top coat over the nude base.
- Finish with a high-shine, plumping top coat to make the shimmery particles pop and create a gel-like, glossy finish.
Pro-Tip: To get the trendy ‘glazed donut’ look popularized by Hailey Bieber, find a chrome powder compatible with gel polish. After curing a non-wipe top coat, gently rub the pearlescent chrome powder onto the nail, then seal with another layer of top coat and cure. This is an advanced salon-grade technique.

6. Master Neutral Ombré “Balayage” Nails

Want a blended look? Pin this beautiful neutral ombré nail tutorial!
Neutral ombre nails for spring season offer a soft, blended gradient effect that’s both eye-catching and sophisticated. This technique, often called “baby boomer” or “balayage” nails, typically blends a nude shade near the cuticle into a soft white at the tip. It can be achieved with both gel vs lacquer.
Products & Tools Used
- Two complementary neutral polishes (e.g., a nude vs beige, or a soft sand and a milky white).
- A disposable, latex-free makeup sponge.
- A liquid latex barrier or petroleum jelly for around the nails.
- A glossy top coat.
Application Steps
- Prep nails and apply your liquid latex/Vaseline to the skin around your nail bed.
- Paint one coat of the lighter neutral shade on your entire nail. Let it dry.
- On a flat surface, paint stripes of your two chosen colors right next to each other.
- On the makeup sponge, paint the same stripes of color.
- Gently dab the sponge onto your nail. The first pass will look sheer. Let it dry for a minute.
- Re-apply polish to the sponge and dab again, slightly shifting the position to blend the line. Repeat until you have an opaque, blended gradient.
- While the polish is still slightly wet, peel off the latex barrier. Clean up any excess on the skin with a brush and acetone. Finish with a glossy top coat to smooth out the sponge texture.
Pro-Tip: For a smoother blend, dampen the makeup sponge slightly before applying the polish to it. This helps the polishes meld together and reduces the sponge’s texture transferring to the nail, giving you a near salon-grade airbrushed look.

7. Embrace Muted Pastel Undertone Neutrals

A playful twist on neutrals! Pin this muted rainbow idea for spring.
If you want to wear color but aren’t ready for brights, muted colors with a pastel-undertone are your answer. Think of shades like dusty rose, sage green, pale lilac, or cornflower blue. These colors have a grey or beige base, which makes them read as sophisticated neutrals while still giving a nod to the colors of spring.
Products & Tools Used
- One or more muted nail polishes with a pastel-undertone (e.g., a dusty lavender, a pale sage green, a creamy light blue).
- A high-quality base and top coat.
Application Steps
- Prep your nails and apply a base coat.
- For a single-color look, simply paint two to three thin coats of your chosen muted pastel shade.
- For a trendy “Skittles” or gradient manicure, select five complementary muted pastel shades.
- Design the look by painting each nail a different color, arranging them from lightest to darkest or in a rainbow-like sequence.
- Ensure each coat is thin and even to build up a creamy, opaque color without thickness.
- Top-off with a glossy top coat to unify the shine and protect the colors, making them appear cohesive.
Pro-Tip: Unsure if a pastel is “muted” enough? Place the bottle next to a true beige or grey. If it feels harmonious and not jarringly bright, it has a neutral undertone. This is a key principle from industry standard color matching.

Key Takeaways: Your Quick Guide to Neutral Spring Nails
- Embrace Sheer and Milky Finishes: The top spring manicure trends for neutrals are milky and translucent polishes. They offer an effortlessly chic look that enhances your natural nails.
- Update Classic Designs: The Micro-French is a modern, elegant alternative to the traditional French manicure, especially for short neutral nails. It’s all about a super-thin, crisp line.
- Subtle Accents Add Personality: Don’t be afraid to add minimalist details. A tiny floral accent, a fleck of gold foil, or a pearlescent finish can elevate a simple nude manicure for the spring season.
- Technique is Everything: For DIY success, use thin coats to prevent chipping and streaks. For ombré looks, a makeup sponge is your best tool, and for micro-tips, an ultra-thin brush is essential.
- Muted Pastels are the New Neutrals: Colors like dusty rose, sage, and pale lilac with a grey or beige undertone act as versatile, subtle spring nails that offer a hint of color while remaining sophisticated.
- Preparation and Protection are Key: Always use a quality base coat to hide nail ridges and a glossy top coat to seal your design. This is crucial for a long-lasting manicure.
FAQs About Neutral Spring Nails
Are neutral nails in style for spring 2026?
Absolutely, neutral nails are a timeless trend that is particularly stylish for spring 2026. The focus is on specific finishes like milky, sheer, and pearlescent textures. These looks align with the popular Clean Girl aesthetic and ‘quiet luxury’ fashion movements, prioritizing understated elegance over bold colors. They are versatile for professional settings, weddings, and everyday wear.
How do you make neutral nails look more “spring-like”?
To make neutral nails feel like spring, focus on finish and accents. Opt for a high-gloss, glossy finish to catch the light. You can also incorporate co_occurrence_contextual_pairs like a neutral + floral accent nail, add a subtle pastel-undertone to a beige, or use the micro-french technique for a fresh, clean look. Even a simple switch to a warmer-toned nude can transition your manicure into the new season.
What is the best neutral nail color for my skin tone?
The best neutral complements your skin’s undertones (cool, warm, or neutral). For fair skin with cool (pink) undertones, sheer pinks like Essie’s ‘Ballet Slippers’ are flattering. For warm (golden, olive) undertones, choose beiges, soft peaches, or creamy whites. Deeper skin tones look stunning with rich caramels, taupes, and chocolate browns that provide elegant contrast.
Can you wear taupe or beige in the spring?
Yes, taupe and beige are perfect for spring when styled correctly. A classic taupe + spring combination works beautifully. To make it feel seasonal, choose a taupe with a warmer or lighter undertone rather than a dark, moody winter shade. Pairing it with a high-gloss top coat or a minimalist design like a gold foil accent also helps it read as fresh and modern.
What is the difference between matte vs glossy for spring nails?
Glossy finishes are traditionally more popular for spring as they reflect light and feel fresh. A high-gloss top coat makes colors pop and evokes a healthy, ‘juicy’ look. However, a matte finish on a neutral or muted pastel color can create a very chic, modern, and unexpected look. For a trendy combination, try a matte nail with a single glossy accent, like a glossy French tip.
How do I get a long-lasting manicure at home?
To prevent chipping and achieve a long-lasting manicure, proper prep and sealing are crucial. Always start by wiping your nails with alcohol to remove oils. Use a quality base coat. Apply your color in 2-3 thin coats, not one thick one. Most importantly, ‘cap’ the free edge of your nail with both your color and top coat. This seals the tip and drastically reduces chipping.
What are the best nail shapes for short neutral nails?
For short neutral nails, a “squoval” (soft square) or a soft oval shape is most flattering. These shapes are practical for everyday wear and help to create an illusion of length. A short, neat shape paired with a clean, neutral color is the epitome of the understated elegance that is trending for spring 2026.
How do I achieve the ‘Clean Girl’ nail look?
The ‘Clean Girl’ nail look is all about a flawless, natural-looking, and healthy manicure. This is typically achieved with one or two coats of a sheer pink or milky nude polish. The key is impeccable nail prep: perfectly shaped nails, tidy cuticles, and a hydrated, high-shine finish. It’s the manicure equivalent of “no-makeup makeup.”
What are some good OPI neutral colors for spring?
OPI offers several iconic neutral colors perfect for spring. “Put it in Neutral” is a versatile pink-infused beige. “Bubble Bath” is a classic sheer, candy-pink perfect for the milky look. “Funny Bunny” is a soft, sheer white that’s great for milky manicures or micro-French tips. For a slightly warmer nude, “Samoan Sand” is an excellent choice.
Should I choose gel vs lacquer for my neutral spring nails?
The choice between gel vs lacquer depends on your priorities. Gel polish offers superior longevity (2+ weeks), high shine, and durability, making it great for vacations or if you’re hard on your hands. Lacquer (regular polish) is more affordable, easier to apply and remove at home, and allows you to change your color more frequently. Both can achieve beautiful neutral spring nails.
Final Thoughts on Your Perfect Spring Manicure
This spring, embracing neutral spring nails doesn’t mean settling for boring. As this guide shows, it’s about choosing sophisticated shades and subtle details that create a look of understated elegance. From the timeless appeal of a milky sheer manicure to the modern edge of a micro-french technique, there is a perfect neutral look to complement your personal style and any occasion the season brings.
By focusing on high-quality products and mastering a few key application techniques, you can create a salon-grade manicure at home that is both on-trend and enduringly chic. Whether you opt for a minimalist design or a touch of floral artistry, your nails will be a perfect reflection of the fresh, clean energy of spring 2026.
Now I’d love to hear from you! Which of these neutral spring nail designs are you most excited to try first? Share your favorite in the comments below
Last update on 2026-02-26 / Affiliate links / Images from Amazon Product Advertising API


