Do generic coffee cups feel lifeless in your hands? You crave unique, personalized drinkware, but finding painted mugs cute enough to match your style is often a struggle. It is frustrating when store-bought options lack personality or when DIY attempts result in paint that simply washes away.
Cute painted mugs: Hand-decorated ceramic vessels featuring charming aesthetics like whimsical animals, boho patterns, or inspirational quotes, typically created using specialized oven-bake paint or ceramic paint pens. These personalized creations transform ordinary drinkware into functional art, offering a durable and unique alternative to mass-produced items when sealed with proper heat curing techniques.
Drawing from proven ceramic painting techniques and industry best practices for adhesion, this guide eliminates the guesswork. You will discover exactly how to craft professional-quality designs that withstand daily use. Get ready to master the art of durable, adorable DIY painted mugs that bring joy to every sip.
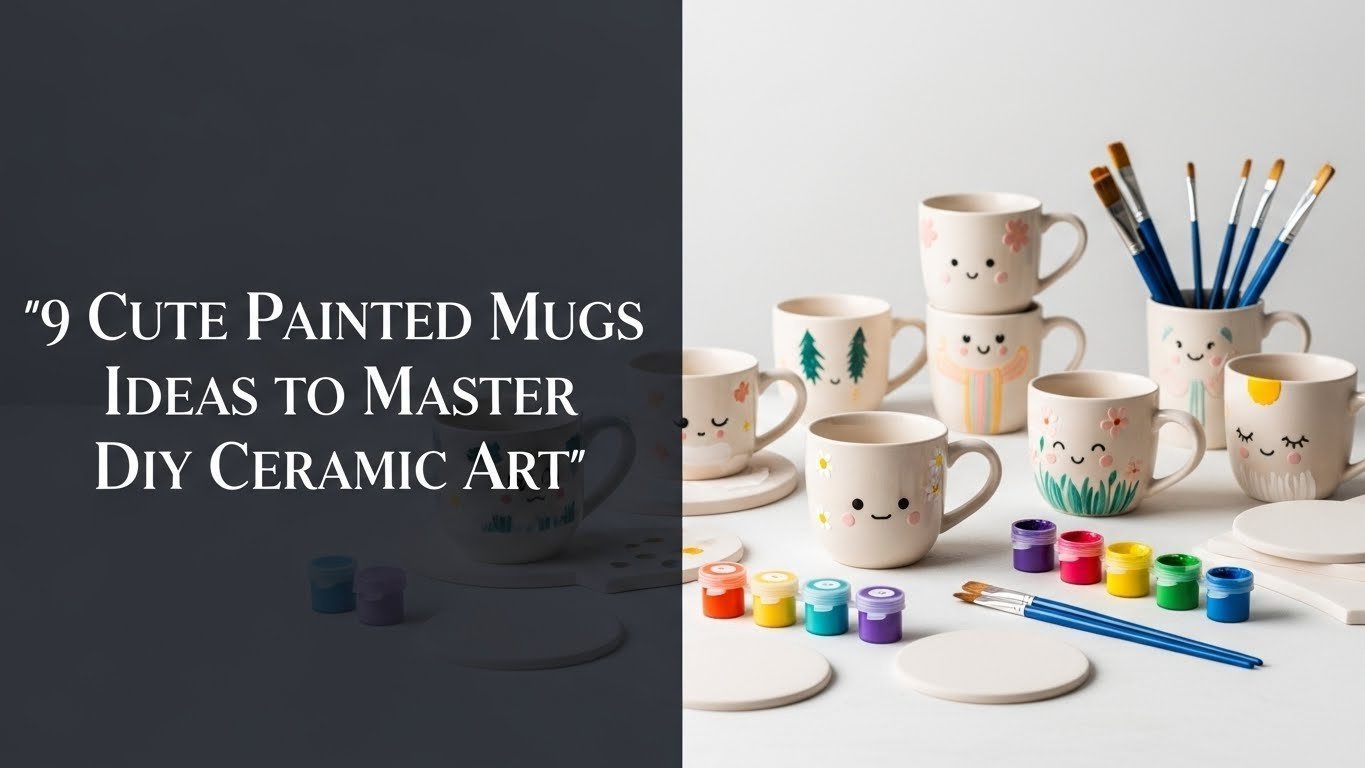
Transform Your Mugs: Cute Painted Mugs Ideas for 2026 to Master DIY Ceramic Art
Painting mugs at home is a rewarding DIY craft that allows for endless personalization, and with the right techniques and materials, your creations can be both beautiful and durable. Transforming a plain white vessel into a piece of art requires more than just creativity; it demands an understanding of the materials. Whether you are looking to create hand painted mugs as heartfelt gifts or simply want to elevate your kitchen cabinet, the process begins with selecting the right ceramic base and appropriate pigments.
Many beginners struggle with designs on coffee cups fading or chipping after a few washes. This usually happens because regular acrylics are used instead of specialized oven bake paint or paint pens designed for non-porous surfaces. To ensure your painted mugs remain vibrant and cute, proper surface preparation and the use of a sealant spray or heat curing process are non-negotiable. By following expert methodologies for sealing ceramic designs, you can bridge the gap between a temporary craft and a lasting keepsake. This guide explores the essential tools and inspiring concepts you need to start your journey into DIY ceramic art.
9 Cute Painted Mugs Ideas for 2026 to Master DIY Ceramic Art
Paint your own mugs with oven-bake ceramic paint for durability and use stencils for clean, intricate patterns. The world of mug painting ideas is vast, ranging from simple minimalist lines to complex, multi-layered scenes. When you decide to decorate mugs, you are not just applying color; you are engineering a bond between the paint and the glaze.
To help you personalize coffee mugs effectively, we have curated a collection of nine distinct styles. Each idea includes specific instructions on materials and techniques, ensuring you can replicate these cute designs at home. Whether you prefer using paint pens for precision or brushes for broad strokes on ceramic bisque, these projects cover various skill levels. We will also address common pitfalls, such as how to prevent paint from peeling, ensuring your creative mug art remains a permanent fixture in your home.
1. Hand Paint Whimsical Animal Faces on Your Mugs

Pin this playful design to your “DIY Gift Ideas” board!
Creating whimsical painted mugs with animal faces is a fantastic way to add character to your morning routine. This approach focuses on cute hand painted ceramic coffee mugs that feature simple yet expressive animal designs. By using fine-tip tools, you can achieve the detail needed for whiskers, eyes, and noses without requiring advanced drawing skills.
Supplies Needed
- Clean, plain ceramic coffee mug
- Ceramic paint pens (fine and medium tips) in assorted colors (e.g., Artistro paint pens)
- Rubbing alcohol or glass cleaner
- Cotton balls or paper towel
- Pencil (for light sketching)
- Oven for curing
Step-by-Step Directions
- Prepare your mug: Clean the mug thoroughly with rubbing alcohol to remove any oils or residues, then allow to dry completely.
- Sketch your design: Lightly sketch your desired animal face (e.g., a sleepy fox, a grinning cat) onto the mug using a pencil. Keep details simple and cute.
- Outline the face: Use a fine-tip black ceramic paint pen to carefully trace your pencil sketch. Allow to dry for 10-15 minutes.
- Fill in colors: Use medium-tip ceramic paint pens to fill in the different colored sections of your animal face. Apply thin, even coats and let dry between layers if needed.
- Add details: Once the base colors are dry, use fine-tip pens to add small details like eyes, whiskers, or rosy cheeks.
- Cure in oven: Follow paint pen instructions for curing (typically bake at 350°F / 175°C for 30-60 minutes, then cool slowly in oven). This step is crucial for making painted mugs permanent.
Pro-Tip: For truly durable paint that won’t chip, ensure your oven bake paint is completely dry before curing. Baking at the correct temperature for the specified time is a proven ceramic painting technique to maximize adhesion and achieve a professional finish technique.

2. Create Boho Rainbow Arch Designs

Save this aesthetic mug idea to your “Boho Home Decor” board!
Boho painted mugs rely on earthy palettes and minimalist painted mugs aesthetics to create a calming visual effect. Rainbow mug designs in this style typically use muted tones like terracotta, sage, and mustard rather than bright primaries. This idea leverages the trend of unique patterns that look sophisticated yet handmade.
Supplies Needed
- Clean, plain white ceramic mug
- Porcelain paint pens or oven-bake ceramic paint in muted, earthy tones (e.g., terracotta, sage green, cream, mustard yellow)
- Rubbing alcohol and cotton balls
- Round object or compass for drawing arches (optional, for stencils)
- Small detail brush (if using paint)
- Oven for curing
Step-by-Step Directions
- Clean your mug: Wipe down the mug with rubbing alcohol to ensure a clean surface for painting.
- Plan your arches: Decide on the number and size of your rainbow arches. You can freehand them or use a round object as a guide for perfect curves.
- Apply paint: Using your chosen porcelain paint pens or a fine detail brush with oven-bake ceramic paint, draw the first, outermost arch. Allow it to dry to the touch.
- Layer colors: Continue adding inner arches with different colors, ensuring each layer dries before applying the next to prevent bleeding. Aim for 3-5 arches for a classic boho look.
- Refine lines: Once all arches are dry, go back and thicken any lines or fill in any sparse areas for an even finish.
- Bake for durability: Follow the manufacturer’s instructions for baking the painted mug to set the paint, typically 30-60 minutes at 300-350°F (150-175°C), followed by cooling slowly.
Pro-Tip: Achieving a truly durable paint finish requires selecting paint specifically formulated for ceramics. Look for paints that explicitly state they are dishwasher-safe methods after curing, ensuring your decorated cups maintain their vibrant colors through countless washes.

3. Personalize Mugs with Initials and Gold Accents

Pin this chic custom mug for an elegant gift idea!
Nothing says thoughtful like personalized painted mugs. By focusing on custom coffee mugs with gold accent mugs detailing, you can create cute custom mugs for special occasions that rival high-end store-bought items. This method uses metallic gold paint to add a touch of luxury to plain ceramic mugs.
Supplies Needed
- Clean, plain ceramic mug (white or light-colored works best)
- Ceramic paint pens (fine tip, black or chosen color)
- Metallic gold ceramic paint pen or liquid gold ceramic paint
- Letter stencils or freehand drawing skills
- Rubbing alcohol and cotton balls
- Masking tape (if using stencils)
- Oven for curing
Step-by-Step Directions
- Prepare your mug: Clean the mug thoroughly with rubbing alcohol and let it dry completely.
- Position initials: If using stencils, secure the letter stencil(s) for the desired initial onto the mug with masking tape. Alternatively, lightly sketch the initial freehand with a pencil.
- Paint the initial: Fill in the stencil or trace your sketch using a ceramic paint pen. For crisp lines, apply paint in thin layers, allowing each to dry before the next. Remove stencils carefully once the initial is dry to the touch.
- Add gold accents: Use the metallic gold ceramic paint pen to add small, elegant accents around the initial, such as dots, a thin border, or a small flourish.
- Allow to dry: Let the entire design dry completely for at least 24 hours to ensure paint adhesion before curing.
- Cure in oven: Follow paint manufacturer’s instructions for baking to make the design permanent (e.g., 350°F / 175°C for 30-60 minutes).
Pro-Tip: When working with metallic gold ceramic paint, ensure you apply it in thin, even coats to prevent cracking or peeling. For best results, allow each layer to fully dry before adding another, which is a proven ceramic painting technique for achieving durable and long-lasting designs.

4. Design Abstract Splatter and Dot Mugs

Splash some creativity onto your “Artistic Home” board!
Abstract painted mugs are perfect for those who want to experiment with creative ceramic art without the pressure of drawing perfect shapes. Techniques like splatter paint mugs and dot art mugs allow for expressive, unique patterns that make for cute mug designs with minimal effort.
Supplies Needed
- Clean, plain ceramic mug
- Oven-bake ceramic paint in various bright, contrasting colors
- Small, stiff paintbrush or old toothbrush (for splattering)
- Dotting tools, toothpicks, or the blunt end of a pencil (for dots)
- Rubbing alcohol and cotton balls
- Cardboard or newspaper to protect your workspace
- Oven for curing
Step-by-Step Directions
- Prepare your mug and workspace: Clean the mug with rubbing alcohol. Lay down plenty of newspaper or cardboard to catch paint splatters.
- Apply dots: Dip your dotting tool into one color of ceramic paint and gently press it onto the mug to create dots. Vary dot sizes and spacing for visual interest. Allow to dry.
- Prepare for splatter: Load a small amount of a contrasting ceramic paint onto a stiff paintbrush or old toothbrush.
- Create splatters: Hold the loaded brush a few inches from the mug and gently flick the bristles with your finger to create controlled splatters. Experiment with different distances for varied effects.
- Layer colors (optional): Once the first layer of splatters and dots is dry, you can add more colors using the same techniques.
- Allow to dry thoroughly: Let the decorated cup dry for at least 24-48 hours.
- Cure in oven: Bake the mug according to the paint manufacturer’s directions to ensure durable paint and make it permanent.
Pro-Tip: For truly artistic expressions and controlled splatter, thin your oven-bake ceramic paint slightly with a few drops of water. This helps create finer, more delicate splatters rather than thick blobs, achieving a more professional finish technique.

5. Hand Letter Inspirational Quotes or Sayings

Inspire your day! Pin this quote mug idea to your “Positive Vibes” board.
Inspirational quote mugs serve as daily reminders of positivity. By mastering hand lettered mugs, you can create custom painted mugs with names or quotes that are deeply personal. This style leans into artistic expressions through typography, making personalized painted mugs that speak volumes.
Supplies Needed
- Clean, plain ceramic mug
- Extra fine-tip ceramic paint pens (e.g., black, white, or preferred colors)
- Rubbing alcohol and cotton balls
- Pencil and paper for practice
- Optional: Stencils for letters or transfer paper
- Oven for curing
Step-by-Step Directions
- Prepare your mug: Clean the mug surface with rubbing alcohol.
- Practice lettering: On paper, practice writing your chosen inspirational quote or saying in various fonts and sizes until you’re comfortable.
- Transfer or sketch: Lightly sketch the quote onto the mug with a pencil. For intricate fonts, you might use carbon transfer paper or stencils.
- Hand letter the quote: Carefully trace over your pencil sketch with the extra fine-tip ceramic paint pen. Work slowly and steadily. Apply a second coat if needed after the first dries to ensure opacity.
- Add small flourishes (optional): Once the main text is dry, you can add small dots, swirls, or a border around the quote.
- Allow to dry: Let the hand painted mug dry for at least 24 hours.
- Cure in oven: Follow paint pen instructions for baking to permanently set the design and make painted mugs permanent.
Pro-Tip: For consistent line thickness and to prevent paint bleeding on ceramic, choose artist-grade paint supplies specifically designed for ceramic surfaces. A steady hand and light pressure will yield the best results for intricate hand lettering.

6. Create Charming Silhouette Designs with Stencils

Pin this elegant stencil art idea to your “Crafty Home” board!
If you worry about drawing skills, silhouette painted mugs are the answer. Stenciled mug designs allow you to apply complex cute patterns for mugs with precision. This method is ideal for easy mug painting projects that require unique designs with sharp, professional edges.
Supplies Needed
- Clean, plain ceramic mug
- Ceramic paint (one contrasting color, e.g., black or white)
- Silhouette stencils (e.g., animals, trees, feathers)
- Sponge pouncer or small, stiff stencil brush
- Rubbing alcohol and cotton balls
- Masking tape or painter’s tape
- Oven for curing
Step-by-Step Directions
- Clean your mug: Prepare the mug by cleaning it with rubbing alcohol and letting it dry completely.
- Position stencil: Carefully place your chosen silhouette stencil onto the mug and secure it firmly with masking tape, ensuring there are no gaps for paint to seep under.
- Apply paint: Dip your sponge pouncer or stencil brush into the ceramic paint. Dab off excess paint onto a paper towel.
- Stipple paint: Using an up-and-down “stippling” motion, dab the paint evenly over the stencil. Apply several thin coats rather than one thick coat, allowing slight drying time between layers. This helps prevent paint from seeping under the stencil.
- Remove stencil: While the paint is still slightly damp, carefully peel off the stencil to reveal your crisp design.
- Clean up edges (if needed): Use a toothpick or cotton swab dipped in rubbing alcohol to gently clean up any stray paint before it fully dries.
- Allow to dry: Let the stenciled mug dry completely for 24-48 hours.
- Cure in oven: Bake the mug according to the paint manufacturer’s instructions for permanent adhesion.
Pro-Tip: For crisp designs and to avoid paint bleeding on ceramic, always use minimal paint on your sponge or brush when stenciling. Pressing the stencil firmly to the mug surface also helps create clean lines, demonstrating advanced stencil application.

7. Paint Playful Fruit or Vegetable Patterns

Add a splash of color! Pin this fruity mug idea to your “Kitchen Decor” board!
Fruit painted mugs and vegetable patterns mugs inject fun and freshness into your collection. These cute cup designs utilize vibrant colors like cherry reds, lemon yellows, and avocado greens. It’s a form of creative mug art that feels organic and cheerful.
Supplies Needed
- Clean, plain ceramic mug
- Oven-bake ceramic paint in bright colors (e.g., red, yellow, green, blue)
- Small detail brushes or fine-tip ceramic paint pens
- Rubbing alcohol and cotton balls
- Pencil for light sketching (optional)
- Oven for curing
Step-by-Step Directions
- Prepare your mug: Thoroughly clean the mug with rubbing alcohol and let it dry.
- Sketch outlines (optional): Lightly sketch simple fruit or vegetable shapes (e.g., strawberries, lemons, carrots) around the mug with a pencil.
- Paint the shapes: Using your chosen ceramic paints or pens, carefully fill in the fruit/vegetable shapes. Apply thin, even coats.
- Add details: Once the base colors are dry, add small details like seeds for strawberries, leaves for lemons, or dots for texture.
- Create a repeating pattern: Space your designs evenly around the mug to create a cohesive and playful pattern.
- Allow to dry thoroughly: Let the painted mug dry for at least 24 hours.
- Cure in oven: Bake the mug according to the paint manufacturer’s instructions for permanent adhesion and durable paint.
Pro-Tip: To ensure your vibrant colors stay true and resist fading, always follow the paint manufacturer’s specific instructions for the oven bake paint curing process. This is critical for the inorganic pigment stability and overall durable and long-lasting designs.

8. Transform Mugs into Galaxy Night Scenes

Drift into dreamland! Pin this galaxy mug to your “Space & Stars” board.
For a truly mystical look, galaxy painted mugs and night sky mugs are unbeatable. These cosmic mug designs utilize blending techniques to create cute painted mugs that look like they contain the universe. This style leans heavily on artistic expressions involving sponge blending and layering.
Supplies Needed
- Clean, plain ceramic mug (dark blue, black, or white base)
- Oven-bake ceramic paint in deep blues, purples, pinks, and white
- Small natural sponge or piece of crumpled plastic wrap
- Small detail brush or old toothbrush (for stars)
- Rubbing alcohol and cotton balls
- Oven for curing
Step-by-Step Directions
- Prepare your mug: Clean the mug with rubbing alcohol. If using a white mug, paint it dark blue or black as a base coat and let it fully dry.
- Layer base colors: Dab small amounts of deep blue, purple, and pink ceramic paint onto the mug using a sponge, blending them slightly to create a swirling nebula effect. Build up thin layers for depth.
- Create nebulae: While the base colors are still wet in some areas, gently blend small dabs of white paint into the colors with a clean part of the sponge to create brighter, ethereal cloud effects.
- Add stars: Once the main galaxy background is dry, load a small detail brush or old toothbrush with white ceramic paint. Gently flick the bristles to create tiny white speckles (stars) across the galaxy.
- Add larger stars (optional): Use the fine tip of a brush or a toothpick to paint a few slightly larger, brighter stars.
- Allow to dry thoroughly: Let the painted mug dry for at least 24-48 hours.
- Cure in oven: Bake the mug according to the paint manufacturer’s instructions for permanent adhesion.
Pro-Tip: The surface preparation for optimal adhesion is crucial for multi-layered designs like a galaxy mug. Ensuring each thin layer of oven-bake ceramic paint is dry before adding the next prevents smudging and ensures better molecular bonding of paints.

9. Embrace Minimalist Line Art Characters

Keep it simple and sweet! Pin this minimalist mug idea to your “Minimalist Decor” board.
Minimalist painted mugs prove that less is often more. By focusing on line art mugs and cute abstract mug designs, you can achieve unique painted mugs with charming aesthetics using just a single pen. This style highlights the elegance of simple, confident strokes.
Supplies Needed
- Clean, plain ceramic mug (white or light-colored for best contrast)
- Extra fine-tip ceramic paint pen (black or preferred single color)
- Rubbing alcohol and cotton balls
- Pencil for light sketching (optional)
- Oven for curing
Step-by-Step Directions
- Prepare your mug: Clean the mug thoroughly with rubbing alcohol.
- Sketch your characters: Lightly sketch simple line art characters (e.g., a continuous line face, a small stick-figure scene, abstracted animals) onto the mug with a pencil.
- Trace with paint pen: Carefully trace over your pencil sketch using the extra fine-tip ceramic paint pen. Maintain a consistent line weight for a professional look.
- Allow to dry: Let the decorated cup dry completely for at least 24 hours.
- Cure in oven: Bake the mug according to the paint pen manufacturer’s instructions to ensure the design is permanent and durable.
Pro-Tip: For truly durable and long-lasting designs that don’t fade, invest in artist-grade paint supplies like ceramic paint pens known for their adherence. Properly curing your painted mugs in the oven is the critical step for achieving dishwasher-safe results.

Key Takeaways: Your Quick Guide to Painted Mugs
To ensure your success in creating cute painted mugs, we have synthesized the most critical points from this guide. Mastering DIY ceramic art relies on these core principles.
- Choose the right materials: Always use oven-bake ceramic paint or ceramic paint pens that are explicitly designed for ceramics and ideally food-safe, ensuring your cute painted mugs are durable.
- Preparation is crucial: Thoroughly clean your ceramic mug with rubbing alcohol before painting to remove oils and residues, preventing paint peeling off mugs and ensuring optimal adhesion.
- Baking makes it permanent: Curing your painted mugs in the oven according to the paint manufacturer’s instructions is essential for making the designs permanent and often dishwasher-safe.
- Experiment with cute designs: From whimsical animal faces and boho rainbow arches to minimalist line art, there’s a vast array of mug painting ideas to explore to create unique custom painted mugs.
- Seal for extra protection: For designs that experience heavy use or frequent washing, consider an additional layer of sealant spray specifically formulated for ceramics to enhance durability and prevent faded mug paint.
- Practice makes perfect: Before committing to your mug, practice your design and hand lettering on paper to refine your technique and build confidence, which is an expert mug painting tip.
- Prioritize food safety: Ensure all paints and sealants used on areas that come into contact with food or lips are certified food-safe paints to guarantee the safety of your artistic drinkware.
People Also Ask About Painted Mugs Cute
To address any lingering questions about mug painting ideas, we’ve compiled answers to the most common queries regarding DIY mug painting.
How do you paint mugs at home to make them cute?
To paint mugs at home and achieve a cute aesthetic, start by cleaning a plain ceramic mug with rubbing alcohol, then sketch your design (like whimsical animals or simple patterns) with a pencil. Use oven-bake ceramic paint pens or specialized ceramic paint for detailed lines and vibrant colors. Finish by curing the decorated cup in the oven according to paint instructions, ensuring durability and a professional finish for your hand painted mugs.
What kind of paint do you use for mugs to ensure durability?
For durable painted mugs, always use specialized ceramic or porcelain paints that are designed for high heat and permanent adhesion, such as oven-bake ceramic paints or ceramic paint pens. These paints are formulated to bond to the non-porous surface of the mug when cured in an oven, making the designs scratch-resistant and often dishwasher-safe. Avoid regular acrylic paints unless specifically marked for ceramics and oven-curing.
How do you seal painted mugs permanently?
To permanently seal painted mugs and ensure longevity, the most effective method is proper oven curing according to the paint manufacturer’s instructions. After your design is completely dry, bake the mug in a preheated oven (typically 300-350°F or 150-175°C) for 30-60 minutes, then allow it to cool slowly inside the oven. This thermal process hardens the paint, making your custom painted mugs resistant to washing and light wear.
Is painting mugs a good DIY gift idea for beginners?
Yes, painting mugs is an excellent DIY gift idea for beginners, offering a highly customizable and thoughtful present. Simple designs like dots, stripes, or basic silhouettes are easy to achieve with ceramic paint pens. The process is generally low-cost, requires minimal supplies, and allows for personalized touches that make the gift unique, such as adding initials or a meaningful quote to your personalized painted mugs.
How do you make painted mugs dishwasher safe?
To make painted mugs truly dishwasher safe, it is essential to use oven-bake ceramic paints specifically labeled as dishwasher-safe after curing, and then meticulously follow the manufacturer’s baking instructions. The high heat of the oven during curing chemically bonds the paint to the mug’s surface. Even with oven-cured designs, handwashing with soft sponges is often recommended for maximum longevity, especially for frequently used hand painted mugs.
Can kids paint ceramic mugs safely?
Yes, kids can safely paint ceramic mugs with proper supervision and the right materials, making it a fun craft activity. Opt for non-toxic ceramic paint pens or specialized children’s ceramic paints that clearly state they are safe for kids. Ensure adequate ventilation and cover workspaces. While designs may be whimsical, adult supervision for the oven-curing step is crucial to make the cute painted mugs durable.
What are common mistakes when painting mugs and how can they be avoided?
Common mistakes when painting mugs include inadequate mug cleaning, using non-ceramic specific paints, and improper curing. To avoid these, thoroughly clean the mug with alcohol to prevent paint peeling off mugs, select oven-bake ceramic paint for durability, and always follow the manufacturer’s precise instructions for baking time and temperature. Applying multiple thin coats instead of one thick coat also prevents cracking and ensures vibrant results.
What’s the best way to clean painted mugs to preserve the design?
The best way to clean painted mugs and preserve their design is typically by gentle handwashing with mild soap and a soft sponge. Avoid abrasive scrubbers, harsh chemicals, or prolonged soaking. Even if paints are labeled as dishwasher-safe after curing, the high heat and strong detergents in dishwashers can degrade the design over time. For long-lasting designs, treat your hand painted mugs with care.
What are some themes for cute painted mugs that are popular in 2026?
Popular themes for cute painted mugs in 2026 often include minimalist line art faces, whimsical animal characters like foxes or sloths, and vibrant boho rainbow arches. Inspirational hand-lettered quotes, playful fruit or vegetable patterns, and dreamy galaxy night scenes are also trending. These cute mug designs offer a blend of personalized charm and modern aesthetic, perfect for unique gifts or home decor.
What’s the difference between ceramic paint and glass paint, and which is better for mugs?
Ceramic paint is formulated specifically for ceramic surfaces, while glass paint is designed for glass. Although some paints might be dual-purpose, ceramic paint is generally better for mugs as it’s optimized for the non-porous nature and thermal requirements of ceramic materials. Using the correct paint ensures optimal adhesion, durability, and a food-safe finish for your painted mugs after oven curing.
Final Thoughts on Painted Mugs Cute
Mastering the art of creating cute painted mugs is more accessible than you might think. By combining creative mug painting ideas with the right techniques and materials, you can craft personalized pieces that are not only beautiful but also durable. Whether you’re making custom painted mugs as heartfelt gifts or adding a unique touch to your own kitchen, the satisfaction of transforming a plain ceramic surface into a work of art is immense. Remember the core principles: thorough preparation, appropriate ceramic-specific paints, and meticulous oven-curing are the secrets to long-lasting designs.
This guide has walked you through 9 distinct DIY mug painting ideas, from whimsical animal faces to elegant minimalist line art, ensuring you have a wealth of inspiration. We’ve also emphasized the importance of proven ceramic painting techniques and selecting durable paint to prevent common issues like paint peeling off mugs. With these expert mug painting tips and reliable product recommendations, you’re well-equipped to embark on your DIY ceramic art journey. So, gather your supplies, unleash your creativity, and start painting your way to unique and adorable hand painted mugs that will be cherished for years to come. What’s the first cute painted mug design you’re excited to try?
Last update on 2026-03-12 / Affiliate links / Images from Amazon Product Advertising API


