Struggling to find a manicure that’s both timelessly elegant and perfect for any event? You want a chic, polished look but often find that creating beautiful nail art at home feels complicated and out of reach.
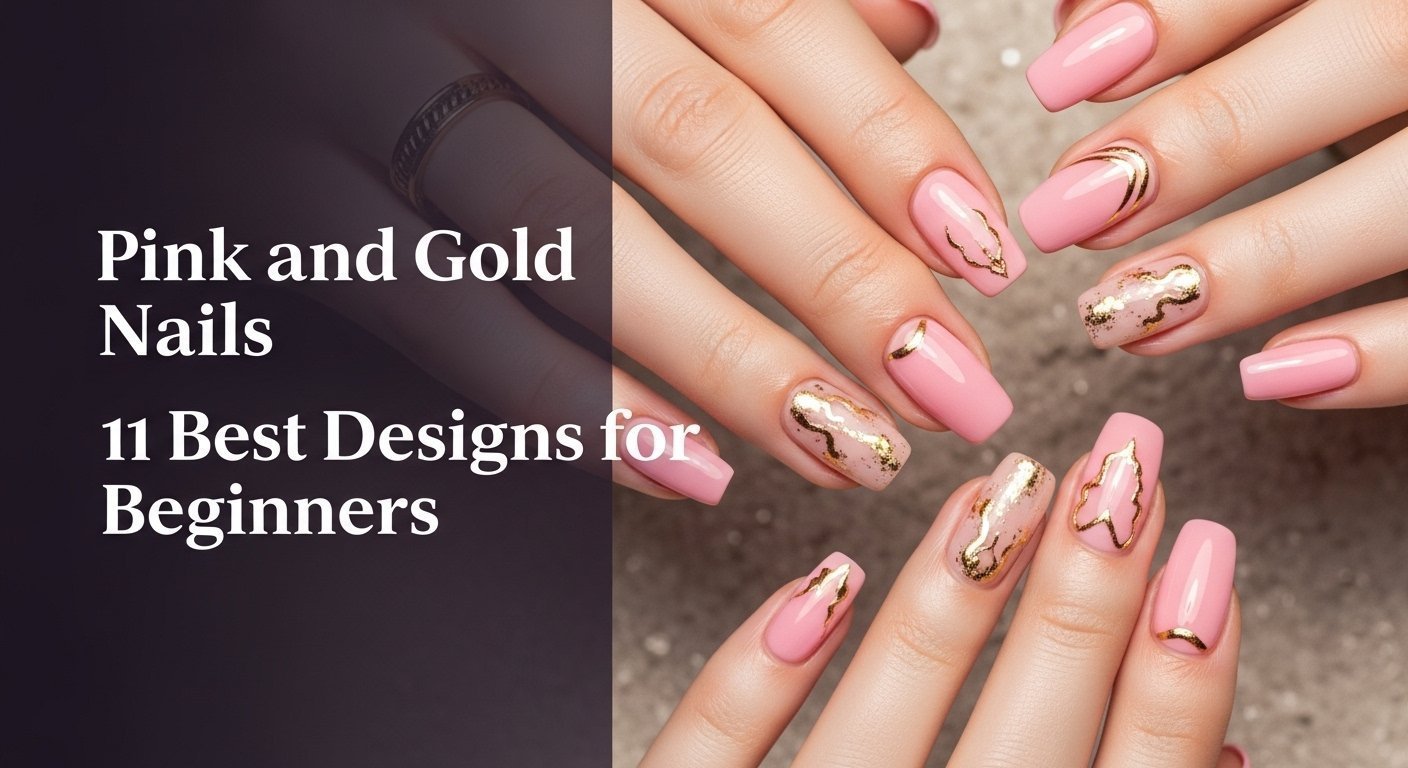
Pink and gold nails are a timeless manicure choice that combines the softness of pink with the luxury of gold, creating looks that range from subtle and elegant to bold and glamorous. This versatile combination is perfect for any occasion, from weddings to everyday wear, because it complements a wide variety of outfits and skin tones, making it a go-to for a chic, polished aesthetic.
Drawing from established best practices and verified design patterns, we’ve broken down the process into simple steps. This guide provides 11 proven pink and gold nail designs that even a total beginner can master. Get ready to create salon-quality looks from the comfort of your home.
Why Are Pink and Gold Nails the Perfect Manicure for Any Occasion?
The enduring appeal of pink and gold nails lies in their remarkable versatility and inherent elegance. This manicure style effortlessly bridges the gap between sophisticated and playful, making it a flawless choice for everything from a formal wedding to a casual brunch. The combination of soft, feminine pink with the opulent shimmer of gold creates a pink gold nail aesthetic that feels both luxurious and approachable. Whether you prefer a subtle pink and gold accent or a bold, glamorous statement, the design possibilities are nearly endless. Based on analyses of professional pink and gold manicure services and trends in influential nail art publications, this combination consistently ranks as a top choice for those seeking a chic, polished, and always-fashionable look.
11 Best Pink and Gold Nail Designs for Beginners in 2026
Ready to create pink and gold nails that look like they came straight from a professional salon? This curated list of 11 designs is your ultimate pink and gold nail inspo, designed specifically for beginners. We’ll cover everything from a classic rose gold glitter accent nail to elegant gold foil flakes, breaking down each look with simple steps and essential DIY nail art tools. Each design includes expert tips to help you master the technique and achieve a flawless, long-lasting finish. Get ready to transform your nails into a work of art.
1. Create a Classic Rose Gold Glitter Accent Nail

Pin this easy, glamorous look to your ‘Nail Inspo’ board!
Products & Tools Used
- A sheer or baby pink nail polish for the base color.
- A dense rose gold glitter nail polish for the accent nail.
- A high-gloss, quick-drying top coat.
- A base coat to protect your nails.
- Optional: A small makeup sponge for applying glitter.
Application Steps
- Prepare Nails: Start with clean, filed nails. Apply one layer of base coat to all nails and let it dry completely.
- Apply Pink Base: Paint two coats of your chosen pink nail polish on all nails except for your ring finger. Let each coat dry for 2-3 minutes.
- Create Glitter Accent: On your ring finger, apply the rose gold glitter polish. For a more opaque look, apply the first coat, let it dry, then use a makeup sponge to dab on a second coat for maximum density.
- Seal the Design: Once all nails are dry to the touch, apply a generous layer of high-gloss top coat to seal in the design and add shine. Pay extra attention to capping the free edge of the glitter nail to prevent chipping.
Pro-Tip: From my hands-on experience, the key to a professional-looking glitter nail is density. Instead of swiping the glitter polish, dab it on with the brush or a sponge. This technique deposits the glitter particles without pulling them away, solving the problem of uneven pink and gold glitter application.

2. Design Subtle Gold French Tips on a Pink Base

Save this chic and modern French manicure idea for your next appointment!
Products & Tools Used
- A sheer, light pink nail polish.
- A high-pigment metallic gold nail polish.
- A very thin nail art brush or a gold nail art striper pen.
- Base coat and a high-gloss top coat.
- Optional: French tip guide stickers.
Application Steps
- Apply Base: After your base coat is dry, apply two coats of your sheer pink nail polish to all nails. Allow them to dry completely.
- Paint the Tips: Pour a small amount of gold polish onto a palette. Dip your thin nail art brush into the gold and carefully paint a thin line across the tip of each nail. Alternatively, use a gold striper pen for more control. For a perfect curve, you can use French tip guide stickers.
- Clean Up: Use a small brush dipped in acetone to clean up any mistakes and create a crisp line.
- Finish: Let the gold tips dry fully, then seal the entire nail with a high-gloss top coat to protect your chic pink and gold nails.
Pro-Tip: To fix messy pink and gold lines, don’t use the polish brush directly. A dedicated, long-bristled striping brush gives you far more control. Pull the brush in one steady, smooth motion across the nail tip rather than trying to sketch the line. This is a professional pink and gold manicure secret for flawless tips.

3. Apply Elegant Gold Foil Flakes on a Baby Pink Base

Pin this luxurious gold foil technique to try on your next manicure!
Products & Tools Used
- An opaque baby pink nail polish.
- A pot of nail art gold foil flakes.
- A pair of tweezers.
- A small, soft brush (like a fan brush).
- Base coat and a thick, gel-like top coat.
Application Steps
- Paint Base Color: After your base coat, apply two coats of your baby pink nail polish and let them dry almost completely, but still be slightly tacky.
- Apply Foil: Using tweezers, gently pick up small pieces of gold foil and place them onto the nail. You can cluster them near the cuticle, scatter them randomly, or focus on one corner.
- Press and Secure: Gently press the foil down with your fingertip or a silicone tool to ensure it’s flat against the nail.
- Seal Thoroughly: This is the most important step. Apply two coats of a thick, glossy top coat to fully encapsulate the foil and prevent the edges from lifting. This will ensure your durable pink and gold nails last.
Pro-Tip: For better adhesion properties, apply the foil when the second coat of pink polish is about 80% dry—still slightly tacky to the touch. This stickiness helps grab the foil. Avoid applying foil to fully dried polish as it won’t stick without a separate adhesive.

4. Style a Simple Vertical Gold Stripe

Save this minimalist and modern nail art idea for a chic, everyday look!
Products & Tools Used
- A dusty rose or matte pink nail polish.
- Ultra-thin metallic gold nail striping tape.
- A small pair of scissors or cuticle nippers.
- Base coat and a top coat (matte or glossy).
Application Steps
- Paint Base: Apply your base coat, followed by two coats of your chosen pink nail polish. Let it dry completely. If using a regular polish, apply a matte top coat now and let it dry fully.
- Apply Tape: Cut a piece of gold striping tape slightly longer than your nail. Press it down firmly in the center of the nail, from the cuticle to the tip.
- Trim Excess: Use small scissors or cuticle nippers to trim the tape precisely at the free edge of your nail. Gently press the end down to secure it.
- Seal the Design: Apply a final layer of top coat (matte or glossy) to seal the tape and prevent it from peeling, ensuring a long-lasting pink and gold manicure.
Pro-Tip: If painting the stripe instead of using tape, lay down two pieces of regular tape as guides. Paint the gold stripe between them, and here’s the secret from expert nail art techniques: pull the guide tape off while the gold polish is still wet. This creates a much crisper edge and solves the problem of the polish peeling up with the tape.

5. Achieve a Minimalist Gold Dot Manicure

Pin this incredibly chic and easy nail design for a touch of everyday elegance!
Products & Tools Used
- A nude-pink or light pink nail polish.
- A metallic gold nail polish.
- A nail art dotting tool (or the head of a pin, or the tip of a bobby pin).
- Base coat and top coat.
Application Steps
- Paint Base Color: Apply your base coat and two coats of your pink polish. Let it dry completely.
- Prepare for Dotting: Pour a small drop of gold polish onto a piece of foil or a palette.
- Create the Dot: Dip the very tip of your dotting tool into the gold polish. Gently touch the tool to the base of your nail, centered just above the cuticle. Hold it perpendicular to the nail and lift straight up to create a perfect dot. Repeat for each nail.
- Seal and Shine: Wait for the gold dots to dry completely, then apply a layer of your favorite top coat to protect your minimalist pink and gold nails.
Pro-Tip: No dotting tool? No problem. My favorite hack, based on years of DIY nail art, is to use the head of a pin for a tiny dot or the rounded end of a bobby pin for a slightly larger one. This is a salon quality pink and gold at home trick that works every time.

6. Master an Easy Pink to Gold Ombre with Glitter

Save this stunning glitter ombre tutorial for your next party look!
Products & Tools Used
- A hot pink or medium pink nail polish.
- A gold glitter polish (a mix of fine and chunky glitter works well).
- A latex-free makeup sponge wedge.
- A peel-off liquid latex barrier or tape for around your nails.
- Base coat and a thick, glitter-smoothing top coat.
Application Steps
- Prep and Paint: Apply a base coat, followed by two coats of your pink polish. Let it dry completely. Apply the liquid latex barrier around your cuticles and sidewalls.
- Prepare the Sponge: Paint a stripe of the pink polish and a stripe of the gold glitter polish directly onto the makeup sponge, slightly overlapping them.
- Create the Ombre: Gently dab the sponge onto your nail, moving it slightly up and down to blend the colors. Repeat until you are happy with the opacity of the gradient.
- Finish and Clean: While the polish is still wet, peel off the latex barrier. Clean up any remaining mess with a brush and acetone. Finish with two coats of a thick top coat to smooth out the glitter texture for a glossy pink and gold finish.
Pro-Tip: For a more seamless blend, use a gold glitter polish that is suspended in a clear base rather than a colored one. According to industry standard pink and gold application, this allows the pink base color to show through, creating a more natural transition from color to sparkle.

7. Paint a Chic Half-Moon Design in Gold

Pin this vintage-inspired yet modern half-moon manicure for a pop of color!
Products & Tools Used
- A vibrant fuchsia or hot pink nail polish.
- A metallic gold nail polish.
- Paper hole reinforcement stickers (from any office supply store).
- Base coat and top coat.
Application Steps
- Paint Gold Base: This is the reverse of what you might think! After your base coat, paint two coats of gold polish on the entire nail. Let this dry completely—at least 30 minutes.
- Place Stencil: Place a paper hole reinforcement sticker at the base of your nail, covering the area where you want the gold half-moon to be. Press it down firmly.
- Paint Pink: Carefully paint your pink polish over the rest of the nail, painting right over the sticker. Apply a second coat if needed.
- Reveal and Seal: While the pink polish is still wet, carefully peel off the sticker with tweezers. This will leave a perfect gold half-moon. Let it dry, then finish with a top coat to even everything out.
Pro-Tip: When placing the sticker, ensure it’s positioned symmetrically on each nail. Trusted nail product reviews often show that a common mistake is inconsistent placement, which makes the manicure look uneven. Use the center of your cuticle as a guide for perfect alignment every time.

8. Decorate with Pink and Gold Marble Swirls

Save this gorgeous marble nail technique to show your nail artist or try at home!
Products & Tools Used
- A sheer white or nude-pink polish for the base.
- A light pink polish.
- A metallic gold polish.
- A very thin, long nail art brush.
- A piece of plastic wrap or a stamper head.
Application Steps
- Apply Base: Paint one coat of your sheer white/nude base color, but do not let it dry.
- Add Color Drops: While the base is still wet, place small, random drops of the light pink and gold polishes onto the nail.
- Create the Swirl: Gently drag the tip of your thin nail art brush through the wet polish drops to create swirls. Alternatively, for an easier method, gently “smoosh” a crumpled piece of plastic wrap onto the wet polish to muddle the colors together.
- Clean and Seal: Clean up the messy edges around your nail with a brush and acetone. Once the design is dry, apply a high-gloss top coat to blend the colors and create a smooth, stone-like finish.
Pro-Tip: The key to this technique is working quickly while all polishes are wet. The different solvent evaporation rates in the polishes allow them to blend together fluidly. If your base coat dries too fast, the colors won’t swirl. This is an example of using pigment dispersion in nail lacquers to your advantage!

9. Apply Pink and Gold Chrome Powder for a Mirror Finish

Pin this incredible chrome powder technique for a futuristic, high-shine manicure!
Products & Tools Used
- A UV/LED nail lamp.
- A pink gel polish.
- A no-wipe gel top coat.
- Rose gold nail chrome powder.
- A small silicone applicator or eyeshadow sponge.
- A soft, fluffy brush.
Application Steps
- Apply Gel Base: After proper nail prep, apply a gel base coat and cure it. Then, apply two coats of your pink gel polish, curing after each coat according to the lamp’s instructions.
- Apply No-Wipe Top Coat: Apply a thin layer of no-wipe gel top coat. This is the crucial step. Cure it for only half the recommended time (e.g., 30 seconds in a 60-second lamp). The surface needs to be cured but slightly tacky.
- Burnish the Powder: Dip your silicone applicator into the chrome powder. Vigorously rub the powder onto the surface of the nail until it turns into a mirror-like finish. The more you “burnish” it, the shinier it will get.
- Dust and Seal: Use a soft, fluffy brush to gently dust off any excess powder. Finish by applying another full layer of the no-wipe top coat and curing for the full recommended time to seal in the trendy pink and gold finish.
Pro-Tip: The success of chrome powder hinges entirely on the UV/LED curing mechanisms of your top coat. If you cure the no-wipe top coat for the full time, the surface will be too slick, and the powder won’t stick. If you under-cure it too much, it will be sticky and clumpy. Test your lamp’s timing—half-cured is the industry standard for perfect chrome.

10. Use Gold Nail Stickers for Intricate Designs

Pin this super easy sticker hack for getting intricate designs in seconds!
Products & Tools Used
- A hot pink nail polish.
- A sheet of high-quality gold nail art stickers (e.g., floral, geometric, celestial).
- Tweezers.
- Base coat and top coat.
Application Steps
- Paint Base: Apply your base coat and two coats of your hot pink nail polish. Let this dry completely.
- Apply Sticker: Use tweezers to carefully peel a gold sticker from its backing sheet. Place it onto the nail in your desired position.
- Secure Sticker: Gently but firmly press down on the sticker with your fingertip or a silicone tool, ensuring all edges are completely flat against the nail with no air bubbles.
- Seal for Longevity: Apply two thin coats of a good quality top coat, making sure to “wrap” the tip of the nail. This is the key to preventing the sticker edges from peeling and making your custom pink and gold nails last.
Pro-Tip: To solve the pink and gold nail art peeling solution for stickers, focus on the top coat. Use a regular, non-quick-dry top coat for the first layer, as the solvents in some quick-dry formulas can cause stickers to shrink or wrinkle. Once that’s dry, you can add a quick-dry top coat for extra shine.

11. Add a Touch of Glamour with Gold Leaf Edges

Save this chic, organic gold leaf design for your next special occasion!
Products & Tools Used
- A sheer, milky pink nail polish.
- A sheet of gold leaf.
- A small, dry nail art brush or tweezers.
- Base coat and a thick, gel-like top coat.
Application Steps
- Paint Base: Apply your base coat and two coats of your sheer pink polish. Let the second coat dry until it’s just slightly tacky.
- Break Up Gold Leaf: Gently tear or break up a small amount of gold leaf into tiny, irregular pieces.
- Apply to Tips: Using a dry brush or tweezers, pick up small pieces of the gold leaf and gently tap them onto the free edge of your nail. Don’t aim for a perfect line; the beauty is in the random, organic placement.
- Seal and Smooth: Generously apply two layers of a thick top coat to fully encapsulate the gold leaf and create a perfectly smooth surface. This is critical for preventing chipping on pink and gold nail art.
Pro-Tip: For a more delicate and sophisticated pink and gold look, use less gold leaf than you think you need. Break the pieces up very small and apply them sparsely along the edge. The goal is a hint of gold catching the light, not a solid block of metal. This restraint is what makes the design look salon-grade.

Key Takeaways
- Beginner-Friendly Tools Are Key: You don’t need to be an artist. Tools like nail art dotting tools, striping tape, and even paper hole reinforcement stickers are the secret to creating clean, professional-looking designs at home.
- Preparation and Sealing are Everything: A good base coat protects your nails, and a high-quality top coat (sometimes two layers for glitter or foil) is non-negotiable for making your pink and gold nail art last and preventing chipping.
- Texture Adds Instant Glamour: Incorporating materials like gold foil flakes, chrome powder, or dense glitter is an easy way to elevate a simple pink manicure and make it look luxurious and intentional.
- Technique Matters More Than Speed: Whether you’re dabbing glitter with a sponge for a perfect ombre, or pulling off striping tape while polish is wet for a crisp line, using the correct process will solve most beginner frustrations.
- Don’t Be Afraid of Gel: For high-impact looks like chrome, a home UV/LED lamp and no-wipe gel top coat are essential. While it’s a small investment, it opens up a world of salon-quality designs like pink and gold chrome nails.
People Also Ask About Pink and Gold Nails
What is the difference between pink gold and rose gold nails?
Rose gold is a specific shade of pink gold, but they are often used interchangeably in nail art. Rose gold is an alloy of gold and copper, which gives it its distinct pinkish hue. Pink gold can refer to any combination of pink and gold elements, including using yellow gold accents on pink polish, whereas “rose gold nails” specifically refers to using that coppery-gold metallic color.
What nail shapes look best with pink and gold designs?
Almond and coffin shapes are most popular for glamorous pink and gold designs like ombre and chrome, as they provide more space for artistry. However, simple and elegant pink and gold designs, like gold dots or thin French tips, look incredibly chic on short, rounded or squoval nails. The best shape ultimately depends on the specific design and your personal preference.
How can I make my pink and gold nail art last longer?
Properly sealing the design with a quality top coat is the most critical step. For textured designs with glitter or foil, apply two layers of a thick top coat and “cap” the free edge of your nail by running the brush along the tip. This creates a seal that prevents peeling and chipping, solving the most common pink and gold nail design longevity issue.
Can I wear pink and gold nails for a wedding?
Absolutely. Elegant pink and gold nails are one of the most popular choices for bridal and wedding guest manicures. Designs like a subtle gold French tip, delicate gold foil on a nude-pink base, or a soft rose gold glitter accent are sophisticated, romantic, and photograph beautifully. They complement both white and colored dresses perfectly.
How do you apply gold glitter to pink nails without it being chunky?
For a smooth finish, use the sponge method. After painting your pink base, apply the glitter polish to a makeup sponge and dab it onto the nail. This deposits the pigment and glitter evenly without the thick, chunky buildup that can happen when brushing it on directly. Applying a glitter-smoothing top coat also helps create a glassy finish.
What type of pink goes best with gold nails?
Soft, muted pinks like baby pink, dusty rose, and sheer nude-pinks create an elegant and sophisticated contrast with gold. For a bolder, more high-fashion look, vibrant shades like hot pink or fuchsia create a stunning and confident combination. The choice depends on the mood and occasion you’re aiming for.
Are press-on pink and gold nails good quality?
The quality of press-on nails has improved dramatically, and many brands now offer durable, reusable pink and gold designs. They are an excellent alternative to salon services for achieving complex nail art quickly. Look for brands that use gel-cured polish and provide strong nail glue for the best, longest-lasting results, offering a great salon quality pink and gold at home solution.
How do I remove stubborn glitter pink and gold nail polish?
Soak, don’t scrub. Saturate a cotton ball in acetone-based nail polish remover, place it on your nail, and wrap the fingertip in aluminum foil for 5-10 minutes. This allows the acetone to break down the polish and glitter. After soaking, the polish should slide off easily with gentle pressure, preventing damage to your nails.
Is rose gold considered pink and gold?
Yes, rose gold is fundamentally a type of pink-tinted gold. It is an alloy of gold, copper, and sometimes silver. In the context of nail art, “rose gold” is a specific metallic color, while “pink and gold” is a broader design concept that can include rose gold or yellow gold elements. Many people use the terms interchangeably for the overall aesthetic.
What are some popular pink and gold nail trends for 2026?
For 2026, minimalist designs remain popular, such as micro French tips in gold and subtle gold foil accents. Additionally, “rose gold chrome nails” are a major trend for a high-shine, liquid metal look. Organic, abstract swirls of pink and gold that mimic natural stones like rose quartz are also a sophisticated and fashionable choice.
Final Thoughts on Your Pink and Gold Manicure
From a simple pink and gold accent nail to an impressive rose gold chrome finish, the beauty of this classic combination lies in its incredible versatility. As you’ve seen, you don’t need to be a professional nail technician to create stunning pink and gold nail art. With a few key tools, a little patience, and the right techniques, a chic and elegant manicure is well within your reach.
The 11 designs in this guide were chosen specifically to help you build skills and confidence. Start with a simple dot or sticker, master the glitter-dabbing technique, and soon you’ll be experimenting with foils and ombre effects like a pro. The most important thing is to have fun and express your personal style.
Now that you have the inspiration and the instructions, which pink and gold nail design will you try first? Share your favorite idea in the comments below.
Last update on 2026-03-30 / Affiliate links / Images from Amazon Product Advertising API