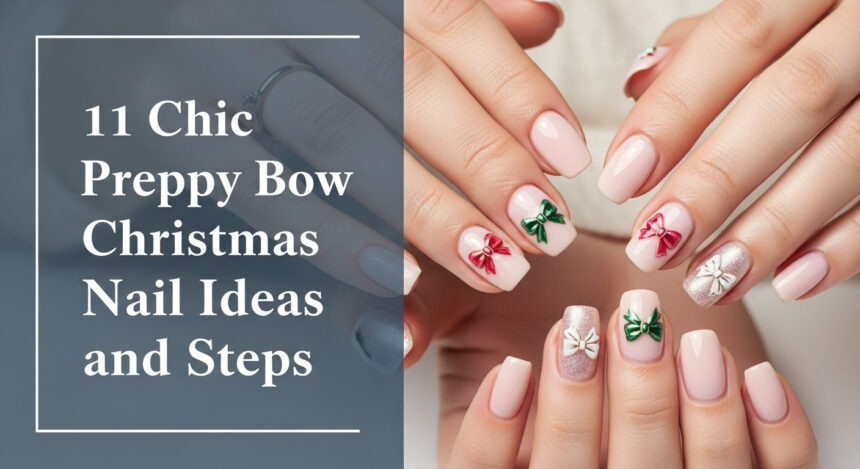
Have you noticed the explosion of tiny, perfect bows on everything this holiday season? You want to try the chic preppy bow Christmas nail trend, but worry it will look childish or that your carefully placed 3D charms will pop off before the party even starts. It’s a common frustration to see a perfect design online but struggle with the at-home execution.
The Preppy Bow Nail Aesthetic is defined by combining classic preppy elements like crisp white, navy, or plaid with small, delicate bow motifs, often using non-traditional holiday colors like soft pink, to achieve a sophisticated, feminine, and festive look for the season. This style merges timeless fashion with current micro-trends for a perfectly polished result.
Drawing from established best practices and current trend analysis, this guide provides more than just inspiration. You’ll discover 11 chic, professionally curated designs and the exact, proven steps to make them last. Get ready to master the most sophisticated manicure of 2026.
Are Preppy Bow Christmas Nails the Biggest Trend of 2026? Understanding the Aesthetic Fusion
Yes, preppy bow Christmas nails are a dominant trend, largely because they represent a perfect fusion of several powerful micro-trends. This isn’t just about sticking a bow on a nail; it’s about translating a specific aesthetic. The look borrows from the clean lines and classic color palettes of Preppy Style—think navy, cranberry red, and emerald green. It then integrates the hyper-feminine, dainty details of the Coquette Aesthetic, where the bow is the central icon.
This holiday bow nail art also shares DNA with Balletcore Nails, favoring soft, sheer colors like milky pinks and whites as a sophisticated base. The result is a Christmas manicure that feels intentional and high-fashion rather than loud or cartoonish. The core elements are small, delicate bow motifs—whether hand-painted, decals, or 3D charms—set against a clean, often high-contrast background. This combination ensures the final design reads as elegant and on-trend for the holiday season.
11 Chic Preppy Bow Christmas Nail Ideas and Steps
Here are 11 curated preppy bow Christmas nail designs, complete with the products, tools, and expert steps needed to achieve a flawless, long-lasting manicure at home. These ideas are designed to look chic and sophisticated, addressing the common concern of making bow art feel grown-up and elegant.
1. Classic Red and White Gift Bow Accent

Pin this genius hack to your ‘Dream Christmas Nails’ board!
This timeless look uses traditional Christmas colors to create a high-impact, festive manicure that looks like a perfectly wrapped gift. The key is using a highly pigmented cranberry red against an opaque white accent nail for maximum contrast. Precision in hand-painting the symmetrical bow is what makes this design feel elegant and classic.
Products & Tools Used:
- High-pigment, opaque red gel polish (cranberry or true red)
- Opaque white gel polish
- Fine liner brush (short, 5mm bristles)
- Small dotting tool
- Non-wipe glossy top coat
- UV/LED Curing Lamp (36W minimum)
Application/Styling Steps:
- Prepare and cleanse all nails, applying a thin base coat and curing.
- Apply two thin coats of the opaque white polish to the accent nail, curing between coats. Apply red polish to the remaining nails.
- Using the dotting tool, place a small dot of red polish where the center knot of the bow will be (this is your anchor point).
- Using the fine liner brush dipped in red polish, draw two symmetrical triangles connected at the center dot to form the loops of the bow.
- Draw two short, downward ribbon tails extending from the center dot, tapering the ends slightly.
- Flash cure the design for 10 seconds, then encapsulate the design with a thin layer of glossy top coat and cure for a full 60 seconds.
Pro-Tip: For perfect symmetry, stabilize your painting hand by resting your pinky finger on the table surface. Use a thin layer of top coat before painting to allow polish cleanup without disrupting the base color.

2. Coquette Pink Velvet Bow 3D Charm Application

Save this clever organization idea!
Leaning heavily into the Coquette and Balletcore aesthetics, this design uses a soft, milky pale pink base as the canvas for a textural 3D velvet bow charm. The challenge here isn’t the design itself, but the application. Securing a 3D charm for long-lasting wear requires a specific technique and the right kind of adhesive to prevent it from snagging or falling off.
Products & Tools Used:
- Sheer milky pale pink builder gel for nails (BIAB preferred)
- Small velvet or resin bow charms (under 4mm)
- Specialized thick viscosity UV-cured gem glue or thick builder gel
- Wax pencil or fine tweezers for placement
- UV/LED Curing Lamp
Application/Styling Steps:
- Apply and cure your pink base color (BIAB or polish). Do not apply top coat yet.
- Using a small tool, scoop a pea-sized dollop of the specialized thick gem glue and place it on the exact spot where the bow will sit (usually near the cuticle or the nail center).
- Use the wax pencil to carefully lift and place the 3D velvet bow charm directly onto the gem glue. Gently press the charm down so the glue slightly oozes around the base.
- Flash cure the charm for 10-15 seconds to freeze it in place.
- Using a thin brush, apply non-wipe top coat around the base of the charm, encapsulating the edges for maximum security, but avoid getting top coat on the velvet surface.
- Cure for a full 60 seconds to ensure long-lasting wear.
Pro-Tip: The key to securing heavy charms is using a thick adhesive (gem glue or builder gel) that has minimal self-leveling properties, ensuring the charm doesn’t slide during the initial flash cure.

3. Minimalist Micro-Bows on a Neutral Nude Base

Pin this clean, sophisticated look now!
For a subtle nod to the trend that’s perfect for the office or formal events, this minimalist design is ideal. It features tiny, precisely painted or decaled micro-bows on a clean, neutral nude base. The sophistication comes from the restraint and the perfection of the base color, making it an understated yet chic holiday nail choice.
Products & Tools Used:
- High-quality, opaque nude builder gel for nails or neutral beige polish
- Black or very dark green fine-tip nail art pen or micro-bow decals
- Clear silicone tool for smoothing decals (if applicable)
- Non-wipe top coat
Application/Styling Steps:
- Shape the nails into a neat squoval and apply the nude base color (two thin coats). Cure/dry thoroughly.
- For Decals: Cut the micro-bow decals closely and soak in water for 15 seconds. Slide the bow off the paper backing and carefully position it near the cuticle or the free edge using tweezers.
- For Hand-Painting: Using a micro dotting tool, dab two tiny symmetrical dots and connect them with two small curves to form the loops of the bow using black polish.
- Ensure the design is centered and fully dry/cured.
- Seal the entire design with two thin layers of high-gloss top coat, ensuring the decals are fully encapsulated, and cure for a final 60 seconds.
Pro-Tip: Minimalist designs require maximal prep. Use a cuticle remover and ensure your base color is absolutely perfect and streak-free, as small flaws will be amplified by the simple design.

4. Emerald Green Plaid Accent Bow

Save this high-end preppy pattern idea!
This design offers unique information gain by integrating a classic preppy pattern—plaid—with the bow motif. Most guides focus only on the bow, but layering it over a rich emerald green and white tartan on an accent nail elevates the look. This is for the intermediate artist who wants to fully embrace the preppy aesthetic.
Products & Tools Used:
- Opaque emerald green gel polish
- Crisp white gel polish
- Very thin, long-bristled fine liner nail art brush
- Striping tape or stamping plate (optional, for the plaid base)
- Dotting tool
Application/Styling Steps:
- Apply two coats of white polish to the accent nail base and cure. Apply emerald green to all other nails.
- Creating the Plaid: Use the fine liner brush and emerald green polish to paint thin, parallel horizontal lines, and then thin vertical lines, creating a checkered grid. Flash cure.
- Next, use a slightly darker green or black polish to paint even thinner lines slightly offset from the main grid lines to simulate the complexity of tartan. Flash cure.
- Using the white polish and dotting tool, paint a small, simple bow motif centered over the plaid pattern, ensuring the bow stands out against the lines.
- Seal with a glossy top coat, being careful not to smudge the fine lines, and cure.
Pro-Tip: When painting fine lines for plaid, wipe almost all the polish off your fine liner brush before starting. Use long, smooth strokes and flash cure each color layer before applying the next one to prevent color bleeding.

5. Metallic Silver Ribbon Wrap Design (Decal or Foil)

Try this easy, high-impact festive look!
Hand-painting metallic ribbons can be incredibly difficult. This low-effort, high-impact alternative uses metallic silver nail foil or striping tape to create the illusion of a ribbon wrapping around the nail. Set against a sheer, milky white base, the metallic shine provides a festive and elegant feel without requiring advanced painting skills.
Products & Tools Used:
- Sheer milky white or sheer pink gel polish
- Metallic silver nail art foil or silver striping tape
- Nail foil adhesive (if using foil)
- Silicone stamper or dry brush (for pressing foil)
- High-quality, thin top coat
Application/Styling Steps:
- Apply and cure the milky white base color. Apply a thin layer of nail foil adhesive (or clear tacky polish) only where the silver design will go. Allow to dry until tacky/clear.
- Press a small section of the silver metallic foil face-down onto the tacky surface. Rub firmly with a silicone stamper or dry brush to ensure transfer.
- For the bow/ribbon shape, use thin strips of the transferred foil, or apply metallic striping tape in a simple ‘X’ shape on the nail, meeting in the middle to mimic a knot.
- Carefully use a craft knife or sharp tweezers to trim any excess foil or tape at the edges.
- Immediately seal the entire nail with two thin coats of top coat, ensuring the edges of the metallic element are fully covered to prevent peeling. Cure for 60 seconds.
Lesson Learned: Metallic foil and tape are prone to lifting. Sealing the entire nail with two thin layers of top coat, making sure the top coat is dragged over the foil’s edges, is mandatory for longevity.

6. Classic Navy and Gold Formal Bow

Achieve the perfect formal look for holiday parties!
This design embodies the classic preppy aesthetic with a formal twist. A deep, opaque navy blue base creates a sophisticated canvas for a small, meticulously hand-painted metallic gold bow. The high contrast between the dark navy and shimmering gold makes this manicure perfect for any formal holiday event.
Products & Tools Used:
- Deep, opaque navy blue gel polish for nail art
- Fine-tipped metallic gold or silver paint/gel polish (highly pigmented)
- Thin striping brush
- Glossy top coat
Application/Styling Steps:
- Apply two thin, flawless coats of the deep navy base color to all nails, curing between coats.
- Using the metallic gold polish and a striping brush, carefully paint a small, simple outline of the bow loops and ribbon tails onto the accent nail. Precision is crucial for this high-contrast look.
- Optional: Fill the bow outline with a slightly lighter gold shimmer polish for dimension. Cure immediately.
- For added interest, paint a single thin gold line vertically down the center of one or two other nails to mimic a stripe detail, a key preppy element.
- Apply the final glossy top coat, ensuring the metallic lines are perfectly smooth and sealed. Cure for a full 60 seconds.
Pro-Tip: If your gold metallic polish is too thick, thin it slightly with a drop of clear top coat before painting. The deep navy background requires extremely crisp lines; stabilize your hand thoroughly before painting the bow outline.

7. Frosted White Glitter Bow with Matte Contrast

Get the perfect velvet-matte holiday texture!
This winter-themed design creates a sophisticated look by playing with textural contrast. A crisp white base is given a “frosted” appearance with a velvet matte top coat, which makes the shimmering, glitter-coated 3D bow charm pop. The juxtaposition of the non-reflective base and the sparkling bow creates a cozy yet elegant feel.
Products & Tools Used:
- Opaque crisp white gel polish
- High-quality velvet finish matte top coat for gel nails
- Pre-made resin bow charm or sculpted gel bow
- Fine silver or iridescent white glitter powder
- Non-wipe glossy top coat and gem glue
Application/Styling Steps:
- Apply two coats of white polish and cure. Apply the matte top coat over the white base on all nails and cure for 60 seconds (this creates the ‘frosted’ look).
- Apply a thin coat of glossy top coat only to the bow charm. Immediately sprinkle fine silver glitter over the entire charm until fully coated. Gently tap off the excess.
- Flash cure the glitter-coated charm for 10 seconds to lock the glitter.
- Secure the cured, glittery charm onto the accent nail using a dot of thick gem glue (refer to Idea 2 for 3D application steps). Cure again.
- Use a dry brush to gently sweep away any loose glitter from the matte base, ensuring the textural contrast remains clean. Do not apply any top coat over the matte base or the glitter bow.
Pro-Tip: To ensure your matte finish stays perfectly matte, avoid touching the nail surface after the matte top coat cures. Oils from your skin will ruin the velvet texture.

8. Sculpted Clear Gel Bow (Low Profile 3D)

Learn the advanced technique for a durable 3D bow!
This advanced technique offers superior durability and a sleek, integrated finish compared to pre-made charms. By sculpting the bow directly onto the nail using a thick, clear builder gel, you create a low-profile 3D effect that is less prone to snagging. The transparent “glass bow” look over a sheer pink base is subtle, modern, and incredibly chic.
Products & Tools Used:
- Sheer pink or nude base gel polish
- High-viscosity, non-self-leveling thick builder gel clear
- Detail sculpting brush (small, firm flat brush)
- Dotting tool or wax pencil
- UV/LED Curing Lamp
Application/Styling Steps:
- Prep the base coat and apply the sheer pink color (cure). Apply a layer of non-wipe top coat and cure to create a smooth surface.
- Using a clean dotting tool, scoop a small bead of the thick clear builder gel. Place it on the nail where the bow knot will be.
- Scoop two slightly smaller beads and place them symmetrically on either side of the center bead.
- Use the detail sculpting brush (dipped slightly in rubbing alcohol or slip solution) to gently mold the two outer beads into bow loops, shaping them before they can self-level.
- Mold two small ribbon tails below the knot. Flash cure the entire sculpted design for 10-15 seconds.
- After ensuring the shape is perfect, apply a thin layer of top coat over the entire nail, including the sculpted bow, to smooth out any rough edges and cure for a final 60-120 seconds.
Pro-Tip: The key to sculpting is to use a very thick, non-runny gel and keep your brush slightly damp with slip solution or rubbing alcohol. This prevents the gel from sticking to the brush and allows you to push the shape precisely.

9. Candy Cane Stripe Bow Combination

The ultimate festive pattern nail tutorial!
For a manicure that screams “Christmas,” this design combines two quintessential holiday motifs: candy cane stripes and bows. By layering a crisp, opaque white bow over a background of diagonal red and white stripes, you create a fun, festive, and visually engaging look that still feels clean and preppy.
Products & Tools Used:
- Opaque red and white gel polish
- Thin white and red nail stripe tape or liner brush
- Glossy top coat
Application/Styling Steps:
- Apply two coats of white polish to the nail. Cure.
- Apply thin diagonal strips of the red and white striping tape evenly across the nail to create the candy cane pattern. Ensure the tape ends are flush with the nail edges.
- Using a fine liner brush and opaque white polish, paint the solid bow design directly over the center of the stripes. The opacity of the white will make the bow pop against the pattern. Cure.
- Remove the striping tape while the polish underneath is still tacky (or cure if using gel).
- Immediately apply two coats of glossy top coat to fully seal the stripes and the bow design, ensuring no tape edges are exposed. Cure.
Pro-Tip: If using striping tape, ensure the layers of polish underneath the tape are completely dry (or fully cured) before applying the bow. Wait until the very end to remove the tape to prevent smudging the stripes.

10. Pearl Accented Dainty Bow

Achieve a stunning, elegant feminine design!
To amplify the dainty, Coquette-inspired aspect of the trend, this design incorporates tiny micro-pearls as accents. Placed around a small white 3D bow charm on a sheer pink base, the pearls add a touch of timeless elegance and texture, making the manicure feel more intricate and luxurious.
Products & Tools Used:
- Sheer milky pink gel polish or BIAB
- Small white pearl nail art charms set (micro-size, 1mm-2mm)
- Small white 3D bow charm
- Thin gem glue or clear builder gel
- Wax pencil or placement tool
Application/Styling Steps:
- Apply and cure the sheer pink base color.
- Using gem glue, adhere the main 3D bow charm to the accent nail (refer to Idea 2). Flash cure.
- While the base of the bow is secure, apply tiny dots of gem glue around the bow and along the cuticle line.
- Carefully place 3-5 micro-pearls onto the dots of glue, using the wax pencil to push them flush with the nail surface.
- Use a thin detail brush to apply top coat around the pearls (but not over them) and the base of the bow to fully seal them against snagging.
- Cure for a final 60 seconds.
Lesson Learned: Pearls have a rounded surface, making them prone to falling off. Ensure the gem glue completely surrounds the flat base of the pearl before curing to maximize adhesion and minimize snagging.

11. Dark Academia Tartan Bow

A sophisticated, non-traditional preppy look!
This is a moody, intellectual take on the preppy bow trend. It swaps bright holiday colors for a Dark Academia palette of deep burgundy, forest green, and navy. A complex tartan pattern on the accent nail, topped with a small, matte black bow decal, creates a sophisticated and cozy winter look perfect for those who prefer a less traditional holiday style.
Products & Tools Used:
- Deep burgundy or forest green opaque polish
- Multi-color green and blue plaid nail stamping plate (or water decals)
- Black matte bow decals or stamps
- Stamping tool and scraper (if using plate)
- Matte top coat
Application/Styling Steps:
- Apply two coats of the dark burgundy or forest green base color to all nails and cure/dry.
- Applying Tartan: Use the stamping plate and appropriate colored polishes (navy, brown, red) to transfer the tartan pattern onto the accent nail. Work quickly to ensure the pattern transfers cleanly. Cure/dry completely.
- Apply a small, opaque matte black bow decal or stamp onto a corner of the tartan pattern.
- Apply a glossy top coat to all nails, avoiding the accent nail. Cure.
- Apply a matte top coat ONLY to the tartan accent nail (optional: apply the matte top coat to all nails for a true academia feel) and cure for a full 60 seconds.
Pro-Tip: If hand-painting the complex tartan pattern, use a stamping plate instead. If using a stamp, make sure the base color is fully dry and apply minimal pressure to the stamp head for a clean transfer.

Key Takeaways: Your Quick Guide to Flawless Bow Art
To make sure your preppy bow manicure is a success, focus on the fundamentals of adhesion, contrast, and proportion. These three simple rules will ensure your design looks chic and lasts throughout the holiday season.
Three Essential Rules for Dainty Bow Longevity
- Adhesion is Key: For any 3D charm (resin, acrylic, velvet), use a thick, specialized UV-cured gem glue or builder gel, not traditional nail polish or super glue, to prevent the bow from falling off within 24 hours.
- Contrast is Chic: To maintain the ‘preppy’ aesthetic, always ensure high visual contrast. Pair light bows (white, silver, pink) with dark bases (navy, deep green) or use a matte finish on the nail base to make a glossy bow charm pop.
- Size Matters: The difference between a chic, dainty bow and a bulky, cartoonish one is size. Opt for micro-bows (3-5mm) for a sophisticated look, especially if pairing them with complex patterns like plaid or stripes.
FAQs About preppy bow christmas nails
How long do 3D bow charms typically last on the nail?
Properly secured 3D bow charms applied with UV-cured specialized gem glue or builder gel generally last 10 to 14 days, provided the edges are fully encapsulated with a top coat and the charm is not too large or prone to snagging. Designs using only standard top coat for adhesion will likely fail within 1-3 days.
What is the difference between Coquette and Classic Preppy nail aesthetics?
The Classic Preppy aesthetic utilizes bold, crisp colors (navy, red, green, white) and clean patterns (stripes, plaid) for a tailored look. The Coquette aesthetic overlaps but focuses on hyper-femininity, using softer, lighter colors (pale pink, cream, white) and emphasizes dainty, delicate elements like micro-bows and pearls.
Can I safely remove gel-adhered 3D bow charms at home?
Yes, you can remove them safely at home, but never pull or pry them off. You must first use a coarse file to gently file down the bulk of the hard 3D charm and the adhesive gel surrounding it. Once the material is thinned, soak the remainder in acetone and gently scrape away the softened product to prevent damage to the natural nail plate.
What essential tools are needed for hand-painting symmetrical small bows?
The most essential tool for symmetrical bow painting is a high-quality, long-bristled fine liner brush (5-9mm) and a dotting tool. The dotting tool helps you mark the center knot and the four outermost points of the loops, providing perfect, stable guides for connecting the lines with the liner brush.
Why do my hand-painted ribbon lines look wobbly or bleed into the base color?
Wobbly or bleeding lines typically result from either using too much polish on the brush or not properly curing the base coat. Always wipe almost all the excess polish off your fine liner brush before painting, and ensure your gel base color has been flash-cured and wiped of any inhibition layer before beginning detail work.
Final Thoughts
Mastering the preppy bow trend is all about attention to detail—from selecting the perfect muted base color to ensuring your 3D charm is securely anchored. By following these 11 sophisticated ideas and applying the expert techniques for durable charm placement, you’re not just wearing a manicure; you’re participating in the chicest holiday trend of 2026. Go forth and enjoy your perfectly polished, high-fashion holiday season!
Which of these 11 designs will you try first, and will you choose a classic red or a trendy pink bow? Let us know in the comments below!
Last update on 2026-03-03 / Affiliate links / Images from Amazon Product Advertising API


