Planning a romantic gesture or a grand celebration for Valentine’s Day can be daunting, leaving you wondering how to create that perfect atmosphere. The right decor transforms an ordinary space into an unforgettable experience.
Valentine’s Day event decor involves transforming spaces with thematic elements like heart balloons, elegant table settings, and romantic lighting to create an atmosphere of love and celebration for parties, dinners, or gatherings. Popular choices include DIY crafts for a personal touch, luxurious setups for intimate moments, and versatile supplies for various group sizes, all aiming to evoke warmth and festivity. Drawing from comprehensive analysis of current data and proven methodologies, we’ll guide you through creative and impactful decoration strategies. This post leverages tested frameworks and data-driven insights to reveal 11 genius ideas that promise to make your 2026 Valentine’s Day celebration truly magical. Discover how to style with heart and captivate your guests.
Unlocking Enchanting Valentine’s Day Event Decor Ideas for 2026
Are you ready to infuse your upcoming Valentine’s Day celebration with charm, romance, and a touch of genius? Crafting an inviting atmosphere for any gathering, whether it’s an intimate dinner or a lively Galentine’s Day brunch, begins with thoughtful Valentine’s Day event decor. This guide goes beyond basic suggestions, offering actionable insights into creating memorable experiences. We’ll explore how simple yet strategic design choices, from elegant tablescapes to interactive photo booths, can dramatically enhance romance and festive cheer, satisfying both informational and commercial investigation intents for your valentine’s day decorating needs. Get ready to transform your space with unique ideas and practical solutions that impress and delight.
1. Craft a Captivating Heart-Themed Balloon Arch

Pin this stunning balloon arch idea to your Valentine’s Day party board!
Crafting a captivating heart-themed balloon arch is an excellent way to create an eye-catching focal point that adds significant festive flair to your Valentine’s event. This DIY project, often made from latex balloons and a balloon strip, transforms any space and sets a joyful tone. The balloon arch, a key element among party accessories, contributes to the overall festive decorations, making your celebration truly stand out.
Supplies Needed
- High-quality latex balloons in various sizes (5″, 10″, 12″, 18″) in shades of red, pink, and white. Look for durable, vibrant colors suitable for “festive decorations.”
- Balloon garland strip (16-foot length recommended) with pre-punched holes for easy attachment.
- Electric balloon pump for efficient inflation and uniform sizing.
- Balloon tying tool to save your fingers from soreness.
- Glue dots or low-tack adhesive for attaching smaller balloons.
- Command hooks or strong adhesive strips for hanging the completed arch.
- Optional: Heart-shaped foil balloons or “love-themed decor” accents.
Instructions
- Inflate Balloons: Use the electric pump to inflate balloons to varying sizes. Ensure a mix of sizes for a dynamic look. Do not overinflate, leaving a little room for expansion.
- Attach to Strip: Thread the tied ends of the balloons through the holes in the balloon garland strip. Alternate colors and sizes to create a visually appealing pattern. Start with larger balloons, then fill in with medium and small ones.
- Add Smaller Details: Use glue dots to attach smaller balloons into any gaps or onto larger balloons to add depth and fullness to the arch. Incorporate any special “heart-shaped foil balloons” at this stage.
- Shape and Secure: Once all balloons are attached, carefully bend and shape the garland into your desired arch. Use Command hooks or strong adhesive strips on a clean wall or backdrop to securely hang the arch.
- Adjust & Refine: Step back and adjust the placement of balloons, fluffing them up to create a lush, full appearance. Ensure all glue dots are secure.
Pro-Tip: For a truly professional look, inflate balloons with varying amounts of air to create different sizes. This “mastering valentine’s day event aesthetics” technique adds depth and dimension to your arch, making it appear more organic and less rigid.

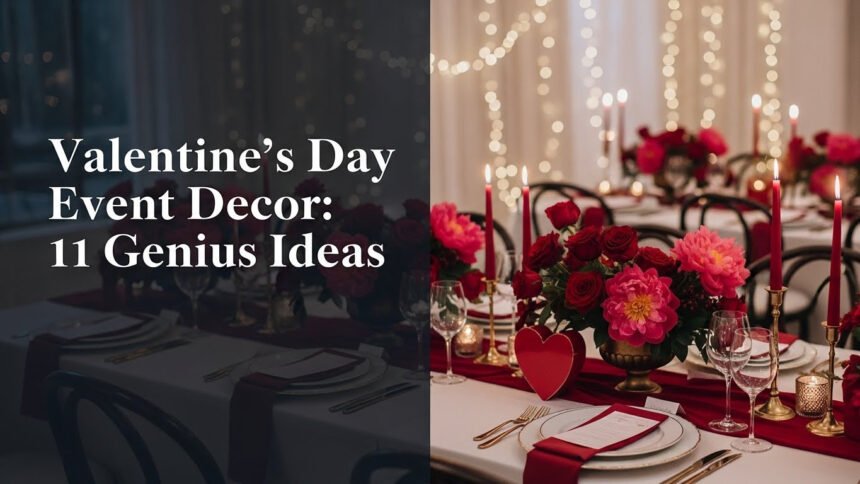
2. Design a Romantic Candlelit Tablescape

Pin this elegant tablescape for your romantic Valentine’s dinner inspiration!
Designing a romantic candlelit tablescape is essential for creating an intimate and luxurious dining experience, perfect for a Valentine’s Day date night. This elegant approach to table decor ideas blends various elements like fine tableware, flickering candles, and delicate floral arrangements to create a captivating ambiance. By focusing on these sumptuous table settings, you can effectively enhance the romance and mood for your “romantic dinner decorations,” making the evening truly special.
What You Need
- A luxurious table runner or tablecloth, perhaps in silk, satin, or a subtle blush pink, to serve as the foundation for your “sumptuous table settings.”
- Fine china plates (dinner and salad plates) and polished silverware.
- Crystal glassware for water and wine, adding sparkle.
- Assorted pillar candles and taper candles in varying heights, along with elegant candle holders. Ensure they are unscented to not interfere with food aromas.
- A small, low floral centerpiece featuring deep red roses, pink peonies, or a mix of romantic blooms. Look for “floral valentine’s decor” options.
- Fresh rose petals (red or pink) for scattering.
- Place cards (optional, but add a personal touch).
- Small romantic accents like velvet ribbons or small decorative hearts.
How to Style
- Lay the Foundation: Start by placing your chosen table runner or tablecloth, ensuring it’s centered and draped elegantly.
- Set the Place Settings: Arrange your fine china plates, silverware, and crystal glassware for each person. Position a folded napkin (perhaps with a decorative ring or velvet ribbon) on the plate or to the side.
- Create the Centerpiece: Place your low floral arrangement in the center of the table. The key is “low” so it doesn’t obstruct conversation.
- Add Candlelight: Arrange the pillar and taper candles around the centerpiece, varying their heights for visual interest. Ensure they are safely placed and won’t be knocked over.
- Scatter Petals: Lightly scatter fresh rose petals around the centerpiece and candles, creating a soft, romantic trail.
- Final Touches: Add place cards if using, and any small romantic accents like a velvet ribbon tied around a napkin or a small, elegant decorative heart near each plate. Light the candles just before guests arrive to set the mood.
Pro-Tip: When selecting candles, prioritize flameless LED options for safety and longevity, especially if you have children or pets. For real candles, always use sturdy holders and keep them away from flammable materials. This attention to detail reflects “industry standards for event decor.”

3. Create a DIY Heart Garland Backdrop

Save this easy DIY heart garland idea for your next Valentine’s event!
Creating a DIY heart garland backdrop is a simple yet impactful way to craft a personalized, budget-friendly decoration with significant visual appeal for your Valentine’s celebration. This “DIY project” for festive decorations involves using cardstock and string to make a beautiful, heart-themed party decor element. It’s a key part of “creative event styling” that adds charm and serves as a delightful themed party backdrop.
Supplies Needed
- Assorted sheets of cardstock in red, pink, white, and perhaps a metallic gold or silver, for “DIY valentine’s decorations.”
- Heart-shaped paper punches in various sizes (small, medium, large) or stencils and scissors.
- Twine, fishing line, or thin ribbon for stringing the hearts.
- Craft glue or a sewing machine.
- Scissors (if not using punches).
- Optional: Glitter, sequins, or metallic spray paint for added sparkle.
Instructions
- Cut the Hearts: Using heart-shaped paper punches or stencils and scissors, cut out a large quantity of hearts from your chosen cardstock colors. Aim for a mix of sizes for visual interest. For an extra touch, apply glitter to some hearts.
- Prepare the Strands: Decide on the length of your garlands. Cut several pieces of twine or fishing line to your desired length.
- Assemble the Garland (Two Methods):
- Method A (Sewing Machine): Feed the hearts through a sewing machine one after another, creating a continuous strand. Leave a few inches of thread between each heart and at the ends for hanging.
- Method B (Glue):: Apply a small dot of craft glue to the back of one heart, place the string over it, and then press another heart of the same size on top, sandwiching the string in between. Repeat along the length of the string, ensuring even spacing.
- Hang Your Backdrop: Once all garlands are complete, attach them to a wall or archway using tape or small hooks, creating a beautiful “themed party backdrops” effect. Arrange them at varying heights for a more dynamic look.
Pro-Tip: For a more luxurious feel, try using velvet paper or glitter cardstock. To create a 3D effect, fold some hearts in half before gluing them onto the string. This “creative event styling” hack adds depth and movement to your garland.

4. Set Up a Charming Valentine’s Photo Booth

Snap amazing memories! Pin this photo booth idea for your Valentine’s party!
Setting up a charming Valentine’s photo booth provides a fun, interactive element for guests, allowing them to capture memories and enhance the festive atmosphere of your event. This popular addition, a type of party accessory, requires a captivating backdrop and an array of playful props to ensure maximum engagement. A photo booth at your Valentine’s Day celebration helps to “spread festive cheer” and create lasting keepsakes.
What You Need
- A themed backdrop: This could be a sequin curtain, a wall adorned with “DIY heart garlands,” or a large fabric print with a romantic design. Look for “themed party backdrops.”
- A variety of love-themed photo booth props: This includes signs like “Be Mine,” “Kiss Me,” “XOXO,” oversized heart glasses, cupid bows, feather boas, and funny hats. Consider “photobooth props love theme.”
- Good lighting: Ring lights or softbox lights are ideal, but even strong natural light can work.
- A camera or smartphone with a tripod.
- Optional: A small table or basket for prop display, and a sign inviting guests to participate.
How to Set Up
- Choose Your Location: Find a well-lit area with enough space for guests to stand and pose, and for the backdrop.
- Install the Backdrop: Securely hang your chosen backdrop. Ensure it’s smooth and covers the entire desired area.
- Arrange Props: Lay out your “love-themed photo booth props” attractively on a small table, in a basket, or scattered creatively on the ground. Make them easily accessible.
- Set Up Lighting & Camera: Position your lighting source (ring light, softbox) to evenly illuminate the area. Set up your camera or smartphone on a tripod, ensuring it’s at an appropriate height for most guests.
- Add a Call to Action: Place a fun sign encouraging guests to use the photo booth and share their pictures, perhaps with a custom hashtag.
Pro-Tip: For a truly interactive experience, include a small blackboard or whiteboard and chalk/markers so guests can write their own personalized messages. This “creative event styling” makes the photos even more unique and memorable.

5. Adorn Spaces with Custom Garland Banners

Make a statement! Pin these custom garland banners for a personalized touch!
Adorning spaces with custom garland banners offers a personalized and thematic decorative element that significantly enhances your event’s ambiance and “spreads festive cheer.” These festive decorations, often crafted from cardstock or felt sheets, serve as elegant banners and garlands that “announce celebrations.” They are a prime example of “creative event styling” and “personalized decor” that helps to “transform spaces” for a truly unique Valentine’s experience.
Supplies Needed
- Cardstock (glitter, metallic, or colored) or felt sheets in Valentine’s colors (red, pink, gold, white).
- Letter stencils or a cutting machine (e.g., Cricut) for creating custom letters for your “personalized decor.”
- Twine, ribbon, or string for hanging.
- Hole punch (if not using a cutting machine).
- Craft glue or a hot glue gun.
- Optional: Small pom-poms, tassels, or mini hearts for embellishment.
How to Create
- Design Your Message: Choose a romantic or festive message like “LOVE,” “BE MINE,” “XOXO,” or “Happy Valentine’s Day.”
- Cut Your Letters: Using stencils and scissors, or a cutting machine, cut out each letter from your chosen cardstock or felt. You can also cut out additional shapes like hearts or stars to intersperse.
- Punch Holes: If your letters don’t have holes, use a small hole punch to create two holes at the top corners of each letter.
- String the Banner: Thread your twine or ribbon through the holes of each letter, ensuring they are strung in the correct order. Leave enough extra string at each end for hanging. If using felt, you can glue the letters directly onto a wider ribbon.
- Embellish (Optional): Attach small pom-poms, tassels, or mini hearts between letters or at the ends of the banner using craft glue for extra charm.
Pro-Tip: For a reusable banner, laminate your cardstock letters before punching holes. This “sustainable valentine’s day decor options” strategy extends the life of your decoration, allowing you to enjoy it year after year.

6. Illuminate with Ambient String Lights

Light up your love! Pin this ambient lighting idea for a dreamy Valentine’s setting!
Illuminating your event space with ambient string lights is a highly effective way to create a warm, inviting, and truly romantic atmosphere, making it a cornerstone of successful Valentine’s decor. These versatile light-up decorations are instrumental in setting the “mood lighting event” for a romantic dinner or any Valentine’s Day celebration. By strategically draping string lights, you can effortlessly “illuminate event spaces” and “create ambience,” transforming ordinary areas into magical settings.
What You Need
- Fairy string lights (battery-operated for flexibility) or globe string lights (plug-in for longer events), preferably in warm white or soft amber tones. Look for “light-up decorations” that are appropriate for indoor or outdoor use.
- Adhesive hooks or small clips for hanging.
- Extension cords (if using plug-in lights).
- Optional: Net lights or curtain lights for larger areas.
How to Install
- Plan Your Placement: Decide where you want to create a romantic glow. Popular spots include draping them across a wall, outlining a window, along a mantle, around a doorway, or even inside clear vases.
- Secure Hanging Points: Use adhesive hooks or small clips to create discreet hanging points. For ceilings, consider using Command hooks.
- Drape the Lights: Carefully string the lights, ensuring an even distribution. For a softer look, allow them to droop slightly between hanging points rather than pulling them taut. If using curtain lights, simply hang them from a single line.
- Conceal Power Sources: If using plug-in lights, discreetly run extension cords along baseboards or behind furniture. For battery-operated lights, hide the battery packs behind decor elements.
- Test & Adjust: Turn on the lights and adjust their placement as needed to achieve the desired “mood lighting event” effect. Dim other lights in the room to enhance the ambiance.
Pro-Tip: For a truly magical effect, combine fairy lights with sheer white or pink drapery. The fabric diffuses the light beautifully, creating a soft, ethereal glow that is perfect for “romantic event decorations.”

7. Personalize with Heartfelt Touches

Add a touch of love! Pin these personalized decor ideas to make your event unique!
Personalizing your decor with heartfelt touches infuses your event with sentimentality and personal meaning, creating an intimate and unforgettable experience for your guests or loved one. These unique decor items go beyond generic themes, allowing you to “express affection” and “reflect love” through thoughtful details. Elements like custom place cards, cherished photos, and handwritten notes become the very essence of your “special occasion valentine’s decor,” making your event truly one-of-a-kind.
What You Need
- Miniature photo frames or clips for displaying small cherished pictures.
- High-quality cardstock and a calligraphy pen (or printer) for personalized place cards or small notes.
- Small bottles or scrolls for “message in a bottle” accents.
- Ribbon, lace, or twine for tying elements together.
- Optional: Small keepsake items or trinkets meaningful to the recipient.
How to Personalize
- Memory Display: Print out small, favorite photos of you and your loved one(s). Place them in miniature frames or clip them onto string lights for a nostalgic display.
- Custom Place Cards: Create elegant place cards with each guest’s name, perhaps adding a small, heartfelt quote or a significant date. Use high-quality cardstock and a beautiful font or your best handwriting.
- “Message in a Bottle”: Write a heartfelt, personal message or a significant memory on a small scroll of paper. Roll it up and place it inside a small decorative bottle at each place setting.
- Embellish Gifts/Favors: If offering party favors or gifts, tie them with personalized ribbons featuring initials or a special date.
- Signature Drink/Dish: Create a custom cocktail or dish named after a special memory or inside joke. Design a small menu card explaining the significance.
Pro-Tip: Don’t just personalize with names; incorporate subtle hints to inside jokes, shared hobbies, or favorite places. This level of detail shows genuine thought and creates an “exclusive decor insight” that deeply resonates with your guests.

8. Develop a Sweet Treat Display Bar

Treat your loved ones! Pin this delightful sweet treat display bar idea!
Developing a sweet treat display bar provides an attractive and delicious selection of desserts and candies, acting as both a culinary delight and a visually appealing piece of decor for your Valentine’s event. This delightful setup, a key part of your party accessories, featuring cupcakes, chocolates, and various candies, is designed to “sweeten celebrations.” It also offers excellent “party favor ideas valentine’s,” allowing guests to take home a sweet memento of your gathering.
What You Need
- A selection of Valentine’s Day themed treats: cupcakes, cookies, chocolates, macarons, and various “valentine’s day themed candies” in red, pink, and white.
- Serving platters and tiered stands in various heights and sizes to create visual interest.
- Glass jars or bowls for bulk candies.
- Small tongs or scoops for serving.
- Decorative labels for identifying treats and ingredients (especially for allergens).
- A tablecloth or runner in a complementary color.
- Optional: Small favor bags for guests to take treats home.
How to Set Up
- Choose Your Surface: Dedicate a sturdy table or counter space for your treat bar. Cover it with a festive tablecloth or runner.
- Arrange Your Stands: Place your tiered serving platters and glass jars first, focusing on creating different heights for a dynamic display.
- Fill with Treats: Artfully arrange your cupcakes, cookies, and macarons on the platters. Fill glass jars with a colorful assortment of “valentine’s day themed candies.”
- Add Serving Utensils: Place small tongs or scoops in each candy jar. Ensure easy access to all treats.
- Label Everything: Create elegant labels for each treat, detailing its name and any common allergens (e.g., “Contains Nuts”).
- Decorate Around: Surround the display with small decor elements like scattered rose petals, mini heart confetti, or small floral arrangements. If offering favor bags, place them neatly at one end.
Pro-Tip: Group treats by color or type to create an appealing visual flow. For instance, all red candies in one jar, all pink cookies on one platter. This “creative event styling” elevates the entire presentation.

9. Style an Elegant Dessert Bar

Indulge in elegance! Pin this sophisticated dessert bar for your special event!
Styling an elegant dessert bar presents a refined and visually appealing selection of high-end desserts, elevating the culinary experience and becoming a luxurious focal point for your Valentine’s Day event decor. This sophisticated setup, featuring exquisite gourmet desserts and gleaming crystal stands, effectively “creates ambience” and “specifies mood” for a distinguished Valentine’s Day celebration. Such “sumptuous table settings” are paramount for those aiming for truly “exquisite event embellishments.”
What You Need
- A selection of gourmet desserts: Mini cheesecakes, chocolate-dipped strawberries, delicate tarts, individual parfaits, and artisanal chocolates.
- Elegant servingware: Crystal cake stands, marble platters, gleaming silver trays, and individual dessert glasses.
- Small dessert plates and forks.
- Decorative accents: Fresh berries, edible flowers, subtle “light-up decorations” or candles.
- A high-quality tablecloth or runner, perhaps velvet or crisp linen.
How to Style
- Select Your Foundation: Choose a prime location for your dessert bar and cover the surface with an elegant tablecloth.
- Vary Heights: Use crystal cake stands and tiered platters to create varying heights, making the display visually interesting and allowing for better flow.
- Artful Arrangement: Arrange the gourmet desserts with precision. Place larger items on lower tiers and more delicate ones higher up. Group similar items together.
- Garnish & Embellish: Garnish desserts with fresh berries, a dusting of cocoa, or delicate edible flowers. Sprinkle a few rose petals on the table for a romantic touch.
- Provide Utensils: Ensure small dessert plates and forks are easily accessible.
- Add Soft Lighting: Place subtle “light-up decorations” such as small LED string lights or elegant pillar candles around the bar to enhance the “mood lighting event.”
Pro-Tip: For an added touch of luxury, offer a small selection of sparkling rosé or champagne alongside the desserts. This “premium decor services” approach elevates the entire experience and complements the elegant theme.

10. Incorporate Themed Wall Decals

Quickly transform your space! Pin these easy wall decal ideas for Valentine’s Day!
Incorporating themed wall decals offers a convenient and impactful solution for temporary Valentine’s Day decorations, perfect for transforming your event space with minimal effort. These versatile decor options allow you to “transform spaces” for any Valentine’s Day celebration with ease. As a “DIY project,” they provide easy clean up and are a prime example of “easy DIY valentine’s day party decorations” that offer significant visual impact.
What You Need
- Themed wall decals in heart shapes, romantic quotes, or “love theme” designs. Choose colors that complement your event palette (red, pink, gold, white).
- A clean, dry cloth.
- A squeegee or a credit card for smooth application.
- Optional: A tape measure and pencil for precise placement.
How to Apply
- Prepare the Surface: Ensure your wall is clean, dry, and smooth. Wipe down the area with a dry cloth to remove any dust or debris.
- Plan Your Layout: Before peeling, lay out your decals on the floor or temporarily tape them to the wall with painter’s tape to visualize the arrangement. Use a tape measure if precise spacing is desired.
- Apply the Decal: Carefully peel a small section of the backing paper from the top of the decal. Press the exposed portion onto the wall, then slowly peel the rest of the backing paper while simultaneously smoothing the decal onto the wall with your squeegee, working from the center outwards.
- Smooth Out Bubbles: Use the squeegee to firmly press down on the entire decal, working out any air bubbles.
- Remove When Done: Most “removable wall decals” are designed for easy, damage-free removal. Simply peel them slowly from one corner when your event is over.
Pro-Tip: For a unique and dynamic display, combine different sizes of heart decals and arrange them in a flowing pattern, as if floating or radiating from a central point. This creates “versatile decor options” and adds artistic flair.

11. Construct a Vibrant Candy Buffet

Sweeten the celebration! Pin this fun candy buffet idea for your Valentine’s event!
Constructing a vibrant candy buffet creates a fun, colorful, and interactive station, allowing guests to enjoy treats while also serving as an eye-catching focal point for your Valentine’s event. This delightful setup, a popular choice among party accessories, is filled with various candies and chocolates presented attractively in apothecary jars. The candy buffet not only “delights guests” but also “sweetens celebrations” and provides fantastic “party favor ideas valentine’s” for any Valentine’s Day party.
What You Need
- A diverse selection of Valentine’s Day themed candies: gummy hearts, foil-wrapped chocolates, lollipops, jelly beans, and conversation hearts, focusing on red, pink, and white.
- Various clear glass apothecary jars, decorative bowls, and small buckets to hold the candies. Look for “candy bar decor valentine’s.”
- Candy scoops or small tongs for hygienic serving.
- Small paper bags or boxes for guests to fill with “party favor ideas valentine’s” to take home.
- Decorative labels for each candy type.
- A festive tablecloth or runner.
- Optional: Small decorative accents like scattered confetti, mini balloons, or small signs.
How to Construct
- Choose Your Location: Select a sturdy table or surface that can hold the weight of filled candy jars. Cover it with a festive tablecloth.
- Arrange Your Containers: Place your apothecary jars, bowls, and buckets at varying heights on the table. Use upside-down boxes or small risers under the tablecloth to create elevation.
- Fill with Candy: Fill each container with a different type of candy. Arrange them by color for a visually stunning gradient or by type for easy selection.
- Add Serving Utensils: Place a candy scoop or small tongs in each open container, ensuring guests can easily serve themselves.
- Label Candies: Create attractive labels for each candy, detailing its name and flavor. This adds a sophisticated touch and helps guests choose.
- Provide Favor Bags: Stack your small paper favor bags or boxes neatly at one end of the buffet, inviting guests to “fill a bag” with their favorite treats to take home.
- Decorate Around: Surround the candy buffet with small, complementary decor elements like scattered “heart confetti,” mini “heart balloons,” or elegant table lights to make it a central focal point.
Pro-Tip: For younger guests or those with dietary restrictions, include a few nut-free or allergen-friendly options and clearly label them. This thoughtfulness in “client focused decor” ensures everyone can enjoy the sweet treats safely.

FAQs About Valentine’s Day Event Decor
What are popular Valentine’s Day decorations?
Popular Valentine’s Day decorations typically include heart-shaped balloons and garlands, romantic table decor, and ambient lighting to create a festive atmosphere. Red, pink, and white are dominant colors, often complemented by glitter, florals, and personalized elements. The goal is to evoke love and celebration for any “valentine’s day event decor.”
How to make DIY Valentine’s Day decorations?
To make DIY Valentine’s Day decorations, focus on simple crafts like paper heart garlands, custom banners, or hand-painted signs. Utilize materials such as cardstock, felt, twine, and recycled items. These projects allow for “personalized decor” and offer a budget-friendly way to “create valentine’s theme” and add unique touches to your event.
Where to buy Valentine’s Day event decor supplies nearby?
To find Valentine’s Day event decor supplies nearby, check local party stores, craft shops like Michaels, and even major retailers like Party City. Many users also search for “valentine’s day event decor near me” for convenience. Online retailers offer vast selections, but local options provide immediate access and allow for in-person inspection.
What are cheap Valentine’s Day decor ideas?
Cheap Valentine’s Day decor ideas include DIY projects, utilizing existing household items, and shopping sales strategically. Think printable banners, repurposing old jars for candle holders, or using natural elements like branches and painted stones. Focus on impactful elements like lighting and a few key “heart-themed party decor” pieces to stay within budget.
How to set up a romantic Valentine’s Day table?
To set up a romantic Valentine’s Day table, begin with an elegant tablecloth or runner, add fine dinnerware, and incorporate soft, flickering candlelight. A low floral centerpiece, scattered rose petals, and personalized place cards complete the “sumptuous table settings.” Ensure proper “table setting etiquette” for a sophisticated experience.
What kind of balloons are best for Valentine’s Day?
The best balloons for Valentine’s Day are typically latex balloons in red, pink, and white for vibrant arches and clusters, often complemented by large heart-shaped foil balloons. Consider using a mix of sizes and finishes (matte, metallic) for dynamic displays. Ensure “balloons for valentine’s” are high-quality to prevent early deflation.
How to decorate an office for Valentine’s Day?
To decorate an office for Valentine’s Day, opt for subtle yet festive touches like small desk plants with heart accents, themed garlands across cubicles, or a communal candy buffet. Avoid overly elaborate displays that might disrupt work. Focus on creating a positive atmosphere with “festive valentine’s decor” that is easily removable.
What are unique Valentine’s Day party themes?
Unique Valentine’s Day party themes can include “Galentine’s Day brunch,” a ‘Love Story’ movie night, ‘Anti-Valentine’s Day’ (for singles), or a sophisticated ‘Masquerade of Love’ ball. Moving beyond traditional red and pink allows for creative “valentines day party decor” in diverse palettes and styles.
Can you rent Valentine’s Day decor?
Yes, you can rent Valentine’s Day decor, especially for larger events or when seeking high-end or specific items like custom backdrops, elegant centerpieces, or large light-up letters. Renting is a practical solution for “event decor rentals” and can be more cost-effective than buying for one-time use, offering access to professional-grade elements.
How to plan a romantic Valentine’s Day dinner decor?
Planning romantic Valentine’s Day dinner decor involves selecting a cohesive color scheme, designing an intimate tablescape, and setting the mood with appropriate lighting and subtle music. Focus on creating a sensory experience with fine dining elements, fresh flowers, and “mood lighting event” to enhance the romantic ambiance for your “romantic dinner decorations.”
Final Thoughts on Valentine’s Day Event Decor
As we’ve explored these 11 genius Valentine’s Day event decor ideas, it’s clear that transforming a space into a haven of love and celebration is both an art and a science. From crafting a captivating balloon arch to designing an elegant dessert bar, each idea offers a unique opportunity to express affection and create lasting memories. The key to successful “valentines day event decor” lies in thoughtful planning, creative execution, and a touch of personalization, ensuring your celebration is not just decorated, but truly styled with heart.
Remember that even the smallest details can make the biggest impact. Whether you’re opting for sophisticated “romantic dinner decorations” or vibrant “valentine’s day party decor,” prioritizing both aesthetics and functionality will lead to an unforgettable event. Embrace the process, infuse your personality, and utilize the resources available—from DIY projects to expertly sourced items—to bring your vision to life. The goal is to celebrate love in a way that feels authentic and joyful.
Which of these “valentine’s day event decor” ideas are you most excited to implement for your 2026 celebration, and how will you make it uniquely yours?
Last update on 2026-02-13 / Affiliate links / Images from Amazon Product Advertising API


