Dreaming of a dazzling manicure that truly pops this Valentine’s Day, only to feel overwhelmed by the intricate world of dimensional nail art? Many struggle to achieve those stunning, raised designs without a salon visit, making the idea of valentines day nails 3d seem out of reach for a DIY enthusiast.
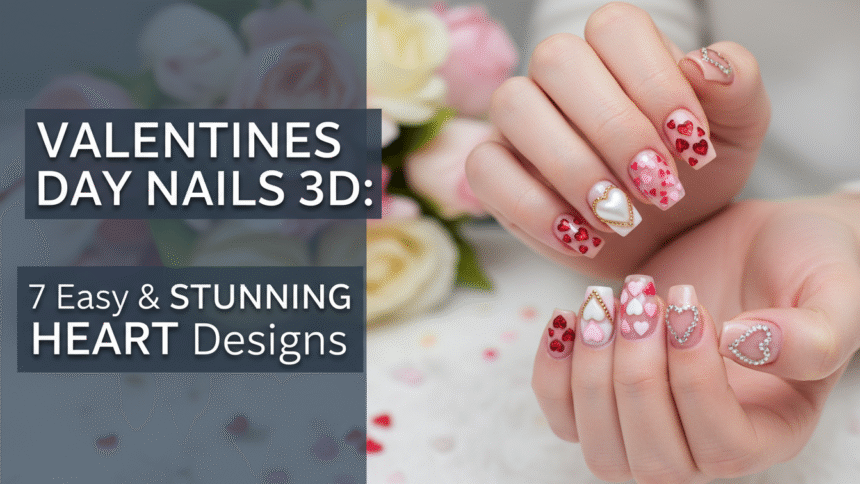
3D Valentine’s Day nails are elevated, textured designs achieved using sculpted acrylic or gel, applied decals or charms, or embossed stickers to create a raised effect, typically featuring romantic elements like hearts and roses in festive red and pink palettes. This technique enables unique, intricate art that goes beyond traditional flat manicures, adding a tactile and visually striking dimension. Leveraging tested frameworks and data-driven insights, this guide provides the foundational knowledge and specific steps needed to transform your manicure. You’ll discover how to create seven stunning, easy-to-achieve 3D heart designs, empowering you to craft salon-quality looks from the comfort of your home.
Transforming Your Manicure: How to Master Valentines Day Nails 3D Art at Home
Valentines day nails 3d elevate your festive manicure beyond simple polish, adding a captivating texture and depth that flat designs can’t match. This isn’t just about applying a sticker; it involves using specialized techniques and materials to create truly dimensional effects. While the idea of 3d nail art valentines might sound intimidating, requiring an expert nail tech, many stunning designs are surprisingly achievable at home. The core concept behind these trending 3d valentine nails is to create elements that literally stand out from the nail surface, transforming your fingertips into miniature works of art.
What exactly are 3d valentine nails? They are nail enhancements featuring raised elements, sculpted directly onto the nail or applied as pre-made pieces. These designs often feature romantic symbols like hearts, roses, or bows, frequently showcased in red and pink hues for the holiday. Achieving these looks requires specialized materials beyond regular polish. You’ll typically encounter:
- 3D Sculpting Gel: A high-viscosity gel that holds its shape when manipulated, allowing you to sculpt designs directly on the nail before curing. This is key for creating “puffy” or rounded elements.
- Acrylic Powder and Monomer: The traditional method for creating robust, highly detailed acrylic 3D designs, though it demands more expertise.
- Embossed Decals or Stickers: Pre-made, slightly raised designs that simply adhere to the nail, offering a quick and easy valentines day 3d nails solution.
- Charms and Embellishments: Small, decorative pieces (like micro-beads or rhinestones) that are applied with strong adhesive for an instant 3D effect.
The biggest challenges for DIY enthusiasts often revolve around the difficulty with 3d sculpting and 3d nail art falling off. However, by selecting the right high-quality materials and following proven techniques, these common pitfalls can be avoided. This guide focuses on simple 3d valentine nails with hearts, providing step-by-step instructions to ensure your designs are both beautiful and durable, offering solutions for beginner 3d nail art challenges.
7 Easy & Stunning Heart Designs: How To Create Trending 3D Valentine Nails
Getting those perfect 3d valentines nails doesn’t have to be a daunting task. These easy DIY 3d valentine’s day nail art tutorials will guide you through creating some of the most charming and trending 3d valentine nails featuring hearts, making your manicure unforgettable this February March, 2026. From soft, puffy heart nails using sculpting gel to intricate sculpting micro-bead hearts, each design offers a unique way to celebrate love on your fingertips. Whether you’re learning how to apply 3d heart decals for valentine’s nails or delving into gel 3d valentine nails, you’ll find clear, actionable steps to master these looks.
1. Create Puffy Heart 3D Nails Using Sculpting Gel

Pin this genius puffy heart tutorial to your ‘Valentine Nail Ideas’ board!
Puffy heart nails offer a delightfully cute 3d valentine nails aesthetic with their soft, rounded appearance. This look is primarily achieved using a specialized thick gel 3d sculpting gel, which allows for effortless manipulation into dimensional shapes without running. This method is ideal for those seeking a subtly raised, yet impactful, heart design.
Products & Tools Used
- Thick 3D Sculpting Gel (high viscosity) in clear or base color
- Detail Nail Art Brush (silicone or fine synthetic bristles)
- Dotting Tool or Wax Picker for small bead placement
- UV/LED Curing Lamp (at least 48W)
- Matte or Glossy Top Coat
- Base color polish (red, pink, or neutral)
Application Steps
- Prep & Cure Base: Apply your chosen base color and top coat, curing completely. Buff the top coat lightly if it’s glossy to aid adhesion.
- Scoop Gel Bead: Use the dotting tool or brush to pick up a small, perfectly rounded bead of 3D sculpting gel.
- Place Heart Outline: Gently deposit the bead onto the nail where the heart will be. Split the bead into two small mounds forming the top curves of the heart.
- Sculpt Shape: Use the fine brush to lightly push and drag the gel, forming the precise V shape at the bottom and ensuring the edges are smooth but the center remains raised and puffy.
- Cure: Flash cure the 3D heart for 10-20 seconds before moving to the next nail, then perform a full cure (60-120 seconds, depending on lamp).
- Seal (Optional): Apply a final thin layer of non-wipe top coat over the base polish, avoiding the 3D heart itself, to maintain the puffy texture and cure again.
Pro-Tip: The key to true micro-sculpting is controlling the gel viscosity control. If your gel runs or flattens instantly, it’s too thin. For durable 3D nail art, always use a non-acid primer on the base layer before applying the gel bead to improve adhesion.

2. Design Velvet Flocking Texture 3D Heart Accents

Love this festive, fuzzy look? Save it now!
Velvet flocking creates a soft, fuzzy, and wonderfully textured nails effect, perfect for cute 3d valentine nails. This technique is straightforward and requires minimal precision detail work, making it an excellent choice for beginners looking for red heart shaped designs with a unique twist. The flocking powder adheres to uncured gel to form a raised, velvet finish, adding a tactile dimension.
Products & Tools Used
- Flocking Velvet Powder (red or pink)
- Gel Polish in matching color (essential for the stickiness)
- Fine Detail Brush
- Dusting Brush (for removal)
- UV/LED Lamp
- Soft tray or piece of paper to catch excess powder
Application Steps
- Apply Base Coat: Prep nails and apply a base coat. Cure fully. Apply the base color polish, but DO NOT CURE.
- Draw Heart Outline: Using the fine detail brush dipped in the matching colored gel polish, draw the precise heart shape where you want the 3D texture. Keep the lines clean and the gel slightly thick.
- Dip: While the gel polish is still wet (uncured), generously sprinkle the velvet flocking powder over the entire nail, ensuring the heart is completely covered. Press the powder gently with a clean finger or silicone tool.
- Cure: Carefully tap off the excess powder onto your tray. Cure the nail immediately under the UV/LED lamp for a full cycle (60-120 seconds).
- Clean Up: Use a soft dusting brush to gently brush away any remaining loose powder from around the heart shape. Do not apply a top coat over the flocked area, as this will eliminate the fuzzy 3D texture.
Pro-Tip: Flocking powder works best with high-quality materials and gel polish that is cured directly beneath the powder. For better durability, ensure you use a thick layer of the color gel when drawing the shape, as this will act as a strong adhesive, preventing the ‘fluff’ from falling off.

3. Apply Embossed Candy Decals for Quick 3D Nail Art

Need a quick V-Day fix? Save this easy decal design!
For the fastest and most beginner-friendly approach to 3d nail art sticker designs, embossed nail art decals are your go-to. These pre-made candy nail art pieces, like tiny conversation hearts, are already sculpted with a slight rise, making them incredibly simple to apply for a quick and festive look. This method bypasses the need for sculpting micro-beads or manipulating gels, offering immediate gratification.
Products & Tools Used
- Pre-made 3D Embossed Nail Decals (Candy Hearts/Bows)
- Nail Tweezers or Silicone Tip Picker
- Strong Nail Art Glue or Builder Gel (for adhesion)
- Non-Wipe Top Coat
- Small Curing Lamp (if using gel adhesive)
Application Steps
- Prep Nail: Apply base color and cure. Apply a thin layer of top coat and cure fully.
- Select Decal: Use tweezers to carefully peel the 3D embossed decal from its backing sheet. Avoid touching the adhesive side.
- Apply Adhesive: Place a small dot of strong nail art glue or a dab of builder gel exactly where the decal will sit on the nail.
- Position Decal: Using the tweezers, gently place the decal onto the adhesive area. Press down gently but firmly for 15-30 seconds to secure, ensuring all edges are adhered. If using builder gel, cure under the lamp.
- Seal Edges: For maximum durability, carefully brush a layer of top coat around the decal’s base to seal the edges, but avoid brushing over the raised 3D texture itself to preserve dimensionality. Cure fully.
Pro-Tip: To prevent 3d nail art falling off, use a high-quality builder gel instead of standard nail glue to secure heavier embossed decals. This provides superior adhesion science and structural integrity, especially for pieces applied near the free edge.

4. Sculpting Micro-Bead Hearts for an Intricate Layered Look

Ready for luxury? Pin this intricate micro-bead design now!
For a truly luxury 3d valentine nails statement, sculpting micro-bead hearts creates an intricate layering effect that mimics fine jewelry. This technique uses tiny, sparkly nail embellishments (micro-beads) to form a delicate and highly detailed dimensional design. While it requires precision detail work, the results are stunning and sophisticated, perfect for a romantic evening.
Products & Tools Used
- Micro-Beads or Caviar Beads (gold, silver, or red)
- Clear Builder Gel
- Wax Picker or Dotting Tool (essential for precision)
- Fine Nail Art Brush (optional for gel application)
- UV/LED Lamp
- Shallow dish for holding beads
Application Steps
- Prepare Base: Apply base color and cure. Apply a thin layer of builder gel where the heart design will sit. DO NOT CURE.
- Define Outline: Using the dotting tool, carefully outline the heart shape in the wet builder gel. This acts as the sticky map.
- Pick and Place: Dip the wax picker into the micro-beads, picking up several at a time. Carefully deposit the micro-beads onto the wet gel, following the defined heart shape. Use the dotting tool to gently push them into place, ensuring the beads sit tightly against each other.
- Cure: Once the heart shape is perfectly formed, cure the nail fully.
- Encapsulate (Optional but Recommended): For maximum long-lasting 3d valentine’s nails results, apply a very thin layer of clear builder gel or thick top coat over the beaded area, lightly encapsulating them to prevent fallout. Cure fully.
Pro-Tip: The key to securing intricate beaded designs is ensuring the gel used is neither too thick (which obscures the bead texture) nor too thin (which causes shifting). When placing the beads, use the precision detail work technique: place beads one by one along the edges first, then fill the center, ensuring a clean, crisp outline.

5. Create 3D Heart Balloon Nails Using Clear Gel

Make your hearts fly! Save this unique heart balloon design now!
The heart balloon nail design is a whimsical and unique 3d valentine nails look, creating the illusion of tiny, floating hearts. This dimensional nails effect is achieved using layers of thick gel 3d sculpting gel, often with a sheer color overlay for a translucent quality. It’s a fantastic example of gel 3d valentine nails that really stand out.
Products & Tools Used
- Very Thick, Clear 3D Sculpting Gel
- Sheer Red or Pink Gel Polish
- Fine Liner Brush (for the balloon string)
- Dotting Tool
- UV/LED Lamp
- Base and Top Coat
Application Steps
- Build the Heart Base: Apply base color and cure. Using the thick clear gel, sculpt a large, rounded heart shape on the nail. Cure for 30 seconds.
- Layer for Dimension: Add a second, slightly smaller layer of clear gel directly onto the first layer to increase the height and create the rounded ‘balloon’ effect. Cure fully (120 seconds).
- Add Color (Optional): Once cured, brush a single thin layer of sheer red or pink gel polish over the clear heart to give it a translucent color, then cure again.
- Draw String: Dip the fine liner brush into black or white gel polish. Starting at the bottom point of the heart, draw a thin, curved line down the nail to represent the balloon string. Cure.
- Final Seal: Finish with a non-wipe top coat over the entire nail, avoiding the top of the 3D heart if you prefer the raised texture, then cure.
Pro-Tip: The key to achieving a truly hyper-realistic 3d element is ensuring each layer of clear gel is cured fully before applying the next. This prevents the heart shape from collapsing or forming air bubbles during the layering process. Use polymer clay nail art techniques if you find the gel too difficult to manipulate.

6. Achieve Chrome Heart Overlays Using Powder and Gel

Go glamorous this V-Day! Save this chrome 3D tutorial.
For a truly luxury 3d valentine nails effect, chrome powder effects combined with 3D gel create a highly reflective and bold statement. This technique transforms sculpted dimensional nails into a mirror-like surface, making your heart designs literally shine. The contrast between a dark base and a sparkly chrome heart is particularly striking. This ombre 3d techniques approach offers a modern twist.
Products & Tools Used
- Chrome Powder (silver or rose gold)
- No-Wipe Top Coat (medium viscosity)
- Silicone Tool or Eyeshadow Applicator
- Fine Detail Brush
- Base Color Gel Polish (black or dark color recommended)
- UV/LED Lamp
Application Steps
- Base & Prep: Apply your base color (black works best for intense chrome) and cure fully. Apply a layer of regular top coat and cure.
- Draw the Heart: Using a very fine detail brush, draw the heart shape using a no-wipe top coat. This is crucial, as the chrome only sticks to this layer.
- Partial Cure: Cure the no-wipe heart layer for 15-20 seconds only (this creates the perfect tacky surface without being too sticky).
- Rub Chrome: Immediately rub the chrome powder onto the tacky heart shape using the silicone tool or applicator. Ensure complete coverage.
- Dust Off: Use a clean, soft dusting brush to gently remove the excess powder from the surrounding nail surface.
- Final Seal: Seal the entire nail, including the 3D chrome heart, with a final layer of no-wipe top coat and cure fully.
Pro-Tip: Proper UV/LED curing specifics are vital for successful chrome application. Curing the 3D top coat layer for too long or too short before rubbing the powder can cause patchy results. When applying the final sealant, use a floating technique (not pressing down) to avoid scratching the mirror finish, ensuring the longevity of the professional-looking chrome.

7. Combine Layered Stamping and Puffy Heart Decals for Definition

Achieve layered definition! Save this mixed media 3D design now!
For a vibrant and defined look that balances ease with impact, combining nail stamping with simple 3d valentine nails decals is an excellent strategy. This technique allows for beautiful, crisp flat designs (like simple drawings nails) to form a background, which are then enhanced by a single, bold 3D element. It’s an effective way to get an intricate layering effect without extensive sculpting, perfect for acrylic press on nails or natural ones.
Products & Tools Used
- Nail Stamping Plate with Heart Patterns
- Stamping Polish (contrasting color, e.g., red or black)
- Nail Stamper and Scraper
- Pre-made Puffy Heart Decal (small, bold red)
- Strong Nail Glue or Builder Gel
- Tweezers
- Base and Top Coat
Application Steps
- Prep & Stamp Base: Apply base color and cure. Apply the chosen stamping polish to your heart design on the plate, scrape, and quickly press the stamper onto the plate. Transfer the image to the nail. Wait 30 seconds for the stamping polish to dry (if not using gel polish) and seal with a top coat.
- Mark Placement: Determine the exact spot where the 3D puffy heart decal will sit—usually centrally or offset on one stamped design.
- Apply Adhesive: Apply a small dot of strong nail glue or builder gel onto the marked spot.
- Position Decal: Using tweezers, carefully place the 3D puffy heart decal onto the adhesive, pressing gently but firmly. If using builder gel, cure under the lamp.
- Final Seal: Apply an extra layer of top coat around the base of the decal to seal the edges, being careful not to obscure the raised texture of the decal itself. Cure fully.
Pro-Tip: When combining flat and 3D art, always apply the flat elements (like stamping) and their top coat first. This ensures the 3D element sits on a stable, cured surface. For professional tutorial results, use opaque high-quality materials for both the stamping polish and the decal to ensure high contrast and definition.

FAQs About Valentines Day Nails 3D
Is 3D nail art difficult for beginners, or can I create it at home?
While professional 3D nail art can involve advanced techniques like micro-sculpting, beginners can easily create dimensional designs at home using pre-made 3D nail decals, charms, or simple velvet flocking powder. These methods require minimal skill and tools compared to using specialized acrylic powder and monomer, making them excellent, cost-effective options for testing the trend. Start with simple shapes like the puffy heart gel tutorial before attempting hyper-realistic flowers or characters.
How long do 3D Valentine’s nails typically last?
High-quality 3D Valentine’s Day nails, when applied correctly using strong builder gel or professional acrylic systems, can last anywhere from two to four weeks, similar to traditional gel or acrylic manicures. Decals and charms secured with the correct adhesive (avoiding common adhesion problems) often last shorter, around one to two weeks. Proper sealing and avoiding excessive friction or harsh chemicals are key to maintaining the structural integrity of 3d elements.
What kind of gel is best for creating 3D nail art designs?
The best kind of gel for sculpted 3D nail art is a high-viscosity, non-leveling sculpting gel, often sold specifically for 3D designs or ornamentation, sometimes referred to as ‘thick gel 3d’. Unlike regular gel polish, this specialty gel maintains its shape without running when manipulated with a dotting tool or fine brush, allowing you to sculpt precise elements like puffy hearts or roses before curing under a UV/LED lamp.
What is the difference between 3D stickers and sculpted 3D nails?
3D stickers or decals are pre-formed, slightly raised embellishments that are simply adhered to the nail surface, offering a quick and easy dimensional effect without skill requirement. Sculpted 3D nails, conversely, are formed directly on the nail using specialized materials (gel or acrylic liquid and powder), allowing for completely custom, highly detailed, and often more durable embossed elements, though they require more expertise.
How do I safely remove 3D Valentine’s nail art without damaging my nails?
To safely remove 3D nail art, first file down the bulk of the 3D element (gel or acrylic) using an e-file or coarse grit file, then soak the remaining product in pure acetone. If using decals or charms secured with glue, simply soak until the adhesive dissolves. This process action is slower but minimizes damage to the underlying natural nail plate, which is crucial for nail health tips.
Can I do 3D Valentine’s nails on short natural nails?
Yes, you can absolutely do 3D Valentine’s nails on short natural nails, though the designs should focus on small, minimalist 3D elements like micro-bead outlines, small puffy hearts, or tiny flat-back crystal charms. Avoiding large, bulky dimensional nails prevents the design from overwhelming the smaller nail surface and ensures the 3D element adheres securely without frequent chipping or snagging.
What are the most popular 3D Valentine’s nail art themes besides hearts?
Besides the classic heart, other popular 3D Valentine’s nail art themes include sculpted roses or flowers (often pink or red), tiny teddy bears or cartoon characters (3d cute cartoon), bow ties, and lips. These themes incorporate the romantic or playful spirit of the holiday, often decorated with glitter or small rhinestones for added festive sparkle, expanding beyond the primary entity.
How can I make my 3D nail art last longer and prevent breakage?
To make 3D nail art last longer, ensure you apply a good base coat, use strong adhesive (builder gel over glue), and properly cure all gel layers fully. After completion, seal the edges of the design, and advise the client or yourself to wear gloves for prolonged periods when working with water or chemicals, which can cause 3d nail art falling off due to lifting.
What tools do I absolutely need for beginner 3D Valentine’s nail art?
For beginner 3D nail art, you absolutely require only three main tools: high-quality 3D decals or charms, a precise dotting tool or wax picker for placement, and a strong adhesive (such as builder gel). If you progress to sculpting, you will require a detail nail art brush and a UV/LED lamp, which are necessary to create the custom rounded shapes.
What are common mistakes to avoid when applying 3D decals?
A common mistake when applying 3D decals is failing to properly seal the edges of the decal, leading to premature lifting and snagging. Another error is applying a thin top coat directly over the thick 3D element, which can ruin the dimensional effect. Always ensure the nail is fully dry/cured and use a precision tool to apply the decal to avoid bubbles or misplacement, minimizing beginner 3d nail art challenges.
Final Thoughts on Valentines Day Nails 3D
Creating striking valentines day nails 3d designs no longer requires a trip to the salon or years of professional training. By breaking down the process into manageable steps—whether you choose the simple adhesion of embossed candy decals or the intermediate technique of sculpting micro-bead hearts—you can achieve salon-quality results at home. The key, as demonstrated in the 7 tutorials, lies in prioritizing material compatibility and secure application methods to prevent common 3d nail art falling off issues. Remember to leverage high-viscosity gels and specialized tools for the most durable 3D nail art. Using these proven techniques, you can ensure your hands look stunning and festive for February 14th. We hope this comprehensive guide inspires you to achieve your most intricate Valentine’s Day manicure yet.
Which of these 7 stunning 3D heart designs will you try first? Share your favorite material—gel, acrylic, or decals—in the comments below!
Last update on 2026-03-03 / Affiliate links / Images from Amazon Product Advertising API


