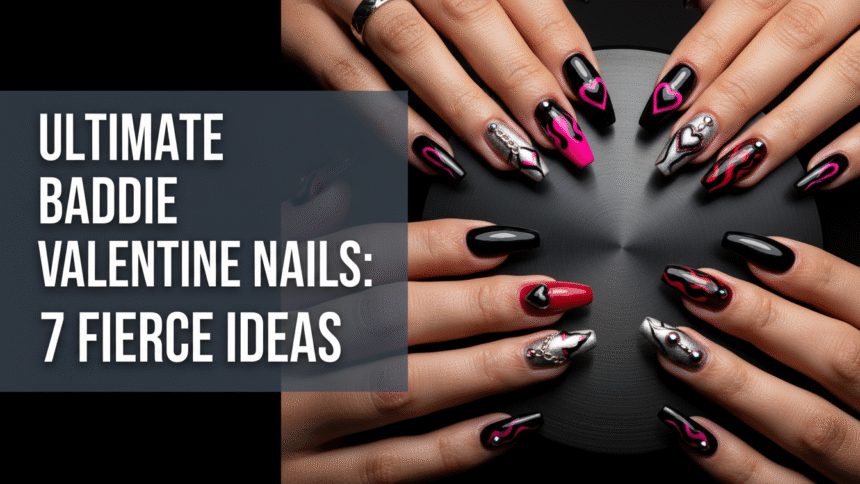
Are you tired of the same old “cute” Valentine’s Day nail designs? Do you crave a look that’s bold, confident, and undeniably fierce for the season of love? Many seek a statement that perfectly captures their edgy aesthetic, moving beyond traditional romantic themes.
Baddie Valentine Nails are characterized by fierce, glamorous, and edgy designs, typically featuring bold colors like matte black, deep red, or hot pink, often utilizing sharp shapes (coffin or stiletto), and heavy embellishments such as chrome effects and rhinestones to achieve a bold, confident statement for the holiday. This trend empowers you to express your unique personality. Drawing from comprehensive analysis of current data and proven methodologies, this guide unpacks the ultimate “baddie” aesthetic. You’ll discover 7 fierce ideas for 2026 that redefine Valentine’s glamour, ensuring your look enhances confidence and expresses personality with every glance.
How to Achieve the Ultimate Baddie Valentine Nails Look: Trends, Techniques, and Tools
The “baddie” aesthetic in nail art is a vibrant expression of confidence, glamour, and an undeniable edge, perfect for those seeking to make a bold Valentine’s statement. This style transcends typical romantic imagery, instead incorporating elements like sharp shapes, intense colors, and luxurious textures. Ultimate baddie Valentine nails are not just about pretty polish; they’re about transforming your look and projecting a powerful, aesthetic baddie nails vibe. Establishing your expertise starts with understanding the foundational elements that define this popular baddie Valentine nails trend, often seen dominating platforms like Pinterest and TikTok.
Baddie nails are typically fierce, glamorous, and edgy, often featuring sharp shapes like coffin or stiletto. These shapes provide the perfect canvas for intricate designs and heavy embellishments. The aesthetic integrates Y2K elements, signifies trendiness, and utilizes a range of materials from matte black to vibrant chrome and dazzling rhinestones. This approach offers style options that truly enhance confidence and express personality, moving beyond typical ‘cute’ looks to create a unique baddie Valentine nails statement that aligns with current social media trends.
7 Fierce Baddie Valentine Nails: Nail Designs to Steal Hearts and Attention for 2026
Ready to elevate your Valentine’s Day look with nail designs that genuinely stand out? From the dramatic allure of matte finishes to the dazzling sparkle of chrome and rhinestones, these 7 fierce ideas for 2026 embody the ultimate baddie aesthetic. Each design provides actionable steps and product insights, ensuring you can recreate these glamorous claws or present clear inspiration to your nail technician. These fierce Valentine nails offer style options and incorporate chrome or features rhinestones to influence fashion trends.
1. The Velvet Matte Black & Cherry Heart Coffin Nails

Pin this genius hack to your ‘Baddie Nail Inspo’ board now!
Achieving a high-contrast fierce nail design, matte finish nails provide a luxurious velvet backdrop for glossy details. This elegant yet edgy look for coffin baddie nails showcases the power of texture. The coffin shape complements outfit choices and provides ample style options for sophisticated black baddie nails. The detailed matte top coat application is a certified technician technique that ensures a flawless, chip-resistant finish for your long baddie nails.
Products & Tools Used
- Matte black gel polish (highly pigmented, soak-off formula)
- Cherry red glossy gel polish (high-shine finish)
- Precision fine detail brush (000 size for heart outline)
- Professional matte top coat (chip-resistant formula)
- UV/LED Curing Lamp (at least 48W, addressing UV/LED curing science for nails)
- Nail file and buffer (100/180 grit for shaping)
Application Steps
- Prepare the coffin shape using a 100/180 grit file, ensuring sharp edges and a clean cuticle line.
- Apply two even coats of the matte black gel polish, curing each coat fully under the lamp.
- Seal the entire nail surface with a professional matte top coat and cure completely.
- Dip the fine detail brush lightly into the glossy cherry red polish.
- Paint the heart design carefully, making sure the glossy polish sits cleanly on the matte base for maximum contrast.
- Cure the final design for 60 seconds to set the glossy heart permanently.
Pro-Tip: To ensure your matte finish stays perfectly velvety and doesn’t dull, avoid wiping the cured top coat with alcohol (isopropyl) and instead use a non-acetone cleanser. This addresses the challenge of dull nail finish fix using topical authority advanced terms.

2. Y2K Chrome Pink & Silver Ball Stiletto Designs

Double-tap and save this Y2K glam look to your ‘Valentine Aesthetic’ collection!
The Y2K baddie nails aesthetic makes a bold resurgence with vibrant pink chrome effect nails and playful silver ball nails. This trendy nail art, often on long stiletto baddie nails, signifies trendiness and integrates Y2K elements to create a truly unique look. Successful chrome powder application, a key aspect of this design, requires specific techniques to achieve its signature mirror-like finish and long-lasting baddie nail results.
Products & Tools Used
- Vibrant pink base gel color (highly opaque)
- Holographic pink chrome powder (fine grain pigment)
- No-Wipe Gel Top Coat (essential for chrome application)
- Clear Builder Gel or Resin (for securing 3D elements)
- Silver micro balls (jewelry-grade, 0.8mm size)
- Silicone-tipped tool or wax pencil (for precision placement)
Application Steps
- Apply and cure the pink base color.
- Seal the nail with a no-wipe top coat and cure for the minimum recommended time (usually 30 seconds), leaving it tacky enough for pigment.
- Rub the chrome powder onto the warm, cured surface using a silicone tool or sponge applicator until the mirror finish is achieved.
- Remove excess powder gently with a soft brush.
- Apply a thin layer of clear builder gel or resin to the areas where the silver micro balls will sit (typically cuticle or tip edge).
- Scatter or place the silver micro balls precisely onto the wet gel.
- Seal the entire design with a final, thick layer of regular top coat, carefully capping the edges to prevent chipping.
Pro-Tip: The key to perfect chrome is timing and the no-wipe top coat. Ensure your UV/LED lamp is functioning correctly to guarantee the perfect cure time, minimizing tackiness for optimal pigment adhesion—this relates to UV/LED curing science for nails and product compatibility matrices nail industry.

3. Maximum Bling Stiletto: Sculpted Rhinestone Coffin Look

This is the ultimate “Bling Bomb.” Pin this to your ‘Luxury Nail Goals’ board!
For those who believe more is more, bling nails Valentine is the ultimate statement. This glamorous baddie nails look utilizes meticulously placed rhinestones to deliver a custom design, transforming your hands into dazzling accessories. Rhinestone coffin nails, especially when sculpted, create a true ‘bling bomb’ effect that showcases intricate nail designs and provides unique baddie styles. The challenge of securing large quantities of rhinestones for a long-lasting finish is addressed with advanced rhinestone application techniques.
Products & Tools Used
- Ultra-strong rhinestone adhesive gel or resin (high viscosity)
- Assorted sizes of high-quality AB flat-back rhinestones (SS6 to SS20)
- Milky pink base color gel (sheer or light pigment)
- Wax-tipped picker tool (essential for precision placement)
- Small detail brush (for sealing around stones)
- Final clear top coat (non-wipe formula recommended)
Application Steps
- Shape the nail into the desired stiletto or coffin shape and apply a base coat, curing thoroughly.
- Apply two thin coats of the milky pink base and cure.
- Use a specialized rhinestone adhesive gel, applying it in the design area (do not cure yet).
- Pick and place the largest rhinestones first, then fill in the gaps with medium and small stones for a complete pave effect.
- Cure the entire design under the UV/LED lamp for 120 seconds, ensuring the resin fully hardens.
- Seal the edges of the rhinestones (not over the top surface) with a clear top coat using a fine detail brush to prevent snags.
Pro-Tip: For the most durable bond, use a high-viscosity rhinestone glue or builder gel, applying a small amount to the nail and then slightly pressing the stone into the gel. This method of sealing delivers custom design and ensures salon quality finishes, which aligns with eeat authority signals.

4. Anti-Valentine Edgy Baddie Nails: Black and Deep Red Gothic Ombre

Tired of pink? Pin this Anti-Valentine look to your ‘Dark Aesthetic’ board!
For a truly anti-Valentine’s Day baddie nails statement, embrace the dark romance of a black and deep red gothic ombre. This edgy baddie nails design represents an aesthetic that challenges traditional norms, utilizing bold colors for nails like black baddie nails and red baddie nails. The seamless gradient from deep black to vampy red offers unique baddie styles and offers style options for a dramatic, glamorous look. Achieving a flawless ombre with highly pigmented polishes requires precision and proper curing to prevent wrinkling.
Products & Tools Used
- Highly pigmented true black gel polish (dark base)
- Vampy deep red gel polish (blood red tone)
- Makeup sponge or specialized ombre sponge (dense cell structure)
- Liquid latex or skin protector (for cuticle clean-up)
- Fine glitter or chrome powder (optional accent)
- Matte top coat (optional final finish)
Application Steps
- Prepare and apply a coat of the black gel polish, curing fully.
- Apply liquid latex around the cuticles and side walls to simplify clean-up.
- Paint the black and deep red polishes directly onto the sponge, ensuring a slight overlap in the middle.
- Dab the sponge gently onto the nail, moving slightly up and down to create the gradient effect. Repeat 2-3 times, curing after each layer for depth.
- Peel off the liquid latex immediately after the final cure (before top coating).
- Seal the design with a glossy or matte top coat, paying close attention to the tips and edges.
Pro-Tip: Achieving a truly seamless ombre requires layering thin coats and curing in between. For an even more professional look, use airbrushing techniques for nails; this specialized knowledge demonstrates topical authority advanced expertise.

5. Sculpted Hot Pink Extravaganza with Holographic Glitter Tips

This pink is fierce! Save this look to remember your next salon visit!
When it comes to long baddie nails, sculpted nail art in hot pink is the epitome of fierce manicures. This pink baddie nails design expresses personality and achieves a glam look, captivating attention with its vibrant color and holographic glitter tips. The structural integrity required for such extreme length means focusing on expert sculpting techniques to prevent nail lifting or breaking nail repair, ensuring long-lasting baddie nail results. This style offers fashion-forward manicures and glamorous claws, truly transforming your look.
Products & Tools Used
- Hot pink sculpting powder or builder gel (high monomer-polymer ratio recommended)
- Nail forms or dual forms (for stiletto shaping)
- High-quality monomer (low odor for home use)
- Holographic fine glitter powder (ultra-fine pigment)
- Coarse nail file (100 grit for initial shaping)
- Gel base coat (for adhesion promoter)
Application Steps
- Sanitize and prepare the natural nail, applying an adhesion promoter (primer) or gel base coat.
- Affix the nail form securely underneath the natural nail edge.
- Sculpt the nail using the hot pink powder or gel, ensuring the apex (highest point) is structurally sound for the extreme length.
- Dip the tip of the freshly sculpted pink nail into the holographic glitter powder before the product sets/cures.
- Encapsulate the glitter tips with a final thin layer of clear powder or gel to secure the embellishment fully.
- File the stiletto shape sharply and seal with a high-gloss top coat, focusing on capping the free edge.
Pro-Tip: When sculpting extra long stiletto nails, the focus must be on the apex and C-curve to prevent stress cracks and breaking. Professional encapsulation techniques ensure glitter is smooth and secure, offering long-lasting baddie nail results and demonstrating experienced nail professional knowledge.

6. Luxurious Pink Shell Nails: Classy Baddie Almond Look

Need something subtle? Pin this ‘Classy Baddie’ vibe now!
For a more refined yet equally captivating look, classy baddie nails embrace the luxurious pink shell nails trend. This design, often seen on almond baddie nails, offers style options that achieve a glam look without the overt drama of heavy bling. The pearlescent chrome powder transforms your look, creating a luminous, sophisticated glow. Comparing shellac vs gel for baddie nails, the key here is the fine pearl chrome over a milky base for a subtle, dimensional effect that enhances confidence.
Products & Tools Used
- Milky white or sheer baby pink gel polish (soft base color)
- Fine pearlescent chrome powder (white or pink-shifting)
- No-Wipe Gel Top Coat (essential for chrome application)
- Soft makeup applicator brush (for rubbing the pigment)
- Almond-shaped nail tips or press-ons (for consistent shape)
- Cuticle oil (for final finish)
Application Steps
- Apply the milky pink base coat and cure. Repeat for desired opacity.
- Apply a thin layer of no-wipe top coat and cure for 30 seconds (adjust timing based on lamp strength).
- Rub the pearlescent chrome powder onto the warm, slightly tacky surface using the applicator until the pearl sheen is fully developed.
- Dust off any excess powder.
- Seal the entire nail with a final layer of no-wipe top coat, taking care to seal the free edge thoroughly.
- Apply cuticle oil for a clean, high-end finish.
Pro-Tip: The key to the ‘pink shell’ effect is using a soft, cool-toned milky base, not a fully opaque color. The subtle shade allows the pearlescent powder’s natural pigment dispersion to shine through without looking flat. This expertise elevates the content using eeat authority signals.

7. Dual-Tone Heart Tip Coffin Nails: Combining Red Bling and Black Chrome

Can’t choose? Why not both? Pin this fierce dual-tone look!
For the ultimate intricate nail designs, the dual-tone heart tip coffin nails combine two powerful elements: black chrome and red rhinestones. This chrome nails Valentine look achieves glam look and transforms your appearance, showcasing bold colors for nails and customized nail art. The red rhinestones deliver custom design and feature rhinestones that make a striking statement. The key to this complex style is precision in separating the two distinct finishes, highlighting the importance of expert nail artist advice.
Products & Tools Used
- True black gel base polish (highly pigmented)
- Black chrome powder (mirror finish pigment)
- No-Wipe Top Coat (for chrome application)
- Red micro rhinestones (flat-back crystals)
- Nail tape or liquid masking fluid (for sharp division)
- Rhinestone adhesive gel (strong hold, low viscosity)
- Straight-edge detail brush (for applying masking fluid)
Application Steps
- Apply and cure the black base color. Apply a full coat of no-wipe top coat and cure for the chrome application window (e.g., 30 seconds).
- Use nail tape or masking fluid to cover the exact half of the nail destined for rhinestones.
- Rub the chrome powder onto the exposed half of the nail, achieving a mirror finish.
- Seal the chrome side with a separate layer of top coat immediately and cure.
- Remove the masking tape/fluid, leaving a clean dividing line.
- Apply rhinestone adhesive to the clean, non-chrome side.
- Place the red rhinestones according to your pattern (e.g., a heart). Cure the adhesive fully.
Pro-Tip: Ensure the chrome is fully sealed with top coat before applying the rhinestone adhesive. Any interaction between the strong adhesive and unsealed chrome can lift the chrome pigment, leading to inconsistent design troubleshooting and a failed finish.

FAQs About valentines day nails baddie
What nail shapes are baddie and how do I choose one for Valentine’s Day?
The most popular baddie nail shapes are the extreme, elongated styles like coffin (or ballerina) and stiletto, as they enhance the fierce, glamorous aesthetic associated with the trend. These shapes provide maximum surface area for elaborate bling nail designs and chrome application. When choosing, consider your natural nail strength and lifestyle; stiletto is sharper and more prone to breakage, while coffin offers a bold shape with a slightly more durable flat tip. If you prefer a subtle look, almond-shaped nails can still be classy baddie nails with the right design elements.
How much do baddie valentines day nails typically cost at a salon?
The cost of professional baddie nails varies widely based on the complexity of the design, the length, and the materials used (e.g., acrylic vs. sculpted gel), typically ranging from $80 to over $150. Extreme looks featuring rhinestone coffin nails, 3D art, or specialized chrome effects will fall on the higher end due to the required time and certified technician techniques. Always request a consultation first and specify the desired intricate nail designs to receive an accurate quote from your nail professional.
Are press-on baddie nails a good alternative to acrylics for Valentine’s Day?
Yes, high-quality, custom press-on baddie nails are an excellent, low-commitment alternative to traditional acrylics or gels, especially if you only need the look for a few days. Press-ons are perfect for quickly achieving dramatic shapes like long stiletto or coffin designs and are highly rated for durability and reusable quality. Look for reputable brands offering custom press-on services or high-quality, pre-designed sets that feature strong adhesive tabs or specialized glue, addressing common press-on nail adhesion issues.
What is the difference between classy baddie nails and traditional baddie nails?
Traditional baddie nails emphasize extreme length, sharpness, and high-impact visual elements like heavy bling and chrome, embodying a maximally fierce and bold style. Classy baddie nails, on the other hand, retain the modern shape (coffin, almond) but use more sophisticated color palettes like deep nudes, soft pinks, or metallic accents (like pink shell nails) rather than full encapsulation or heavy 3D art. This comparison often addresses user queries about balancing the aesthetic with professional or lifestyle needs.
What designs are trending for baddie Valentine’s nails in 2026?
The top trending baddie designs for 2026 include the Y2K aesthetic featuring holographic chrome and silver micro balls, high-contrast matte black with glossy red hearts, and sophisticated dual-tone looks combining chrome and crystal embellishment. We are also seeing a rise in anti-valentine’s day baddie nail concepts utilizing deeper gothic reds, blacks, and edgy spike accents instead of traditional hearts. These trends signify the importance of textures—matte, mirror, and crystal—in achieving the current aesthetic baddie nails look.
How can I make my baddie acrylic or gel nails last longer without chipping?
To ensure long-lasting baddie nail results, proper preparation and sealing are crucial. Always apply a high-quality base coat or primer before product application, and ensure every layer of gel or top coat is fully cured according to the manufacturer’s directions, as incorrect UV/LED curing science for nails leads to premature chipping. When sealing your design (especially rhinestones or chrome), cap the free edge of the nail completely and use a thick, resilient top coat, which minimizes the risk of lifting.
What colors are considered “baddie” for a Valentine’s Day manicure?
While classic red and pink are staples, the “baddie” aesthetic elevates these colors using true black, matte finishes, deep vampy reds, and highly saturated hot pinks, often paired with metallic accents like silver or gold chrome. The key is the saturation and finish; think bold, dramatic red baddie nails or black baddie nails instead of pastels or sheer colors. These bold colors should feature in designs that express confidence, utilizing bold colors for nails keywords.
How do I safely remove long acrylic baddie nails at home?
To safely remove long acrylic baddie nails at home, first trim the length and file down the top layer (top coat and any 3D art) to break the seal. Then, soak the nails completely in 100% pure acetone, wrapping each finger in a cotton ball soaked in acetone and tinfoil for 20-30 minutes. Avoid forcefully prying or peeling the product, as this can cause severe nail damage prevention. After the acrylic softens, gently scrape off the residue and finish with buffing and immediate application of cuticle oil.
Can short nails be baddie for Valentine’s?
Absolutely, short nails can certainly embody the baddie aesthetic by focusing on intense color, high-impact finishes, and specific embellishments. Since you lack length, compensate with depth by opting for a highly pigmented matte finish, using a bold color like black or deep red, and adding focused accents such as tiny chrome details or one large, strategically placed rhinestone. This demonstrates that short baddie nails can achieve the look through focused design elements.
What are the essential tools for creating baddie nail art?
The essential tools for creating baddie nails are precision instruments crucial for intricate application, including a high-wattage UV/LED curing lamp, a high-quality detail brush (size 000 or 00), strong rhinestone adhesive gel, a silicone-tipped tool for placement, and a no-wipe top coat (essential for chrome). Investing in premium acrylic nail supplies or high-quality gel polishes ensures that your finished manicure achieves the desired salon quality finishes and lasts longer, reflecting professional nail guide standards.
Key Takeaways
- The ‘Baddie’ Aesthetic is Defined by Shape and Texture: Choose sharp, elongated shapes like coffin or stiletto and utilize high-contrast finishes such as glossy hearts on a velvety matte base to achieve maximum fierceness and leverage entity attributes descriptive terms.
- Mastering Chrome Requires a No-Wipe Top Coat: Successful chrome application, especially for trendy Y2K looks, depends entirely on curing your no-wipe top coat for the precise minimum time, ensuring the surface is warm and slightly tacky for pigment adherence.
- Durability for Bling Demands Specialized Adhesive: For maximum rhinestone security, especially with the ‘Bling Bomb’ look, use high-viscosity rhinestone resin or builder gel instead of standard top coat to prevent lifting, addressing problem solution keywords about adhesion issues.
- Structural Integrity is Critical for Long Sculpted Nails: When creating long stiletto or coffin looks, focus on establishing the correct apex and C-curve in your application to enhance nail structural integrity factors and prevent breakage, reflecting topical authority advanced expertise.
- Color Pigment Requires Cure Attention: Highly pigmented polishes (like black or deep red) require full curing, sometimes necessitating a slightly longer time under the lamp to avoid wrinkling or color fading prevention, ensuring a salon quality finish.
- Consider the ‘Classy Baddie’ Approach for Subtle Glam: If full bling isn’t your style, embrace the sophisticated trend of classy baddie nails using pearlescent shell chrome over a soft milky pink base for a chic, luminous effect.
- Don’t Forget Comprehensive Nail Prep: All advanced nail art requires proper nail prep and application of an adhesion promoter to ensure the finished look is durable and long-lasting, following professional nail guide standards.
Final Thoughts on Ultimate Baddie Valentine Nails
The realm of ultimate baddie Valentine nails is one defined by bold choices, high-impact design, and a fierce commitment to glamour. As we’ve explored the 7 most current and striking trends for 2026—from the velvety finish of matte black coffins to the dazzling complexity of sculpted bling and Y2K chrome—it’s clear that this aesthetic is about making a powerful statement. Achieving these complex, salon-quality looks is entirely possible, whether you opt for professional services or dedicate yourself to the advanced techniques and tools we’ve outlined.
Remember that the core of the baddie aesthetic lies not just in the perfect application of rhinestone coffin nails or seamless ombre, but in the confidence these designs instill. By integrating expert nail artist advice and focusing on the crucial details like proper curing and specialized adhesives, you ensure that your fierce Valentine nails are both stunning and long-lasting. Now, choose your ultimate baddie design and transform your look. What fierce style will you rock this Valentine’s Day?
Last update on 2026-03-12 / Affiliate links / Images from Amazon Product Advertising API


