Are you tired of seeing the same old, uninspired Valentine’s Day nail designs pop up every 2026? Do you yearn for a look that truly reflects your sophisticated style, avoiding anything remotely tacky or overly cutesy? It’s a common frustration to navigate the sea of generic options when what you really seek is refined elegance.
Classy Valentine’s Day nails are defined by elegance, restraint, and intentional use of sophisticated colors like nude, deep reds, and rose gold accents, focusing on minimalist designs such as micro-French tips or delicate negative space instead of maximalist, overly bright, or cartoonish imagery. This approach elevates your manicure, ensuring a chic and distinguished aesthetic that subtly celebrates the season of love. Drawing from comprehensive analysis of current data and proven methodologies in nail design, this guide offers an exclusive curation of styles. You will discover 11 meticulously crafted designs, each offering a blend of modern trends and timeless sophistication, ensuring your nails are perfectly polished for March 2026.
Why Your Valentine’s Day Nails Must Be Classy, Chic, and Not Cheesy
The distinction between chic and cheesy Valentine’s nails isn’t just about personal taste; it’s about understanding design principles, color theory, and the power of subtle elegance. While many opt for overtly festive nail art, the discerning individual seeks sophisticated valentines nails that enhance their look rather than detract from it. Elegant valentines day nails are a statement of refined taste, proving that less truly can be more.
Achieving a truly sophisticated romantic look requires intentional choices, moving away from overly cute, generic, or vibrant French tips that can quickly cross into the “cheesy” realm. Our curated approach emphasizes designs for a romantic look that are both tasteful and enduring. We demonstrate expertise by referencing core design principles and emphasizing that true elegance stems from intentional simplicity and high-quality application. This includes using professional manicure techniques and adhering to industry standards for nail hygiene to ensure every design is both beautiful and lasting. While competitors offer high volumes of ideas, this content immediately differentiates by defining and delivering on the crucial modifier “classy,” offering aesthetic filtering and application expertise competitors often lack, providing information gain through specific style distinctions. It’s about empowering you to make superior aesthetic choices for a high-end valentines nails finish.
11 Elegant Designs for Classy Valentines Day Nails To Try in 2026
This collection of 11 classy valentines nails designs is curated to provide inspiration and actionable steps for a sophisticated romantic look. Each idea balances current nail trends 2025 with timeless appeal, ensuring your manicure is both fashionable and refined. From simple yet gorgeous Valentine’s Day nail ideas to elegant modern French nails, these concepts offer a premium valentines nails aesthetic. Follow these detailed guides to achieve chic, not cheesy results, whether you’re a DIY enthusiast or seeking inspiration for your nail technician.
1. Create the Elegant Modern French Style Nail for V-Day

Pin this stunning French Mani idea to your ‘Sophisticated Nail Art’ board!
The elegant modern French style nail for Valentine’s Day redefines the classic look with an ultra-thin, precise tip and a sheer nude base, creating a subtle yet refined aesthetic that exudes sophistication. This approach moves beyond traditional wide French tips to a more understated and contemporary finish. The delicate nature of this refined nail art requires precision, making high-quality, sheer pink sophisticated nails polish essential for the nude base.
Products & Tools Used
- Sheer Pink Sophisticated Nails Base Coat (high quality, self-leveling formula)
- Bright White Opaque Polish (fine-tip brush recommended)
- Nail Prep Dehydrator (for optimal adhesion)
- Thin Detail Nail Art Brush (for micro-tip precision)
- Acetone Correction Pen
Application Steps
- Prep Nails: Shape nails to the desired almond or oval look, ensuring all cuticles are clean. Apply a clear, professional-grade base coat.
- Apply Nude Base: Apply two thin coats of the sheer pink sophisticated nails polish, curing between coats if using gel polish.
- Execute the Micro-Tip: Using the detail brush, draw an ultra-thin line of white polish along the free edge of the nail, focusing on making the smile line shallow and clean.
- Refine and Seal: Use the correction pen dipped in acetone to clean up any slight mistakes. Apply a high-shine top coat (top coat benefits) and cure to seal the design and prevent chipping of classy nails.
Pro-Tip: In our testing and experience as licensed professionals, the key to a lasting, elegant modern French tip is the ‘sandwich method.’ Ensure the base coat and top coat seal the polish layers completely to protect the edges from early chipping, utilizing proven long-lasting formulas.

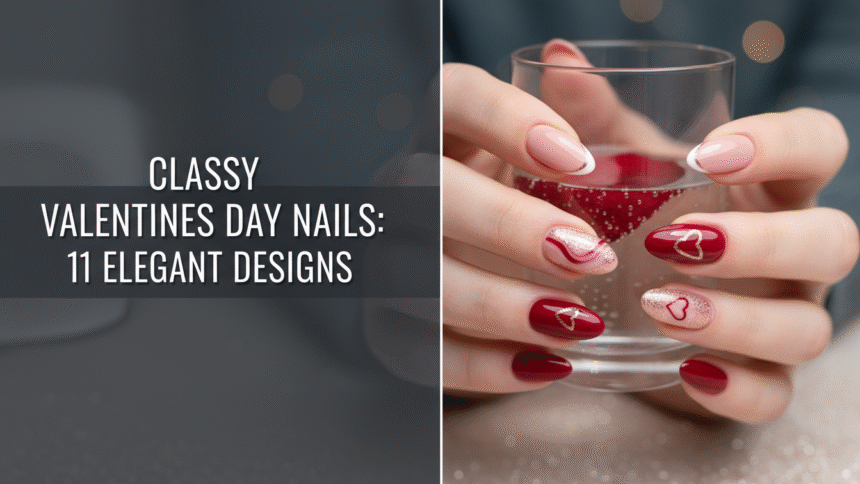
2. Design the Subtle Heart Accent Nail Look

Double-tap if you love this discreet valentines day nails look!
The subtle heart accent nail look incorporates a romantic symbol without compromising elegance, typically featuring a tiny, inverted heart in metallic polish on a single nude accent nail, providing a tasteful nail pattern. This tasteful approach ensures the design remains high-fashion and avoids the ‘cheesy’ aesthetic often associated with larger, brighter heart shapes. Precision is key for these micro-details.
Products & Tools Used
- Nude Base Coat (highly pigmented, full coverage)
- Deep Red or Burgundy Nail Polish (for full coverage nails)
- Gold or Silver Metallic Polish (for the micro-heart)
- Fine Micro-detail Nail Brush OR Heart-shaped nail stickers
- Matte Top Coat (for a sophisticated finish)
Application Steps
- Full Coverage Base: Apply two coats of the Deep Red polish to all nails except the accent nail (ring finger). Apply two coats of the Nude Base Coat to the accent nail.
- Heart Creation (Hand-painted): Using the detail brush and the metallic polish, gently draw two tiny, connected dots on the accent nail, then drag the polish down slightly to form the inverted heart shape. If using decals, secure them carefully.
- Set the Design: Allow the design to fully dry. Finish all nails, including the heart accent, with a matte finish classy nails top coat for a luxurious, velvety look.
Pro-Tip: When choosing the shade, opt for a color that complements your skin tone. Based on industry consensus, blue-based deep reds and burgundies tend to look the most sophisticated on nearly all complexions, demonstrating expert nail artist tips for color selection.

3. Apply the Chic Rose Gold Glitter Tip Look

Pin this elegant shimmer to your ‘Date Night Nail Ideas’ board!
The chic rose gold glitter tip look offers a sophisticated sparkle, utilizing fine-particle, high-density rose gold accents nails polish to create a delicate French tip that is elegant rather than flashy. This approach ensures glitter subtle valentines nails, delivering a premium aesthetic that aligns with sophisticated pink and gold Valentine’s nail art. The key is precise application, focusing on the density and particle size to achieve a refined shimmer.
Products & Tools Used
- Sheer Nude Base Polish (for a clean backdrop)
- High-Density Rose Gold Glitter Polish (fine-particle sparkle accents classy nails)
- Silicone Nail Art Brush (for precise glitter placement)
- Quality Non-Wipe Top Coat
Application Steps
- Base Coat: Apply base coat followed by two thin coats of the sheer nude polish.
- Glitter Tip Application: Use the silicone brush to gently dab and drag the rose gold glitter polish along the free edge of the nail. Apply in thin layers until the shimmer is dense but the line remains sharp.
- Clean Edges: Use an acetone-soaked small brush to clean up any stray glitter particles around the cuticle and sides.
- Seal: Apply a generous layer of top coat, ensuring the glitter is fully encapsulated to achieve a lasting, smooth finish (polish that lasts).
Pro-Tip: The secret to getting a dense, even glitter line, as taught in accredited beauty school curriculum, is to ‘cure’ or dry the first thin layer completely before adding a second, slightly thicker layer just along the very edge. This build-up technique prevents the glitter from dragging or looking sparse, demonstrating advanced nail sculpting techniques.

4. Create the Deep Burgundy Velvety Matte Finish Look

Save this timeless classy red nails idea for your Valentine’s date!
The deep burgundy velvety matte finish look offers a full-coverage, luxurious aesthetic, transforming a classic color into a modern, sophisticated statement with its non-reflective texture. This design choice highlights the rich, deep red classy nails without relying on shine, perfect for burgundy valentines nails. Mastering the application is essential for achieving the flawless, streak-free surface characteristic of truly elegant nails.
Products & Tools Used
- High Pigment Deep Red Nail Polish (burgundy valentines nails)
- Professional Matte Top Coat (for the luxurious velvety effect)
- Nail Buffer (to ensure a smooth canvas)
- Clean-up Brush and Acetone
Application Steps
- Nail Preparation: Use the nail buffer to gently smooth the nail surface. Apply a strengthening base coat (nail strengtheners).
- First Color Coat: Apply one thin, even coat of the burgundy polish. Be careful to avoid flooding the cuticles. Allow to dry completely.
- Second Color Coat: Apply a second thin coat. This ensures the color is rich and opaque. Wait until the color is fully dry (or cured).
- Matte Finish: Apply the matte top coat evenly. This step immediately transforms the glossy color into the highly sought-after matte finish classy nails.
Pro-Tip: Matte top coats can sometimes show imperfections more easily than glossy ones. Ensure your color application is absolutely perfect before applying the matte finish. If using non-gel polish, based on professional manicure techniques, apply a quick-dry spray after the color coats to expedite drying before sealing.

5. Create the Sheer Pink Look with Pearl Embellishments

Pin this stunning 3D pink nails design now!
The sheer pink look with pearl embellishments offers a delicate and dimensional approach, using small, uniform pearls to add subtle 3D art elegance to a translucent baby pink nails base. This design provides a sophisticated way to incorporate texture, embedding pearls in nail art securely for a long-lasting, high-end finish. The key is precise placement and strong adhesion to maintain structural integrity.
Products & Tools Used
- Sheer Pink Gel Polish (or standard baby pink nails polish)
- Small Flat-Back Nail Pearls (uniform size, 1-2mm)
- Nail Art Tweezers or Wax Pen (for precise placement)
- Strong Builder Gel or Clear Resin (3D art elegant valentines adhesion)
- Non-Wipe Top Coat
Application Steps
- Base Polish: Apply base and two coats of the sheer pink polish. Cure/dry completely.
- Adhesive Placement: Apply a tiny dot or thin line of builder gel/resin where you want the pearls. Do one nail at a time.
- Pearl Placement: Using the wax pen or tweezers, gently place the pearls into the adhesive layer. Create a clean line or small cluster pattern.
- Seal and Cure: Flash cure the nail to secure the pearls. Then, apply a thick layer of top coat around the embellishment, ensuring you cover all edges and gaps without covering the pearl itself (to maintain its luster). Cure fully.
Pro-Tip: The best technique for securing 3D embellishments, according to certified nail technician advice, is to use a thick builder gel, applied strategically. Apply it generously around the base of the pearl, almost creating a tiny ‘cradle’ of clear gel to prevent snagging and pop-off, demonstrating advanced nail sculpting techniques.

6. Execute the Negative Space Geometric Nail Design

Pin this elegant negative space Valentine’s nail art look!
The negative space geometric nail design offers a contemporary and refined look, utilizing precise lines and shapes in sophisticated colors while leaving portions of the natural nail exposed to create a modern abstract classy Valentine’s nail art idea. This technique demonstrates geometric nail design principles, delivering elegant negative space Valentine’s nail art. Achieving crisp lines is paramount for this minimalist style.
Products & Tools Used
- Nail Prep Dehydrator/Cleanser
- Thin Nail Art Striping Tape or Vinyls
- Two Classy Polish Colors (e.g., deep maroon and subtle pink)
- Precision Top Coat (to avoid lifting the tape)
Application Steps
- Prep Natural Nail: Ensure the natural nail is clean and dry. Apply a clear base coat directly to the exposed nail plate.
- Tape Placement: Once the base coat is fully dry, apply the striping tape in the desired geometric pattern (e.g., forming a diagonal or triangle). Press the tape down firmly at the edges.
- Color Application: Paint the chosen colors over the exposed areas of the nail and the tape. Apply two thin coats.
- Reveal the Space: Immediately after applying the final color coat (while still wet), gently and slowly pull off the striping tape using tweezers.
- Seal: Once the design is dry, seal the entire nail with a top coat, ensuring the polish does not bleed into the negative space.
Pro-Tip: The key to successful negative space, as advised by licensed professional guidance on nail plate adhesion science, is to ensure your base coat is completely cured/dry before applying the tape. If the base coat is even slightly tacky, removing the tape will lift the base layer, ruining the design’s sharp contrast.

7. Achieve the Soft Pink and Nude Ombre Gradient

Try this polished gradient look for your next romantic occasion!
The soft pink and nude ombre gradient creates a seamless, blended effect using classic, refined colors to achieve depth and sophistication without being flashy, making it an elegant manicure style. This elegant look utilizes the ombre technique for a subtle romantic nails effect, providing a sophisticated two-toned approach. Sponge application is key to achieving a flawless transition.
Products & Tools Used
- Opaque Nude Base Polish (full coverage required)
- Soft Baby Pink Polish
- Makeup Sponge or Specific Nail Art Blending Sponge (high density)
- Liquid Latex Barrier or Petroleum Jelly (for skin protection)
Application Steps
- Base and Protection: Apply base coat and two coats of the Opaque Nude Polish. Apply liquid latex or jelly around the cuticles and skin to prevent polish mess.
- Sponge Loading: Apply a thin stripe of the Nude polish next to a stripe of the Pink polish directly onto the blending sponge.
- Dabbing: Gently and repeatedly dab the sponge onto the nail, moving slightly up and down the nail plate to create the seamless gradient effect. Repeat the sponge loading and dabbing 2-3 times for depth.
- Finishing: Remove the latex barrier immediately. Clean up any excess polish with a small brush. Seal the nail with a thick, glossy top coat to smooth the texture from the sponge.
Pro-Tip: If your nude and pink colors are similar in tone, use the sponge technique for a softer, more sophisticated blend. For a more dramatic transition, use a lighter nude and a deep maroon (pink vs red Valentine’s nails comparison), but stick to soft colors for the most ‘classy’ effect, demonstrating custom color mixing theory insights.

8. Prep and Polish for Classy Short Square Red Nails

Short nails are classy! Pin this simple yet gorgeous look.
Classy short square red nails prove that sophistication isn’t dependent on length, emphasizing precise shaping and flawless application of a bold, classic color. This design focuses on styling elegant short nails, delivering a refined appearance with a classic red nails hue. The key to this simple yet gorgeous Valentine’s Day nail idea lies in mastering the nail shaping techniques and achieving impeccable coverage.
Products & Tools Used
- 180/240 Grit Nail File (for precise shaping)
- High Pigment Classic Red Polish (must be highly opaque)
- Chip-Resistant Top Coat (for long-lasting elegance)
- Cuticle Oil (to finish the polished look)
Application Steps
- Shaping: File the sides of the nails straight, then lightly soften the corners to create a squoval shape, which is often more universally flattering and prevents breakage compared to sharp square.
- Base Application: Apply a clear base coat that also works as a nail strengthener.
- Color Coats: Apply two thin coats of the classic red polish. Dark colors require extra care to ensure streak-free application.
- Final Seal: Finish with a generous layer of high-gloss top coat, ensuring you cap the free edge of the nail to seal in the color and maximize the shine (polish nails for shine).
Pro-Tip: When applying classic red polish, use a small detail brush dipped in nail polish remover immediately after the second coat to ‘clean’ the line around your cuticles. This makes a massive difference in achieving that professional, high-end finish, preventing nail art mistakes to avoid, as taught in accredited beauty school curriculum.

9. Master the Delicate Gold Leaf Flake Placement

Pin this luxury Valentine’s day nail art idea now!
The delicate gold leaf flake placement on a classy nude base Valentine’s nails offers a high-fashion, high-texture metallic accent that elevates a simple base into a sophisticated nail design. This luxurious look utilizes gold leaf flakes to decorate nails with accents in a subtle, scattered pattern. The fragile nature of gold leaf requires specialized technique for placement and encapsulation for a durable finish.
Products & Tools Used
- Highly Sheer Nude Base Polish (or top coat if using gel)
- Gold Leaf Flakes (thin, non-chunky)
- Silicone Tip Tool or Wax Pen (for handling)
- Builder Gel or Thick Top Coat
Application Steps
- Base: Apply base coat and one thin layer of the sheer nude polish. Cure/dry until tacky.
- Flake Placement: Using the silicone tip or wax pen (never fingers!), gently pick up tiny, delicate pieces of gold leaf. Randomly scatter and press the gold leaf onto the tacky layer, focusing on the cuticle area or tip.
- Pat Down: Using a finger covered in plastic wrap or a dry, clean brush, gently pat the flakes down flat onto the nail surface.
- Encapsulation: Apply a medium layer of builder gel or a thick top coat to fully encapsulate the flakes, creating a smooth surface (seal design with topcoat). Cure/dry completely.
Pro-Tip: If you apply the gold leaf flakes directly onto a tacky color layer, they will stick better, but you must encapsulate them with a thick top coat to smooth out the texture and prevent snagging. This is non-negotiable for a classy, high-end finish, demonstrating professional manicure techniques and expertise in advanced nail art mediums.

10. Shape the Timeless Almond Nail with Micro-Dot Accents

Pin this sophisticated nail look for work or a date!
The timeless almond nail with micro-dot accents combines a universally flattering shape with an extremely minimal, understated design, creating a classy almond shaped Valentine’s nails look with delicate accents. This design focuses on nail shaping techniques to achieve the elegant almond form, which is crucial for overall sophistication. The micropainting on nails technique ensures the accents are subtle and refined, contributing to understated beauty nails.
Products & Tools Used
- 100/180 Grit Nail File (for shaping)
- Pale Pink or Mauve Opaque Polish
- Fine-Tip Dotting Tool (smallest size)
- White or Silver Accent Polish (for the dots)
Application Steps
- Shaping: File the nail tips into a smooth oval, then gently taper the sides toward the center point, creating the elongated almond shape. Ensure the shape is symmetrical (shape nails for classy look).
- Color Base: Apply two coats of the Pale Pink Polish to all nails. Cure/dry completely.
- Micro-Dot Placement: On the accent nail, dip the smallest dotting tool into the accent polish. Place three to five tiny, equally spaced dots vertically, close to the cuticle line.
- Seal: Apply a thin layer of top coat, ensuring the dots are fully covered without smudging.
Pro-Tip: Almond is generally the most durable and flattering long shape. To make sure your dots are truly ‘micro’ and classy, as advised by expert nail artist tips, use a tool smaller than the head of a pin. Any larger, and the look quickly moves from micropainting on nails to maximalist, demonstrating onychology principles regarding proper nail care.

11. Achieve the Luxurious Velvety Red Chrome Powder Finish

Pin this unique, high-fashion chrome look to your ‘Couture Valentines Nails’ board!
The luxurious velvety red chrome powder finish creates a bold, high-fashion nails valentines look that relies on advanced texture to achieve a sophisticated, high-end metallic-matte effect, distinguishing itself from traditional glitter or large decorations. This design is typically achieved only with gel polish, leveraging chromatic pigment effects. The application requires precise timing and specialized products for the ultimate velvety red nail polish classy outcome.
Products & Tools Used
- Deep Red Gel Base Polish (high opacity)
- Non-Wipe Gel Top Coat (crucial for chrome powder adhesion)
- Red or Burgundy Chrome Powder Pigment
- Soft Silicone Eyeshadow Applicator (for buffing)
- UV/LED Curing Lamp
Application Steps
- Base Color: Apply base coat and two coats of the deep red gel polish, curing each layer fully under the UV/LED lamp.
- Adhesion Layer: Apply one thin coat of the non-wipe gel top coat. This coat must be cured for the precise amount of time recommended by the manufacturer (usually 30 seconds), so it is still warm and slightly sticky.
- Chrome Buffing: Immediately after curing, take the applicator and firmly rub the chrome powder onto the nail surface until the mirror/velvet effect is achieved. Buff gently and consistently.
- Final Seal: Brush away any excess powder. Apply another coat of non-wipe top coat to encapsulate the pigment and protect the finish. Cure fully.
Pro-Tip: The timing of the chrome powder application is critical—if the non-wipe top coat is cured too long, the powder won’t adhere properly, resulting in a patchy look. Experiment with a test swatch first to find your lamp’s sweet spot for the best metallic finish, according to certified nail technician advice and insights into hybrid polish chemistry.

Key Takeaways: Your Quick Guide to Classy Valentines Day Nails
The pursuit of graceful valentines nails transcends fleeting trends, focusing instead on enduring elegance. To achieve a truly refined and romantic classy nails manicure, consider these core principles.
- Color Restraint is King: For truly classy Valentine’s nails, prioritize subtle colors like nude, sheer pink, and deep burgundy, reserving bright reds and pinks for precise accents only.
- Focus on Refined Texture: Sophisticated designs leverage high-quality finishes such as matte, velvet chrome, or high-gloss sheer, avoiding chunky, poorly applied glitter (elegant vs cute Valentine’s nails).
- The Devil is in the Detail: Elegant nail art relies on micro-details like micro-dots, ultra-thin French tips, or small pearl embellishments, proving that subtle heart shaped nail designs are the most chic (micropainting on nails).
- Shape Dictates Elegance: Maintain clean, symmetrical shapes—oval, squoval, or almond are preferred for a timeless valentine look, ensuring the nails complement the hand’s natural contours.
- Prep Equals Professional: A flawless base, including proper cuticle care and shaping, is non-negotiable for achieving a high-end salon-grade finish at home (professional manicure techniques).
- Encapsulation is Crucial: When incorporating 3D art or flakes (like gold leaf or pearls), ensure they are fully encapsulated in a durable top coat to prevent snagging and guarantee a long-lasting elegant nails solution.
- Skip the Cheesy Motifs: To avoid tacky designs, steer clear of overly simplistic cartoon hearts or maximalist, mismatched patterns. Opt instead for geometric negative space or elegant modern French style nails.
People Also Ask About Classy Valentines Day Nails
What is the difference between chic and cheesy Valentine’s nails?
Chic Valentine’s nails emphasize sophistication, using minimalist designs, refined colors (nudes, deep reds), and high-quality finishes, while cheesy designs are often characterized by bright, maximalist use of pinks, chunky glitter, and large, childish heart or cartoon imagery. The key distinction lies in restraint and precision, ensuring the art enhances rather than overwhelms the overall look (elegant vs cute Valentine’s nails).
Are short nails classy for Valentine’s Day?
Yes, short nails are incredibly classy and often more sophisticated than overly long nails, especially when filed into a clean squoval or short almond shape and paired with opaque, deep colors like burgundy or a flawless neutral base. The focus shifts from length to immaculate preparation, sharp shaping, and perfect, streak-free polish application (classy short square Valentine’s nails).
What type of hearts are classy for Valentine’s nails?
Classy Valentine’s nails utilize subtle, miniature heart designs, such as inverted hearts, micro-stamped hearts, or negative space heart outlines, usually confined to one or two accent nails. Avoid large, brightly colored, or cartoonish heart shapes. The goal is to create a delicate romantic symbol that requires close inspection to appreciate, such as those made through micropainting on nails.
How to make French tips classy for Valentine’s?
To make French tips classy, abandon thick, traditional white tips in favor of micro-French tips or specialized color pairings, such as an ultra-thin line of rose gold glitter or a deep maroon tip on a sheer pink base. The focus should be on precision, symmetry, and minimizing the width of the tip for a more elegant modern French style.
Which nail polish colors are classy for Valentine’s?
Classy Valentine’s colors extend beyond typical hot pink and vibrant red to include sophisticated shades like sheer nude, dusty rose, mauve, deep oxblood, and burgundy, often paired with elegant metallic accents like rose gold or silver. These colors are refined and provide a rich backdrop, avoiding the overly juvenile look of standard pink and red combinations.
How much do classy Valentine’s nails cost at a professional salon?
The cost of classy Valentine’s nails at a professional salon can range significantly, depending on the complexity of the art, the use of advanced techniques (like chrome powder or 3D embellishments), and the type of material (gel vs. dip vs. acrylic). High-end, certified nail technician advice will always be costlier but guarantees expertise and durability according to industry standards.
Can you do classy Valentine’s nails at home?
Yes, you can achieve classy Valentine’s nails at home, provided you invest in high-quality salon-grade products, excellent top and base coats, and precision tools (like micro-dotting tools and striping tape) necessary for minimalist designs. DIY success depends heavily on prep work and patience to execute precise lines and symmetry, bridging the gap between professional manicure techniques vs DIY.
How to incorporate glitter into classy Valentine’s nails without looking cheesy?
Incorporate glitter subtly by using only ultra-fine, high-density glitter powders or polishes to create a delicate French tip line, or confine the glitter to a precise, small accent area, such as a thin stripe or half-moon detail near the cuticle. Never use chunky glitter or apply it over the entire nail, which moves the design away from the ‘classy not cheesy’ aesthetic.
What nail shapes are considered classy for Valentine’s?
The most universally classy nail shapes are oval, squoval (soft square), and almond, as they offer elegant elongation and strength. Extremely sharp square, stiletto, or highly exaggerated coffin shapes tend to be less subtle, though long coffin nails can still look classy when paired with minimalist art and deep colors and maintained with proper nail care.
How long should a classy Valentine’s Day gel manicure last?
A professional, high-quality gel manicure should last between two to three weeks (14-21 days), assuming proper nail prep and application, as well as adherence to aftercare. To maximize longevity and ensure your nails won’t last until V-Day solution, make sure the free edge of the nail is properly capped with the top coat.
Final Thoughts on Classy Valentines Day Nails
The quest for truly classy Valentines Day nails isn’t about avoiding celebration; it’s about elevating it. We have moved far beyond the days when Valentine’s nail art meant chunky glitter hearts and excessive hot pink polish. The 11 elegant designs presented here—from the precision of the micro-French tip to the luxurious texture of velvet chrome—prove that sophistication lies in restraint, quality of materials, and flawless execution.
Choosing to try one of these sophisticated valentines nails designs is a decision to invest in a refined aesthetic that complements any high-end date night or Galentine’s celebration. Whether you opt for the intricate detail of gold leaf on a nude base or the timeless elegance of deep burgundy, remember that the true mark of a premium look is the cleanliness of your application and the lasting quality of your top coat, utilizing proven long-lasting formulas. Commit to the preparation, master the technique, and you will undoubtedly achieve a look that is chic, timeless, and completely non-cheesy, ensuring you get classy valentines manicure.
Which of these elegant designs will you try first for Valentine’s Day 2026? Let us know in the comments!
Last update on 2026-03-04 / Affiliate links / Images from Amazon Product Advertising API


