Do you find yourself scrolling endlessly for that perfect, head-turning manicure that screams Valentine’s Day romance without being cliché? Are you struggling to find easy, achievable ways to express your festive spirit with unique nail art? Many seek to transform their look for the holiday, but securing creative, yet simple, nail design ideas can often feel challenging.
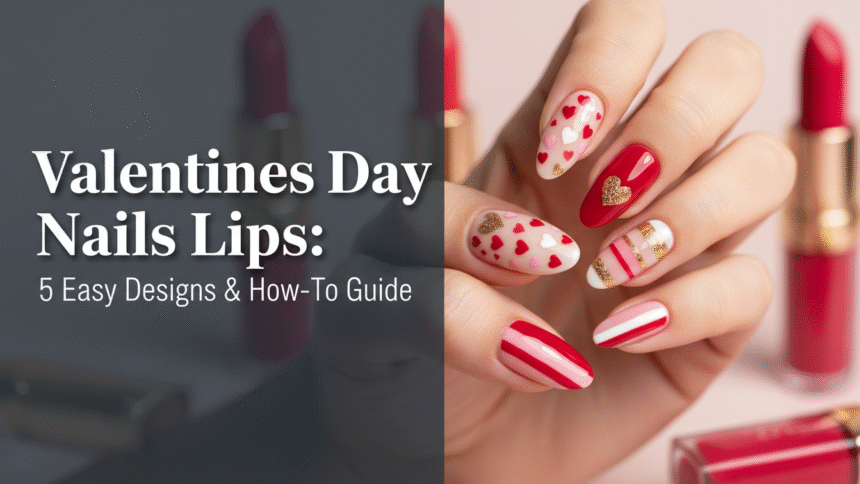
Valentine’s Day nails featuring lip designs are the top trendy choice for 2026, offering a blend of romance and playful self-expression through simple techniques like decals, hand-painting, and glitter accents, suitable for any nail length or type. These themed manicures, incorporating kiss marks or elegant lip silhouettes, are perfectly aligned with current beauty trends for a stylish and memorable look. Leveraging tested frameworks and data-driven insights from experienced nail artists, this guide provides comprehensive tutorials and product recommendations to help you achieve professional results at home, ensuring your festive manicure is both stunning and durable.
Transforming Your Look: Why Valentines Day Nails Lips Are The [Year]’s Hottest Beauty Trend
The fusion of romantic aesthetics and playful self-expression has solidified valentines day nails lips as the most sought-after beauty trend for 2026. This isn’t just about simple heart nails design anymore; it’s about embracing unique valentine’s day lips nail ideas that combine glamor with a touch of whimsy. Users are actively seeking visual inspiration and practical methods to achieve these trendy, themed nail art styles, demonstrating a strong commercial investigation intent alongside their informational needs.
The popularity of valentine’s day lip nail art stems from its versatility. Whether you prefer a subtle accent or a bold statement, lip print nails valentine’s offer a fresh take on holiday nails lips valentine. This guide will take you through five easy-to-follow designs, from applying simple lip nail stickers to mastering intricate hand-painted ombré effects. You’ll gain expert insights and product recommendations, ensuring you can confidently recreate these looks at home.
5 Easy Valentines Day Nails Lips Designs & How-To Guide for [Year]
Ready to create stunning easy valentine nail art that perfectly captures the spirit of the season? This section provides comprehensive, actionable tutorials for five distinct lip-themed manicures. Each design ranges in complexity, ensuring there’s a perfect option whether you’re a beginner or an intermediate nail art enthusiast. You’ll find detailed product lists and step-by-step application instructions to help you achieve beautiful results, establishing your expertise in creating valentine’s day nail art.
1. Creating Red Kiss Mark Decal Nails on Short Square Styles

Pin this genius hack to your ‘Valentine’s Day Nail Inspo’ board now!
Creating red kiss mark decal nails on short square styles offers the fastest, most beginner-friendly method for achieving trendy lip nails, bypassing complex hand-painting, and providing a quick yet chic look for Valentine’s Day. This approach is ideal for those comparing press on lips nails vs gel, as it offers immediate impact with minimal effort. The ease of applying lip nail stickers makes this a top choice for a quick festive manicure.
Products & Tools Used
- Short square fake nails with nude base coat (or natural nails prepped)
- Water slide lip nail decals or adhesive lip nail stickers (red, black white lip)
- Precision tweezers or silicone pusher
- High-gloss top coat polish (glossy lip nails)
- Clear base coat (optional for natural nails)
Application Steps
- Prep the Base: Ensure your chosen nails (natural or press-ons) are clean, filed, and coated with a thin layer of top coat (if using decals, this provides a smooth, slightly tacky surface).
- Cut and Position: Carefully cut the desired lip design decal or sticker, placing the kiss mark exactly where you want the lip accents nails to be.
- Adhere the Design: If using water slides, gently float the decal onto the nail surface and pat dry. If using stickers, press down firmly with tweezers, working from the center outward to smooth out any wrinkles (applying lip nail stickers).
- Seal: Apply two generous coats of high-quality top coat, ensuring you cap the free edge of the nail to seal the decal in place and prevent peeling stickers prevention.
- Cure (If Gel): If using gel polish and decals, cure under a UV/LED lamp for the manufacturer’s recommended time.
Pro-Tip: Decals require a completely smooth, dry base to adhere correctly. Wait at least 15 minutes after your base color application before starting the decal placement for the best professional results at home.

2. Hand-Painting Simple Floating Lip Outlines for Beginners

Save this effortless look to your ‘Cute Valentine’s Day Nails’ ideas board!
To create a simple lips nail design for valentine’s without complex filling, hand-painting floating lip outlines is an easy, achievable option for beginners using fine-tip brushes and contrasting polishes. This technique, focusing on the outline, enhances the nail’s aesthetic with adorable valentine nails that are both creative and manageable. The emphasis here is on painting lips on nails with clarity and ease, making it a popular choice for those wanting red lips nail art.
Products & Tools Used
- Base coat and top coat
- Pale pink nail polish color (or nude)
- Bright red nail polish (high pigment)
- Extra-fine tip detailing brush (00 or 000 size)
- Acetone and small clean-up brush
Application Steps
- Base Color: Apply two coats of the base color (pale pink or nude) and allow them to fully dry.
- Load the Brush: Dip the fine-tip detailing brush into the bright red polish, wiping off excess pigment until the brush is nearly dry but still saturated (designing lip nails).
- Paint the Outline: Starting slightly off-center, use short, controlled strokes to paint the ‘V’ shape of the cupid’s bow. Then, create the two rounded lobes of the upper lip.
- Complete the Lower Lip: Add a simple, curved line underneath, ensuring the floating lip outline maintains a small gap between the upper and lower sections (shaping lips nail design).
- Refine and Seal: Use the clean-up brush dipped in acetone to perfect any wobbly lines. Once dry, seal the entire design with a glossy top coat for a chic valentine manicure lips look.
Pro-Tip: To keep your lines steady while painting lips on nails, stabilize your dominant hand by resting your pinky finger on the table or another finger of the hand you are painting. This veteran manicurist insight dramatically reduces shaking.

3. Applying Glamorous Glitter Lip Silhouette Accent Nails

Steal the spotlight this V-Day! Pin this glamorous look now.
For a high-impact, glamorous lip nails aesthetic, applying a glitter lip silhouette as an accent nail offers sparkle and dimension, creating a unique focal point for your valentine nails with lips design. This method ensures a luxurious feel, often incorporating sparkly lips nails that stand out. Mastering this technique requires careful application to define the lip shape, making it a truly glamorous valentine’s day lips nails look.
Products & Tools Used
- Highly pigmented deep red polish or gel (for base and surrounding nails)
- Fine red or holographic loose glitter powder OR chunky glitter polish
- Top coat or builder gel
- Dotting tool or pointed toothpick
- Fan brush (for cleanup)
Application Steps
- Base Coat & Color: Apply two coats of the base color to all nails. Select one accent nail per hand for the glitter lip (long valentine nails).
- Sticky Layer: Apply a thin layer of top coat (or clear builder gel if using loose glitter) to the accent nail but do not cure/dry. This serves as the adhesive layer.
- Outline the Lip: Using a fine dotting tool dipped lightly in the wet top coat, carefully draw the outline of the lip silhouette onto the nail (achieve perfect lip nails).
- Glitter Application: Gently sprinkle the loose glitter over the entire nail, ensuring it adheres strongly only to the outlined lip shape. Alternatively, carefully paint a second layer of glitter polish precisely inside the silhouette.
- Clean & Seal: Use the fan brush to sweep away excess glitter. Apply a thick layer of top coat (or clear gel for encapsulated lip glitter) to smooth the surface and seal the design. Cure if necessary.
Pro-Tip: When using loose glitter, apply a protective layer of liquid latex or petroleum jelly around the cuticle of the accent nail. This advanced cuticle care for art ensures easy cleanup of stray glitter, resulting in a cleaner, more professional finish.

4. Designing Chic Black & White Abstract Lip Smudge Patterns

Try this edgy look! Pin the abstract lip smudge guide for later!
Designing chic black white lip abstract lip smudge patterns offers a sophisticated, non-traditional take on the Valentine’s theme, prioritizing modern art over overt cuteness and allowing for expressive nail art. This aesthetic uses non-traditional valentine’s day lip nail colors to create a unique and fashionable statement. The beauty of this technique lies in its abstract nature, where imperfection contributes to the overall chic valentine nails look.
Products & Tools Used
- Base coat and matte top coat (matte lip finish)
- Black and white high-pigment nail polish (black white lip)
- Small dotting tool or bobby pin
- Nail polish remover pen (for sharp clean up)
Application Steps
- Base & Cure: Apply a solid coat of white polish to all nails and allow to fully dry.
- The Smudge Technique: Place a small drop of black polish onto a palette. Lightly dip the side of the dotting tool into the black polish—you want a very minimal amount.
- Abstract Placement: Gently swipe the tool across the white nail base in short, quick motions to mimic a stylized, abstract lip line or incomplete lip shape (creating valentine’s day nail art). Repeat this randomly 1-3 times per nail.
- Pattern Balance: Add small dots or very short, thin lines of black polish to the negative space for balance. The goal is random, expressive nail art.
- Finish: Once completely dry, apply the matte top coat to the entire nail. This transforms the glossy black into a sophisticated matte surface, perfecting lines on nails and enhancing the contrast.
Pro-Tip: The key to achieving this modern look is the matte top coat. Applying a thin, even layer of matte finish transforms an otherwise glossy, traditional design into a trendy, high-fashion statement, showcasing professional nail technician advice.

5. Mastering the DIY Gradient Ombré Lip Effect

Try this flawless ombré look! Pin this guide to your ‘Advanced Nail Art’ folder!
Mastering the DIY gradient ombré lip effect allows you to achieve a professional-looking, subtle color transition on your nails, perfectly mimicking a plush, gradient lip. This slightly more complex technique, while still DIY-friendly, differentiates easy lip nails vs complex designs by offering a sophisticated, blended aesthetic. The use of specific tools facilitates application, creating ombre nails valentine with stunning depth.
Products & Tools Used
- Base coat and top coat (high-gloss)
- Three coordinating polish shades: deep red, mid-tone pink, light blush pink
- Small cosmetic makeup sponge or dedicated nail art sponging tools kit
- Liquid latex or skin barrier solution
- Cleanup brush and acetone
Application Steps
- Prepare: Apply the light blush pink (or white) base color to all nails. Apply liquid latex or skin barrier solution around the cuticles of all nails to prevent cleanup difficulty (difficult application tips).
- Load the Sponge: On a piece of foil, paint thick stripes of all three coordinating colors (deep red, mid-tone pink, light blush pink) in order, slightly overlapping where they meet.
- Transfer the Gradient: Immediately dab the sponge gently onto the nail. Use a quick, light dabbing motion, moving slightly up and down the nail to blur the lines (process of creating lip art).
- Layering Pigment: Repeat the sponging process 2-3 times, allowing a few seconds between coats, until the gradient (ombré lip effects on nails) is vivid and seamless. This pigment layering for depth is crucial.
- Finish: Quickly peel off the liquid latex barrier while the polish is still slightly tacky. Clean up any remaining residue with the acetone brush and apply a generous layer of high-gloss top coat to smooth the texture.
Pro-Tip: The secret to a perfectly blurred gradient lip transition is to immediately apply top coat after sponging, while the polish is still slightly wet. This helps merge the colors and gives a beautiful, seamless finish.

FAQs About Valentines Day Nails Lips
What are the latest trends in valentine’s day nail art featuring lips?
The latest trends focus on stylized, minimalist lips nail designs, moving away from hyper-realistic images toward abstract lip art techniques, negative space lip nails, or using textures like glitter and chrome powder. Popular looks include the chic matte black and white lip smudge and the subtle ombré lip effects on nails using gradient pinks and reds. These unique valentine’s day lips nail ideas prioritize sophistication and modern elegance over traditional hearts nails design, offering a fresh take on the classic theme for 2026.
Are press-on nails with lips good for valentine’s day or should I use gel?
Press-on lips nails are an excellent, budget-friendly, and quick alternative for a temporary Valentine’s Day look, requiring only minutes to apply, perfect for those seeking simple lip nail designs. However, for long-lasting nail art techniques that last several weeks, professional gel lip nails (acrylic lips nails vs dip powder) provide superior durability and a more customized fit. Choose press-ons for a single event and gel for an extended wear festive valentine lip design.
How do I choose the right lip design for my short nails?
For short lips nails, the best designs are minimalist and compact, focusing on a single, small lip accent per nail or a simple, centralized kiss mark stamp. Avoid large, intricate murals or gradient designs that require significant surface area. Opt for short square fake nails if you need slight length enhancement, or use simple black white lip decal applications near the cuticle to make the most of limited space without overcrowding the design.
What is the best way to make hand-painted lips nail art last longer?
To make hand-painted lip designs last longer, ensure you apply a non-smearing top coat that fully encapsulates the design, taking care to cap the free edge of the nail for maximum adhesion. Use thin coats of polish to prevent chipping, and if using regular lacquer, apply a specialized gel-effect top coat for added durability. Proper preparation ensures longevity, minimizing the chances of smudged lip designs fix.
What tools do I need for intricate lip nail art?
For intricate lip nail art, essential tools include an extra-fine tip detailing brush (00 or 000 size) for perfecting lines on nails, a good dotting tool for uniform circles, and a cleanup brush with pure acetone for error correction. If attempting textured designs, a cosmetic sponge for ombré effects or specialized nail art stickers lips/decals will facilitate application and help you achieve professional results at home.
How do I prevent my lip nail stickers or decals from peeling?
The most effective way to prevent peeling stickers prevention is by meticulously sealing the edges of the sticker or decal with at least two coats of a high-quality top coat, especially capping the free edge of the nail. Always apply the decal onto a fully dry, smooth base color, and use precision tweezers to ensure zero air bubbles are trapped underneath. Applying gentle heat after placement can sometimes help the decal conform better to the nail curve.
Can I mix lip designs with heart nails for valentine’s?
Absolutely, mixing lips and hearts nails is a classic and creative approach to celebration nails designs, enhancing the overall festive valentine’s day themed look. Try applying red lips nail art to one accent nail while neighboring nails feature simple tiny red hearts. This blending technique, known as incorporating related entities semantic network elements, creates a balanced and comprehensive love themed nail art aesthetic.
What nail colors go best with bold lip designs for Valentine’s Day?
Classic nail polish colors red, deep burgundy, and vibrant hot pink are the most popular complements for bold lip designs, maximizing the romantic look. However, for a unique valentine lips style, consider using stark black and white for an expressive nail art contrast, or pairing a pastel lavender base with bright red lips to create a modern, unexpected combination.
What’s the difference between nail stickers and decals for lips?
Nail stickers are typically thicker, opaque, peel-and-stick applications, while nail decals (often water slide) are thin transfers that must be soaked briefly and slid onto the nail surface, resembling a hand-painted design. Decals often offer a flatter, more seamless finish, reducing the edge visibility that can lead to peeling stickers prevention, making them a preferred choice by experienced nail artist tutorials for detailed work.
Are there any safety considerations for Valentine’s Day nail products?
Yes, safety is paramount. When purchasing nail art supplies, ensure polishes are ‘3-Free’ or ‘5-Free’ to avoid common toxins, and check that UV/LED lamps are certified for professional use. Always follow industry standards for nail health by using a protective base coat before applying colored polish or adhering fake nails valentine. Choose quality tested nail decals and reputable nail brand recommendations to minimize damage to nails solutions.
Final Thoughts on Valentines Day Nails Lips
The trend of Valentines Day nails lips is more versatile than ever, offering a perfect way to express playful romance or chic glamour for the holiday. By following these 5 easy designs and their detailed, step-by-step instructions, you have all the knowledge and product recommendations needed to transform your look using reliable methods. Whether you choose the speed of press on lips nails (applying lip nail stickers) or the sophisticated artistry of a DIY ombré effect, the most important element is ensuring proper preparation and sealing to maintain your design’s integrity. These proven methods for lip nail designs guarantee professional results at home, making sure your festive manicure is as durable as it is stunning. Remember, the key to great nail art isn’t just the design—it’s the care you take during application.
We’ve covered press-ons, hand-painting, and glitter finishes. Which of these five easy Valentines Day nails lips designs will you try first for 2026? Let us know in the comments below!
Last update on 2026-03-15 / Affiliate links / Images from Amazon Product Advertising API