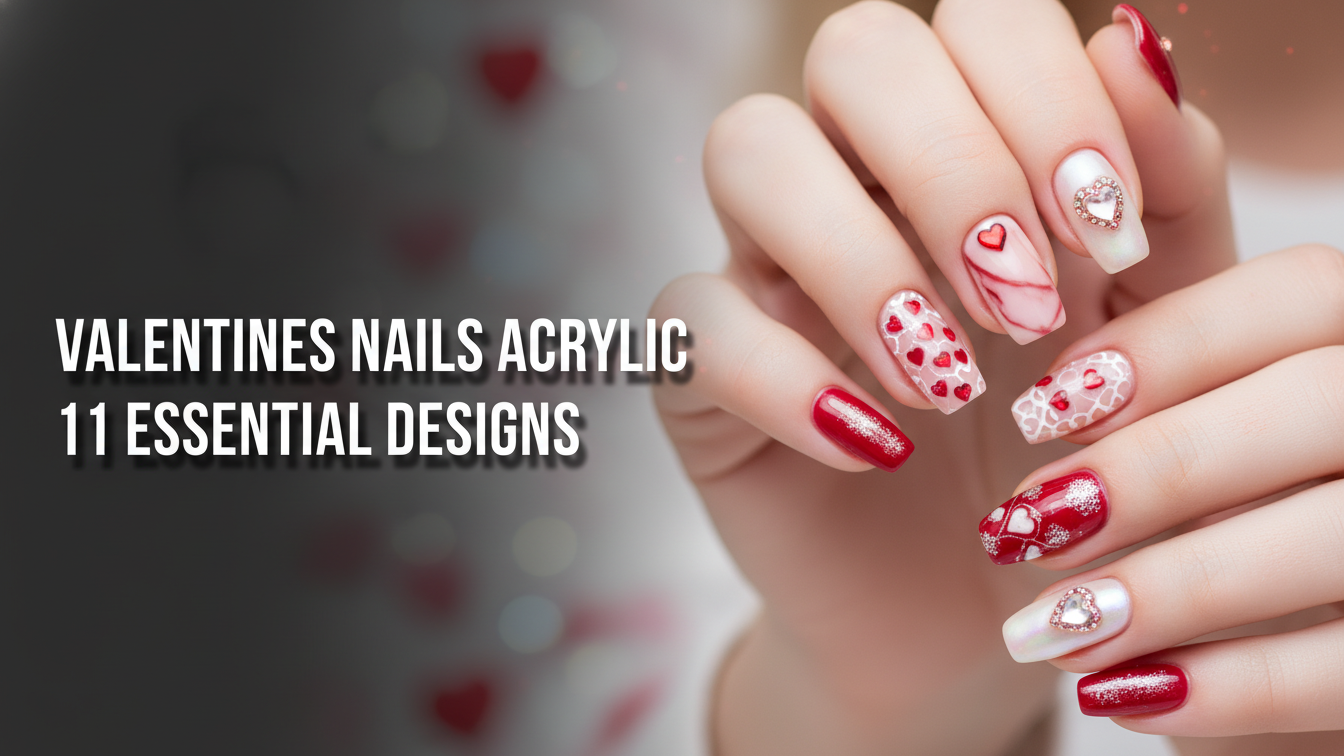
Struggling to find the perfect festive manicure for your date night? Choosing from endless valentines nails acrylic ideas can feel overwhelming, leaving you scrolling for hours without a clear winner. You want a look that’s romantic, on-trend, and perfectly you.
For 2026, the best valentines nails acrylic designs blend classic romance with modern trends, featuring key styles like minimalist heart accents on neutral bases, dramatic red and pink ombre, updated French manicures with heart-shaped tips, and sophisticated coffin shapes with glitter or chrome details. These popular designs offer a range of options from simple and cute to elegant and bold.
Drawing from established best practices and a professional nail artist’s perspective, this guide simplifies your choice. We’ve curated the 11 essential designs you need to see. You’ll discover expert techniques and step-by-step instructions to achieve your dream Valentine’s look, whether at home or in the salon.
What Are the Best Valentines Nails Acrylic Designs to Try in 2026?
Finding the perfect Valentine’s Day nail ideas is a key part of getting ready for the most romantic day of the year. Whether you prefer a subtle nod to the holiday or a bold declaration of love on your fingertips, using acrylics provides a durable and flawless canvas for any design. In 2026, the trends range from modern twists on classics to playful and intricate artwork. This curated list is designed to save you from endless scrolling, providing clear inspiration and actionable steps for the most sought-after V-day acrylic nails. We will explore everything from elegant French tips to dramatic coffin shapes, ensuring you find a style that captures your heart.
11 Essential Valentines Nails Acrylic Designs for 2026
This is your ultimate guide to the most essential and trendy valentines nails acrylic looks for the season. We’ve moved beyond a simple gallery to give you a complete blueprint for creating each style. Every design below includes a detailed list of the products and tools you’ll need, followed by clear, step-by-step application instructions. This structure makes it easy for you to either tackle the design as a DIY project or show your nail technician exactly what you want. From simple valentines nails acrylic for a minimalist look to more intricate designs, you’ll find your perfect match here.
1. Create a Classic Red Heart French Tip Design
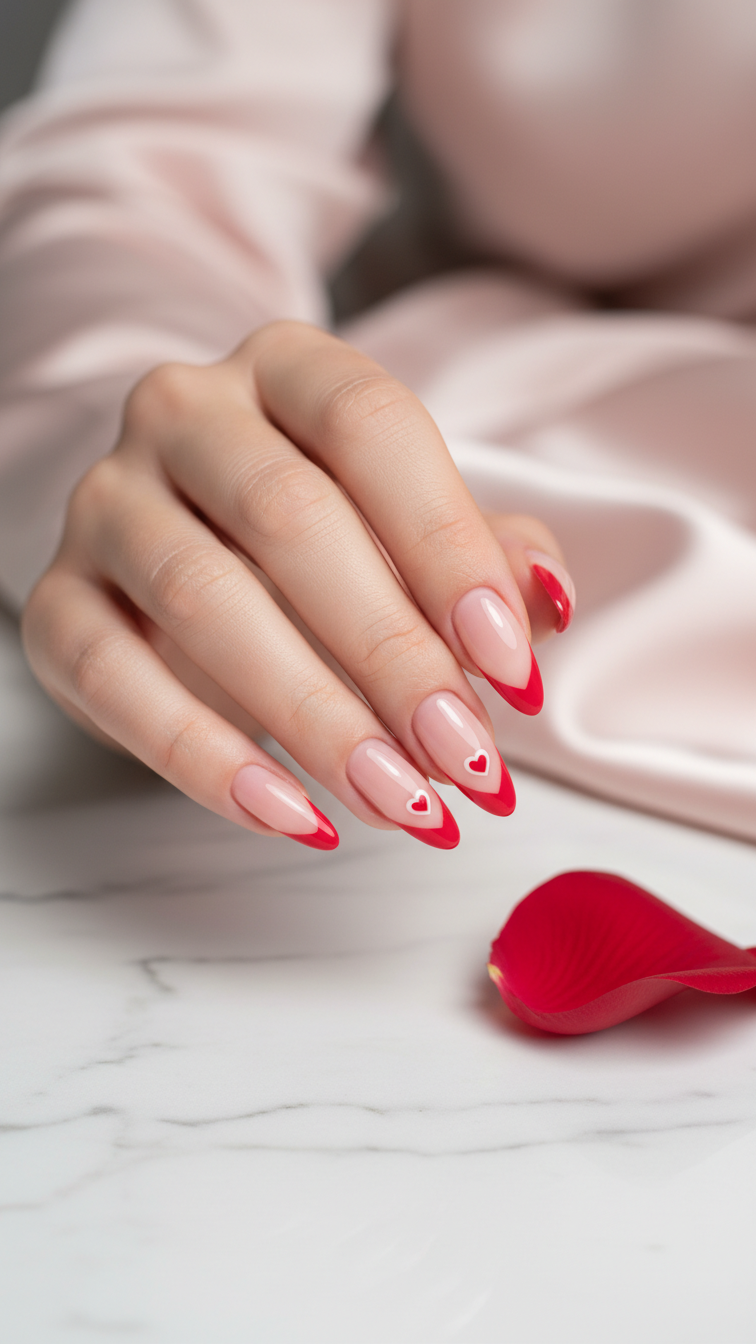
Pin this chic French tip with heart idea to your Valentine’s board!
This design offers a romantic and elegant valentines nails acrylic look by replacing the traditional white line with a perfectly formed red heart. It’s a sophisticated update to a timeless classic, perfect for those who love almond valentines acrylic nails and want a clean yet festive style. The precision of the heart shape on a sheer nude base creates a stunning contrast that is both modern and romantic.
Products & Tools Used
- Sheer pink or nude acrylic powder (for the nail bed)
- Opaque white acrylic powder (for building the extension base)
- Clear acrylic powder (for capping/encapsulating)
- Acrylic liquid (monomer)
- Vibrant red gel polish
- Fine-tipped nail art brush for precision lines
- High-gloss, no-wipe gel top coat
- UV/LED lamp
Application/Styling Steps
- Prep Nails: Prep nails for acrylic application by pushing back cuticles, gently buffing the nail plate, and applying a dehydrator and primer.
- Apply Acrylic Base: Apply a nail form and sculpt the nail extension using white and sheer pink acrylic to create the base structure in your desired almond shape.
- Shape and Refine: Once cured, file and shape the acrylic nail to perfection. Ensure the surface is smooth and the almond shape is symmetrical.
- Paint French Tips: Using the fine-tipped nail art brush and red gel polish, paint french tips by creating two curved lines that meet in a sharp ‘V’ to form the top of the heart. Fill in the shape.
- Cure the Design: Cure the red gel polish under a UV/LED lamp according to the polish manufacturer’s instructions.
- Seal with Top Coat: Seal with top coat by applying a thin, even layer of high-gloss gel top coat over the entire nail. Cure one final time.
Pro-Tip: For a perfectly symmetrical heart tip, place a small dot of red gel polish where you want the point of the heart to be, and two more dots for the top curves. Then, use your fine liner brush to connect the dots smoothly. This proven application method ensures consistency across all nails.

2. Design a Soft Pink Ombre with a Glitter Fade
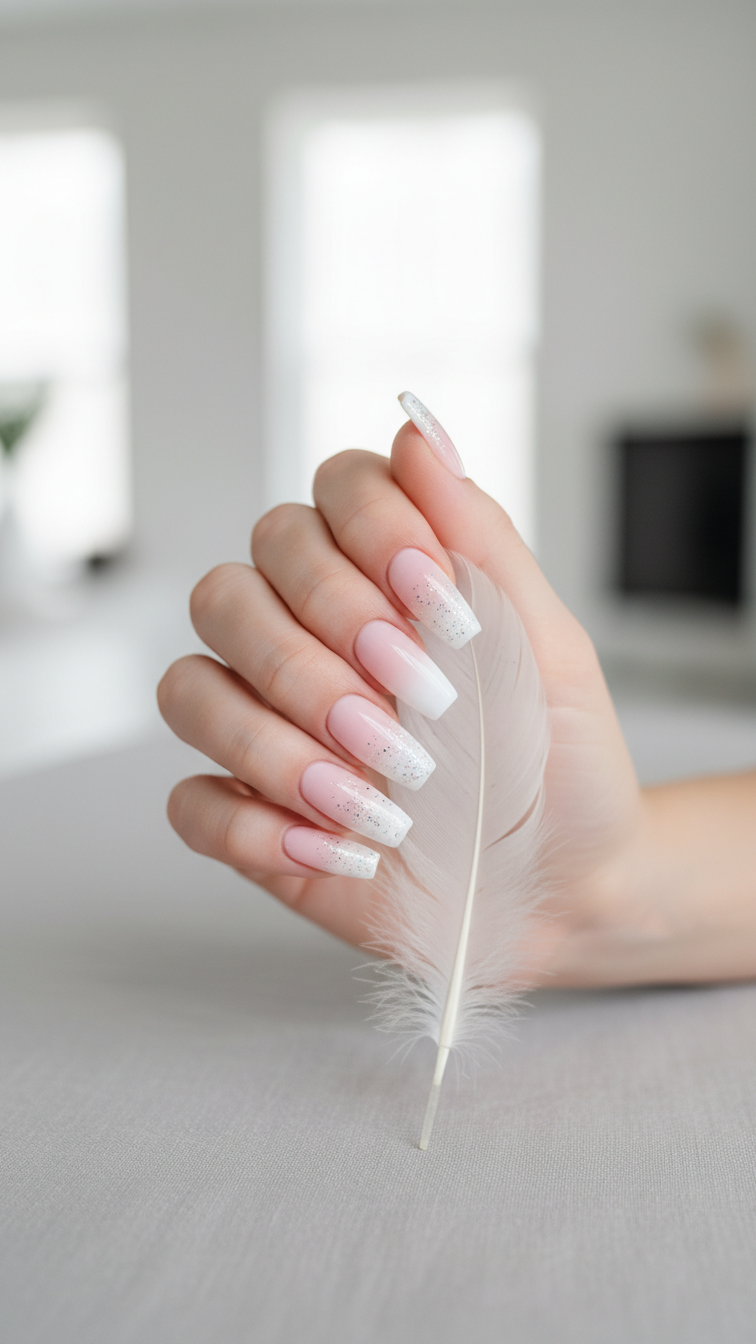
Save this dreamy ombre acrylic nails look for your next manicure!
A timeless choice for any occasion, ombre valentines nails acrylic feel especially romantic in shades of pink and white. This design, often seen on coffin acrylic nails, creates a beautiful gradient effect that is soft and dreamy. The addition of a glitter valentines nails acrylic fade at the tip adds a touch of sparkle and magic, elevating the classic ombre to something truly special for the holiday.
Products & Tools Used
- Soft white acrylic powder
- Baby pink acrylic powder
- Clear acrylic powder
- Acrylic liquid (monomer)
- High-quality acrylic brush (size 8 or 10 is ideal)
- Ultra-fine holographic or silver glitter
- Gel top coat and UV/LED lamp
Application/Styling Steps
- Prep and Form: Prep nails for acrylic and apply your nail form.
- Apply Cuticle Color: Pick up a small bead of the soft white acrylic powder and place it near the cuticle area. Gently pat and press it down, feathering the edge towards the tip.
- Apply Tip Color: Clean your brush, then pick up a bead of the baby pink acrylic powder. Place it on the free edge of the nail and pat it towards the cuticle, blending it into the white acrylic while both are still workable.
- Refine the Blend: Do ombre acrylics by using the belly of your brush to gently pat and smooth the transition zone where the two colors meet until you have a seamless gradient.
- Encapsulate and Shape: Apply a thin layer of clear acrylic over the entire nail to protect the ombre design. Once cured, file and shape coffin nails to perfection.
- Add Glitter Fade: Apply a thin layer of gel top coat. While it’s still wet, use a small brush to sprinkle the glitter onto the tip of the nail, allowing it to fade as you move towards the cuticle. Cure under the lamp.
- Final Top Coat: Apply one more layer of top coat to seal in the glitter and provide a smooth, glossy finish. Cure completely.
Pro-Tip: The key to a flawless acrylic ombre is controlling your monomer to polymer ratio. The acrylic beads should be wet enough to blend but not so wet that they run. In my experience, a slightly wetter bead for the second color helps it meld into the first.

3. Apply Minimalist “Floating Heart” Accents on a Nude Base
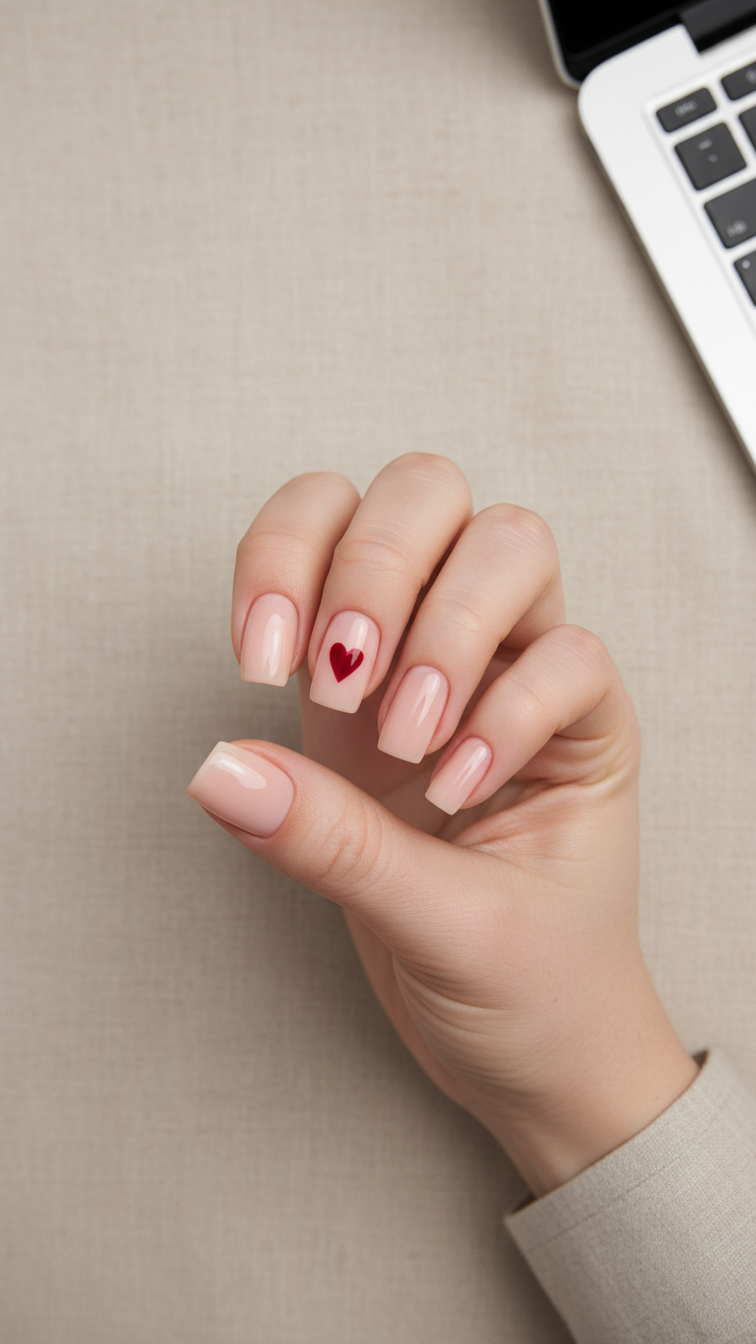
Pin this simple valentines nails acrylic idea for an understated, chic look!
For those who believe less is more, this minimalist design is the epitome of chic. A tiny, crisp red heart on a clean nude base creates a “floating” effect that is both modern and sweet. This style is perfect for short valentines nails acrylic and is a fantastic option if you want a cute valentines nails acrylic look that is subtle enough for the office but still festive for your Valentine’s plans.
Products & Tools Used
- Nude acrylic powder that complements your skin tone
- Clear acrylic powder
- Acrylic liquid (monomer)
- Highly pigmented red gel polish
- A small nail art dotting tool
- A fine-tipped nail art brush
- Matte or glossy gel top coat
- UV/LED lamp
Application/Styling Steps
- Prep and Sculpt: Prep nails and apply nail forms if adding length, or apply acrylic as an overlay on natural nails. Sculpt a clean, short valentines nails acrylic set in a square shape using the nude acrylic powder.
- File and Buff: File the nails into a crisp square shape and buff the surface until perfectly smooth.
- Create the Heart: On the desired accent nail(s), use the dotting tool to place two small, equal-sized dots of red gel polish side-by-side.
- Define the Point: Use the fine-tipped nail art brush to drag the polish from each dot downwards to meet at a single point, forming a perfect heart shape.
- Cure: Once you are happy with the heart, cure the gel polish under the UV/LED lamp.
- Apply Top Coat: Decorate nails with your choice of a matte top coat for a modern look or a glossy top coat for a classic shine. Apply evenly and cure for the final time.
Pro-Tip: To keep the “floating” heart perfectly centered, lightly mark the vertical and horizontal center of your nail with a pencil before painting. The pencil mark will wipe away easily with alcohol after you cure the design. This ensures perfect placement every time.

4. Craft a Romantic “Love Letter” Script Design
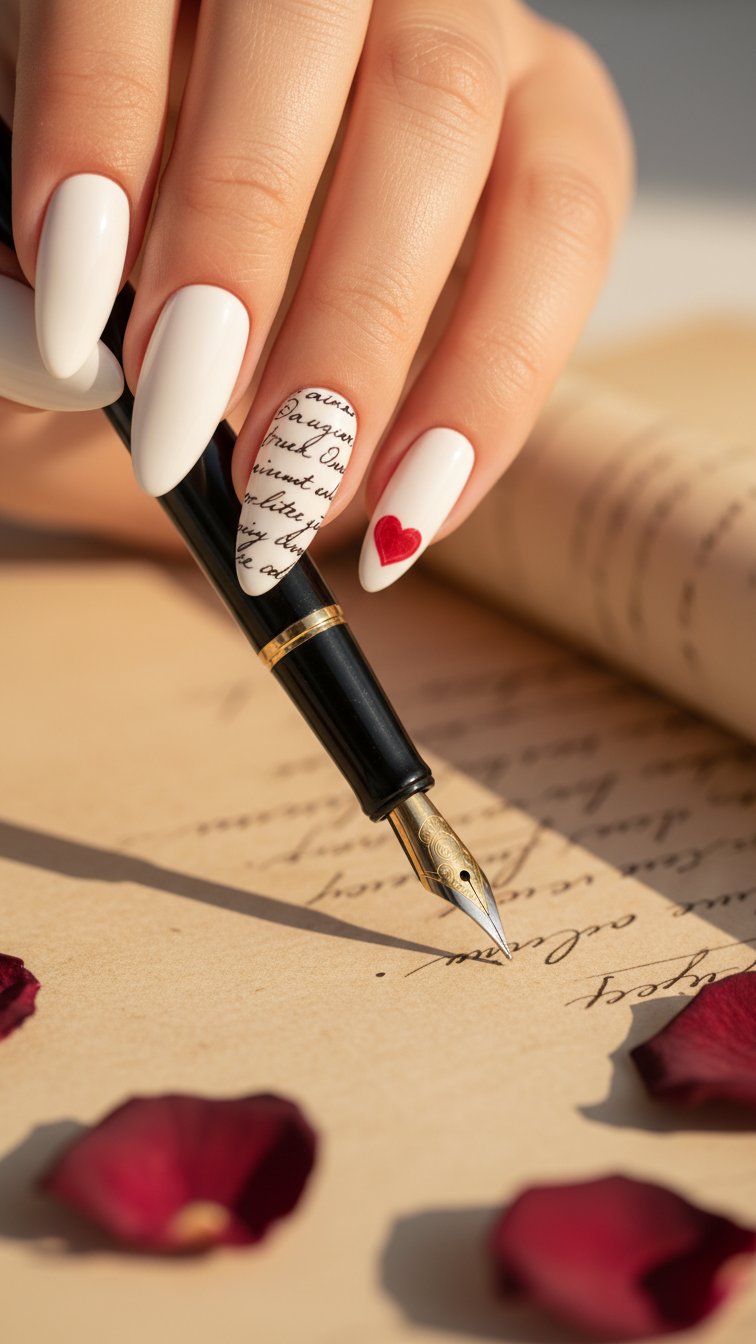
Pin this unique love themed nails idea for a truly romantic statement!
This is a truly unique and personal way to celebrate the season of love. The “Love Letter” design features a creamy white base reminiscent of parchment, with delicate, fine-line script on an accent nail. A tiny red heart acts as a “wax seal,” completing the theme. This intricate valentines nail art acrylic is a conversation starter and a beautiful expression of romance, making it perfect for those who appreciate detailed, artistic manicures.
Products & Tools Used
- Opaque creamy white or off-white acrylic powder
- Black gel paint or highly pigmented black gel polish
- Red gel polish
- An “extra fine” or “xx-fine” nail art liner brush (for script)
- A small dotting tool (for the heart seal)
- Matte gel top coat
- Clear acrylic powder
Application/Styling Steps
- Create the Canvas: After prepping, sculpt your nails into an almond shape using the creamy white acrylic powder. File and buff until smooth.
- Apply a Matte Base: Apply a layer of matte gel top coat and cure it. This creates a slightly textured “paper-like” surface that is easier to draw on than a slick, glossy base.
- Write the Script: Dip your extra-fine liner brush into the black gel paint. Wipe off any excess. With a light hand, design valentines nails by drawing delicate, cursive lines or the word “love” on the accent nail.
- Add the “Seal”: Use a dotting tool and red gel polish to place a small, slightly irregular circle at the end of the script to look like a wax seal.
- Cure the Artwork: Carefully cure the black and red gel paint under the lamp.
- Encapsulate and Finish: To protect the fine lines, apply a very thin layer of clear acrylic over the design. Once hardened, do a final light buff and apply your final glossy or matte top coat, then cure.
Pro-Tip: For those unsteady with freehand, nail stamping is a fantastic alternative. Use a stamping plate with a cursive script design and a black stamping polish to transfer the “love letter” perfectly onto the nail before sealing it. This is a technique used by many professional nail artists for flawless results.

5. Get Elegant with a Pink & White Marble and Gold Foil Design
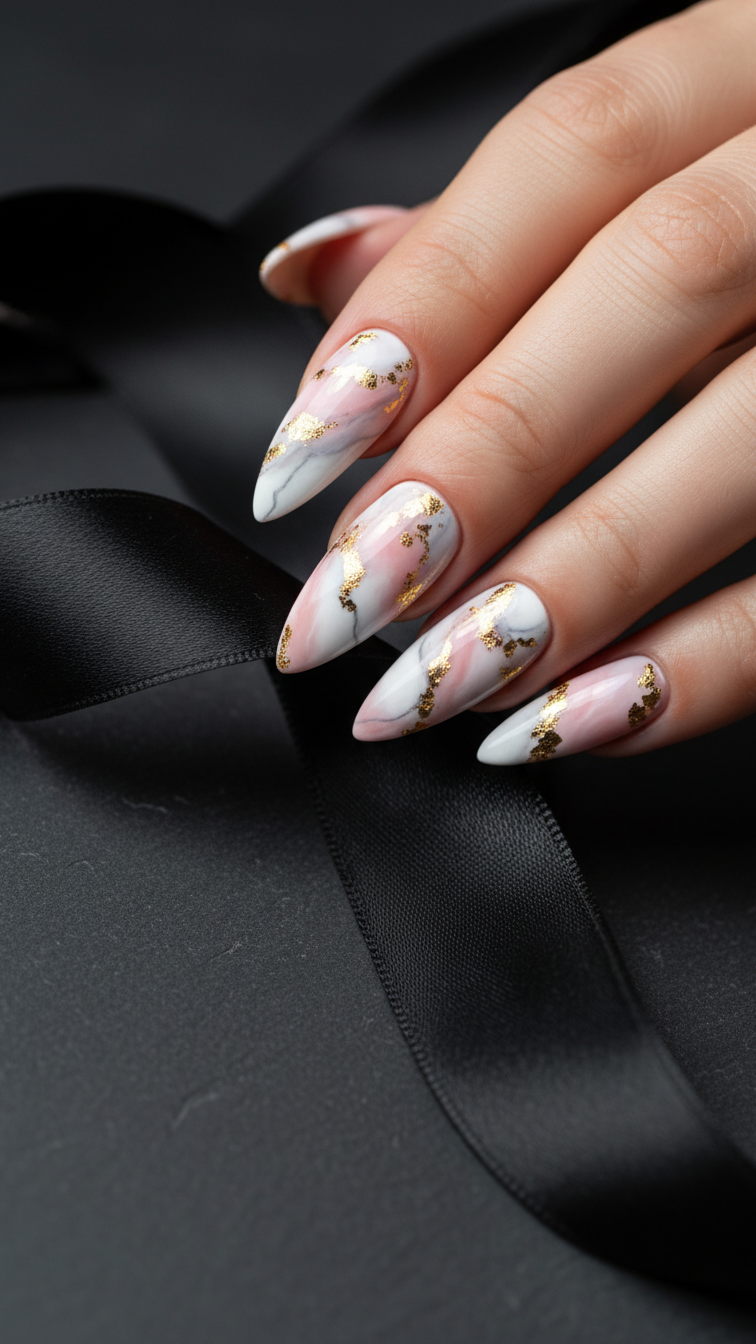
Pin this elegant valentines nails acrylic design for a touch of luxury!
Combine romance and luxury with a stunning marble effect. This design blends soft pink and white to create a delicate stone pattern, elevated by flecks of gold foil that catch the light. It’s a perfect choice for stiletto valentines acrylic nails or any shape where you want to project sophistication. This modern valentines nails acrylic style is ideal for someone looking for a romantic manicure that feels high-end and unique, moving beyond simple hearts and glitter.
Products & Tools Used
- White acrylic powder
- Sheer pink gel polish
- Light grey gel polish or alcohol ink
- A fine liner nail art brush
- Gold foil flakes for nails
- Blooming gel (optional, for an easier effect)
- Clear acrylic powder or builder gel for encapsulation
Application/Styling Steps
- Sculpt the Base: After prepping, sculpt a white acrylic nail in a stiletto shape. File and buff until smooth.
- Apply Base Color: Polish the nail with one coat of the sheer pink gel polish and cure.
- Create Marble Veins: Apply a layer of blooming gel (do not cure). Use your fine liner brush to draw thin, squiggly lines with the light grey polish. The blooming gel will cause the lines to feather out into a soft marble effect. Cure once satisfied.
- Add Gold Foil: Apply a thin layer of builder gel or nail glue where you want the foil. Use tweezers to place small flakes of gold foil onto the nail, pressing them down flat.
- Encapsulate the Design: Enhance nail art by applying a layer of clear acrylic or builder gel over the entire nail. This is crucial to create a smooth surface over the textured foil.
- Final Shape and Shine: Do a final light filing and buffing to ensure the nail shape is perfect. Apply a high-gloss top coat and cure.
Pro-Tip: To make the marble look more natural, slightly dilute your grey polish with a drop of top coat before drawing the veins. This creates a softer, more transparent effect that mimics real stone. This is a favorite expert nail art technique for depth.

6. Make Cute Conversation Candy Heart Nails
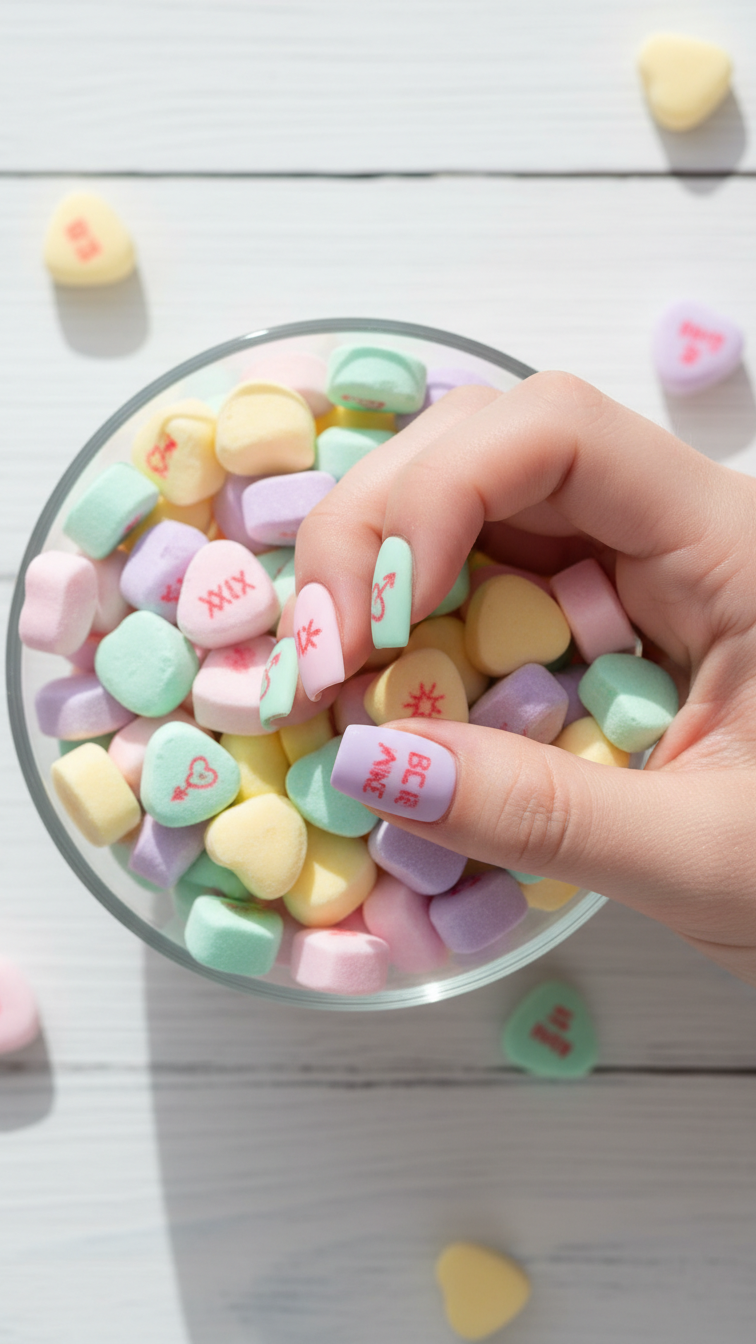
How fun are these? Pin these cute valentines nails acrylic for a playful V-Day!
Channel a sense of fun and nostalgia with candy heart valentine nails. This playful design uses a variety of pastel colors, each with a classic candy heart phrase written in red. The key to achieving the authentic look is a matte top coat, which gives the nails a chalky finish just like the real sweets. It’s a cheerful, colorful, and undeniably cute option that is sure to make you smile.
Products & Tools Used
- White acrylic powder for the base
- A set of pastel gel polishes (e.g., baby pink, light blue, soft yellow, mint green)
- A highly pigmented red gel paint
- An extra-fine nail art liner brush (or Valentine’s word nail decals)
- A matte gel top coat
- UV/LED lamp
Application/Styling Steps
- Sculpt Base Nails: Apply acrylic nails in a square or soft square shape using white acrylic powder. This provides a bright, even canvas for the pastels.
- Apply Pastel Colors: Paint each nail with a different pastel gel polish color. Apply two coats for full opacity, curing between each coat.
- Add the Text: Using the extra-fine liner brush and red gel paint, carefully write a short phrase like “LUV U,” “XOXO,” or “BE MINE” on each nail. Alternatively, apply pre-made nail art letter decals for perfect text.
- Cure the Writing: If you free-handed the text, cure the red gel paint under the lamp.
- Get the Matte Finish: This is the most important step! Apply a generous layer of matte gel top coat over the entire nail. This removes the shine and creates the signature chalky look of conversation hearts.
- Final Cure: Cure the matte top coat thoroughly. Do not wipe with alcohol, as this can sometimes add shine back to matte finishes.
Pro-Tip: For ultra-crisp lettering, flash cure the red gel paint for just 10 seconds after writing each letter. This prevents the thin lines from bleeding or spreading while you work on the next one.

7. Go Dramatic with Black & Red Coffin Nails
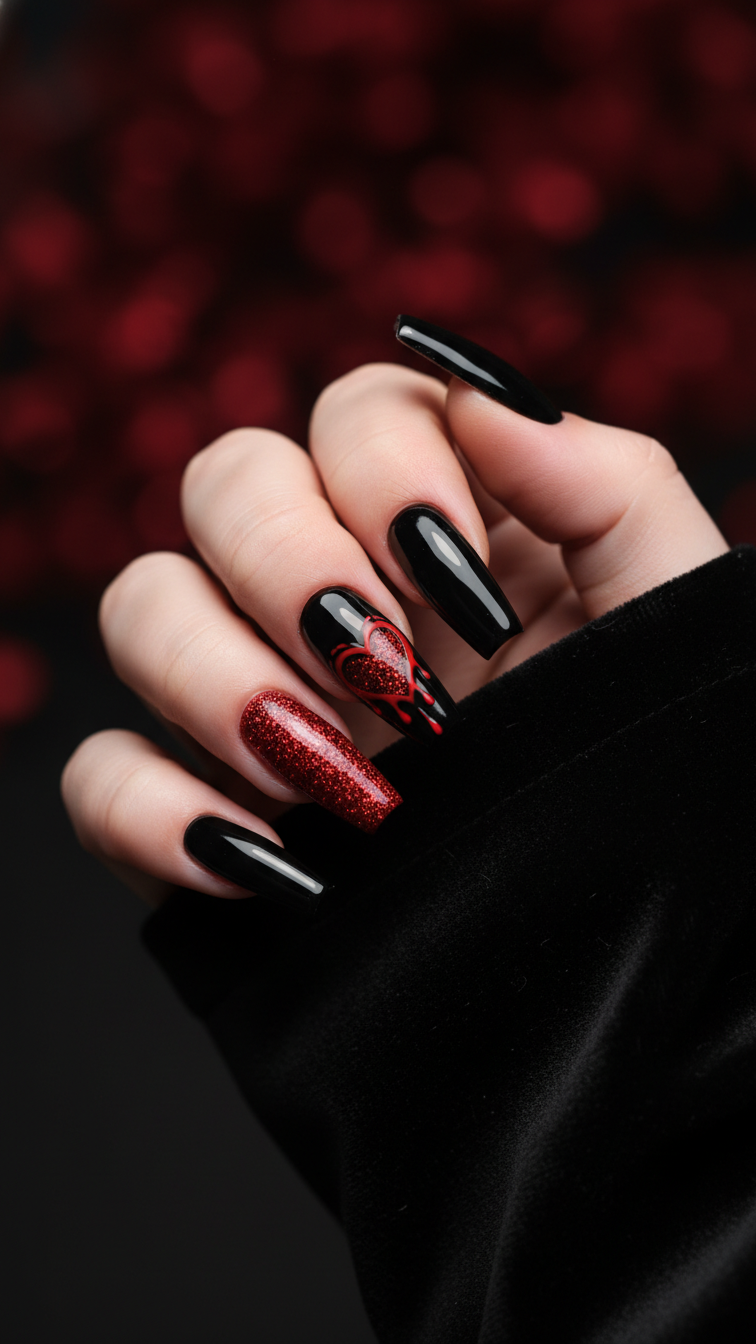
Pin this edgy black valentines nails acrylic look for a dramatic V-day vibe!
Who says Valentine’s has to be all pink and white? This dramatic black and red design is for those who want to make a bold statement. The combination of glossy black, vibrant red glitter, and edgy “dripping heart” art on long valentines nails acrylic creates a powerful and mysterious vibe. It’s the perfect non-traditional choice, especially on a striking coffin valentines acrylic nails shape.
Products & Tools Used
- Clear or white acrylic powder
- Jet-black, highly pigmented gel polish
- A vibrant red glitter gel polish
- A fine-tipped nail art brush
- High-gloss top coat
- UV/LED lamp
Application/Styling Steps
- Sculpt Long Coffin Nails: After prepping, use nail forms to sculpt nail extensions into a long, dramatic coffin shape using clear or white acrylic.
- File to Perfection: Shape coffin nails with crisp, clean lines and a flat top. Ensure all nails are uniform in length and shape.
- Apply Black Polish: On the designated nails, apply two thin coats of jet-black gel polish, curing between each coat for a flawless, opaque base.
- Apply Glitter Accent: On the accent nail, apply two coats of the red glitter gel polish, ensuring even coverage. Cure thoroughly.
- Create Dripping Heart: On the final accent nail, use the red polish and liner brush to paint a heart shape. Then, drag some of the polish downwards from the bottom of the heart in wavy lines to create a “dripping” effect. Cure immediately.
- Seal It In: Apply a high-gloss top coat to all nails to make the colors pop and the glitter sparkle. Cure for a final time.
Pro-Tip: When using highly pigmented colors like black, it’s crucial to apply thin coats. Thick coats can cure improperly, leading to wrinkles or chipping. This is a key part of best practice nail care for gel polish application.

8. Master a Subtle V-Cut French Manicure

Pin this modern v-cut acrylic nails valentines design for a sophisticated take on the French mani!
The V-cut French is a sharp, modern take on a classic. Instead of a soft curve, the tip is defined by a deep, geometric V-shape. For Valentine’s, using a dusty rose or mauve color for the tip creates a look that is both modern valentines nails acrylic and softly romantic. A delicate silver glitter line tracing the V adds a touch of glamour, making this an incredibly elegant valentines nails acrylic option.
Products & Tools Used
- Sheer nude acrylic powder
- Dusty rose gel polish
- Silver glitter liner gel polish
- Thin nail art striping tape
- A small, sharp pair of scissors
- High-gloss top coat
Application/Styling Steps
- Sculpt the Nude Base: Apply acrylic nails in a clean almond shape using the sheer nude powder. File and buff until perfectly smooth.
- Tape the V-Shape: Take two pieces of nail art striping tape. Place them on the nail to form a sharp, deep ‘V’ shape, with the point towards the cuticle. Press the tape down firmly to prevent bleeding.
- Paint the Tip: Carefully paint the exposed tip area with the dusty rose gel polish. Apply a second coat if needed for opacity.
- Remove Tape and Cure: Immediately after painting the second coat, use tweezers to carefully remove the striping tape while the polish is still wet. This creates the sharpest line. Then, cure under the lamp.
- Trace with Glitter: Use the silver glitter liner to carefully trace along the edge of the V-shape. This hides any minor imperfections and adds a touch of sparkle.
- Cure and Seal: Cure the glitter line, then apply a final high-gloss top coat to the entire nail to seal the design.
Pro-Tip: When placing the striping tape, ensure the ‘V’ on each nail points to the exact same angle and depth. Use the center of your nail as a guide to ensure the design is symmetrical and not lopsided.

9. Create a “Sugar” Effect Glitter Heart Nail

Save this textured glitter valentines nails acrylic idea for a super sweet look!
The “sugar” effect is all about texture. Unlike a regular smooth glitter nail, this technique leaves the glitter unsealed, creating a crystalline, sandy texture that sparkles intensely. Creating a love heart acrylic nails design with this effect on a matte pink background results in a super sweet and tactile manicure. This sparkly valentines nails acrylic look is eye-catching and fun to wear.
Products & Tools Used
- Baby pink acrylic powder or gel polish
- Red gel polish
- Ultra-fine red cosmetic glitter (not chunky)
- A fluffy brush or fan brush
- A heart-shaped nail vinyl or stencil (optional)
- Matte gel top coat
Application/Styling Steps
- Create the Base: Sculpt and shape your nails. Paint the non-accent nails with the baby pink polish and seal with a matte top coat, curing as you go.
- Prepare the Accent Nail: Paint the accent nail with two coats of the baby pink polish, curing each coat.
- Draw the Heart: Using the red gel polish, paint a solid heart shape in the center of the accent nail. DO NOT CURE THIS YET.
- Apply the “Sugar”: While the red heart is still wet, generously pour the ultra-fine red glitter over the entire nail, making sure to completely cover the wet polish. Gently tap the finger to remove loose excess glitter.
- Cure the Sugar Heart: Now, cure the nail under the UV/LED lamp. The wet gel polish will cure with the glitter embedded in it.
- Brush Away Excess: Once cured, use a fluffy brush to firmly dust off all the loose glitter that didn’t stick to the heart design. The result will be a sparkling, textured heart. Do not apply a top coat over the heart.
Pro-Tip: For a perfectly crisp heart shape, apply a heart-shaped nail vinyl to the nail first. Paint the red gel inside the stencil, apply the glitter, and then remove the stencil before curing. This gives you a flawless outline.

10. Design Romantic Rose Quartz Crystal Nails
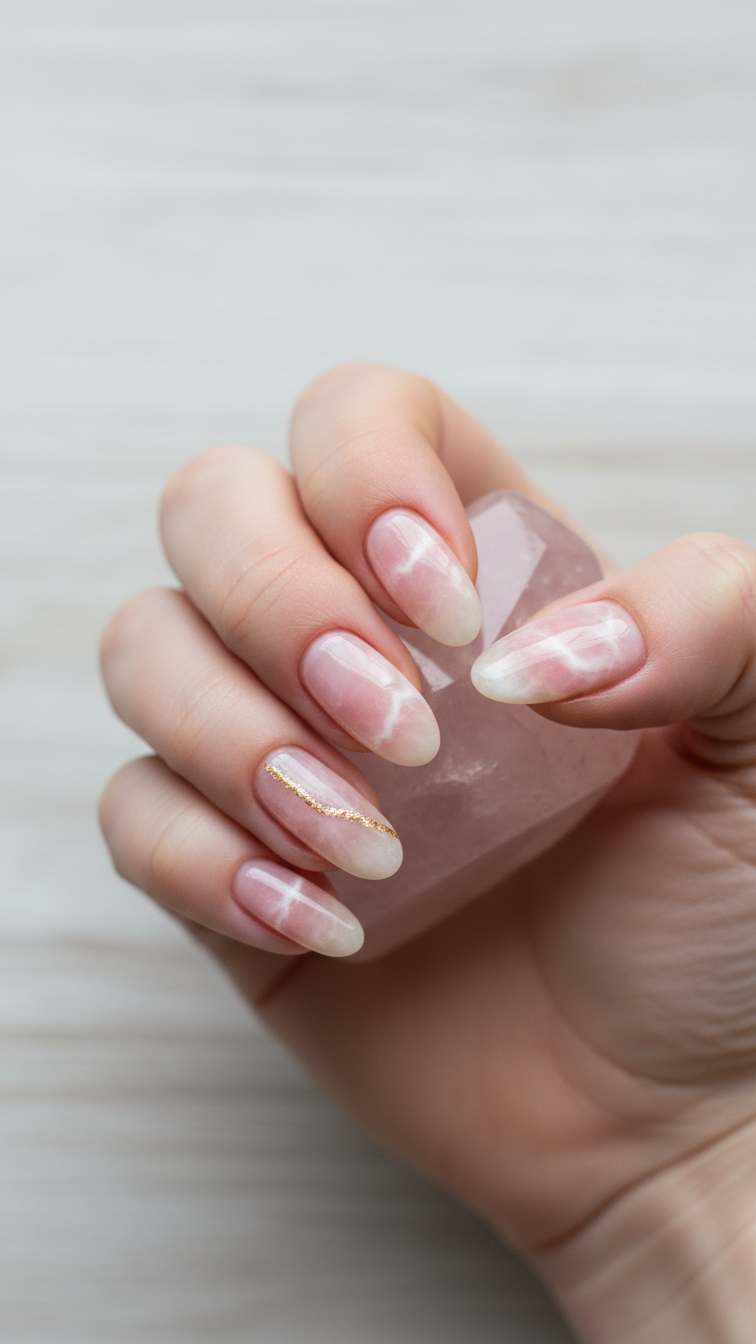
Pin this gorgeous rose quartz acrylic nail design for a serene and romantic look!
Inspired by the stone of unconditional love, rose quartz nails are one of the most elegant valentines nails acrylic options. The design features a semi-translucent milky pink base with soft, hazy white veins, perfectly mimicking the natural crystal. This serene and beautiful pink valentines nails acrylic look is achieved through a special layering technique that creates depth and a gentle glow.
Products & Tools Used
- A sheer or “jelly” pink gel polish
- An opaque white gel polish
- A small amount of isopropyl alcohol or acetone
- A fine-tipped nail art brush
- A small, flat nail art brush
- High-gloss top coat
Application/Styling Steps
- Sculpt a Neutral Base: Apply acrylic nails using a clear or very light nude powder. The base should be neutral to allow the jelly polish to show its translucency.
- Apply First Sheer Coat: Apply one thin coat of the sheer pink jelly polish and cure.
- Draw the Veins: Apply a second, slightly thicker coat of the sheer pink polish, but do not cure it. Use your fine-tipped brush to draw a few thin, squiggly lines with the white polish.
- Create the Haze: Dip your flat brush in a small amount of alcohol and gently tap along the white lines. This will cause the white polish to bloom and spread, creating the soft, hazy look of crystal veins.
- Cure the Design: Once you are happy with the blended effect, cure the nail under the lamp.
- Add Depth and Seal: Apply one more thin coat of the sheer pink jelly polish over the entire nail to add a final layer of depth. Cure, and then finish with a high-gloss top coat.
Pro-Tip: The key to a realistic crystal nail is layering. Don’t be afraid to repeat steps 3-5 with very thin layers to create veins that appear to be at different depths within the “stone.”

11. Use Negative Space with Heart Cutouts
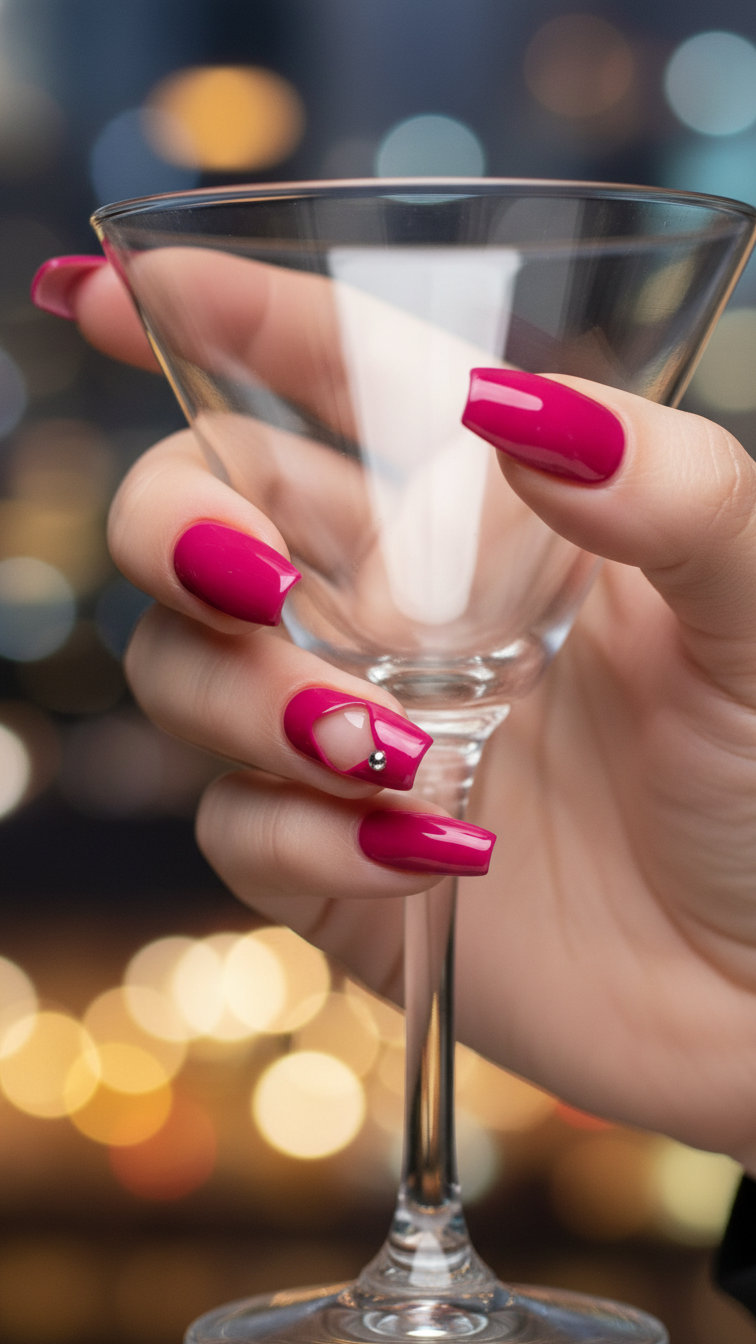
Pin this cool negative space nail art idea for a modern Valentine’s Day!
Negative space designs are a huge trend in the world of nail art. For Valentine’s, a heart “cutout” on a brightly colored nail creates a super modern and chic look. The design is defined by the unpainted heart shape, which shows the nude base underneath. This modern valentines nails acrylic style is bold, graphic, and a favorite among nail influencers for its cool, contemporary feel.
Products & Tools Used
- A clear or nude acrylic powder for the base
- A vibrant magenta or hot pink gel polish
- Heart-shaped nail vinyls (stencils)
- Tweezers
- Small silver nail art studs (optional)
- Nail glue or gem gel
Application/Styling Steps
- Create the Nude Base: Apply acrylic nails in a coffin shape using a nude powder that closely matches your natural nail color. This will be the color of your “cutout.” File and buff until smooth.
- Place the Stencil: Using tweezers, carefully place a heart-shaped nail vinyl firmly in the center of the nail where you want the cutout to be. Press down all the edges to prevent polish from seeping underneath.
- Paint Around the Stencil: Carefully paint the entire nail with the magenta gel polish, painting directly over the vinyl stencil. Apply a second coat for full opacity.
- Remove Stencil and Cure: While the second coat is still wet, use your tweezers to carefully peel off the heart stencil. This will reveal the clean, nude heart shape underneath. Immediately cure the nail under your lamp.
- Add Embellishment: If desired, use a small dab of nail glue to apply a silver stud at the top of the heart for an extra accent.
- Seal the Design: Carefully apply a high-gloss top coat over the entire nail, covering both the magenta polish and the nude heart. Cure for a final, glossy finish.
Pro-Tip: Before applying the nail vinyl, stick it to the back of your hand and peel it off once. This slightly reduces the adhesive’s strength, making it easier to remove from the nail without pulling up any of the base layer.

Key Takeaways
- Modernize the Classics: The most trendy valentines nails acrylic for 2026 involve updating timeless styles. Think French tip nails with red heart shapes instead of white curves, or V-cut tips for a geometric edge.
- Texture is Key: Add dimension to your manicure with a textured “sugar” glitter effect (by not using a top coat over glitter) or by finishing a pastel design with a matte top coat to mimic candy hearts.
- Embrace All Colors: While red pink nails are traditional, don’t be afraid to go for dramatic black valentines nails acrylic or elegant rose quartz designs for a unique and sophisticated look that still feels romantic.
- Tools Make it Easy: Achieving intricate designs like “love letter” script or perfect negative space cutouts is made simple with the right tools. Invest in nail art stamping kits or heart-shaped nail vinyls for professional results at home.
- Preparation and Sealing are Crucial: The longevity of any acrylic nail design depends on proper nail prep (dehydrating and priming) and a quality top coat to seal the artwork, prevent chipping, and provide the desired finish (glossy or matte).
People Also Ask About Valentines Nails Acrylic
What are the best valentines nails acrylic designs?
The best designs blend personal style with festive themes. Popular choices include classic red and pink hearts, modern French tips with a heart design, elegant ombre with glitter, and minimalist accents on a nude base. Consider your wardrobe and the events you’ll be attending when choosing a design.
How long do valentines acrylic nails last?
With proper care, a set of acrylic nails should last 2 to 3 weeks. After this period, you will notice growth at the cuticle and will need a “fill” or “infill” appointment. To extend their life, avoid using your nails as tools, wear gloves when cleaning, and apply cuticle oil daily.
How much do valentines acrylic nails cost?
The cost varies greatly by location and salon, but you can expect to pay for a full set. A basic set is on the lower end, while intricate nail art ideas with rhinestones, complex designs, and a top-tier master nail artist will be more expensive.
Can you get short valentines acrylic nails?
Absolutely! Short valentines nails acrylic designs are very popular and practical. Styles like the “floating heart” on a nude base, simple glitter accents, or a delicate, thin French tip look incredibly chic on short acrylic nails in a square or oval shape.
What is the difference between gel and acrylic nails for Valentine’s?
Acrylics are stronger and better for adding significant length, while gel offers a more flexible and natural feel. Acrylic vs gel nails is a common question; acrylics are a powder/liquid mix sculpted onto the nail, whereas gel is a light-cured viscous polish. Both can be used to create beautiful Valentine’s designs.
How to do valentines nails acrylic at home?
For a DIY approach, press-on nails are the easiest and safest option. For a true acrylic application, you will need an acrylic nail kit with monomer, polymer, brushes, and files. It’s crucial to watch many nail art tutorials and work in a well-ventilated area due to the strong fumes.
What nail shapes are popular for valentines acrylics?
Almond and coffin are the two most popular shapes for Valentine’s designs. The almond shape offers an elegant, slenderizing look perfect for romantic styles. Coffin acrylic nails provide a larger canvas, making them ideal for more dramatic art and bold statements.
How do you create a heart design on acrylic nails?
The easiest way is the “dot and drag” method. Use a dotting tool to place two dots side-by-side. Then, use a fine liner brush to drag the polish from each dot down to a single point. For perfect shapes, use a heart-shaped nail stencil or decal.
What supplies do I need for valentines acrylic nail art?
Key supplies include red, pink, and white gel polishes, a set of fine liner brushes, a dotting tool, and a good top coat. Depending on the design, you might also need glitter, rhinestones, gold foil, or nail stencils to complete your look.
How to remove acrylic nails at home?
The safest method involves soaking your nails in 100% acetone. First, file off the top coat. Then, soak cotton balls in acetone, place them on your nails, and wrap each finger in aluminum foil. After 15-20 minutes, the acrylic should be soft enough to gently scrape off.
Final Thoughts on Your 2026 Valentines Nails Acrylic
Ultimately, your valentines nails acrylic are a fun and beautiful form of self-expression. Whether you chose a simple and cute design or an elegant, intricate work of art, your manicure is a way to celebrate love and feel your best. This guide has provided you with a range of styles, from the classic to the contemporary, empowering you to find a look that truly resonates with you. We hope you feel inspired and confident to try one of these designs for a festive and fabulous Valentine’s Day.
Last update on 2026-01-17 / Affiliate links / Images from Amazon Product Advertising API