Ready to add some magic to your manicure this February? Finding the perfect balance between romantic and whimsical for valentines nails disney designs can be a challenge when scrolling through endless generic images. You want a look that captures the nostalgia of Disney while celebrating the season of love, without requiring a professional salon visit.
Creating personalized Disney Valentine nails involves selecting beloved characters, integrating traditional Valentine’s symbols like hearts and glitter, and applying creative nail art techniques. This guide provides 9 essential ideas and step-by-step instructions to achieve charming and festive looks for the holiday, ensuring your manicure stands out with unique flair.
Drawing from comprehensive analysis of current trends and expert nail art techniques, we have curated the ultimate list for every skill level. You will discover exactly how to recreate these magical looks at home using proven methods and accessible tools. Let’s dive into the most enchanting designs for March 2026.
Your Guide to Essential Valentines Nails Disney Ideas for March 2026
Celebrating the season of love requires a special touch, and nothing combines romance with nostalgia quite like disney valentine nails. Whether you are planning a trip to the parks or simply want to express your fandom, blending Disney characters like Mickey and Minnie with Valentine’s Day themes offers endless creative possibilities. This guide is designed to move beyond simple inspiration, providing you with the practical steps and expert tips needed to execute these designs flawlessly.
From subtle nods to classic animation to elaborate cute disney valentine nails, the right manicure can serve as a powerful form of personal expression. We understand that achieving salon-quality results at home requires clear guidance on tools and techniques. In the following sections, we will bridge the gap between inspiration and application, offering a curated collection of styles that range from beginner-friendly decals to advanced hand-painted art. Get ready to transform your nails into a canvas of Disney magic and Valentine’s romance.
9 Essential Valentines Nails Disney Ideas for March 2026
Finding the perfect design is the first step to a magical manicure. We have selected 9 distinct disney valentine nail art concepts that cater to various styles, from the sweet and traditional to the bold and villainous. Each idea below is structured to help you succeed, detailing exactly what products you need and the specific steps to take.
Whether you are looking for easy diy disney valentine nails or ready to tackle trendy disney valentine nails with intricate details, this comprehensive list covers it all. We will explore how different nail art application methods—like decals, press-ons, and hand-painting—can bring these characters to life. Let’s explore these disney princess valentine nail ideas and character themes to find your perfect match.
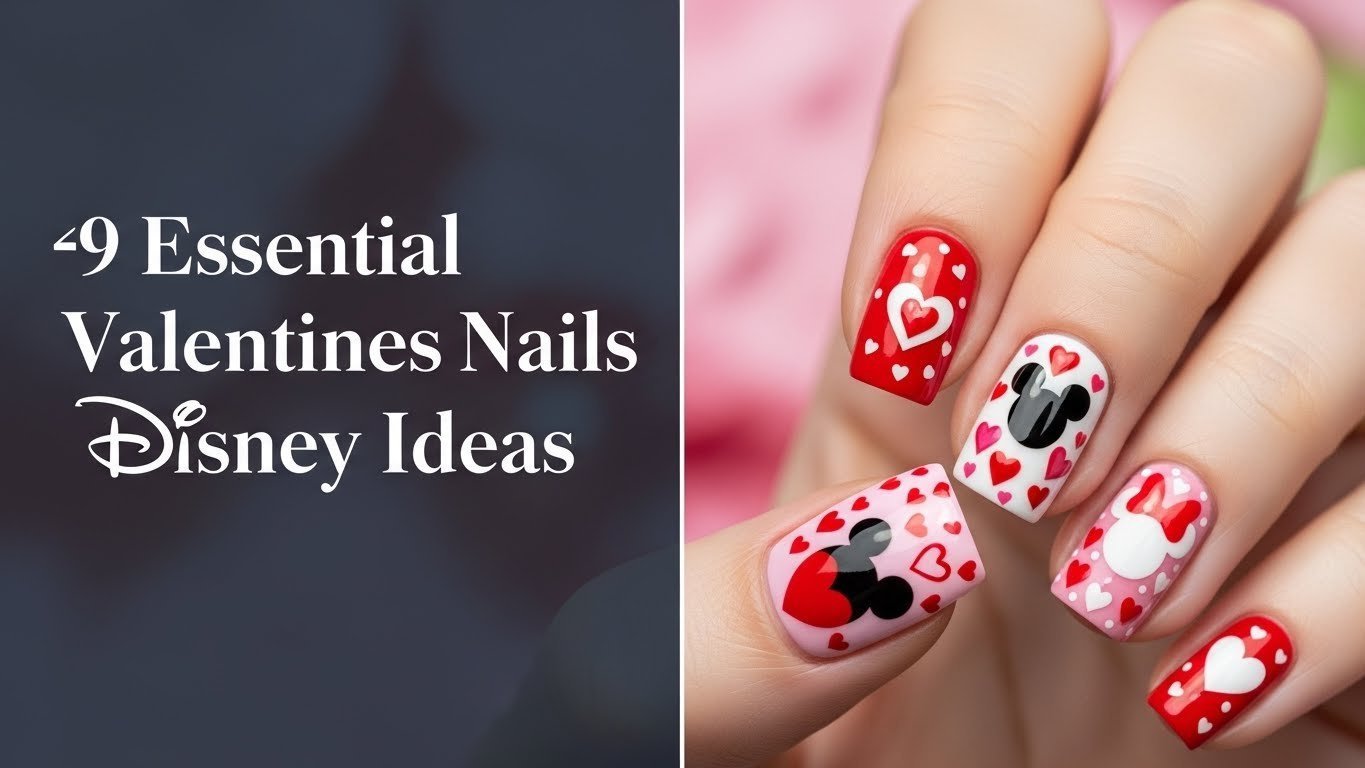
1. Classic Mickey & Minnie Sweetheart Silhouettes

Pin this adorable Mickey & Minnie design to your Valentine’s board!
This design captures the essence of classic disney valentine nails by utilizing the iconic silhouettes of the most famous mouse couple. It is a timeless look that pairs Mickey Mouse and Minnie Mouse with romantic heart nail designs, perfect for beginners who want a high-impact look with manageable techniques. The key here is precision with your dotting tool to create recognizable shapes.
Products & Tools Used
- White nail polish for base coat (e.g., OPI Alpine Snow)
- Red nail polish for details (e.g., Essie Really Red)
- Black nail art pen or thin brush (e.g., Sally Hansen I Heart Nail Art Pen Black)
- Clear top coat (e.g., Seche Vite Dry Fast Top Coat)
- Small dotting tool
Application/Styling Steps
- Prepare nails by cleaning, filing, and applying a base coat. Let dry completely.
- Paint nails with two coats of your chosen light pink or nude base color. Allow to dry.
- Use the black nail art pen or thin brush to carefully draw a small Mickey/Minnie silhouette on one or two accent nails. For Minnie, add a small red bow with the red polish.
- Create tiny red hearts on other nails using the dotting tool or a small brush.
- Seal the design with a high-quality clear top coat for durability and shine.
Pro-Tip: For perfectly symmetrical Mickey ears, use a small dotting tool to create two dots for the ears above a larger dot for the head. This proven technique ensures consistent results for disney character nail art.

2. Enchanted Rose Princess Nails

Bring fairytale romance to your fingertips – Pin this Princess nail art now!
If you prefer a more sophisticated aesthetic, these disney princess valentine nail ideas inspired by Beauty and the Beast offer a touch of elegance. The enchanted rose design serves as a beautiful symbol of enduring love, set against a shimmering background that elevates the look beyond standard cartoon imagery. This style leans into romantic disney nail art, perfect for a dinner date or a formal event.
Products & Tools Used
- Sheer gold shimmer nail polish (e.g., OPI Gold Leaf)
- Red nail art paint or gel polish (e.g., AIMEILI Gel Polish Red)
- Green nail art paint or gel polish
- Fine detail nail art brush
- Dotting tool (optional, for small accents)
- Clear top coat
Application/Styling Steps
- Prep nails and apply one coat of sheer gold shimmer polish.
- Using the fine detail brush and red paint, carefully draw a small rose on one or two accent nails. Start with a central swirl, then build outward with tiny curved strokes.
- Add small green leaves around the rose base with the green paint and detail brush.
- Optionally, add tiny gold glitter specks around the design before it dries completely.
- Seal with a glossy top coat to protect the intricate details.
Pro-Tip: For a more ethereal look, dilute your red nail art paint slightly with a clear polish or a specialized nail art medium to create watercolor effects for the rose petals, a favorite professional nail artist tip.

3. Pixie Dust Glitter Gradient

Sparkle like Tinkerbell this Valentine’s Day! Pin this glittery magic.
For those who believe all you need is faith, trust, and a little pixie dust, this design brings the sparkle. Glitter disney valentine nails are incredibly festive, and this gradient effect mimics the magical trail of Tinkerbell. It combines disney themed valentine’s nails with popular ombre nail art gradients, resulting in a look that is both enchanting and eye-catching.
Products & Tools Used
- Base coat
- Light nude or white nail polish (for gradient base)
- Fine green glitter nail polish (e.g., China Glaze Emerald Sparkle)
- Fine gold glitter nail polish (e.g., OPI I’m Not Really a Waitress)
- Makeup sponge (cut into small pieces)
- Tweezers (optional, for handling sponge)
- Liquid latex or peel-off base coat (for easy cleanup)
- Top coat
Application/Styling Steps
- Prep nails and apply base coat, then two coats of light nude polish. Allow to dry.
- Apply liquid latex around the cuticles of the nails you’ll be glittering.
- Paint a strip of green glitter polish and a strip of gold glitter polish side-by-side onto a small piece of makeup sponge.
- Lightly dab the sponge onto the nail, moving it slightly up and down to create a gradient effect. Repeat for more intensity.
- Peel off the liquid latex while the glitter is still slightly wet.
- Apply two generous layers of top coat to smooth out the glitter and add shine.
Pro-Tip: Applying liquid latex around your cuticles before sponging on glitter makes cleanup incredibly easy and prevents messy edges, a favorite professional nail artist tip.

4. “Be Mine” Disney Villain Accents

Dare to be different! Pin these villainous Valentine nails.
Not everyone wants pink and sweet for February 14th. These unique disney valentine nails celebrate the darker side of Disney by featuring iconic Disney Villain motifs. By mixing symbols like Maleficent’s horns or Ursula’s shell with ironic “Be Mine” text, you create disney villain valentine nails for edgy look that are sure to start conversations. This theme is perfect for those who love dark romantic nails.
Products & Tools Used
- Base coat
- Dark purple nail polish (e.g., OPI Lincoln Park After Dark)
- Black nail polish
- Red or pink nail art polish (e.g., Sally Hansen Insta-Dri Pink Blink)
- Fine detail nail art brush
- Dotting tool
- Nail art stamps with villain symbols (optional)
- Clear top coat
Application/Styling Steps
- Prep nails and apply base coat, then two coats of dark purple or black polish.
- On accent nails, use the fine detail brush to carefully paint small villain symbols (e.g., Maleficent’s horns, Ursula’s shell, Cruella’s spots).
- Using red or pink nail polish and a dotting tool, add small hearts strategically next to the villain symbols, or carefully paint “Be Mine” text.
- Allow designs to dry thoroughly.
- Finish with a durable clear top coat to enhance shine and protect the art.
Pro-Tip: For intricate villain symbols, consider using nail art stamps or disney nail art stencils to achieve crisp lines and professional-looking details with less effort.

5. Simple Mickey Head French Tip

Elegance meets Disney magic! Pin this subtle French tip look.
Sometimes less is more. This design offers elegant disney valentine nails that are understated enough for the office but festive enough for the holiday. By adapting the classic French manicure with a tiny Mickey Mouse french tip, you achieve subtle disney valentine nails for work. This minimalist approach relies on clean lines and a steady hand for a polished finish.
Products & Tools Used
- Base coat
- Sheer nude or light pink nail polish
- White nail polish (for traditional French tip base)
- Red or black nail art polish or pen
- Dotting tool (small and medium sizes)
- French manicure sticker guides (optional)
- Clear top coat
Application/Styling Steps
- Prep nails and apply base coat. Paint two coats of sheer nude or light pink polish.
- On the tip of one or two accent nails, use a French manicure guide or freehand a smooth, thin line of white polish.
- Once the white tip is dry, use the red or black nail art pen/polish and a small dotting tool to create a tiny Mickey head silhouette on the white tip.
- Allow the design to dry completely.
- Finish with a high-gloss clear top coat to smooth the design and add durability.
Pro-Tip: Using french manicure sticker guides can help you achieve a perfectly crisp and even white tip, which is fundamental before adding your disney character nail art details.

6. “Up” Balloon House Gradient

Let your love soar! Pin this adventurous “Up” nail design.
For a colorful and heartwarming tribute to love and adventure, look no further than these disney movie inspired valentine’s day nail ideas. Drawing from the movie Up, this design features a vibrant balloon gradient that mimics the house taking flight. It’s a fantastic choice for vibrant disney valentine nails and incorporates ombre nail art gradients to represent the sky and balloons, symbolizing a love that lifts you up.
Products & Tools Used
- Base coat
- Light blue nail polish (for sky base)
- Variety of pastel colored nail polishes (pink, yellow, orange, green, purple)
- Makeup sponge
- Fine detail nail art brush (for house silhouette)
- Black nail art polish or pen
- Liquid latex (for easy cleanup)
- Clear top coat
Application/Styling Steps
- Prep nails and apply base coat, then two coats of light blue polish. Allow to dry.
- Apply liquid latex around the cuticles.
- On a makeup sponge, paint horizontal strips of pastel polishes in a rainbow sequence.
- Gently dab the sponge onto the nail, concentrating the colors towards the tip for a balloon-like gradient. Repeat for opacity.
- Carefully peel off the liquid latex.
- On one accent nail, use the fine detail brush and black polish to create a tiny silhouette of the “Up” house.
- Seal with multiple layers of a glossy top coat to smooth the gradient and protect the intricate art.
Pro-Tip: When creating a gradient, use a slightly thicker top coat as your final layer to encapsulate the colors and glitter, providing a smooth finish and extending the life of your vibrant disney valentine nails.

7. “Lilo & Stitch” Ohana Love Hearts

Celebrate ‘Ohana’ love! Pin this adorable Lilo & Stitch nail idea.
“Ohana means family, and family means nobody gets left behind or forgotten.” This sentiment makes Lilo & Stitch perfect for a Valentine’s celebration of love in all forms. These cute disney valentine nails mix soft pinks with vibrant blues, featuring Stitch and Angel silhouettes alongside ohana nails text. It is a playful, heartwarming take on disney character valentine nails.
Products & Tools Used
- Base coat
- Light blue nail polish (e.g., OPI A Little Guilt Under the Kilt)
- Soft pink nail polish (e.g., Essie Fiji)
- White nail art polish or pen
- Black nail art polish or pen
- Fine detail nail art brush
- Dotting tool
- Clear top coat
Application/Styling Steps
- Prep nails and apply base coat. Paint alternating nails with light blue and soft pink polish.
- On blue nails, use a fine detail brush and white or black polish to create a small Stitch silhouette or Hawaiian flower.
- On pink nails, use the fine detail brush and white or black polish to create small Angel silhouettes or hearts.
- On an accent nail (blue or pink), carefully write “Ohana” using white or black nail art pen.
- Allow all details to dry thoroughly.
- Apply a high-gloss clear top coat to seal and protect the design.
Pro-Tip: For consistent character silhouettes, practice on paper first or use nail art stencils designed for small details, a technique commonly used by expert nail artists.

8. Toy Story Alien Hearts

“Ooooh!” these Alien nails are perfect! Pin your favorite Toy Story look.
For a quirkier take on the holiday, why not let “The Claw” choose your manicure? These toy story alien nails are incredibly fun and vibrant, moving away from traditional reds and pinks. By combining the aliens’ signature lime green with purple and adding hearts, you get fun disney valentine nails that stand out. This green purple nail designs concept is great for fans who want cute disney nails with a humorous twist.
Products & Tools Used
- Base coat
- Lime green nail polish (e.g., Orly Key Lime Twist)
- Light purple nail polish (e.g., Essie Lilacism)
- White nail art polish or pen
- Black nail art polish or pen
- Fine detail nail art brush
- Dotting tool
- Clear top coat
Application/Styling Steps
- Prep nails and apply base coat. Paint nails with two coats of lime green polish.
- On accent nails (or all nails if desired), use the fine detail brush and white polish to draw small alien heads (three eyes, antennae). Fill in with white.
- Once white is dry, use black polish to add pupils and outline.
- On other nails, use a dotting tool and light purple polish to create small hearts.
- Allow all designs to dry thoroughly.
- Finish with a clear top coat for shine and protection.
Pro-Tip: When working with bright colors like lime green, ensure your base coat is fully dry to prevent streaking and maintain the polish’s true vibrancy, a key part of best practices for nail application.

9. Winnie the Pooh Hunny Pot Hearts

Sweet as honey! Pin these adorable Pooh Bear Valentine nails.
Nothing is sweeter than a “hunny” pot for your Valentine. These winnie the pooh nails bring a cozy, warm vibe to your manicure with sunny yellows and drip effects. The design integrates the iconic pot with hearts, making it one of the most charming cute disney valentine nails options. The hunny pot nail art requires some texture work but results in a delightful disney love nails look.
Products & Tools Used
- Base coat
- Sunny yellow nail polish (e.g., Essie Sunny Daze)
- Orange nail polish (for “hunny” texture)
- Black nail art polish or pen
- Fine detail nail art brush
- Dotting tool
- Clear top coat
Application/Styling Steps
- Prep nails and apply base coat. Paint nails with two coats of sunny yellow polish.
- On accent nails, use the orange polish and a fine detail brush to create dripping “hunny” at the cuticle or tip.
- While the orange is wet, use the black nail art pen to write “Hunny” on the “hunny pot” or create small bees flying around.
- On other nails, use a dotting tool and black or red polish to create small heart accents.
- Allow all designs to dry thoroughly.
- Finish with a clear top coat to seal and protect the design.
Pro-Tip: For the hunny pot design, create small, uneven drips with a fine brush for a more realistic honey effect. Building the drips in thin layers will prevent bubbling and ensure a smooth finish, reflecting advanced nail art techniques.

Key Takeaways: Your Quick Guide to Valentines Nails Disney
To help you choose the best style and ensure success with your disney valentine nail art, we’ve summarized the most critical points. Use this checklist to plan your perfect holiday manicure.
- Disney Valentine nails combine iconic characters with romantic holiday themes for a truly unique look. This fusion creates disney love nails that are both personal and festive.
- A wide range of designs, from classic Mickey & Minnie to whimsical “Up” themes, ensures there’s a style for every Disney fan. Whether you prefer disney character valentine nails or abstract movie themes, the options are limitless.
- Achieving salon-quality Disney Valentine nail art at home is possible with the right tools, polishes, and step-by-step guidance. Following our DIY disney nail art steps with process_action_keywords like “prep” and “seal” ensures professional results.
- Utilizing high-quality nail art supplies, such as fine detail brushes and top coats, is essential for durability and a professional finish. Investing in reputable nail polish brands makes a significant difference in long-lasting disney valentine nails.
- For intricate designs, techniques like using nail art stamps, stencils, or liquid latex for cleanup can significantly simplify the process and improve results. Don’t hesitate to use professional nail artist tips and advanced nail art techniques to elevate your themed disney valentine nails.
- Subtle accents or a single Disney-themed nail can provide a festive touch while maintaining an elegant or professional appearance. Ideas like the Mickey French Tip offer subtle disney valentine nails for work without sacrificing the magic.
- Always finish your Disney Valentine nail art with a generous application of clear top coat to seal the design and enhance shine, protecting your festive manicure. This is the golden rule for protecting nail art.
People Also Ask About Valentines Nails Disney
Here are the most common questions regarding disney valentine nails, answered with expert insights to help you get the best results for 2026.
What are popular Disney Valentine nail designs for 2026?
Popular Disney Valentine nail designs for 2026 often feature classic Mickey and Minnie Mouse silhouettes, incorporating traditional red, pink, and white heart motifs. Trends also include subtle Disney princess accents like enchanted roses, playful “Up” balloon gradients, or unique villain-themed touches for an edgy romance. Glitter, ombre effects, and personalized “Ohana” messages are also highly sought after.
How do you do Disney Valentine nails at home?
Doing Disney Valentine nails at home involves selecting a design, gathering appropriate nail art supplies like polishes, fine brushes, and dotting tools, then following step-by-step application instructions. Many designs, especially those with silhouettes or simple hearts, are beginner-friendly. Using nail art decals or stencils can simplify intricate character details for DIY disney nail art.
Where can I buy Disney Valentine press-on nails?
Disney Valentine press-on nails can be purchased from various online retailers like Etsy for unique, handmade designs, Amazon for wider brand selections, or specialty beauty stores. Look for official disney licensed products to ensure authenticity and quality. Checking reviews for durability and fit is recommended before purchase.
What colors are best for Disney Valentine nails?
The best colors for Disney Valentine nails typically include classic Valentine’s shades like red, various pinks (from soft blush to vibrant fuchsia), and white. For Disney-specific themes, black is essential for silhouettes, while characters like Stitch or Tinkerbell might introduce blues, greens, or golds. Glitter and iridescent top coats enhance the festive feel.
Are there Disney princess Valentine nail ideas?
Yes, Disney princess Valentine nail ideas are popular, often drawing inspiration from iconic symbols like Cinderella’s slipper, Ariel’s shell, or Belle’s enchanted rose. Designs can range from delicate, subtle accents on a single nail to more elaborate, hand-painted scenes across several nails, using colors associated with each princess.
How do you apply Disney nail decals?
To apply Disney nail decals, first ensure your nails are clean and have a fully dry base coat. Cut out the desired decal, soak it briefly in water to loosen it from the backing, then slide it onto your nail. Position carefully, smooth out any wrinkles, and once dry, seal it with a clear top coat for protection and longevity.
Can I get Disney Valentine nails at a salon?
Yes, many nail salons, especially those specializing in nail art, can create Disney Valentine designs. It’s recommended to bring reference images of your desired custom disney themed valentine’s day manicure and consult with the technician beforehand to ensure they have the necessary skills and tools for intricate character details.
How long do Disney Valentine nails last?
The longevity of Disney Valentine nails depends on the application method and aftercare, typically lasting from a few days to several weeks. Regular polish with intricate art might last 3-7 days, while press on disney valentine nails can last 1-2 weeks. Gel or acrylic overlays with designs can last 2-4 weeks with proper maintenance and professional sealing.
What characters are good for Valentine’s Day nails besides Mickey and Minnie?
Beyond Mickey and Minnie, other Disney characters great for Valentine’s Day nails include couples like Lilo & Stitch (for ‘Ohana’ love), Carl & Ellie from “Up” (enduring love), or Beast & Belle (enchanted romance). Playful options like Toy Story Aliens or Winnie the Pooh can also be adapted with heart accents for a unique disney character valentine nails theme.
What are some simple Disney Valentine nail ideas for short nails?
Simple Disney Valentine nail ideas for short nails can include mini Mickey head silhouettes, tiny heart accents in Disney colors, or subtle character-inspired color blocking. French tips with a tiny character ear detail, simple glitter gradients, or small nail decals of favorite characters are also excellent choices that don’t require extensive nail length.
Final Thoughts on Valentines Nails Disney
In conclusion, crafting the perfect Disney Valentine nails is more than just a manicure; it’s an expression of love for both the holiday and the magic of Disney. Whether you opted for the timeless charm of Mickey and Minnie sweetheart silhouettes, the fairytale elegance of enchanted rose princess nails, or the playful whimsy of Toy Story Alien hearts, you now have 9 essential, actionable ideas to bring your vision to life. This guide aimed to equip you with the inspiration, proven techniques, and product knowledge to confidently create your own cute disney valentine nails, enhancing your festive celebrations.
Remember that long-lasting disney valentine nails require proper preparation and a good top coat, regardless of the complexity of your design. Don’t be afraid to experiment with easy diy disney valentine nails using decals or stencils to achieve intricate looks with less effort. Embrace your creativity and let your fingertips tell a enchanting Disney love story this Valentine’s Day.
Which of these disney valentine nail designs are you most excited to try this March? Share your favorite look or any unique disney valentine nails ideas you have in mind
Last update on 2026-03-11 / Affiliate links / Images from Amazon Product Advertising API


