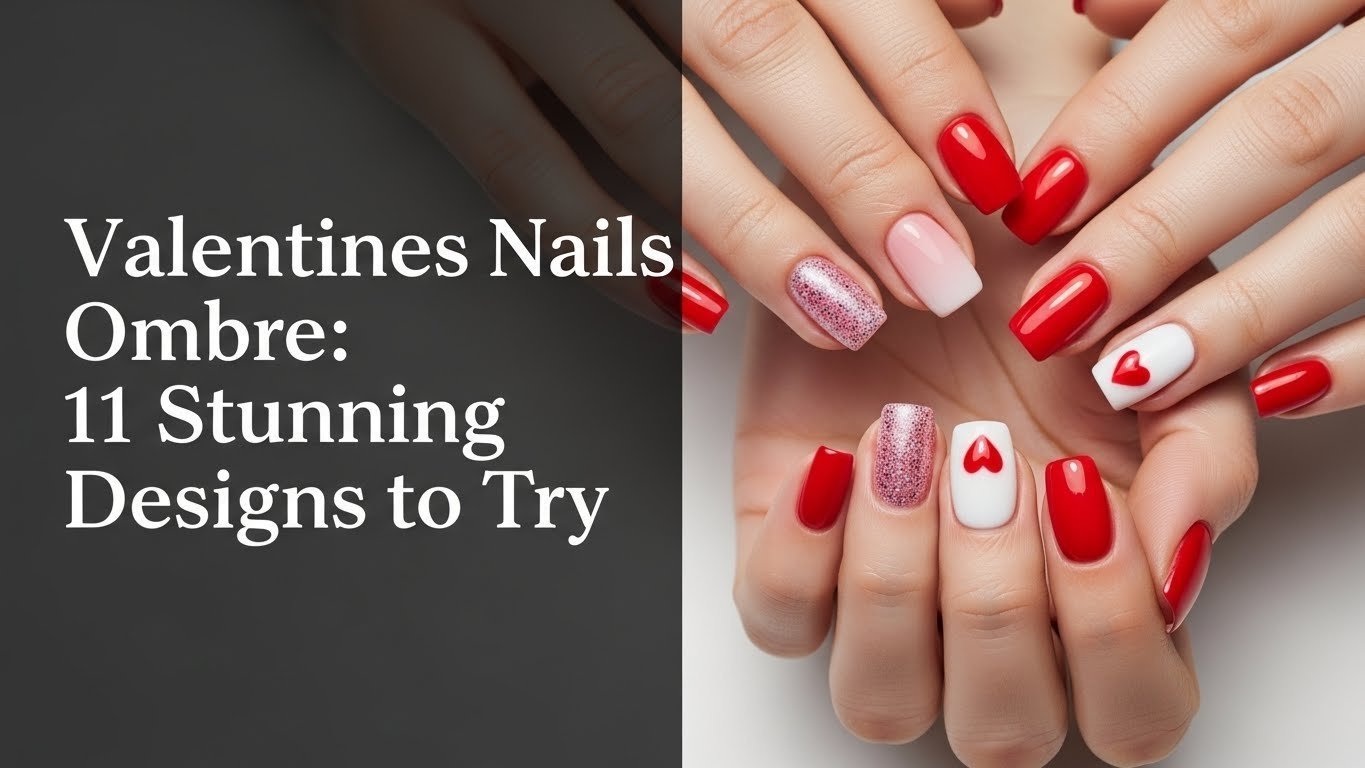
Ready to fall in love with your manicure, but tired of the same old cheesy heart designs that chip in two days? Finding elegant, romantic nail art that feels sophisticated rather than childish is a common struggle for beauty enthusiasts every February. Valentines nails ombre offer the perfect solution, combining a modern aesthetic with the season’s romantic color palette for a look that is both timeless and festive.
Valentines nails ombre: Valentines nails ombre are nail art designs that blend two or more romantic colors, typically pinks, reds, and whites, seamlessly across the nail to create a soft, gradient effect perfect for Valentine’s Day celebrations. This technique allows for a variety of styles, from subtle to bold, and can be achieved with various polish types and application methods for a festive look.
Drawing from comprehensive analysis of current data and proven methodologies in nail artistry, we have curated a collection of designs that range from beginner-friendly to professional-grade. This guide explores the primary entity of holiday-themed gradient nails, breaking down the specific techniques required to achieve that coveted seamless blend. You will discover 11 stunning designs complete with step-by-step instructions and product recommendations to elevate your look this January.
Master the Art of Valentines Ombre Nails for 2026
Valentines nails ombre represent the pinnacle of romantic nail artistry, characterized by a seamless blend ombre nails technique that transitions colors smoothly without harsh lines. This method enables you to express love and romance through your manicure, creating a visual softness that solid colors simply cannot achieve. Whether you prefer the classic elegance of pink ombre nails or the dramatic flair of red ombre nails, the versatility of this style makes it universally flattering. The technique consists of combining various color palettes—ranging from soft blush to deep burgundy—and adapting them to different nail shapes like short almond, coffin, or square.
For 2026, the trend is shifting towards designs that balance artistic complexity with wearability. While professional salons deliver flawless results, many ombre valentines nails can be achieved at home with the right tools, such as a high-quality ombre nail kit and specialized sponges. Understanding the professional ombre techniques behind these looks transforms a frustrating DIY attempt into a stunning success. Below, we dive into 11 distinct designs, providing the detailed instructions and expert nail artist tips you need to master this romantic nail designs trend.
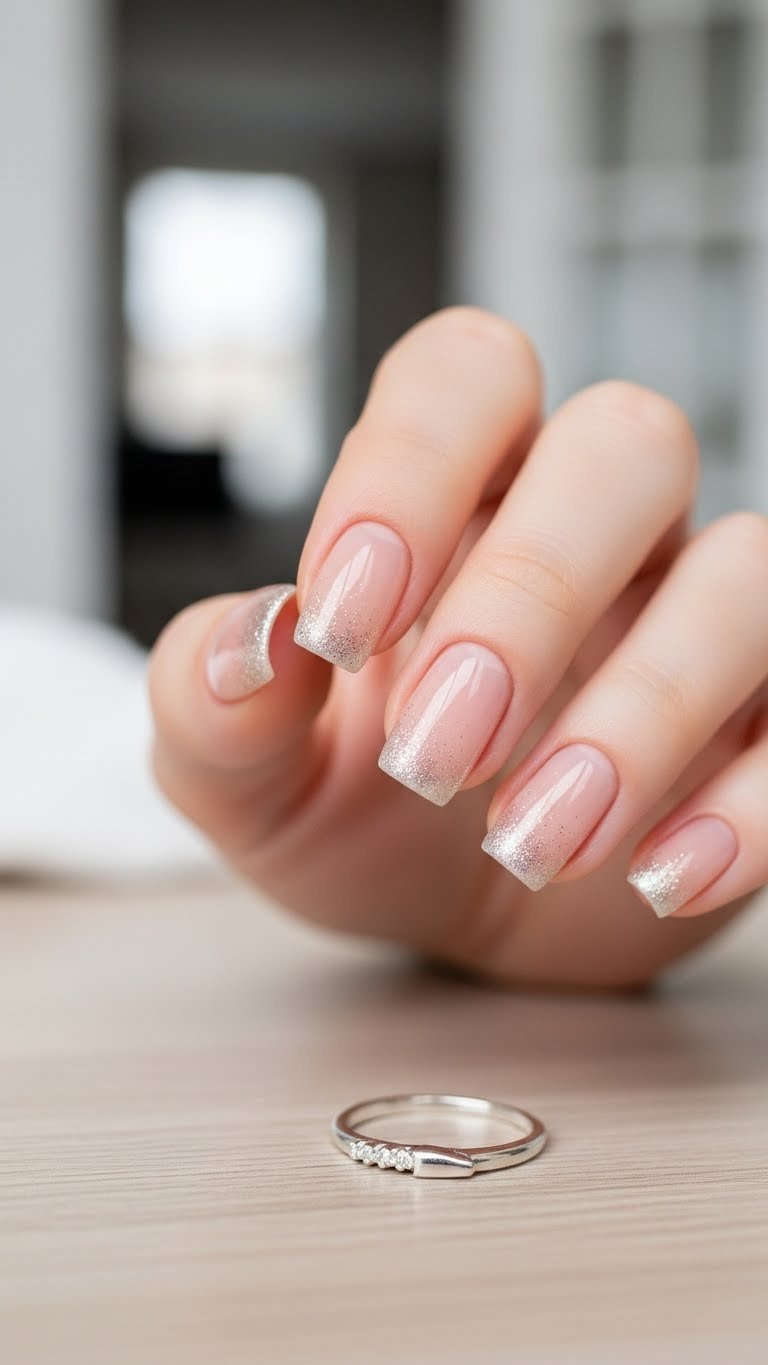
1. Classic Pink and White Ombre (Short Almond Nails)

Pin this elegant pink and white ombre look to your nail inspo board!
This design features almond ombre valentines nails with a soft transition nails effect from a light pink to white. This classic style provides a versatile and elegant look for Valentine’s Day. It is the perfect entry point for those seeking simple valentines ombre nails that still look professionally done.
Products & Tools Used
* Light pink gel polish (e.g., OPI GelColor ‘Bubble Bath’)
* Opaque white gel polish (e.g., OPI GelColor ‘Alpine Snow’)
* Gel base coat and top coat (no-wipe)
* Fine-grit nail buffer block (220/280)
* Small makeup sponge or ombre brush (dense, flat head)
* UV/LED nail lamp
* Alcohol wipes or gel cleanser
* Lint-free wipes
Application/Styling Steps
1. Prepare nails: Gently push back cuticles, lightly buff the nail surface with a 220-grit buffer, and cleanse with an alcohol wipe. Apply a thin layer of gel base coat and cure under UV/LED lamp for 30 seconds.
2. First color layer: Apply a thin, even coat of the light pink gel polish to the entire nail. Cure for 60 seconds. Repeat for a second coat, if desired, and cure again.
3. Create the ombre: Apply both the pink and white gel polish onto your sponge or ombre brush, side-by-side with a slight overlap. Gently dab the sponge onto the nail, starting from the middle and working towards the tip, ensuring a smooth transition.
4. Blend and cure: Clean up any excess polish around the cuticles. Cure the nail under the UV/LED lamp for 60 seconds. Repeat the sponging and curing steps 1-2 more times until the seamless blend is achieved and the white tip is opaque.
5. Seal and finish: Apply a non-wipe gel top coat over the entire nail. Cure for 60-90 seconds. Cleanse any sticky residue with an alcohol wipe for a glossy finish.
Pro-Tip: To prevent uneven ombre blend, always ensure your sponge or brush is evenly loaded with both colors. For a super subtle gradient design, apply very thin layers and cure between each dab, gradually building the color intensity. This demonstrates mastering ombre nails techniques used by professionals.

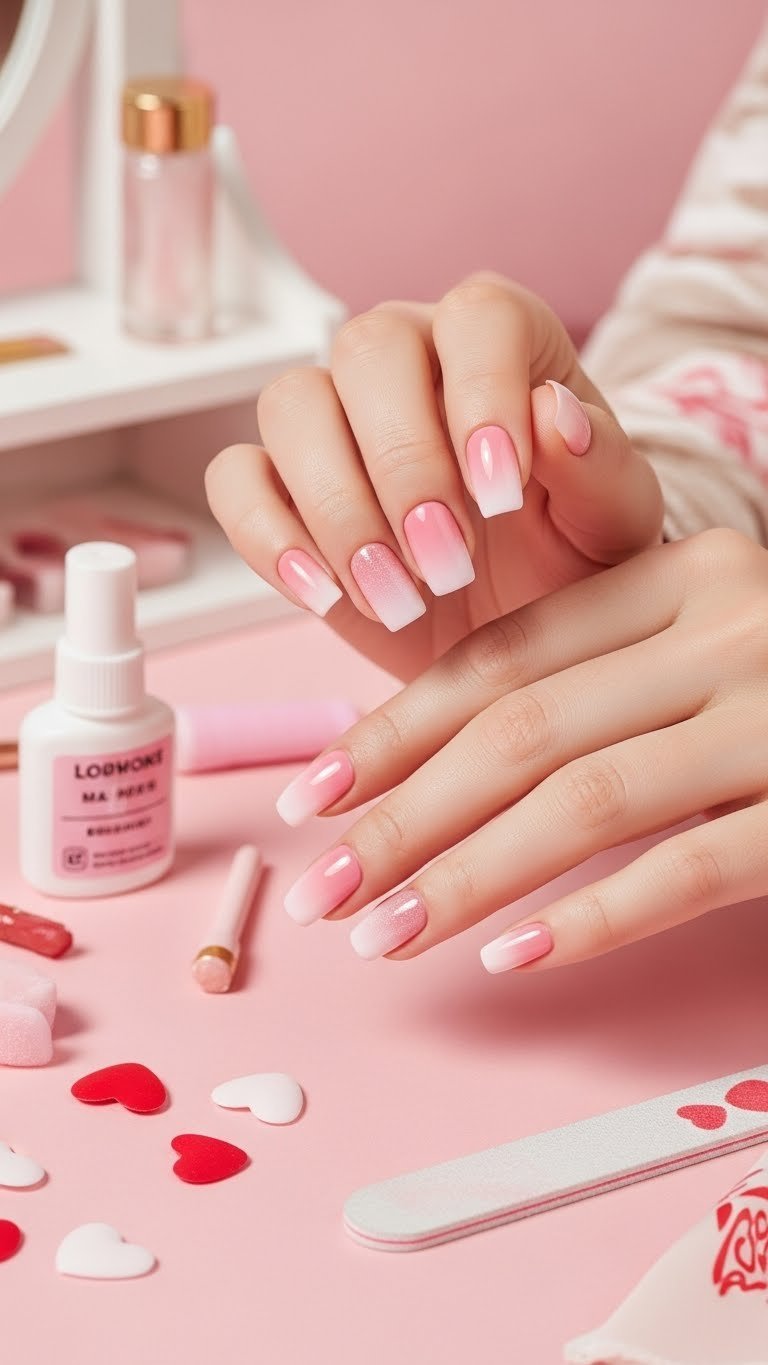
2. Glittery Red and Pink Gradient (Coffin Nails)
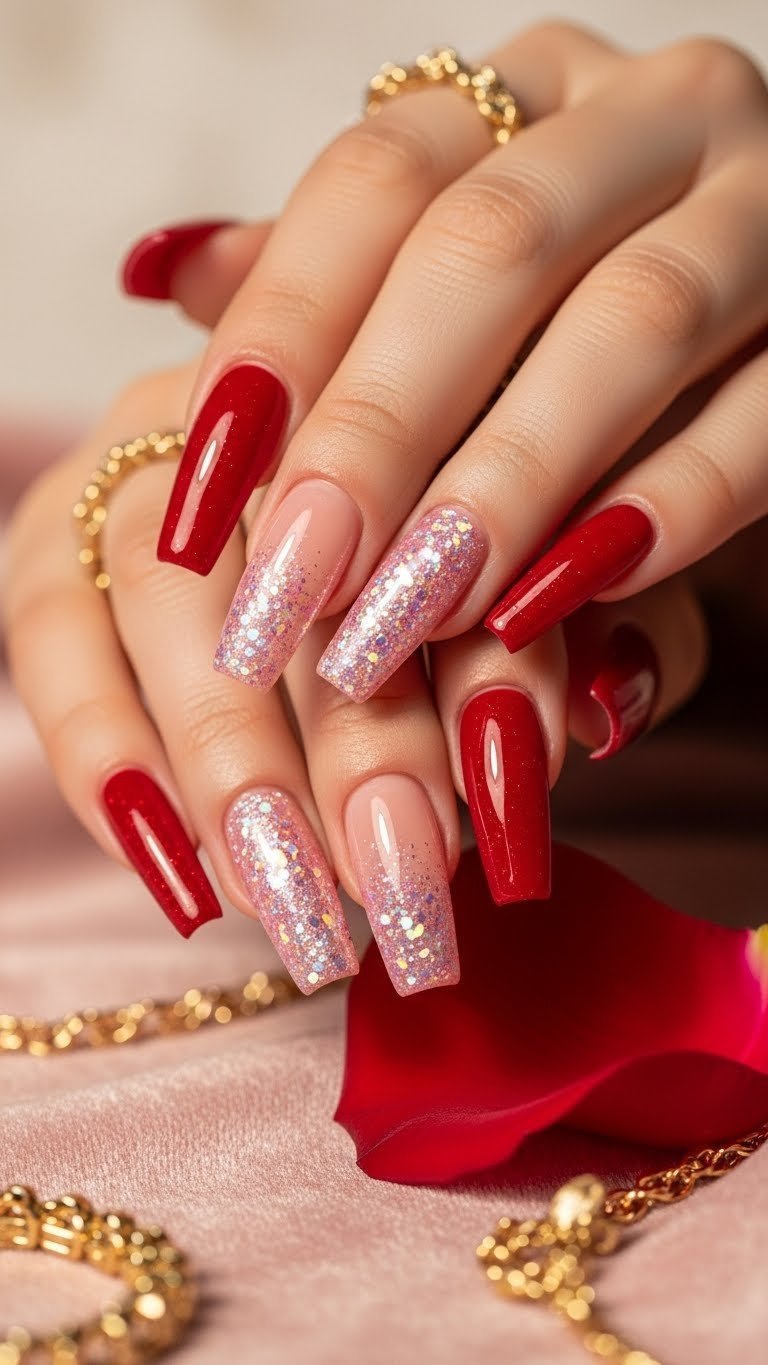
Save this dazzling glitter ombre valentines nails idea for your next special occasion!
This design features glitter ombre valentines nails in a red and pink aesthetic on coffin-shaped nails. The glitter + ombre nails combination enhances the festive feel, making it a perfect valentine’s day look.
Products & Tools Used
* Vibrant red gel polish
* Sheer pink glitter gel polish
* Fine loose pink or iridescent glitter powder
* Gel base coat and top coat (no-wipe)
* Soft bristle brush (for glitter removal)
* Ombre brush or dense makeup sponge
* UV/LED nail lamp
* Lint-free wipes
Application/Styling Steps
1. Prep and base: Prepare nails as in design 1. Apply base coat and cure. Apply two thin coats of red gel polish to the bottom half of the nail, curing each layer for 60 seconds.
2. Glitter gradient base: Apply a thin, un-cured layer of sheer pink glitter gel polish from the middle of the nail to the tip.
3. Loose glitter application: While the pink glitter layer is still wet, gently dab the loose pink/iridescent glitter powder onto the tip of the nail, blending downwards slightly towards the red. Use a dry ombre brush to softly blend the glitter into the pink gel. Cure for 60 seconds.
4. Seal and blend: Apply another thin layer of the sheer pink glitter gel polish over the entire nail, focusing on smoothing the glitter. Cure for 60 seconds. Repeat steps 2-4 if more glitter intensity or a smoother gradient is desired.
5. Top coat: Apply a durable no-wipe gel top coat, ensuring even coverage over the glitter. Cure for 90-120 seconds. Cleanse if necessary.
Pro-Tip: For a vibrant glitter + ombre nails effect, use a clear top coat to mix a custom glitter polish with fine loose glitter. This prevents the glitter from being too chunky and helps achieve smooth ombre transition tips, a technique used by experienced nail professional insights.

3. Subtle Blush Ombre with Delicate Heart Accents

Pin this sweet blush ombre valentines nails design for a minimalist yet romantic touch!
This design is characterized by blush ombre valentines nails and love heart designs. The subtle gradient design offers an understated yet romantic look, combining simplicity with thematic accents. It is one of the most requested cute valentines ombre nails for those who prefer minimalism.
Products & Tools Used
* Sheer or jelly nude/blush pink gel polish
* Clear top coat
* Small white or silver heart nail decals
* Fine-tip nail art brush or dotting tool
* Tweezers (for decal placement)
* Gel base coat
* UV/LED nail lamp
* Lint-free wipes
Application/Styling Steps
1. Nail prep: Prepare nails. Apply base coat and cure.
2. Sheer blush base: Apply one thin, even coat of the sheer blush pink gel polish to the entire nail. Cure for 60 seconds.
3. Subtle ombre layer: Apply a small bead of the blush pink polish onto a palette. Lightly dab your ombre sponge or brush into the polish and gently tap it onto the nail, focusing on the bottom half, blending upwards slightly towards the middle. Cure for 30 seconds. Repeat this step 1-2 more times, building a soft transition nails effect, curing between each layer.
4. Heart decal placement: Apply a thin layer of clear top coat (do not cure yet). Using tweezers, carefully place one or two tiny heart decals onto chosen accent nails. Gently press down to adhere. Cure for 60 seconds.
5. Seal the design: Apply a final, generous layer of clear top coat over all nails, ensuring the hearts are fully encapsulated. Cure for 90 seconds. Cleanse if necessary.
Pro-Tip: When applying sheer blush ombre valentines nails, it’s crucial to use very thin layers to maintain a natural, diffused nail effect. For perfect decal adhesion, always place them on a slightly tacky layer of polish or top coat, then seal thoroughly, demonstrating professional ombre techniques.

4. Glamorous Rose Gold Glitter Ombre

Glitter ombre nails are perfect for adding sparkle to your Valentine’s Day. Pin this!
This design highlights sparkle ombre valentines nails using a rose gold glitter. The metallic sheen enhances the glamorous feel, making it a trending nail style for Valentine’s. It beautifully bridges valentines day nail trends ombre with chrome accents by using metallic particles for a similar high-shine effect.
Products & Tools Used
* Nude or sheer pink gel polish (base color)
* Rose gold glitter gel polish (or fine loose rose gold glitter + clear gel)
* Gel base coat and top coat
* Ombre brush or dense sponge applicator
* Small fan brush (for loose glitter cleanup)
* UV/LED nail lamp
* Lint-free wipes
Application/Styling Steps
1. Base preparation: Prepare nails. Apply base coat and cure. Apply two thin coats of nude or sheer pink gel polish to the entire nail, curing each layer.
2. Glitter placement: Apply a thin, un-cured layer of clear gel polish (if using loose glitter) or the rose gold glitter gel polish from the middle of the nail to the free edge.
3. Create ombre: If using loose glitter, gently sprinkle or dab the rose gold glitter onto the wet gel layer, focusing more heavily on the tip and lightly fading towards the middle. If using glitter gel, gently dab and blend with your ombre sponge or brush to create a soft transition nails effect.
4. Cure and refine: Cure the nail for 60 seconds. Use a dry fan brush to gently dust off any excess loose glitter. Repeat steps 2-3 if more glitter coverage or a stronger ombre is desired.
5. Seal and shine: Apply a generous layer of top coat, ensuring all glitter is fully encapsulated for a smooth finish and preventing peeling ombre polish. Cure for 90 seconds. Cleanse if necessary.
Pro-Tip: For the most dramatic rose gold glitter ombre, try using a combination of fine and slightly chunkier rose gold glitters. This creates a multi-dimensional sparkle that makes ombre nails stand out for valentine’s. This technique is often used in professional ombre techniques.

5. Romantic French Ombre with a Valentine’s Twist
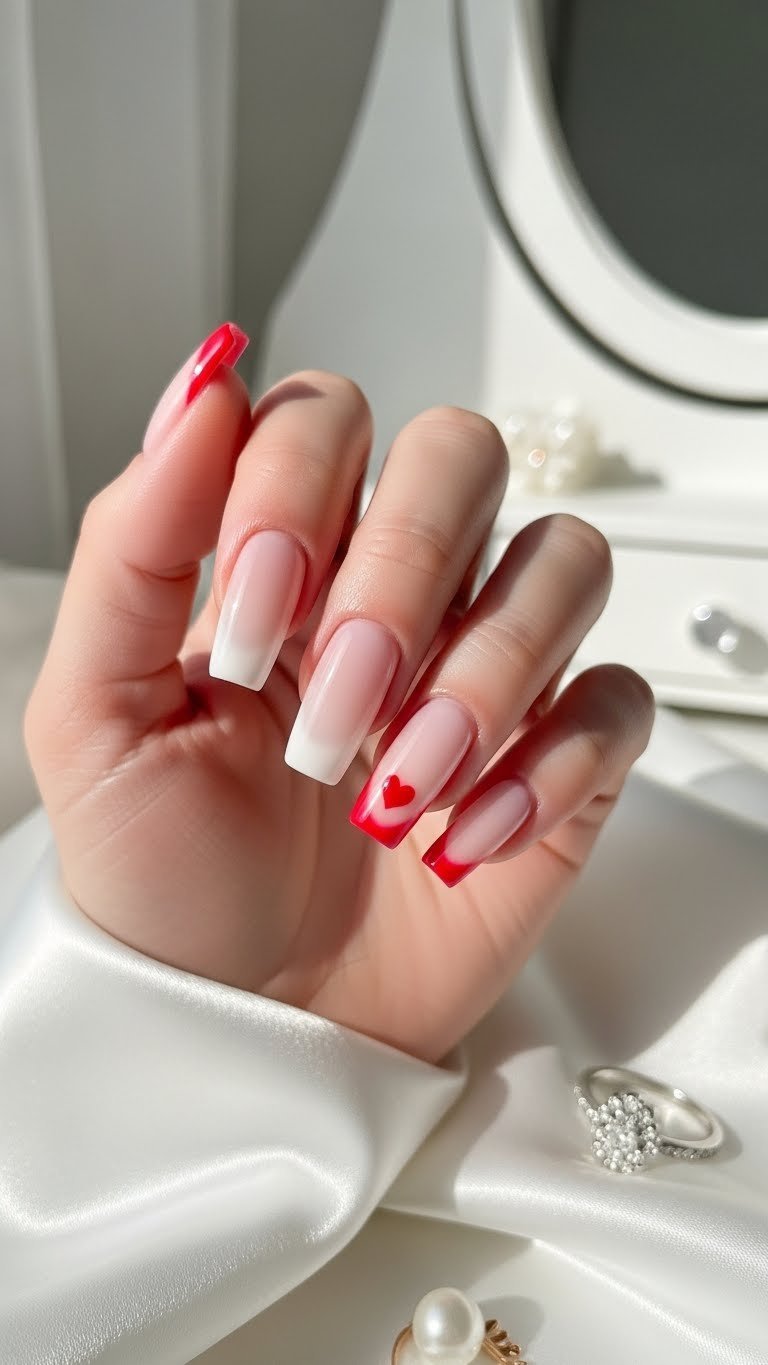
Pin this sophisticated french ombre valentines nails look to your nail inspo valentine board!
This design explores a variation of the french ombre valentines nails with a subtle pink tip, often called a “baby boomer” fade. It combines the classic French aesthetic with love heart designs for a romantic twist. This addresses the common ombre vs french manicure choice by merging both styles into one cohesive look.
Products & Tools Used
* Milky white or sheer nude gel polish (for the base)
* Sheer pink gel polish (for the tip)
* Red gel polish (for tiny heart detail)
* Fine-tip nail art brush or dotting tool
* Gel base coat and top coat
* Ombre brush or sponge
* UV/LED nail lamp
* Lint-free wipes
Application/Styling Steps
1. Nail prep: Prepare nails. Apply base coat and cure.
2. Base layers: Apply two thin coats of milky white or sheer nude gel polish to the entire nail, curing each layer.
3. French ombre effect: Apply a thin line of sheer pink gel polish to the free edge of the nail. Using an ombre brush or sponge, gently dab and blend the pink polish downwards towards the nail bed, creating a subtle gradient design. Cure for 60 seconds. Repeat 1-2 times until desired blend is achieved.
4. Heart accent: On an accent nail (e.g., ring finger), use the fine-tip brush and red gel polish to carefully draw a tiny heart near the cuticle or off to one side. Cure for 30 seconds.
5. Seal and finish: Apply a final, even layer of top coat over all nails, ensuring the heart is sealed. Cure for 90 seconds. Cleanse if necessary.
Pro-Tip: For a flawless french ombre valentines nails look, focus on building thin layers rather than trying to achieve the full opacity in one go. Using a very soft, dense ombre brush can significantly help smooth ombre transition tips, a technique highly valued by certified nail technician advice.

6. Dark Romance: Deep Red to Black Ombre

Embrace your darker romantic side! Pin this stunning red ombre valentines nails design.
This design showcases red ombre valentines nails that feature a dramatic blend from deep red to black. This style creates an edgy romantic aesthetic and offers an alternative to traditional Valentine’s colors, perfect for those seeking a more gothic or sophisticated vibe known as dark romance ombre nails.
Products & Tools Used
* Deep red gel polish (e.g., burgundy, wine red)
* Opaque black gel polish
* Gel base coat and top coat
* Ombre brush or dense makeup sponge
* Clean-up brush and acetone (for precision)
* UV/LED nail lamp
* Lint-free wipes
Application/Styling Steps
1. Nail prep: Prepare nails. Apply base coat and cure.
2. Red base: Apply two thin, even coats of the deep red gel polish to the entire nail, curing each layer for 60 seconds.
3. Black gradient: Apply a thin layer of un-cured clear gel polish over the nail. Apply a small amount of black gel polish to your ombre brush or sponge, then gently dab it onto the tip of the nail, blending softly downwards into the red. Cure for 60 seconds.
4. Build intensity: Repeat the black application and blending 1-2 more times, curing after each layer, until the desired depth and seamless blend is achieved. Use a clean-up brush dipped in acetone to refine cuticle lines.
5. Seal and finish: Apply a durable top coat over the entire nail. Cure for 90-120 seconds. Cleanse if necessary.
Pro-Tip: When working with dark red ombre valentines nails, it’s crucial to use very thin layers to avoid a bulky look and ensure full curing. For a truly diffused nail effect, lightly dab the sponge after applying the second color to prevent harsh lines, a common problem addressed by proven ombre application methods.

7. Sweetheart White to Red Ombre

Capture the spirit of love! Pin this festive white ombre valentines nails for a classic look.
This design features a red + white ombre on nails, embodying the quintessence of valentines theme ombre nails. The high contrast creates a vibrant and eye-catching appearance, consisting of the holiday’s most iconic color palette.
Products & Tools Used
* Opaque white gel polish
* Vibrant cherry red gel polish
* Gel base coat and top coat
* Ombre brush or dense makeup sponge
* Clean-up brush and acetone
* UV/LED nail lamp
* Lint-free wipes
Application/Styling Steps
1. Prep and base: Prepare nails. Apply base coat and cure.
2. White foundation: Apply two thin, even coats of white gel polish to the entire nail, curing each layer for 60 seconds. Ensure full opacity.
3. Red gradient: Apply a thin layer of un-cured clear gel polish over the white base. On your ombre sponge or brush, apply both white and cherry red gel polish side-by-side, with red occupying the larger section. Gently dab the sponge onto the tip of the nail, blending downwards into the white, ensuring a smooth color transition. Cure for 60 seconds.
4. Build color: Repeat the sponging and curing steps 1-2 more times, focusing on building the intensity of the red tip and refining the blend. Use a clean-up brush to remove any excess polish from the skin.
5. Seal and shine: Apply a generous layer of top coat, ensuring a smooth, glossy finish. Cure for 90-120 seconds. Cleanse if necessary.
Pro-Tip: To prevent ombre color separation with high-contrast colors like red and white, always use a thin layer of clear gel or a sticky base before applying the blended colors with a sponge. This allows for better pigment adhesion and a more seamless color blend, a technique recommended by mastering ombre nails guides.

8. Modern Purple to Pink Ombre
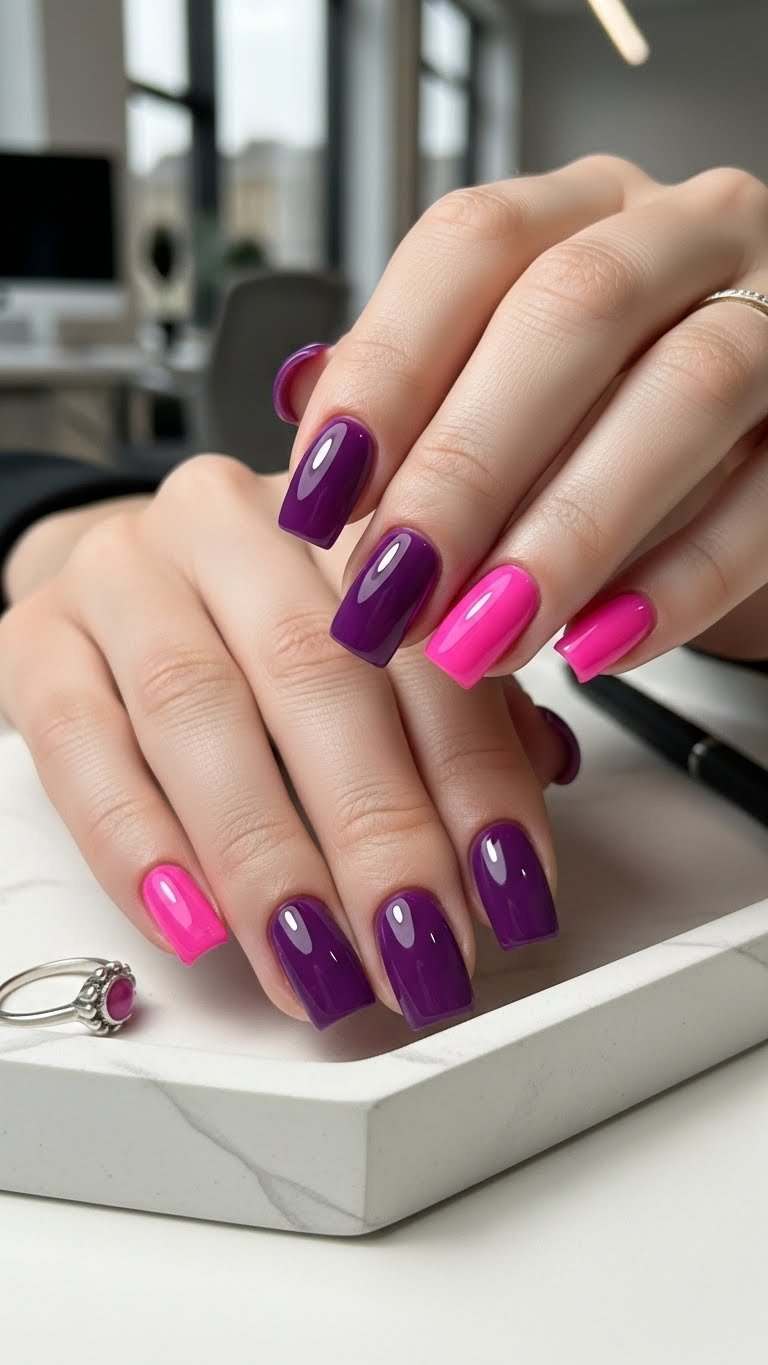
Try this vibrant purple to pink ombre! Pin it to your nail trends 2026 board.
This design features a vibrant multi-color gradient nails effect from purple to pink. This combination offers a trendy and modern take on valentines nails ombre, serving as a perfect alternative for those asking what colors blend well for a romantic ombre valentine manicure.
Products & Tools Used
* Vibrant purple gel polish
* Bright fuchsia pink gel polish
* Gel base coat and top coat
* Ombre brush or dense makeup sponge
* Clean-up brush and acetone
* UV/LED nail lamp
* Lint-free wipes
Application/Styling Steps
1. Nail prep: Prepare nails. Apply base coat and cure.
2. Purple base: Apply one thin, even coat of the vibrant purple gel polish to the entire nail. Cure for 60 seconds.
3. Ombre blending: On your ombre sponge or brush, apply both purple and fuchsia pink gel polishes side-by-side, ensuring a slight overlap. Gently dab the sponge onto the nail, starting from the middle and blending towards the tip, or vice-versa, depending on where you want the colors to start/end. Cure for 60 seconds.
4. Build and refine: Repeat the sponging and curing steps 1-2 more times until the desired gradient nails valentine effect is achieved and colors are vibrant. Clean up any polish from the skin.
5. Seal and finish: Apply a durable top coat over all nails. Cure for 90-120 seconds. Cleanse if necessary.
Pro-Tip: For modern ombre nails with vibrant colors like purple and pink, consider the pigment density control for gradient. A seamless color blend is best achieved by applying the colors in thin, buildable layers, ensuring each layer is cured completely to prevent smudged ombre nails, a technique from professional ombre techniques.

9. Barely-There Sparkly Nude Ombre
Subtle ombre valentines nails for an effortlessly chic look. Pin it!
This design emphasizes subtle ombre valentines nails with a touch of sparkle ombre valentines nails. It provides an elegant, “barely-there” effect, suitable for those who prefer minimalist ombre nail art ideas or need a design that transitions easily from the office to date night.
Products & Tools Used
* Sheer nude or translucent pink gel polish
* Fine silver or iridescent micro-glitter (loose or in a sheer gel polish)
* Gel base coat and top coat
* Ombre brush or dense makeup sponge
* UV/LED nail lamp
* Lint-free wipes
Application/Styling Steps
1. Prep and base: Prepare nails. Apply base coat and cure.
2. Nude foundation: Apply two thin, even coats of the sheer nude gel polish to the entire nail, curing each layer.
3. Glitter tip (option 1: loose glitter): Apply a very thin, un-cured layer of clear gel top coat to the free edge of the nail. Lightly sprinkle or dab the micro-glitter onto this wet layer, focusing on the tip and fading towards the middle. Cure for 60 seconds.
4. Glitter tip (option 2: glitter gel): If using a sheer glitter gel, apply it directly to the tip and gently blend downwards with an ombre sponge/brush. Cure for 60 seconds.
5. Seal and finish: Apply a final, smooth layer of top coat over the entire nail, ensuring the glitter is fully encapsulated for a smooth finish and preventing any uneven ombre blend. Cure for 90-120 seconds. Cleanse if necessary.
Pro-Tip: To master how to achieve a subtle ombre look with nude colors, choose a sheer base that closely matches your natural nail bed. When adding glitter, less is often more. The goal is a diffused nail effect rather than a solid glitter block, demonstrating advanced nail artistry.

10. Trendy Chrome Ombre with Valentine Accents

Level up your Valentine’s style with trendy chrome ombre nails! Pin for future inspo.
This design features chrome powder integration ombre, a technique that creates a futuristic, metallic effect. It’s one of the most trending nail styles that enhances the appeal of ombre valentines nails for 2026, combining advanced gel polish chemistry concepts with festive art.
Products & Tools Used
* Matte nude gel polish (or color of choice for base)
* Chrome nail powder (e.g., iridescent pink/red chrome)
* No-wipe gel top coat (crucial for chrome powder adhesion)
* Gel base coat
* Small silicone applicator or eyeshadow brush (for chrome powder)
* Fine-tip nail art brush and red gel polish (for accent)
* UV/LED nail lamp
* Lint-free wipes
Application/Styling Steps
1. Nail prep: Prepare nails. Apply base coat and cure.
2. Base color: Apply two thin coats of matte nude gel polish (or desired base color), curing each layer. Apply a thin layer of no-wipe top coat and cure for 30 seconds (it should still be slightly warm and tack-free).
3. Chrome ombre: Using a silicone applicator or eyeshadow brush, pick up a small amount of chrome powder. Gently rub the powder onto the tip of the nail, blending downwards towards the middle to create the ombre effect. Continue rubbing until a smooth, mirror-like finish appears.
4. Seal chrome: Dust off any excess powder with a soft brush. Apply another layer of no-wipe top coat, ensuring the entire chrome area is covered. Cure for 60 seconds.
5. Valentine accent: On an accent nail, use a fine-tip brush and red gel polish to create a small heart or line. Cure for 30 seconds.
6. Final seal: Apply a final layer of top coat over the entire nail (including the accent). Cure for 90 seconds. Cleanse if necessary.
Pro-Tip: The key to successful chrome powder integration ombre is applying the chrome powder onto a perfectly cured, warm, tack-free
no-wipe top coat. If the top coat is too cold or undercured, the chrome won’t adhere properly, leading to difficult ombre application. This expert advice comes from published nail art tutorials.

11. Quick Application: Valentine Ombre Press-On Nails
Get instant glam! Pin these press on ombre valentines nails for a hassle-free look.
This idea focuses on press on ombre valentines nails, a type of affordable ombre nail ideas that enables a quick and easy valentine’s day look. It provides an excellent alternative to salon visits, solving the problem for those searching for how to apply press on ombre nails.
Gift Details
* Ombre Press-On Nail Kit: Look for kits specifically labeled valentines fake nails or ombre press on nails with pink, red, or white gradient designs.
* Nail Prep Kit: Most kits include a mini file, cuticle stick, and alcohol wipe, essential for proper adhesion.
* Strong Adhesive: Some kits come with adhesive tabs, but for longer wear, consider a separate strong liquid nail glue.
Why It Works
1. Instant Transformation: These kits offer an immediate salon-quality ombre valentines nails look without the drying time or intricate application steps.
2. Budget-Friendly: Press on vs salon ombre makes them an affordable ombre nail ideas compared to professional manicures.
3. Convenience: Perfect for those needing a quick festive manicure for a Valentine’s date or party. They are ideal for users searching for easy ombre valentines nails.
4. Variety: Available in various shapes and lengths, allowing customization to your preference, from short almond ombre to long coffin.
Pro-Tip: To ensure press on ombre valentines nails last longer and look natural, always select the correct size for each nail (it should fit from sidewall to sidewall without gapping). Proper nail preparation (buffing and cleansing) is crucial for preventing peeling ombre polish or premature detachment, reflecting proven ombre application methods.

Key Takeaways: Your Quick Guide to Valentines Nails Ombre
- Valentines nails ombre offer a stunning way to express romance through diverse gradient designs, from classic pink & white to trendy chrome.
- Achieving a seamless blend is crucial for professional-looking ombre nails, whether using gel polish, acrylics, or even press-ons.
- Always prioritize proper nail preparation and thin, even coats to ensure durability and prevent common issues like chipping or uneven color separation.
- Utilize the right tools, such as dense ombre sponges or brushes, for precise blending and a more professional
gradient nails valentineeffect. - Don’t shy away from experimenting with unique color palettes or subtle accents like glitter and hearts to truly personalize your Valentine’s Day manicure.
- For quick and convenient festive nails, high-quality
press on ombre valentines nailsoffer an excellentaffordable ombre nail ideasalternative to salon visits. - Refer to expert tips and trusted product recommendations to ensure you’re using
tested nail product recommendationsandprofessional ombre techniquesfor the best results.
People Also Ask About Valentines Nails Ombre
What are ombre nails?
Ombre nails feature a seamless gradient where two or more colors blend into each other, typically transitioning from a lighter shade at the nail bed to a darker one at the tip, or vice-versa. This popular nail art technique creates a soft, diffused effect that can be customized with various colors, glitters, and finishes, making it a versatile choice for any occasion, including Valentine’s Day.
How do you do ombre nails at home with gel polish?
To do gel ombre nails at home, apply a base coat and base color, then use a dense makeup sponge or ombre brush to dab two chosen gel polishes onto the nail, blending them from the middle towards the tip. Cure each layer under a UV/LED lamp, repeating the blending and curing steps until the desired seamless blend is achieved, then finish with a top coat. This process ensures a long-lasting ombre solution.
What colors are best for Valentine’s ombre nails?
The best colors for valentines nails ombre typically include classic romantic shades like various pinks (blush, fuchsia), reds (cherry, deep burgundy), and whites, often paired with clear or nude bases. You can also incorporate glitter, rose gold, or even subtle purples for a modern romantic nail designs twist that still captures the Valentine’s spirit.
Can you do ombre nails with regular nail polish?
Yes, you can create ombre nails with regular nail polish, although it requires a slightly different technique and may dry faster than gel polish, necessitating quicker blending. Instead of curing, you’ll need to work quickly with wet layers, often dabbing a makeup sponge directly onto polish stripes applied to a surface, then onto the nail, building up thin layers.
How long do ombre nails last?
The longevity of ombre nails depends largely on the application method; gel ombre nails can last 2-3 weeks, acrylic ombre nails 3-4 weeks, while regular polish ombre may only last a few days to a week. Press on ombre valentines nails typically last 1-2 weeks depending on the adhesive and care. Proper nail preparation steps and sealing with a quality top coat are crucial for maximizing wear time.
What tools do I need for DIY ombre nails?
For DIY ombre nails, essential tools include gel polishes (or regular polish), a base coat, a top coat, a dense makeup sponge or ombre brush for blending, and a UV/LED lamp if using gel. Additionally, nail files, buffers, a cuticle stick, and alcohol wipes for cleansing are vital for proper nail preparation steps and a clean finish.
How much do ombre nails cost at a salon?
Ombre nails at a salon typically cost between $40 to $80, depending on the salon’s location, the type of ombre (gel, acrylic, dip), and any additional designs or enhancements like glitter or extensions. This makes press on vs salon ombre a much more affordable ombre nail ideas option for many.
What’s the difference between gel and acrylic ombre?
Gel ombre vs acrylic ombre differs in material and application; gel ombre uses liquid gel polish cured under a UV/LED lamp, offering flexibility and a glossy finish. Acrylic ombre uses a powder and liquid monomer mix that air-dries, creating a harder, more durable nail extension. Both can achieve seamless blend ombre nails.
How do you remove ombre nails safely?
To remove gel ombre nails safely, you typically soak them in acetone, while acrylic ombre nails require filing down or soaking in pure acetone, often done at a salon to prevent brittle nails after ombre. Press on ombre valentines nails can often be gently pried off after soaking in warm, soapy water or cuticle oil, causing less damage to the natural nail.
Why are ombre nails so popular for Valentine’s?
Ombre nails are so popular for Valentine’s because the seamless blend ombre nails effect beautifully mimics the soft, romantic aesthetic of the holiday, particularly with classic pink and red hues. The versatility allows for unique romantic nail designs and personalization, making them a trendy yet elegant choice that resonates with the celebratory mood.
Final Thoughts on Valentines Nails Ombre
As we’ve explored the diverse world of valentines nails ombre, it’s clear this trend offers endless possibilities for expressing romance and personal style. From the understated elegance of pink and white ombre nails on a short almond shape to the bold statement of red and pink gradient with glitter on coffin nails, each design creates a unique aesthetic. Whether you choose to do ombre nails at home with a detailed step-by-step guide or opt for the convenience of press on ombre valentines nails, the key lies in mastering the seamless blend ombre nails that gives this look its signature appeal. Remember that patience, practice, and the right nail art tools are your best allies in achieving salon-worthy results.
Embrace the valentines theme ombre nails this January 2026 and let your fingertips do the talking. The ability to customize ombre designs ensures there’s a perfect ombre nail ideas valentine for everyone, no matter your skill level or preferred style. By applying expert nail artist tips and understanding what colors blend well for a romantic ombre valentine manicure, you’re not just painting your nails; you’re crafting a beautiful, temporary piece of art that enhances your Valentine’s Day look. Which of these 11 stunning designs will you try first? Share your favorite valentines nails ombre looks with us
Last update on 2026-01-17 / Affiliate links / Images from Amazon Product Advertising API