Ever found yourself staring at intricate nail art tutorials, wishing for a festive look that doesn’t require a degree in fine arts? You are not alone; many of us crave that romantic aesthetic but dread the complexity and time commitment usually involved in valentines nails simple designs.
Achieving simple Valentine’s nails involves choosing designs with minimal steps, utilizing basic tools, and focusing on classic romantic colors like red, pink, and white, making them ideal for DIY enthusiasts and beginners. These designs often incorporate easy elements like dots, lines, or small stickers to create a polished, festive look without the frustration of advanced techniques.
Drawing from comprehensive analysis of current trends and proven methodologies in home manicures, we have curated a collection that balances ease of application with professional-grade aesthetics. Whether you are a complete beginner or looking for a quick salon reference, this guide will walk you through 11 essential designs that prove simplicity is the ultimate sophistication.
Master 11 Simple Valentine’s Nail Designs for a Romantic 2026 Look
What makes a design truly simple? It comes down to technique, tools, and time. When we talk about easy valentines day nails, we are focusing on styles that maximize impact while minimizing the margin for error. This section isn’t just about painting your nails; it is about understanding how simple valentine’s nail designs can elevate your look regardless of your nail shape—whether you prefer short valentine nails, elegant almond, or classic square tips.
Navigating the world of nail art can be overwhelming, especially with the pressure of holiday perfection. However, the trend for 2026 is shifting towards minimalist valentine nails that emphasize clean lines and healthy nail beds over clutter. By mastering a few core techniques—like proper dotting or creating a clean French tip—you can achieve a simple valentine’s manicure that looks like it took hours but only required minutes. We will strip away the complexity, offering you actionable advice to transform your nails into a romantic accessory.
11 Essential Easy Designs for Simple Valentine Nails in 2026
Ready to dive into the tutorials? Below, you will find a curated list of simple valentine’s nail designs that cover everything from playful patterns to sophisticated classics. We have broken down each look into a “recipe” style format, detailing the exact products you need and the step-by-step application process to ensure success.
Whether you are looking for quick valentine nails for a last-minute date or simple heart nails to celebrate the season, these tutorials are designed to be foolproof. Each entry includes specific product recommendations and expert tips to help you achieve salon quality results at home. Let’s explore how to create these stunning looks.
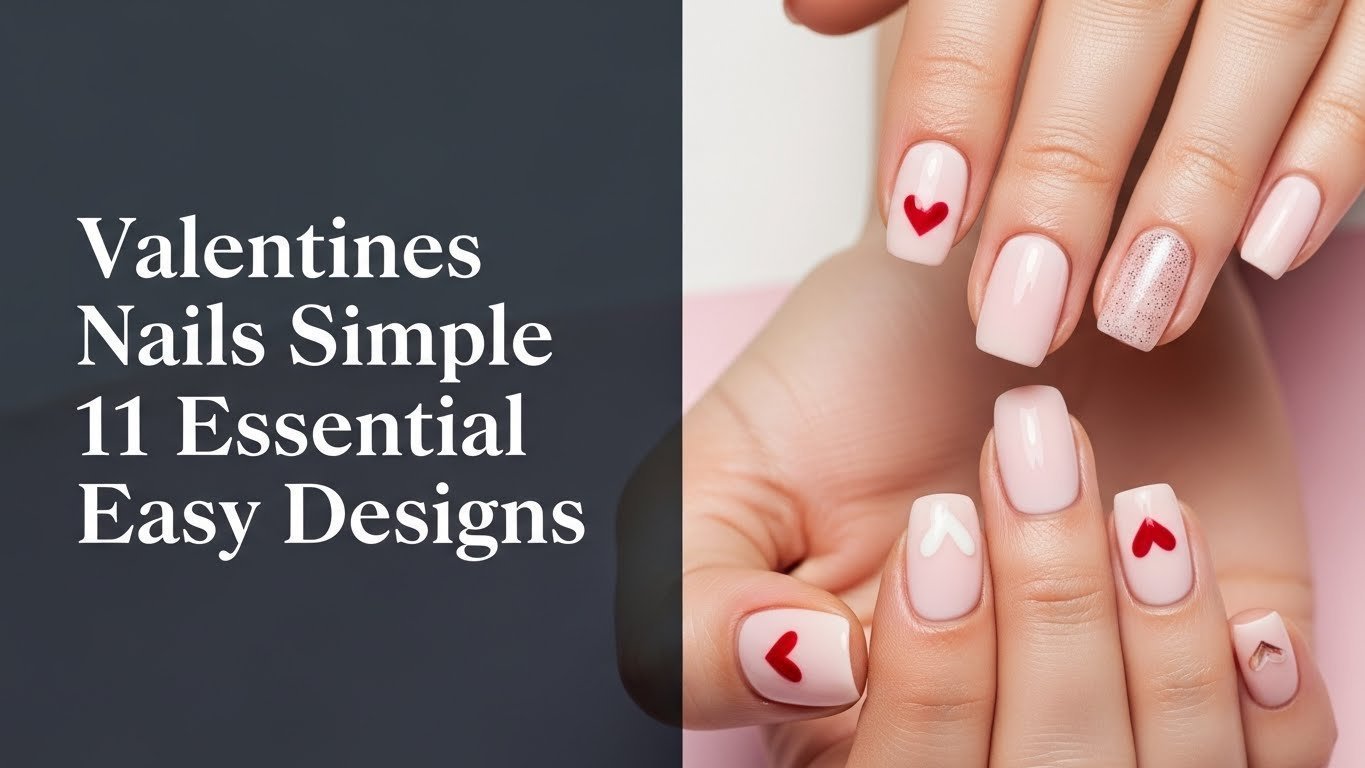
1. Delicate Mini Heart Accents

Pin this cute simple valentine nails idea to your ‘Easy Manicures’ board!
This design is the epitome of cute simple valentine nails. It focuses on the heart entity as a small, non-overwhelming accent, relating it to a simple base coat and natural nails. It is perfect for those who want a nod to the holiday without their nails screaming for attention. The key here is precision using a dotting tool, which makes delicate nail art surprisingly accessible.
Products & Tools Used
- Sheer nude nail polish or light pink base coat
- Red nail art polish or white nail art polish
- Fine-tip nail art brush or dotting tool
- Top coat long-lasting
- Nail polish remover & clean-up brush
Application/Styling Steps
- Apply one or two coats of your chosen sheer base color to all nails and let dry completely.
- Dip the fine-tip brush or dotting tool into the red (or white) nail art polish.
- On accent nails (e.g., ring finger, thumb), place two small dots close together in a V-shape near the cuticle or tip.
- Carefully drag the brush downwards from each dot to meet in a point, forming a tiny heart.
- Repeat for desired number of hearts, allowing each to dry slightly before moving on.
- Once hearts are dry, seal with a high-shine top coat to protect the design.
Pro-Tip: For perfectly symmetrical hearts, use the back of a bobby pin or a small dotting tool to create two dots, then drag the tip of a fine brush to connect them into a point. This technique, used by expert nail tech tips, ensures precision even for beginners.

2. Elegant Simple French Tip Valentine Nails

Save this classy simple valentine nails idea to your ‘Valentine’s Day Inspo’ board!
If you love classy simple valentine nails, this modern twist on a classic is ideal. It links the French tip entity, known for its elegance, with the Valentine’s Day theme through a subtle heart accent. This design works exceptionally well as french tip valentine nails simple for almond shape valentine nails, lengthening the appearance of the finger while remaining appropriate for office environments.
Products & Tools Used
- Sheer pink or clear base coat
- Bright white nail polish
- Optional: French tip nail stencils or striping tape
- Optional: Red or pink nail art pen or fine-tip brush
- Glossy top coat
Application/Styling Steps
- Apply a sheer pink or clear base coat to all nails and allow to dry.
- If using stencils, place them along the natural smile line of your nail, leaving the tip exposed.
- Paint the tips with bright white nail polish. If not using stencils, carefully freehand the tip with a steady hand.
- Immediately remove stencils if used, and allow the white tips to dry completely.
- (Optional) Using a red or pink nail art pen or fine brush, add a tiny heart to the ring finger or thumb.
- Finish with a generous layer of glossy top coat to smooth and protect the manicure.
Pro-Tip: For a flawless French tip even without stencils, load a small amount of polish onto a flat brush and “float” it across the tip, using the curve of your own nail as a guide. This method, often taught in accredited nail art courses, helps create a natural, clean line.

3. Subtle Ombre Valentine Nails

Pin this easy gradient valentine nails tutorial to your ‘Nail Art Ideas’ board!
Gradients often look intimidating, but they are actually one of the easiest ways to create simple valentine nails. This design showcases the ombre technique, relating it to soft pink and white colors for an ombre simple valentine nails look. It provides a dreamy, soft focus effect that is much more forgiving than crisp lines, making it perfect for a subtle valentine nails aesthetic.
Products & Tools Used
- Light pink nail polish
- White or off-white nail polish
- Makeup sponge (dense, fine-pored)
- Liquid latex (optional, for cuticle protection)
- Base coat
- Top coat
- Tweezers
Application/Styling Steps
- Apply a base coat to all nails, then two thin coats of the light pink nail polish as your base color. Let dry completely.
- (Optional) Apply liquid latex around your cuticles to protect the skin from polish.
- On a piece of foil, paint a stripe of the light pink polish next to a stripe of the white polish, slightly overlapping.
- Dab the makeup sponge onto the polish stripes to pick up both colors, then gently dab the sponge onto your nail, moving it slightly up and down to blend the colors.
- Repeat dabbing 2-3 times per nail, allowing each layer to dry slightly, until desired opacity and blend are achieved.
- Once dry, peel off the liquid latex (if used) or clean up edges with a brush dipped in remover.
- Apply a generous layer of top coat to smooth out any texture from the sponge and add shine.
Pro-Tip: To make cleanup a breeze when doing ombre with a sponge, apply liquid latex around your cuticles before you start dabbing. This tested method for DIY nails saves significant time and prevents polish from staining your skin, solving a common pain point for beginners.

4. Glamorous Glitter Accent Valentine Nails

Sparkle up your feed! Pin this sparkly simple valentine nails idea!
Sometimes, you need a little drama without the difficulty. This design connects the glitter entity as an accent with a solid red or pink base, relating it to the Valentine’s Day theme. Glitter valentine nails simple designs are excellent for simple short valentines nails because the sparkle adds dimension without requiring length. It is a high-impact look that requires zero artistic drawing skills.
Products & Tools Used
- Red or deep pink nail polish (for base)
- Matching fine or chunky glitter nail polish (for accent)
- Base coat
- Two layers of top coat (regular, then a glitter-specific or thick top coat)
Application/Styling Steps
- Apply a base coat to all nails.
- Paint all nails (except your accent nail, typically the ring finger) with two coats of red or deep pink nail polish. Let dry.
- For the accent nail, apply a thin coat of your glitter polish. Allow to dry slightly.
- Apply a second (and even third if needed) thicker coat of glitter polish to achieve full opacity and maximum sparkle.
- Once the glitter is completely dry (it can take longer), apply a regular top coat.
- For extra smoothness and longevity, apply a second, thicker layer of top coat specifically designed for glitter or a gel-like top coat.
Pro-Tip: To ensure your glitter accent nail is smooth and doesn’t snag, apply two generous layers of a good quality top coat. The first layer helps ‘sink’ the glitter, and the second creates a glass-like finish, a technique recommended by professional nail designs for long lasting valentine designs.

5. Chic Negative Space Hearts

Pin this minimalist valentine nail art to your ‘Chic Nail Ideas’ board!
For a thoroughly modern take, simple negative space nails are unmatched. This design highlights the negative space entity to create a heart shape, emphasizing a minimalist valentine nails style that feels fresh and cool. It is an excellent example of chic nail ideas that rely on the natural nail color as part of the art, making regrowth less obvious.
Products & Tools Used
- Clear base coat
- Clear glossy top coat
- Fine-tip nail art brush or nail art sticker stencils
- Black or deep red nail polish
Application/Styling Steps
- Apply a clear base coat to all nails and allow to dry completely.
- Using a nail art sticker stencil: Place the heart stencil firmly onto your nail. Paint over the stencil with your chosen polish, then carefully peel off the stencil while the polish is still wet to reveal the clear heart.
- Freehanding with a fine-tip brush: Dip your fine-tip brush into black or deep red polish. Carefully draw the outline of a heart on each nail, ensuring the lines are thin and clean. You are outlining the shape you want to remain clear.
- Allow the polish to dry thoroughly.
- Seal the design with a generous layer of clear glossy top coat.
Pro-Tip: For truly crisp negative space, consider using specific vinyl nail art stencils. They provide a perfect, clean outline without requiring an ultra-steady hand, making this simple solution for nail art accessible to all skill levels.

6. Sweet Polka Dot Hearts

Make your nails adorable! Pin this cute nail art idea!
Polka dots are a staple of easy nail designs, and with a slight tweak, they become simple heart nails valentine favorites. By arranging polka dots to form heart shapes, you create a sweet and cute simple valentine nails look. This technique is brilliant for simple short valentines nails because it scales down perfectly to fit smaller nail beds.
Products & Tools Used
- Base coat
- Pastel pink or light colored nail polish
- White (or contrasting color) nail polish
- Nail art dotting tool (small size)
- Top coat
Application/Styling Steps
- Apply a base coat, then two coats of your chosen pastel pink or light base color. Let dry completely.
- Dip your small dotting tool into the contrasting (e.g., white) nail polish.
- On each nail (or just accent nails), create two small dots side-by-side, very close together.
- Immediately below and slightly between these two dots, create a third dot. This forms a triangular cluster of dots that subtly resembles a heart.
- Alternatively, for a more defined heart, create two dots, then drag the tip of the dotting tool from the top of each dot downwards to meet in a point, as shown in the delicate mini heart section.
- Allow dots to dry fully before applying a top coat to prevent smudging.
Pro-Tip: Don’t overload your dotting tool; use just enough polish to make a clean dot. You can practice on paper first to get a feel for the size and pressure needed. This simple trick is key to mastering simple hearts and achieving salon quality results at home.

7. Modern Abstract Swirls

Discover your inner artist! Pin this simple abstract valentine nails idea!
Abstract art is incredibly forgiving, which is why simple abstract valentine nails are perfect for those who worry about steady hands. This design uses abstract swirls as a pattern, linking to a modern and minimalist nail art aesthetic. It offers an effortless valentine nails vibe where imperfection is actually a stylistic choice rather than a mistake.
Products & Tools Used
- Clear or sheer nude base coat
- Two or three contrasting nail polishes (e.g., soft pink, muted red, gold)
- Fine-tip nail art brush or a toothpick
- Top coat
Application/Styling Steps
- Apply a clear or sheer nude base coat to all nails and let dry completely.
- On a clean surface, dab a small amount of your first contrasting polish.
- Dip your fine-tip brush (or toothpick) into the polish and create a free-form, wavy line or a simple swirl on your nail. You can do this once or twice per nail.
- Clean your brush, then pick up your second contrasting color and add another swirl, allowing it to slightly overlap or intersect the first.
- Repeat with a third color if desired. The beauty is in the organic, imperfect nature of the lines.
- Allow the abstract lines to dry fully.
- Finish with a glossy top coat to seal and add shine.
Pro-Tip: For a truly effortless look, don’t overthink the swirls. Embrace organic shapes and slight imperfections. The charm of modern abstract swirls lies in their unique, hand-drawn quality, making this a great way to design easy valentine nails.

8. Playful Candy Stripe Accent

Get ready for compliments! Pin this simple festive nails idea!
Bring a bit of candy-coated fun to your manicure with this design. Using stripes in a candy pattern creates simple festive nails that are playful and bright. Whether you choose red valentine nails simple or switch to pink, the striping tape does all the hard work for you, ensuring this easy valentine nail art looks professionally done.
Products & Tools Used
- Base coat
- Vibrant red or hot pink nail polish (for non-accent nails)
- White nail polish
- Light pink nail polish
- Nail art striping tape (or a very fine nail art brush)
- Top coat
Application/Styling Steps
- Apply base coat to all nails.
- Paint all nails (except the accent nail) with two coats of vibrant red or hot pink polish. Let them dry completely.
- On the accent nail, apply two coats of white nail polish and let it dry thoroughly. This is crucial for crisp lines.
- Once the white base is completely dry, apply thin strips of nail art striping tape vertically across the nail, evenly spaced.
- Paint over the entire accent nail with light pink nail polish.
- Immediately (while the pink polish is still wet) and carefully peel off the striping tape to reveal the white stripes underneath.
- Alternatively, if freehanding, use a fine-tip brush with white polish to draw thin vertical lines on the pink accent nail.
- Allow to dry fully, then seal with a top coat.
Pro-Tip: For the cleanest candy stripes, ensure the base color on your accent nail is completely dry before applying striping tape. Patience here prevents bleeding and gives you salon quality results at home, making this easy application valentine polish design perfect.

9. Sweetheart Swirls

Add a touch of romance! Pin this simple romantic nails idea!
Evoke the feeling of intertwined ribbons with sweetheart swirls. This design uses swirls to create a simple romantic nails aesthetic, linking the elegant attribute to Valentine’s Day nails using soft pink hues. It is a step up from basic stripes but relies on the same principle of fluid motion to create simple valentine nails that impress.
Products & Tools Used
- Base coat
- Milky pink or sheer light pink nail polish
- Deeper pink or soft red nail polish
- Fine-tip nail art brush
- Top coat
Application/Styling Steps
- Apply a base coat, then two coats of the milky pink or sheer light pink polish to all nails. Let dry completely.
- Dip a fine-tip nail art brush into the deeper pink or soft red polish. Wipe off excess polish to ensure a thin line.
- Starting from one side of the nail, gently draw a flowing, wavy line or a soft S-curve. You can choose to cover the entire nail with one or two swirls or just create a small accent on one side.
- For a “sweetheart” effect, you can try to subtly incorporate two lines that intertwine or meet in a soft point, hinting at a heart shape.
- Allow the swirls to dry fully.
- Finish with a high-shine top coat to encapsulate the design and add durability.
Pro-Tip: The key to delicate swirls is a light hand and a brush that isn’t overloaded with polish. Practice your fluid motion on paper first. This approach ensures you create simple valentine nails that look like professional nail designs.

10. Classic Red Valentine Nails Simple

Embrace timeless romance! Pin this simple romantic nails look!
Never underestimate the power of a solid color. Classic red valentine nails simple designs are the ultimate power move. This look centers on the color red as the primary Valentine’s Day nail attribute, emphasizing simplicity and classic elegance. It is arguably the most plain valentine nails option, but when executed with precision, it beats elaborate art every time.
Products & Tools Used
- Base coat
- High-quality, opaque red nail polish
- Top coat
- Cuticle pusher and nippers (for prep)
Application/Styling Steps
- Begin with clean, prepped nails. Push back cuticles and gently buff the nail surface for better adhesion.
- Apply one thin, even layer of base coat and let it dry.
- Apply the first thin coat of red nail polish. Ensure you paint in smooth, even strokes from base to tip.
- Allow the first coat to dry almost completely before applying a second thin coat. This prevents streaks and bubbles.
- If needed, apply a third very thin coat for ultimate opacity, always allowing drying time in between.
- Finish with a durable, high-shine top coat, capping the free edge of your nail for extra chip protection.
Pro-Tip: The secret to a perfect, streak-free solid red manicure lies in applying multiple thin coats rather than one thick one. This professional technique ensures even drying and prevents chipping, extending the life of your simple romantic nails.

11. Minimalist White Dot Accents

Embrace understated elegance! Pin this minimalist valentine nails design!
If you prefer subtle simple valentine nails, this is your go-to. This design focuses on the dot entity as a minimalist accent, linking it to a sheer white base for an understated look. Minimalist valentine nails like this are incredibly chic and work beautifully as simple nails for valentine’s for those who want to avoid traditional reds and pinks.
Products & Tools Used
- Base coat
- Sheer milky white or light gray nail polish
- White nail polish (for the dot, if using a contrasting base)
- Small nail art dotting tool
- Top coat (glossy or matte)
Application/Styling Steps
- Apply a base coat, then two coats of your sheer milky white or light gray nail polish to all nails. Let dry completely.
- Dip your small nail art dotting tool into white nail polish (or the same milky white polish for a tone-on-tone effect).
- On one or two accent nails (e.g., pinky or ring finger), place a single, small, perfectly round dot. You can position it near the cuticle, slightly off-center, or anywhere that feels balanced.
- Ensure the dot is uniform and not too large.
- Allow the dot to dry thoroughly.
- Finish with your preferred top coat—either a glossy one for a polished look or a matte top coat for an even more understated, modern finish.
Pro-Tip: For the most minimalist nail expression, ensure your dotting tool is clean and you use just the right amount of polish for a crisp, single dot. Less is truly more with this design, allowing you to achieve minimalist valentine look with ease.

Key Takeaways: Your Quick Guide to Simple Valentine Nails
If you are short on time, here is a quick summary of the most effective strategies for achieving easy valentines day nails. Remember these points to ensure your manicure is both beautiful and long-lasting.
- Embrace Simplicity for Stunning Results: Simple valentine’s nail designs prove you don’t need intricate art for a romantic, polished look. Focus on clean lines, classic colors, and subtle accents to create simple valentine nails that truly shine.
- The Power of Color & Placement: Red, pink, and white are iconic for Valentine’s Day manicure, but their impact comes from strategic use. A single red accent nail or a soft pink ombre can be just as impactful as complex designs.
- Tools Make It Easy: Don’t struggle with freehand if you don’t have to. Dotting tools, fine-tip brushes, and striping tape are your best friends for achieving precise easy nail designs like mini hearts, polka dots, or candy stripes, making DIY accessible.
- Practice for Perfection: Even the easiest valentine nail art benefits from a little practice. Try techniques like ombre sponging or dot placement on paper first to master simple hearts and swirls, building confidence before moving to your nails.
- Longevity is Key: Proper nail prep—base coat, thin polish layers, and a quality top coat—is essential for long lasting valentine designs. These steps prevent chipping and keep your simple valentine nails looking fresh longer.
- Beyond the Traditional: Explore minimalist valentine nail art like negative space hearts or abstract swirls for a modern, sophisticated twist on the holiday. These designs offer an elegant alternative to overt symbols.
- Product Choice Matters: Investing in good quality polishes and specific nail art tools can significantly improve your results, turning challenging techniques into beginner friendly valentine solutions and ensuring salon quality results at home.
People Also Ask About Simple Valentine Nails
We have gathered the most common questions about creating simple valentine nails to help you troubleshoot and plan your perfect look. From colors to techniques, here is everything you need to know.
How to do simple valentine nails at home?
Doing **simple Valentine’s nails at home is easy with the right tools and techniques, focusing on basic designs like dots, stripes, or small hearts.** Start with proper nail prep (clean, file, base coat), then use dotting tools or striping brushes for easy accents. Finish with a good top coat for longevity, following easy diy valentine nails guides for a polished look.
What are easy valentine nail designs for beginners?
Beginners should focus on designs that use minimal tools and simple shapes, such as tiny heart decals, single polka dots, or a classic solid red or pink manicure. These simple valentine’s nail designs are forgiving and build confidence. Ombre with a sponge is also surprisingly easy, offering a sophisticated look without complex brushwork.
What colors are best for simple valentine nails?
The best colors for **simple valentine nails are classic romantic hues like various shades of red (from vibrant to deep), soft pinks (pastel to fuchsia), and crisp white or sheer nude.** These colors can be used alone for a minimalist look or combined for subtle accents and gradients, creating a truly simple valentine’s manicure.
Are short nails good for valentine’s day?
Absolutely, **short nails are excellent for simple Valentine’s Day looks, often appearing chicer and more practical for everyday wear.** Many simple valentine’s nail designs, like mini hearts, dots, or negative space art, look particularly elegant and refined on a shorter nail canvas. They also tend to be more durable and less prone to chipping.
How to make simple heart nails without special tools?
You can create **simple heart nails using household items like a toothpick or the blunt end of a bobby pin.** For tiny hearts, make two small dots side-by-side with your chosen tool, then drag a fine point down from the center to meet in a V-shape. This easy nail art design allows for festive customization.
Do simple valentine nails look elegant?
Yes, **simple valentine nails can look incredibly elegant, often more so than overly elaborate designs.** By focusing on clean lines, a sophisticated color palette, and subtle accents like a french tip valentine nails simple with a tiny heart, you can achieve a refined and classy look that conveys understated romance.
What products do I need for DIY valentine nails?
For DIY **simple valentine nails, you’ll need a good base coat, your chosen polish colors (red, pink, white), a top coat, and basic tools like a small dotting tool or fine-tip brush.** Nail polish remover and cotton swabs are also essential for cleanup. Optional items include striping tape or liquid latex for more advanced designs.
How long do simple gel valentine nails last?
When applied correctly, **simple gel valentine nails can last typically 2-3 weeks without chipping, making them a durable option for the season.** The longevity depends on proper nail prep, the quality of gel polish, and thorough curing under a UV/LED lamp, ensuring your easy valentine gel nails stay flawless.
What are some subtle valentine nail designs?
Subtle **valentine nail designs include a sheer nude base with a single tiny red heart on an accent nail, a soft pink and white ombre, or negative space hearts outlined in a fine line.** These looks convey the romantic theme without being overtly festive, perfect for those seeking minimalist valentine nails for any occasion.
What are the latest simple valentine nail trends for 2026?
The latest **simple valentine nail trends for 2026 focus on minimalist aesthetics, subtle chrome accents, elegant pastel ombre, and delicate micro-designs.** Think understated French tips with a touch of pink, single white dots on a sheer base, or abstract, flowing lines in soft, romantic hues for a modern twist on simple holiday nails.
Final Thoughts on Valentines Nails Simple
As we wrap up our journey through these 11 essential simple valentine nails designs for 2026, it’s clear that elegance and romance don’t require intricate, time-consuming artistry. Whether you opted for the delicate charm of mini hearts, the timeless sophistication of a French tip, or the playful sparkle of glitter accents, each design offers a unique way to express your festive spirit with minimal effort. The true beauty of these easy valentine nail designs lies in their accessibility – empowering everyone, from beginners to seasoned DIY enthusiasts, to achieve a polished, romantic look right at home.
Remember that a beautiful manicure starts with good nail care, and patience is your best tool when trying new techniques. By utilizing quality products and following our step-by-step guides, you’re not just painting your nails; you’re creating a personal statement of love and self-care. We hope these ideas inspire you to experiment and discover your new favorite simple valentine’s nail designs. Which of these quick valentine nails will you be trying first for Valentine’s Day?
Last update on 2026-03-06 / Affiliate links / Images from Amazon Product Advertising API


