Tired of the same old heart designs and looking for a manicure that truly stands out this February? You’re not alone in wanting a look that balances romance with edgy style, but finding the perfect inspiration for valentines nails yin yang art can be a challenge. Say goodbye to boring nails and discover how to blend meaningful symbolism with festive flair.
Valentines nails yin yang combine the romantic iconography of Valentine’s Day, often using hearts and traditional colors like pink and red, with the philosophical concept of yin yang, representing balance and duality. This unique nail art style allows for creative expression while embodying harmony and connection, offering a fresh alternative to standard holiday manicures. By merging contrasting elements—like soft pastels with bold lines or glitter with negative space—you create a look that is both sophisticated and seasonally appropriate.
Drawing from comprehensive analysis of current nail trends and proven application methodologies, this guide delivers expert-level inspiration for every skill level. We have curated a collection of diverse designs, ranging from simple DIY options to intricate salon-quality styles, ensuring you find the perfect match for your taste. Get ready to discover 11 stunning ideas that will transform your manicure into a balanced masterpiece of love and art.
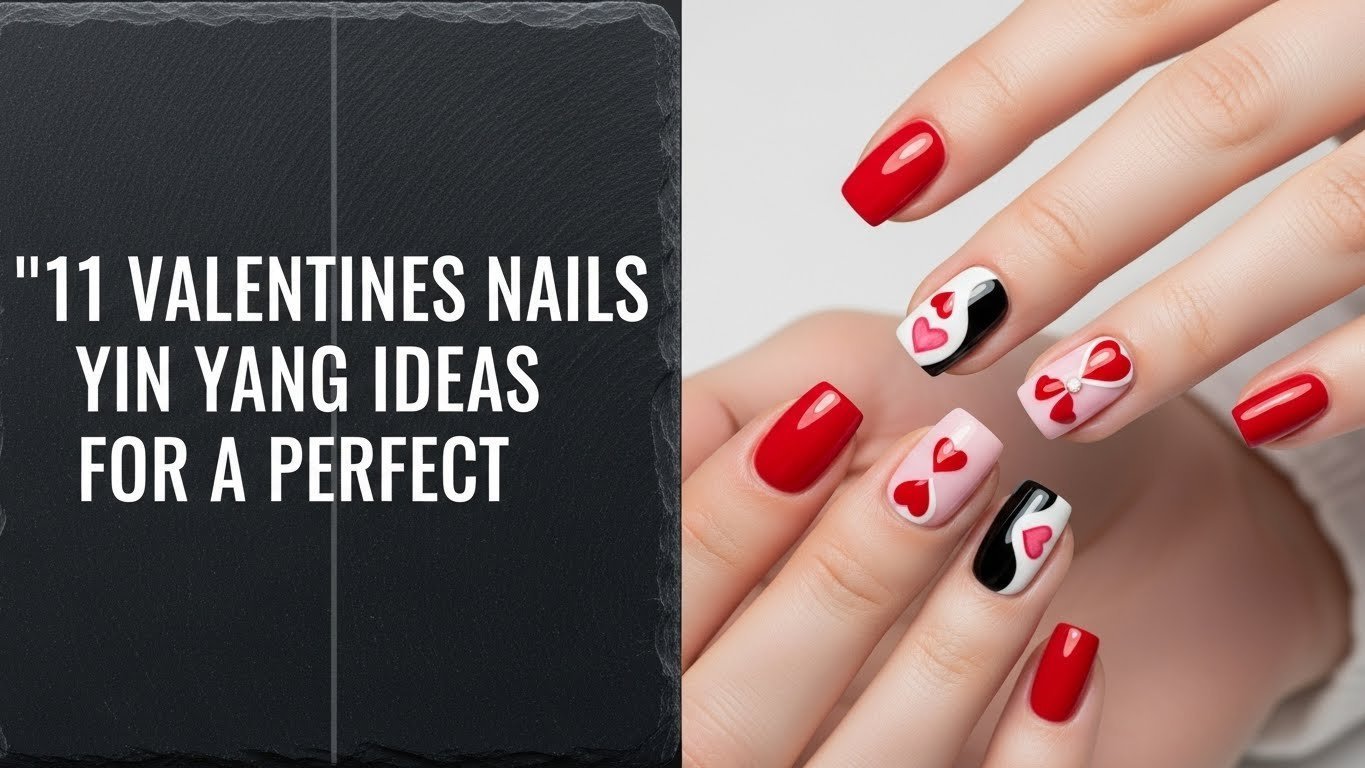
Unveiling 11 Valentines Nails Yin Yang Ideas for a Perfect January 2026 Manicure
Looking for the ultimate nail inspiration? Whether you are a DIY enthusiast or planning your next salon visit, valentines nails yin yang designs offer a versatile canvas for creativity. These designs go beyond simple polish application; they represent a fusion entity of love and balance, utilizing specific tools like dotting instruments and striping brushes to achieve harmony. By exploring various textures, from yin yang valentines nails with matte finishes to those with high-gloss shine, you can customize your look to match your personal style perfectly.
In the following sections, we will break down 11 distinct ideas, providing you with the exact “Products & Tools Used” and step-by-step “Application/Styling Steps” for each. We cover everything from heart yin yang nails to modern abstract interpretations. You will find actionable advice on how to use nail art that represents love effectively, ensuring you have the knowledge to recreate these looks with confidence.
1. Classic Red & White Yin Yang Heart Nails
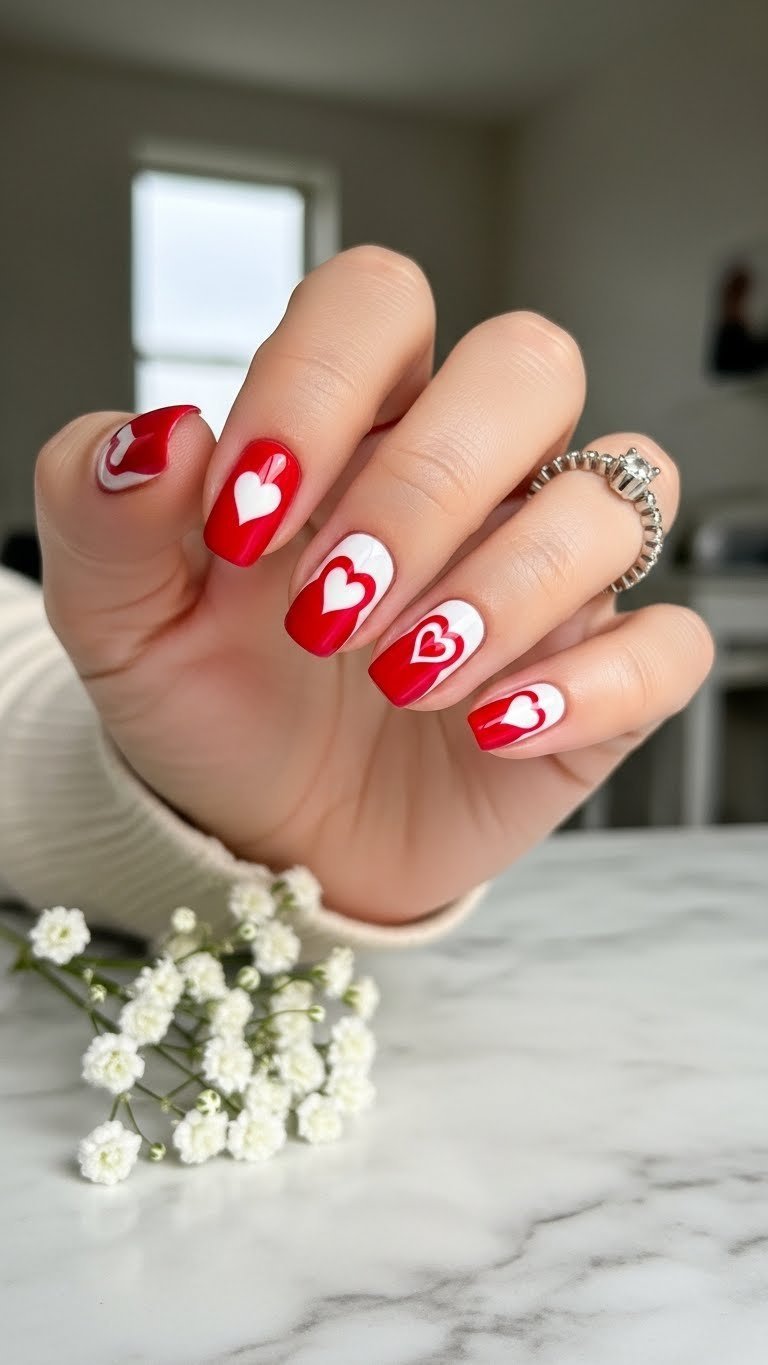
Pin this classic yin yang heart nail design to your Valentine’s board!
Searching for a timeless look? These classic yin yang heart nails are the quintessential choice for Valentine’s Day. This design marries the boldness of red and white nail polish with the harmonious structure of the yin yang symbol. It requires a steady hand to manipulate the polish that creates effect, ensuring the division between the colors is crisp and the heart shape is symmetrical.
Products & Tools Used
- Classic red nail polish (creme finish)
- Crisp white nail polish (creme finish)
- Fine-tip nail art brush
- Small dotting tool
- Base coat and top coat (long-lasting)
- Nail polish remover and cotton swabs (for clean-up)
Application/Styling Steps
- Prep your nails: Apply a base coat and two thin layers of the red nail polish on all nails, allowing each coat to dry completely.
- Create the heart outline: On each nail, use the fine-tip nail art brush to paint a heart shape in the center with white polish.
- Divide the heart: Using the same brush, draw a curved line down the middle of the white heart, dividing it into two halves, mimicking the yin yang design.
- Fill one half: Carefully fill one half of the white heart with red polish.
- Add the dots: Use the dotting tool to place a small red dot in the white half of the heart and a small white dot in the red half.
- Seal and protect: Finish with a high-gloss top coat for durability and shine.
Pro-Tip: To ensure perfectly symmetrical yin yang heart nails, allow each polish layer to dry fully before applying the next. This prevents smudging and allows for cleaner lines, crucial for a professional finish in
advanced nail art techniques.

2. Subtle Pastel Pink & Cream Yin Yang Nails
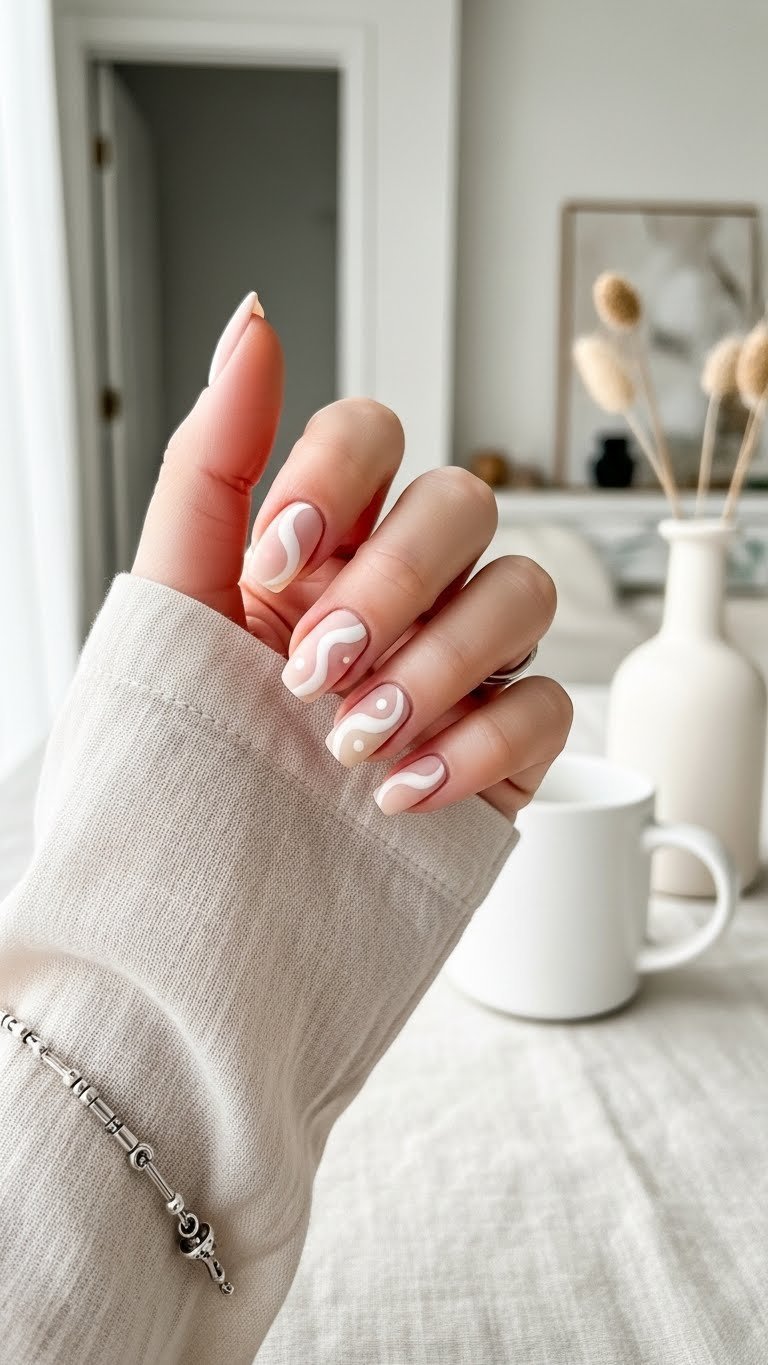
Save this elegant pastel yin yang manicure for a subtle Valentine’s touch!
Prefer a softer aesthetic? If bright reds aren’t your style, pastel pink yin yang nails offer a sophisticated alternative. This cream yin yang design relies on a harmonious color scheme, using soft pastel pink nail polish and cream shades to create a minimalist valentine’s nails look. It’s perfect for those who want a design that features yin yang without it being overly loud.
Products & Tools Used
- Pastel pink nail polish (soft, opaque finish)
- Cream/beige nail polish (complementary, opaque finish)
- Thin nail art striping brush
- Matte top coat (optional, for a softer look)
- Base coat and regular glossy top coat
Application/Styling Steps
- Base application: Apply a base coat, then two thin layers of your chosen cream/beige polish on all nails. Let dry.
- Half-moon shape: Use the nail art striping brush to draw a curved line across the nail, creating the first half of the yin yang design with pastel pink polish.
- Fill the half: Carefully fill in the larger section with the pastel pink polish.
- Add the complementary dot: Using the polish brush (or a dotting tool if preferred), create a small dot of pastel pink in the cream section and a cream dot in the pink section.
- Refine and seal: Clean up any edges with a brush dipped in polish remover. Apply a regular top coat or, for a subtle finish, a matte top coat.
Pro-Tip: For a truly subtle and elegant finish with your pastel pink yin yang nails, opt for a
matte top coat. This will diffuse the light and give your manicure a soft, velvety texture that enhances the delicate color palette, demonstrating anadvanced composition in nail art.

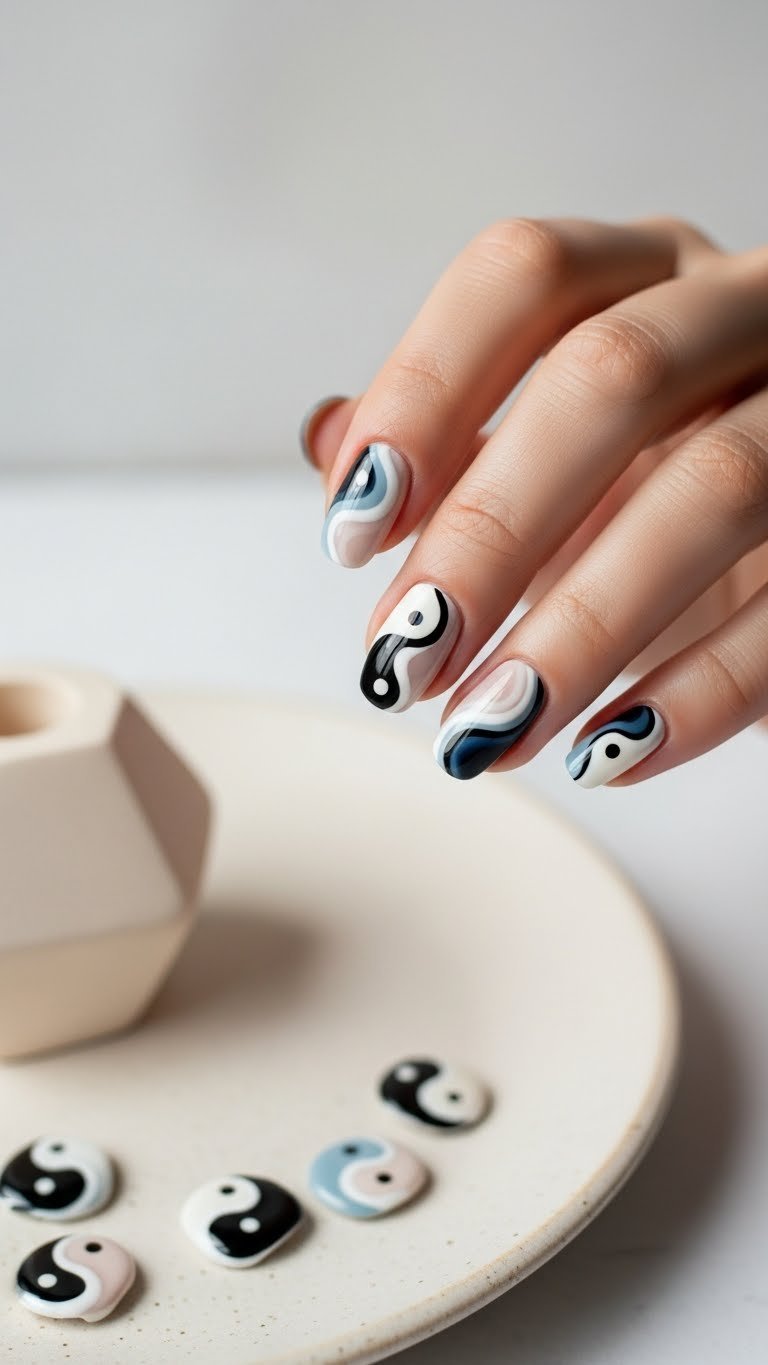
3. Bold Black & White Contrast Yin Yang Nails
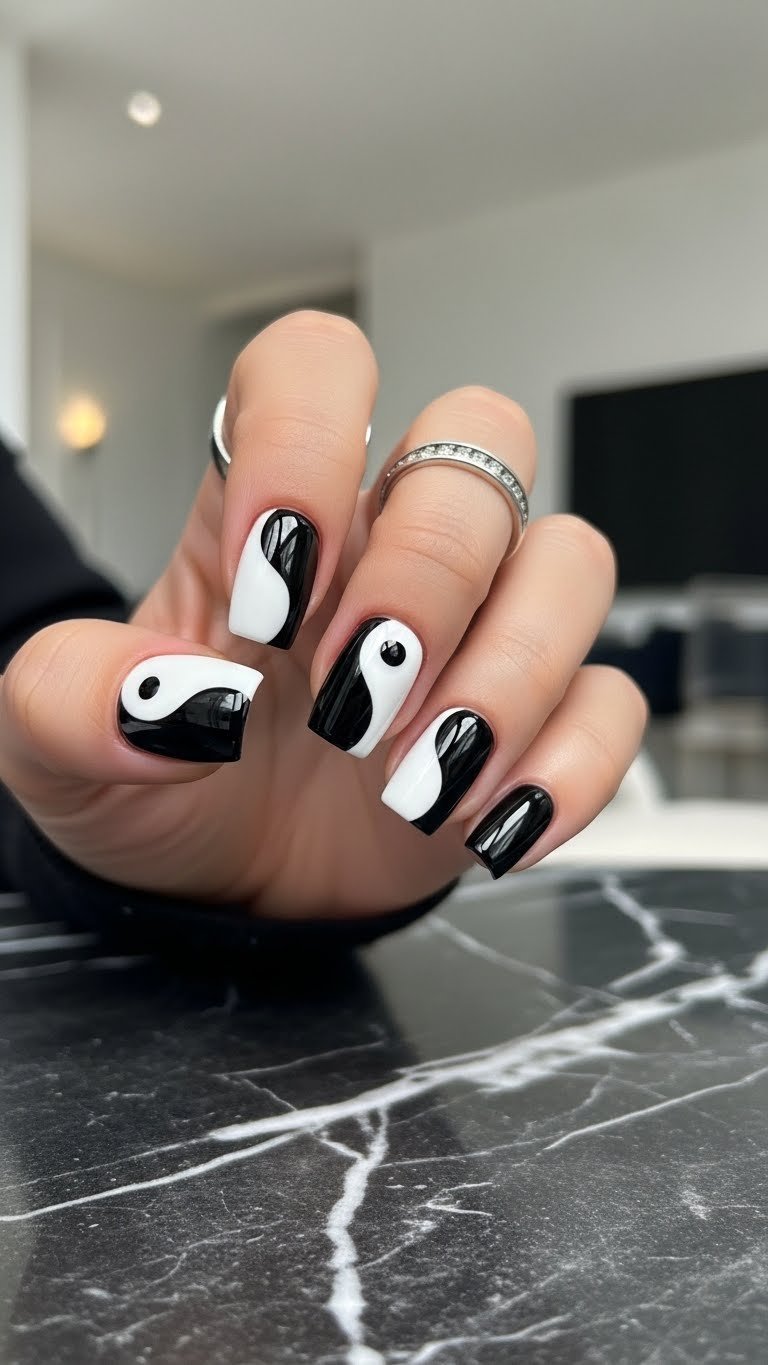
Pin this striking black and white yin yang design for a modern Valentine’s look!
Want a modern edge? Sometimes the most romantic statements are the boldest. Bold black and white yin yang nails provide a contrast yin yang design that is incredibly striking. By utilizing highly pigmented black nail polish and white nail polish, you create a modern yin yang nails look that emphasizes the core duality of the symbol. This style is perfect for an elegant evening out.
Products & Tools Used
- Black nail polish (highly pigmented, opaque)
- White nail polish (highly pigmented, opaque)
- Thin striping brush or nail art pens
- Optional: Nail art striping tape for crisp lines
- Base coat and high-gloss top coat
Application/Styling Steps
- Prepare your base: Apply a base coat. Paint half of your nail with black polish and the other half with white, meeting in the middle, or choose one color as the base.
- Draw the curve: Using your thin striping brush and the contrasting color, carefully draw the signature curved line of the yin yang design.
- Fill in: Fill in the larger half-moon section with the contrasting color.
- Add the dots: Using a small dotting tool or the fine brush, place a small white dot in the black section and a small black dot in the white section.
- Perfect and seal: Clean up any smudges with a precise brush and polish remover. Apply a generous layer of top coat for a smooth, glossy finish.
Pro-Tip: For the sharpest division in your black and white yin yang nails, consider using
nail art striping tape. Apply it after your base color is dry, paint the second color, then carefully peel the tape off while the polish is still slightly wet. This is a greattested nail art hackfor precise lines.

4. Glitter-Accent Ombré Yin Yang Nails

Sparkle up your Valentine’s with these glitter yin yang nails! Pin for inspiration!
Ready to shine? Combine two major trends with glitter-accent ombré yin yang nails. This look uses an ombré nail effect as a soft, romantic base and overlays it with a shimmering yin yang design using glitter nail polish. It demonstrates how different textures can work together, utilizing encapsulated glitter techniques to create depth and interest that flat polish alone cannot achieve.
Products & Tools Used
- Two shades of pink nail polish (e.g., light pink and medium rose)
- Small makeup sponge (for ombré effect)
- Glitter nail polish (silver or gold, fine glitter) or loose nail art glitter
- Fine-tip nail art brush
- Base coat and top coat (chip-resistant)
Application/Styling Steps
- Base and ombré: Apply a base coat. Paint the lighter pink polish on the top half of your sponge and the darker pink on the bottom half. Dab the sponge onto your nail repeatedly to create an ombré effect, allowing each layer to dry. Repeat for intensity.
- Yin Yang outline: Once the ombré is dry, use the fine-tip nail art brush and the glitter nail polish to outline the yin yang design on each nail.
- Fill with glitter: Carefully fill in one of the yin yang halves with the glitter nail polish, or press loose glitter into a wet clear top coat if using loose glitter.
- Add dots: Place a glitter dot in the non-glitter half and a solid polish dot (matching your ombré) in the glitter half.
- Seal for durability: Finish with two layers of a durable top coat to smooth over the glitter and prevent snagging.
Pro-Tip: When working with
loose nail art glitterfor your glitter-accent ombré yin yang nails, apply a thin layer of top coat first, then gently sprinkle or dab the glitter onto the wet surface. This ensures the glitter adheres properly and can then beencapsulatedfor a smooth, long-lasting finish, showcasingadvanced nail art techniques.

5. Abstract Swirl Modern Yin Yang Design
Discover unique abstract yin yang nails! Pin this modern Valentine’s look.
Feeling artistic? Break the rules of symmetry with an abstract swirl modern yin yang design. This style interprets the traditional symbol through swirling yin yang art, using nail polish colors in muted tones to create fluid, organic lines. It’s a unique valentines day nail art yin yang option that feels more like a contemporary painting than a strict geometric pattern, perfect for those who view nail art as a form of self-expression.
Products & Tools Used
- Two complementary, slightly muted nail polish colors (e.g., dusty blue and soft grey, or rose and cream)
- Fine-point detail brush (flexible bristles recommended)
- Base coat and high-gloss top coat
Application/Styling Steps
- Base color: Apply a base coat and two thin layers of your lighter chosen polish, allowing it to dry.
- Abstract swirl: Dip your fine-point detail brush into the darker polish. Instead of a hard line, draw a soft, organic “S” shape across the nail, mimicking the yin yang curve with a more fluid movement.
- Fill the swirl: Gently fill in one side of the “S” shape, allowing the edges to be slightly imperfect for an abstract feel.
- Add the dots (abstracted): Use a dotting tool or the brush handle to place a small, abstract dot of the contrasting color in each half, keeping the organic feel.
- Seal for art: Apply a durable top coat to protect the design and give it a polished finish.
Pro-Tip: For truly abstract swirl modern yin yang nails, don’t aim for perfect symmetry. Embrace the imperfection of the freehand swirls. The fluidity of the lines is what gives this design its unique, artistic flair, demonstrating a
nuanced interpretation of yin yanginconceptual nail art.

6. Negative Space Minimalist Yin Yang Nails
Embrace subtle elegance with these negative space yin yang nails! Pin now.
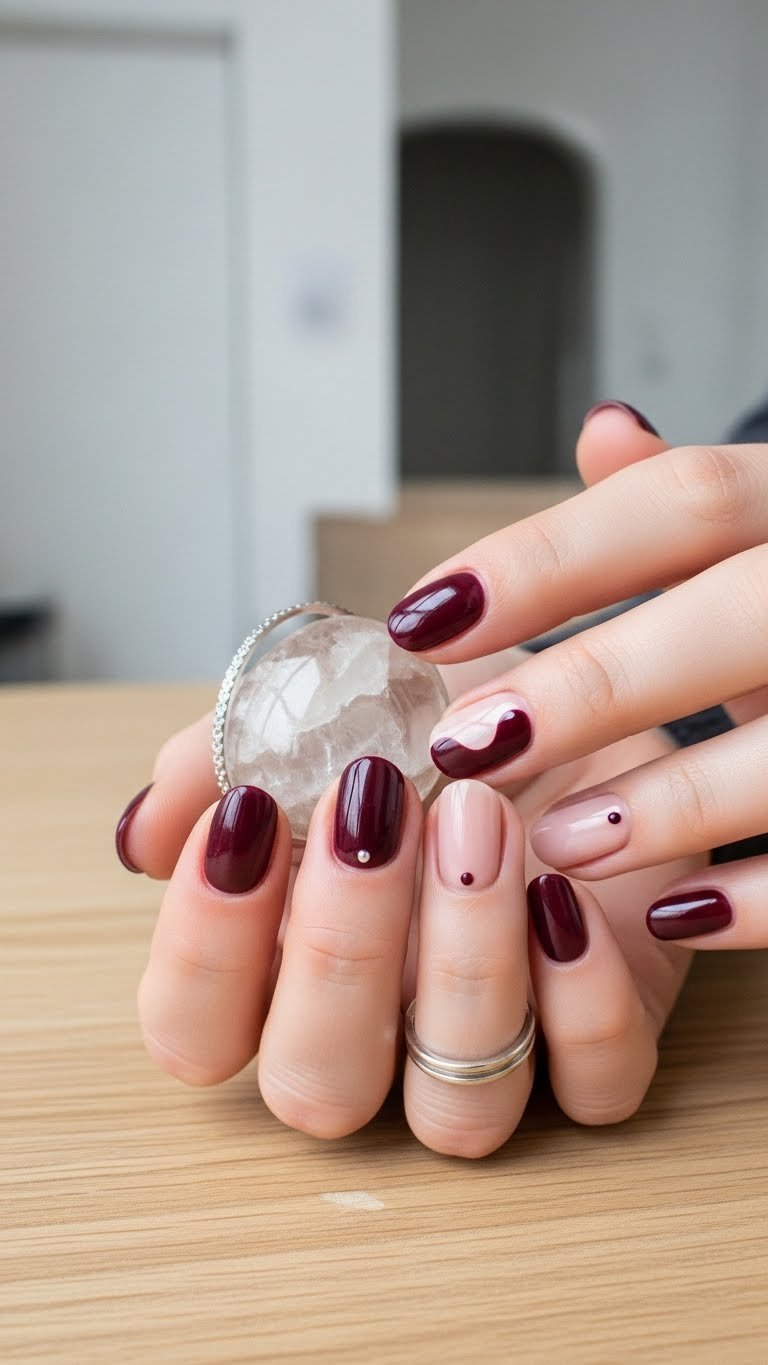
Love the natural look? Negative space yin yang nails are the epitome of chic minimalism. By utilizing the natural nail bed as one half of the yin yang design, you create a breathable, sophisticated look. This minimalist yin yang nails style uses a deep, romantic nail polish color like berry or red to contrast against the naked nail, creating a bold yet subtle yin yang design.
Products & Tools Used
- Opaque nail polish in a deep romantic shade (e.g., deep berry, rich red)
- Small nail art brush
- Dotting tool
- High-quality base coat (clear)
- High-gloss top coat
Application/Styling Steps
- Prep and base: Ensure nails are clean and well-manicured. Apply a strong base coat to protect the natural nail and provide a smooth surface.
- Define the curve: Using the small nail art brush, carefully draw the signature curved line of the yin yang design across your nail with the chosen polish. One half of the nail will remain natural (negative space).
- Fill the painted half: Fill in one side of the curved line with your chosen deep polish.
- Add the dots: Using the dotting tool, place a tiny dot of the same polish in the clear (negative space) half, and a clear (or very light nude) dot in the painted half if desired for definition.
- Seal the look: Apply a high-gloss top coat over the entire nail to seal the design and enhance the natural nail’s shine.
Pro-Tip: For the best negative space minimalist yin yang nails, ensure your nails are perfectly clean and shaped before starting. The natural nail is part of the design, so healthy, well-prepped nails are essential. A good base coat also helps protect the exposed natural nail, aligning with
nail health tipsforself-care nails.

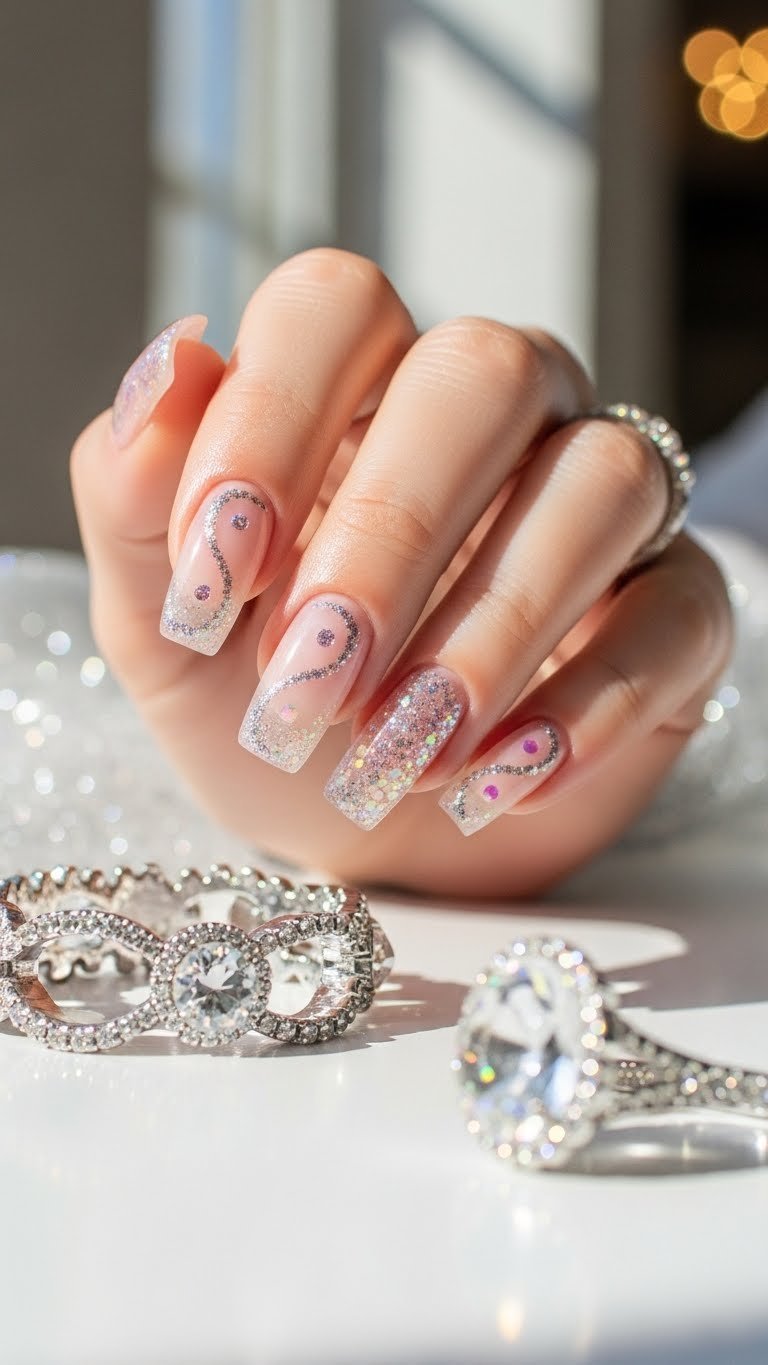
7. Gold Foil Embellished Yin Yang Nails
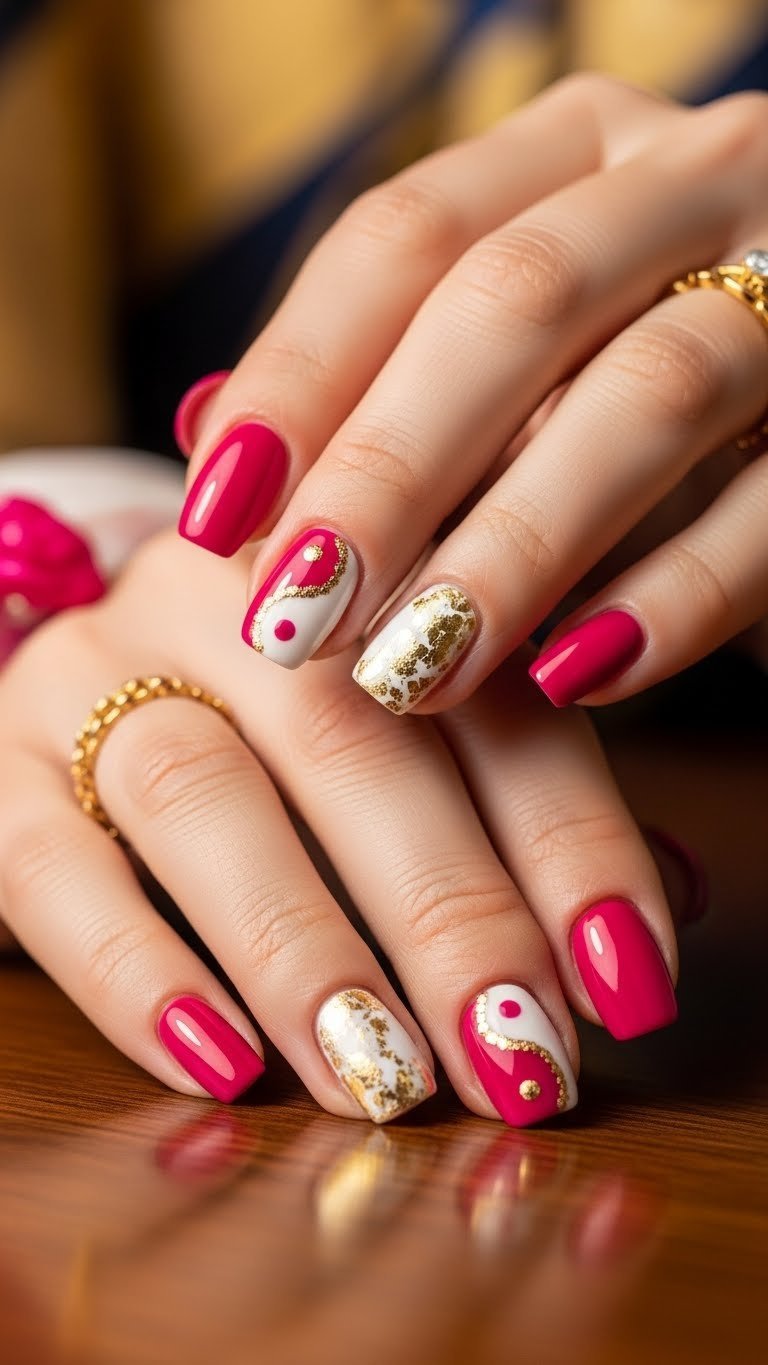
Add a touch of glam! Pin these gold foil yin yang nails for Valentine’s.
Craving luxury? Elevate your manicure with gold foil embellished yin yang nails. This luxurious valentine’s nail art technique incorporates delicate gold nail art foil into the design, adding texture and shine. Whether you use it to define the dividing line or replace the traditional dots, the foil interacts with vibrant nail polish colors like fuchsia to create a glamorous yin yang design that feels like jewelry for your fingertips.
Products & Tools Used
- Two opaque nail polish colors for the yin yang base (e.g., fuchsia and white)
- Gold nail art foil (flakes or transfer sheets)
- Foil glue (optional, recommended for intricate designs)
- Wax pick-up tool or tweezers
- Small detail brush
- Base coat and durable top coat
Application/Styling Steps
- Create yin yang base: Apply a base coat. Paint your chosen yin yang design (e.g., fuchsia and white) as desired and allow it to dry completely.
- Apply foil adhesive: If using foil glue, apply a thin line along the yin yang dividing curve and/or small dots where the contrasting dots would go. Let it dry until tacky (usually transparent). If not using glue, proceed immediately to the next step while the polish is still slightly tacky.
- Place the foil: Using a wax pick-up tool or tweezers, gently press small pieces of gold nail art foil onto the tacky areas. Rub firmly to transfer.
- Remove excess: Carefully peel away the transfer sheet, or brush off excess flakes with a soft brush.
- Seal and protect: Apply two layers of a good top coat to encapsulate the foil and ensure a smooth, long-lasting finish, preventing
chipping gel nails.
Pro-Tip: When applying gold nail art foil for your gold foil embellished yin yang nails, a
foil transfer gel polishand a UV/LED lamp can make the process much easier and ensure better adhesion. This offers a more reliable method than traditional polish and helpsachieve lookwith longevity, a key part ofdurable nail finishes.

8. Playful Heart-Eye Emoji Yin Yang Nails

Express your love with these cute heart-eye emoji yin yang nails! Pin it!
Feeling fun and flirty? Heart-eye emoji yin yang nails inject personality and pop culture into your manicure. This playful yin yang design swaps the traditional dots for tiny, hand-painted red heart-eye emojis, turning a classic symbol into modern emoji nail art. Using bright nail polish colors like pink and yellow ensures this look pops, making it perfect for a Galentine’s party or a fun date night.
Products & Tools Used
- Two bright, contrasting nail polish colors (e.g., hot pink and sunny yellow)
- Smallest nail art detail brush
- Red nail polish (for the hearts)
- White nail polish (for tiny reflections in the eyes)
- Base coat and high-shine top coat
Application/Styling Steps
- Paint the yin yang base: Apply a base coat. Create your primary yin yang design with the hot pink and sunny yellow polishes. Allow it to dry completely.
- Draw the heart shapes: Using the smallest nail art detail brush and red polish, carefully paint two tiny heart shapes where the traditional yin yang dots would be (one red heart in the yellow section, one in the pink section).
- Add the “eyes”: While the red hearts are still slightly wet (or after drying with a tiny dot of top coat), use the smallest brush and white polish to add tiny, almost invisible dots or short lines within each red heart to mimic the “eye” reflection.
- Perfect and seal: Clean up any mistakes with a fine brush and remover. Finish with a high-shine top coat to give the design a smooth, playful finish.
Pro-Tip: When painting the tiny heart-eye emojis for your playful heart-eye emoji yin yang nails, use a drop of polish on a palette (like aluminum foil) to work from, keeping your detail brush loaded with just the right amount of polish. This prevents flooding the nail and ensures crisp,
detailed yin yang nails, demonstratingintricate freehand nail painting.

9. Gradient Ombré Yin Yang Tips

Get trendy! Pin these gradient ombré yin yang tips for a stylish Valentine’s Day.
Obsessed with French tips? Gradient ombré yin yang tips put a fresh spin on the classic French manicure. By combining a gradient ombré effect with the structural curve of the yin yang, you get yin yang French tips that feel incredibly current. This modern ombré nails look typically uses pastel nail polish colors like lilac and mint, blending them onto the tips for a balanced nail art tips style that is light and airy.
Products & Tools Used
- Two complementary pastel nail polish colors (e.g., lilac, mint green)
- White or very light nude nail polish (for blending)
- Small makeup sponge (cut into small squares)
- Fine-tip nail art brush
- Base coat and high-gloss top coat
- Liquid latex barrier (optional, for clean-up)
Application/Styling Steps
- Prep and base: Apply a base coat. Paint your entire nail with a very light nude or white polish as a clean canvas. Let dry.
- Create the ombré tip: On a small piece of your makeup sponge, paint a stripe of lilac, then a stripe of white, then a stripe of mint green. Lightly dab the sponge onto just the tip of your nail, blending the colors to create a gradient ombré effect. Repeat for opacity.
- Form the yin yang: Once the ombré tip is dry, use the fine-tip nail art brush and either the lilac or mint green polish to carefully draw the curved line of the yin yang design across the ombré tip.
- Fill and dot: Fill in one side of the yin yang tip with its corresponding color, and then add a small dot of the contrasting color in each half of the yin yang.
- Seal with shine: Finish with a generous layer of top coat to smooth the gradient and seal the intricate tip design.
Pro-Tip: For clean gradient ombré yin yang tips, apply
liquid latex barrieraround your cuticles before sponging. This makes clean-up much easier and prevents excess polish from staining your skin, demonstrating a practicaltested nail art hackfor flawlessmastering gradient effects.

10. Press-On Valentines Nails Yin Yang Set
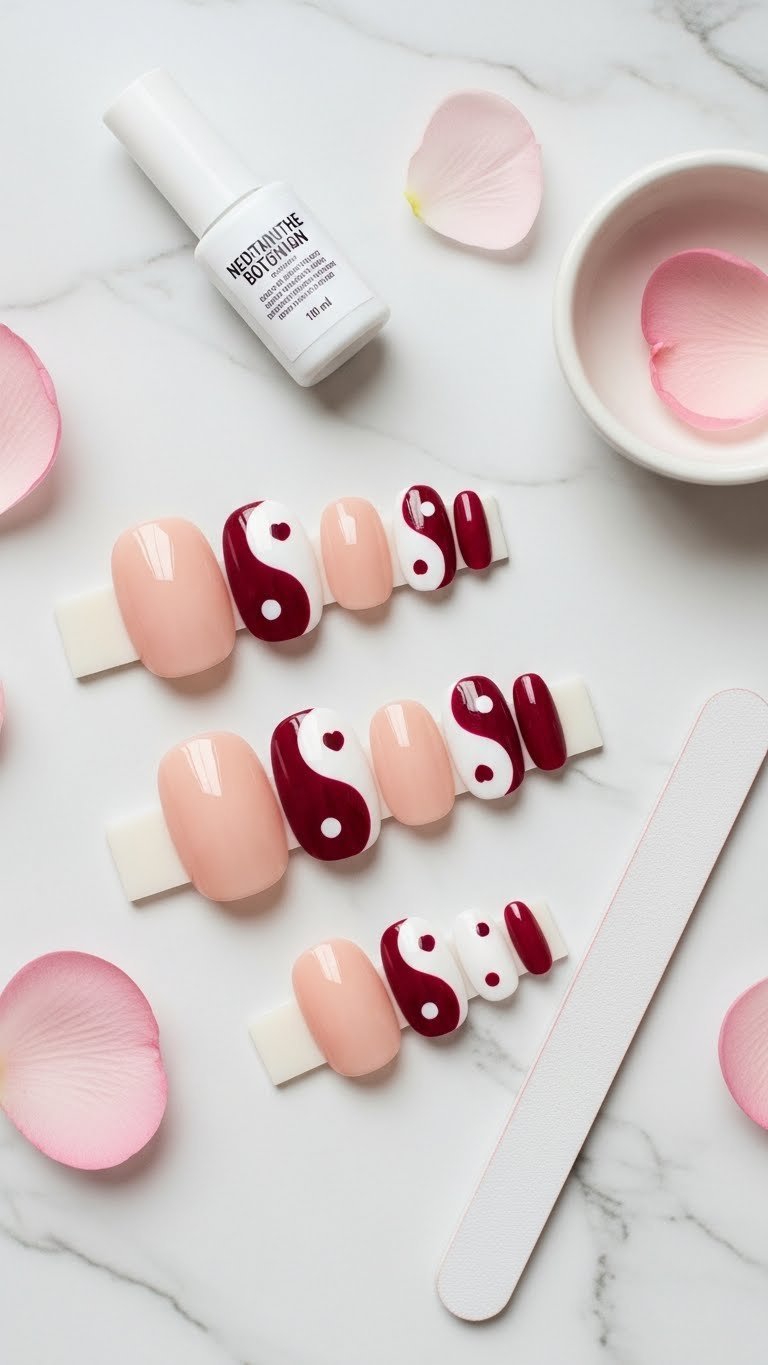
Get an instant mani! Pin this press-on yin yang nail set for Valentine’s Day.
Short on time? Not everyone has the patience for intricate DIY art. Press-on valentines nails yin yang sets are the perfect solution. Pre-designed yin yang nails offer instant gratification and perfect symmetry without the effort. These easy application false nails come in various shapes and custom made yin yang valentine’s day false nails styles, providing a quick nail styling fix that looks professionally done.
Products & Tools Used
- Press-on nail set with yin yang design (ensure correct sizes)
- Nail file and buffer
- Cuticle stick
- Nail glue (if not pre-glued)
- Alcohol prep pads
- Base coat (optional, for natural nail protection)
Application/Styling Steps
- Prepare natural nails: Clean and dry your natural nails. Gently push back cuticles with a cuticle stick. Lightly buff the surface of your nails with a nail file for better adhesion. Wipe with an alcohol prep pad.
- Size selection: Lay out the press-on nails and match them to your natural nails, ensuring a perfect fit. If needed, gently file the sides for a seamless look.
- Apply glue (if needed): If your press-ons are not pre-glued, apply a small dot of nail glue to your natural nail and a small dot to the back of the press-on.
- Attach press-ons: Align the press-on nail with your cuticle and press down firmly for 10-15 seconds, starting from the cuticle and moving towards the tip.
- Shape and finish: Once all nails are applied, gently shape nails with a nail file if desired. Avoid heavy water exposure for the first hour.
Pro-Tip: To ensure your press-on valentines nails yin yang last longer, apply a thin layer of clear base coat to your natural nails before adhering the press-ons. This creates a barrier and can help protect your natural nails while ensuring a smooth surface for the fake nails to adhere to. This is a crucial step in
caring for false nailsandproven nail art methods.

11. Encapsulated Glitter Yin Yang Nails for Depth
Experience true sparkle! Pin these encapsulated glitter yin yang nails for depth.
Ready for advanced techniques? Encapsulated glitter yin yang nails offer a mesmerizing 3D effect. By layering loose glitter or holographic flakes under clear builder gel or acrylic, you create a multi-dimensional yin yang design that has depth and glass-like smoothness. This technique utilizes gel that enables lasting wear and requires professional gel sculpting skills, making it ideal for those who want a durable nail finish that won’t dull over time.
Products & Tools Used
- Clear or sheer base gel polish or acrylic system (powder and liquid monomer)
- Loose fine glitter or holographic flakes
- Gel top coat (no-wipe) or acrylic top coat
- UV/LED nail lamp (for gel)
- Fine-tip nail art brush
- Dotting tool
- Nail buffer and file
Application/Styling Steps
- Prep and base layer: Apply a base coat or clear builder gel layer and cure (if gel). If using acrylic, create a thin, clear acrylic base.
- Create yin yang with glitter: Apply a thin layer of clear gel/acrylic where one half of your yin yang design would go. Using a fine-tip brush or dotting tool, carefully place the loose glitter to form one half of the yin yang, including a small dot of contrasting color. Cure/let dry.
- Repeat for other half: Apply a thin layer of clear gel/acrylic for the other half of the yin yang design, and place contrasting glitter (or solid color if desired) to form the second half. Cure/let dry.
- Encapsulate: Apply a thicker layer of clear builder gel or acrylic over the entire nail, fully
encapsulating the glitterdesign. Build to desired thickness, cure/let dry, and then file and shape the nail smooth. - Finish: Buff the nail smooth. Apply a no-wipe gel top coat and cure, or an acrylic top coat for a high-gloss, durable finish.
Pro-Tip: Achieving truly encapsulated glitter yin yang nails requires careful
gel sculptingoracrylic applicationto ensure a smooth, durable surface. Pay close attention to apex placement and filing techniques to avoid bulkiness while maintaining the glitter’s depth and sparkle, a key element ofadvanced nail art techniques.

Key Takeaways: Your Quick Guide to Valentines Nails Yin Yang
We’ve covered a wide spectrum of ideas, from simple press-ons to complex encapsulated gels, ensuring there is a style for every enthusiast. Valentines nails yin yang art is more than just a trend; it is a creative way to symbolize the balance inherent in love. To help you summarize your next steps, here are the most critical points to remember:
- Embrace the Balance: Valentines nails yin yang offer a unique blend of romantic imagery and philosophical harmony, making them perfect for expressive festive manicures.
- Variety is Key: From classic red and white to subtle pastels, bold contrasts, and glitter accents, there’s a yin yang design for every style and skill level.
- Actionable Steps for DIY: Most yin yang nail art designs can be created at home with basic tools and polishes, following clear, step-by-step instructions.
- Product Selection Matters: Using quality nail polishes, precise brushes, and appropriate top coats ensures durability and a professional finish for your yin yang manicure.
- Leverage Trends: Incorporating elements like ombré tips or negative space can modernize the traditional yin yang heart nails, keeping your look fresh and trendy.
- Convenience with Press-Ons: For a quick and easy solution, pre-designed press-on yin yang nails offer instant style without the need for extensive DIY.
- Professional Finishes: Techniques like
encapsulated glitterprovide salon-quality depth and long-lasting wear for your most intricate yin yang designs.
FAQs About Valentines Nails Yin Yang
Many readers still have specific questions about execution and symbolism. Below, we address the most common inquiries to ensure you have all the information needed to nail your look.
What do yin yang nails symbolize for Valentine’s Day?
Yin yang nails for Valentine’s Day symbolize the balance and harmony within a romantic relationship, representing complementary forces uniting as a whole. This design reflects the idea that two individuals, despite their differences, create a perfect unity, embodying love, interconnectedness, and a balanced partnership. It’s a deeper, more symbolic expression than traditional heart motifs.
How to do yin yang nails for Valentine’s at home?
To do yin yang nails at home, you typically apply two contrasting colors, then use a fine-tip nail art brush to create the signature curved line and dots. Start with a base coat, apply two shades (e.g., pink and red), draw the “S” curve, fill in the halves, and add the small contrasting dots. Finish with a top coat for durability and shine.
What nail polish colors are best for Valentine yin yang nails?
Classic colors for Valentine yin yang nails include red and white, or pink and white, symbolizing love and purity. However, you can also use pastel pinks and creams for a subtle look, or even black and white for a modern, bold contrast. Complementary colors that represent duality work best for the design’s meaning.
Can you buy Valentine’s Day yin yang press on nails?
Yes, you can absolutely buy pre-designed Valentine’s Day yin yang press on nails, offering a convenient and quick solution for a themed manicure. Many online retailers and beauty brands offer sets with various yin yang designs, sometimes incorporating hearts or romantic color schemes, perfect for immediate application.
Is it hard to do yin yang nail art if I’m a beginner?
Yin yang nail art can be simplified for beginners by focusing on basic shapes and using helpful tools like dotting tools or striping brushes. While precision is key, starting with larger designs or using nail art guides can make it much easier. Practice is essential, and many tutorials break down the steps for easy learning.
How long do gel yin yang nails last compared to regular polish?
Gel yin yang nails typically last significantly longer than regular polish, often remaining chip-free for two to three weeks with proper application and curing. Regular polish usually lasts only a few days to a week before showing signs of wear. The durability of gel makes it ideal for intricate designs.
What tools do I need for yin yang nail art?
Essential tools for yin yang nail art include a fine-tip nail art brush for drawing the curves, and a small dotting tool for the signature dots. Additionally, you’ll need your chosen nail polishes, a base coat, and a top coat. Optional tools like striping tape or liquid latex can assist with precision and clean-up.
What are some unique Valentine’s Day nail art ideas beyond traditional yin yang?
Beyond traditional yin yang, unique Valentine’s Day nail art ideas include negative space designs, abstract swirls, glitter encapsulation, or incorporating heart-eye emojis. You could also explore ombré French tips with a subtle yin yang element, or mix in other romantic symbols like arrows or initials alongside the yin yang.
How can I make my yin yang nails symmetrical?
To make your yin yang nails symmetrical, use a fine-tip brush for precise lines and consider sketching the design lightly with a pencil first. A steady hand and working slowly are crucial. You can also use a small piece of tape as a guide for the central curve, ensuring both halves are balanced.
What’s the best way to remove gel yin yang nails without damage?
The best way to remove gel yin yang nails without damage is through proper soaking in acetone, avoiding harsh scraping or peeling. Break the top coat seal, soak cotton pads in acetone, place them on nails, wrap with foil, and wait 10-15 minutes. Gently push off softened gel, then nourish nails.
Final Thoughts on Valentines Nails Yin Yang
As we’ve explored these 11 creative valentines nails yin yang ideas, it’s clear that this trend offers a beautiful way to celebrate love and balance. Whether you opt for the classic red and white, a subtle pastel gradient, or a bold encapsulated glitter look, the versatility of the yin yang design allows for personal expression while embracing the spirit of Valentine’s Day.
Remember, the key to successful yin yang nail art lies in patience, precision, and choosing the right products. From DIY yin yang nails with simple polishes to intricate salon-worthy gel yin yang nails, there’s an option for every skill level. By following our step-by-step guides and integrating the expert nail artist tips, you can achieve a truly stunning and symbolic manicure. So, pick your favorite design, gather your tools, and get ready to flaunt your perfectly balanced valentines nails yin yang this January 2026! Which yin yang nail art valentines idea will you try first?
Last update on 2026-01-17 / Affiliate links / Images from Amazon Product Advertising API