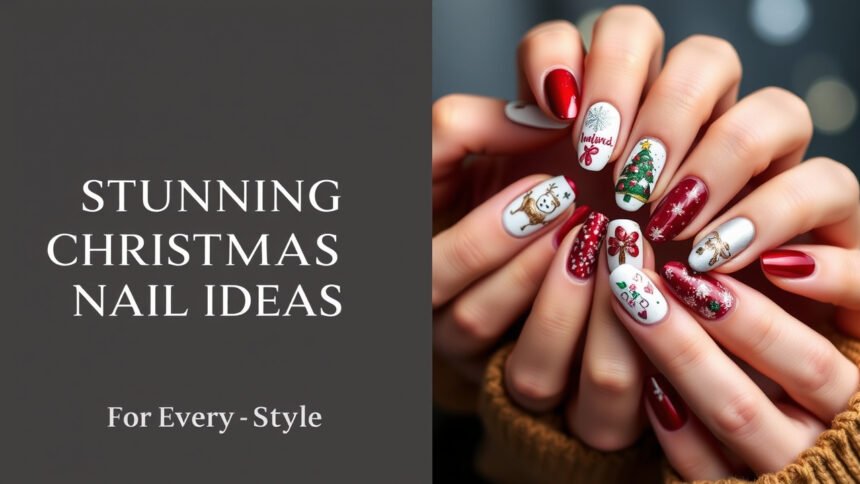
Scrolling for hours trying to find the perfect festive manicure? You’re not alone.
The search for stunning Christmas nail designs can be completely overwhelming. You want a holiday nail art look that’s festive and celebratory, but still feels like you.
The most popular Christmas nail colors include classic holiday red, deep forest green, sparkling gold, icy silver, and crisp winter white. This guide will show you how to use them in nine stunning, achievable designs for every style, complete with step-by-step tutorials.
Feeling Uninspired? Why Finding the Perfect Christmas Nails Can Be So Overwhelming
Every March, the search begins for that perfect holiday manicure that’s festive but still you. With endless options on Pinterest and Instagram, it’s easy to fall into “decision paralysis.” You might wonder if a design is too complicated to do yourself, too flashy for the office party, or if it will even look good on your nail shape. This can turn a fun bit of holiday preparation into a stressful task.
This guide is designed to solve that problem. We’ve curated a list of the most stunning and, most importantly, achievable Christmas nail ideas for 2026. We’ve broken them down by personal style—from elegant and minimalist to cute and cozy—so you can quickly find a look you love. Forget the guesswork; we’ll give you the exact inspiration and the steps to bring it to life, whether you’re heading to the salon or trying some DIY nail art at home.
9 Stunning Christmas Nail Ideas (And Exactly How to Do Them)
Ready for some real inspiration? We’ve curated a collection of the best Christmas nail designs that cater to every style, skill level, and occasion. These looks are based on the latest 2026 trends and timeless classics, blending expert trend-spotting with foundational knowledge. Each idea comes with a complete product list and a step-by-step tutorial, removing all the guesswork so you can create a beautiful festive manicure.
1. The Elegant Snowflake Accent Nail

Pin this chic holiday look for your next manicure!
This sophisticated and subtle holiday nail design is perfect for those who want a touch of festive cheer that’s still office-appropriate. The delicate white snowflake motif on a single accent nail, set against a sheer nude polish, is the definition of winter elegance. A tiny pop of silver glitter adds just the right amount of sparkle.
Products & Tools Used:
- Sheer nude or milky white nail polish
- Opaque white nail art polish with a fine brush
- Fine silver glitter nail polish or loose cosmetic glitter
- A fine-tipped nail art brush or toothpick
- A dotting tool (smallest size)
- High-gloss, quick-dry top coat
Application Steps:
- Prep & Base: Apply a base coat, followed by two thin coats of your sheer nude polish on all nails. Let dry completely.
- Create the Snowflake: On your chosen accent nail, use the fine-tipped brush and white art polish to draw a cross (+). Then, draw an ‘X’ through the center to create 8 spokes.
- Add Details: Add small ‘V’ shapes to the end of each spoke to create the classic snowflake branches.
- Center Sparkle: Use the dotting tool to place a tiny dot of silver glitter polish right in the center of the snowflake.
- Seal the Design: Wait 5-10 minutes for the design to dry, then ‘float’ a generous layer of quick-dry top coat over the nail to seal the art without smearing. Finish all other nails with the top coat.
Pro-Tip: For perfectly straight lines, use white acrylic craft paint instead of polish for the snowflake. It’s easier to control and you can wipe away mistakes with water before you apply the top coat.

2. The Classic Candy Cane Stripe Accent

Save this classic and cute Christmas nail idea!
Nothing says “Christmas” quite like a candy cane. This timeless and cheerful design is surprisingly easy to create and works wonderfully even on short nails. The accent nail technique keeps the look modern, with classic red nails perfectly complementing the fun, striped pattern.
Products & Tools Used:
- An opaque, true white nail polish
- A classic, vibrant red nail polish
- Thin nail art striping tape
- Small scissors
- A quick-dry, high-gloss top coat
Application Steps:
- Base Coat: Paint your accent nail with two coats of opaque white polish. Paint all other nails with two coats of classic red. Let them dry completely for at least 20-30 minutes.
- Apply Tape: Cut small pieces of striping tape and press them down firmly in a diagonal pattern across your white accent nail, leaving even spaces between each strip.
- Paint the Stripes: Carefully paint one coat of the red polish over the entire accent nail, right on top of the tape.
- Reveal the Stripes: While the red polish is still wet, gently and slowly peel off each piece of striping tape to reveal the crisp white lines underneath.
- Top Coat: Wait another 10-15 minutes for the red stripes to set, then apply a thick layer of top coat to smooth everything out and add shine.
Lesson Learned: Don’t wait for the polish to dry before removing the tape! Removing it while wet is the secret to getting clean, sharp lines without any peeling.

3. The Minimalist Gold French Tip

Pin this sophisticated and modern holiday nail idea!
For a holiday look that is incredibly chic and modern, this minimalist French manicure is the perfect choice. It swaps the traditional white tip for a razor-thin line of metallic gold polish. This design is wonderfully understated, work-appropriate, and feels festive without using any classic motifs.
Products & Tools Used:
- A high-quality sheer pink or nude nail polish
- A highly pigmented metallic gold nail polish
- An ultra-thin nail art striping brush
- Optional: French tip guide stickers
- A glossy top coat
Application Steps:
- Flawless Base: Apply one or two coats of your sheer nude polish for a clean, healthy-looking base. Let it dry completely.
- Guide Application (Optional): If your hands aren’t steady, apply French tip guide stickers just below the free edge of your nail, leaving a thin sliver of the tip exposed.
- Paint the Tip: Dip your ultra-thin striping brush into the gold polish. With a steady hand, paint a fine, crisp line across the tip of your nail. If using guides, simply paint over the exposed tip.
- Remove Guides: If you used guides, remove them immediately while the gold polish is wet.
- Seal and Shine: Wait for the gold tips to dry, then apply a top coat to all nails for a durable, high-shine finish.
Pro-Tip: For an even more modern look, try a “deep French” or “V-shape French” tip with the gold polish instead of the traditional curved line.

4. The Cozy “Sweater Weather” Textured Nail

Save this super cozy sweater nail tutorial for a chilly day!
Capture the cozy feeling of the season with this trendy, textured sweater nail design. This 3D nail art technique mimics the look of a cable-knit sweater. Using a non-traditional holiday color like sage green and a matte finish on the accent nail creates a unique, tactile manicure that’s perfect for winter.
Products & Tools Used:
- A sage green nail polish
- A creamy off-white nail polish
- A high-quality matte top coat
- A fine-tipped nail art brush
- Clear acrylic powder (optional, for raised texture)
Application Steps:
- Base Colors: Paint your accent nails with two coats of sage green. Paint the other nails with two coats of off-white. Let dry.
- Create the Pattern: Using the fine-tipped brush and the same sage green polish, draw your sweater pattern (like cable-knit C’s and vertical lines) onto the green accent nails.
- Add Texture (Easy Method): While the pattern is still wet, immediately go over it again with another layer of polish to build it up slightly.
- Add Texture (Advanced Method): While the polish pattern is wet, sprinkle clear acrylic powder over it. Wait a moment for it to absorb, then gently brush off the excess. This creates a raised, fuzzy effect.
- Matte Finish: Once the pattern is dry, apply a matte top coat ONLY to the sweater-textured accent nails. Apply a glossy top coat to the off-white nails for a beautiful contrast in finishes.
Pro-Tip: If using gel polish, you can create the 3D effect by mixing the gel color with a bit of clear builder gel or acrylic powder to make it thicker before piping on the design.

5. The Cute & Simple Reindeer Accent Nail

Pin this adorable and easy reindeer nail art!
If you’re looking for a fun, cute, and incredibly easy DIY Christmas nail design, this is it! This simple reindeer motif is made almost entirely with a dotting tool, making it perfect for beginners or for doing on children’s nails. Paired with a festive red glitter polish, it’s a playful and charming look.
Products & Tools Used:
- A light beige or nude nail polish
- A medium brown nail polish
- A red glitter nail polish
- An opaque white nail polish
- An opaque black nail polish
- A set of nail art dotting tools (or toothpicks/bobby pin)
- A fine-tipped nail art brush
Application Steps:
- Base Coats: Paint your accent nail with two coats of the light beige polish. Paint the other nails with two coats of red glitter polish. Let dry.
- Reindeer Head: Using a large dotting tool and brown polish, place a large dot on the bottom half of your beige nail to create the reindeer’s head.
- Eyes & Nose: Use a small dotting tool to place two white dots for eyes. Once dry, use the smallest dotting tool or a toothpick to place a tiny black dot in each white dot. Use a medium dotting tool to place one red glitter dot for the nose.
- Antlers: Using a fine-tipped brush and the brown polish, draw two slightly wavy lines coming from the top of the head for antlers. Add a few smaller lines branching off.
- Seal it: Wait for the entire face to dry completely, then apply a glossy top coat to all nails.
Lesson Learned: The key to this design is simplicity! Don’t worry about making the antlers perfect. A few simple lines are all you need to get the reindeer effect.

6. The Glamorous Gold Glitter Gradient

Pin this for your holiday party! A perfect New Year’s Eve look, too.
For holiday parties and New Year’s Eve, you need a glamorous, high-impact nail look. This glitter gradient (or ombre) technique is surprisingly simple to achieve at home but delivers a professional, sparkling finish. Using a chunky gold glitter over a nude base creates a stunning cascade of sparkle that’s perfect for any festive occasion.
Products & Tools Used:
- A sheer nude or pink base polish
- A chunky gold glitter nail polish
- A disposable makeup sponge
- Liquid latex or peel-off base coat for easy cleanup
- A thick, glossy top coat (like a gel-effect top coat)
Application Steps:
- Prep & Base: Apply your sheer nude base color and let it dry completely. Apply liquid latex to the skin around your nails to make cleanup a breeze.
- Load the Sponge: Paint a generous amount of the gold glitter polish directly onto a corner of the makeup sponge.
- Apply the Gradient: Gently dab the sponge onto the top third of your nail, near the cuticle. Re-load the sponge and dab again, focusing the dabbing mostly at the cuticle and lightly dabbing downward to create the faded effect.
- Clean Up: While the glitter is still slightly tacky, peel off the liquid latex. Use a small brush dipped in acetone to clean up any remaining stray glitter.
- Smooth Finish: Apply one to two thick coats of a glossy top coat. This is key to smoothing out the rough texture of the chunky glitter and giving it a brilliant shine.
Pro-Tip: The makeup sponge absorbs the clear base of the polish, leaving behind a much denser concentration of glitter. This is the professional secret to getting a fully opaque glitter look without ten coats of polish.

7. The Chic & Moody Holiday Plaid

Save this moody and sophisticated plaid nail tutorial!
Move beyond the traditional with this chic and moody take on holiday plaid. A deep forest green base paired with thin black and metallic gold lines creates a sophisticated pattern that feels festive in a high-fashion way. It’s the perfect modern Christmas nail art for those who love darker, richer color palettes.
Products & Tools Used:
- A deep, forest green nail polish
- A black nail art polish with a built-in striping brush
- A metallic gold nail art polish with a built-in striping brush
- A long, thin nail art brush (for more control)
- A glossy top coat
Application Steps:
- Base Color: Paint your accent nail with two coats of deep green polish. Paint the other nails green as well. Let dry completely.
- Black Lines: Using the black striping polish, draw two vertical lines on one side of the nail, and two horizontal lines across the bottom of the nail. Don’t worry about perfection; plaid is never perfectly symmetrical.
- Translucent Lines (Optional): To add depth, mix a drop of black polish with a few drops of top coat to make it sheer. Draw one wider, translucent vertical and horizontal line.
- Gold Accent: Using the gold striping polish, draw one thin vertical line and one thin horizontal line, crossing over the black lines. This little bit of sparkle makes it festive.
- Seal the Look: Wait for all the lines to dry, then apply a glossy top coat to blend the design together seamlessly.
Lesson Learned: The key to plaid is layering. Let each set of lines (e.g., all the black vertical lines) dry for a minute before adding the next set to prevent colors from bleeding into each other.

8. The Icy Blue & Silver “Winter Wonderland”

Pin this magical Winter Wonderland nail inspiration!
Embrace the magic of the season with a cool, non-traditional color palette. This winter wonderland theme uses a shimmering icy blue base, holographic silver glitter, and delicate snowflake decals. It’s a serene and beautiful look that is incredibly easy to achieve, thanks to the use of simple nail stickers.
Products & Tools Used:
- A shimmering icy blue nail polish
- A holographic silver glitter polish
- A sheet of snowflake nail art decals or stickers
- A pair of fine-tipped tweezers
- A glossy top coat
Application Steps:
- Paint the Base: Apply two coats of the icy blue polish to all nails except your ring finger. Paint the ring finger with two coats of the holographic silver glitter. Let all nails dry.
- Apply Decals: Using tweezers, gently peel a snowflake decal from its backing sheet. Carefully place it onto one of the blue nails.
- Press to Secure: Lightly press down on the decal with your fingertip or a silicone nail tool to ensure it’s flat against the nail with no air bubbles.
- Repeat as Desired: Continue adding decals to your chosen nails until you’re happy with the design.
- Double Top Coat: Sealing decals is crucial. Apply one layer of top coat, let it dry for a few minutes, and then apply a second layer. This ensures the edges of the decals won’t peel up.
Pro-Tip: For a “frozen” effect, use a matte top coat over the blue nails and decals, but keep the silver glitter nail glossy for a stunning textural contrast.

9. The Trendy & Luxe Velvet Nails

Save this trendy velvet nail look for a touch of holiday luxury!
Try the viral nail trend that’s perfect for the holidays. “Velvet” or “cat eye” nails use a special magnetic polish to create a deep, multi-dimensional shimmer that looks just like crushed velvet. In a deep ruby red, this look is incredibly luxurious, on-trend, and guaranteed to get compliments.
Products & Tools Used:
- A black or dark base polish (optional, but recommended)
- A deep red magnetic “cat eye” or “velvet” nail polish
- A strong nail art magnet wand (often comes with the polish)
- A high-shine, quick-dry top coat
Application Steps:
- Dark Base: For the richest effect, apply one coat of black polish and let it dry. This makes the magnetic polish pop.
- First Magnetic Coat: Apply one thick coat of the magnetic red polish to one nail. Do not let it dry.
- Activate the Polish: Immediately hold the magnet wand over the wet polish, as close as you can without touching it. Hold it steady for 10-15 seconds. You will see the magnetic particles shift into a pattern.
- Repeat for all Nails: Continue this process, working one nail at a time. It’s crucial to use the magnet while the polish is wet.
- Seal the Effect: Once all nails are done and have been activated with the magnet, let them dry for a few minutes. Then, apply a glossy top coat to enhance the depth and shine.
Pro-Tip: Experiment with the magnet! Holding it diagonally creates a classic “cat eye” line. Hovering it flat over the nail and then pulling straight up can create a more dispersed “velvet” look.

Key Takeaways: Your Quick Guide to Perfect Holiday Nails
- For Elegance: Try a minimalist snowflake on a nude base or a chic gold French tip.
- For Classic Fun: A candy cane stripe or a cute reindeer accent nail are timeless choices.
- For a Trendy Look: Experiment with textured “sweater” nails or luxe “velvet” magnetic polish.
- For Easy Glam: A glitter gradient using a makeup sponge is a simple way to get a high-impact party look.
- The Right Tools are Key: Simple tools like dotting tools, striping tape, and decals make intricate designs achievable for beginners.
- Don’t Forget the Top Coat: A good, quick-dry top coat is the secret to protecting your art, smoothing out textures, and adding a professional-looking shine.
People Also Ask About Christmas Nails
How can I make my DIY Christmas manicure last through the holidays?
To make your holiday manicure last longer, always start by wiping your clean, bare nails with rubbing alcohol to remove oils. Use a quality base coat, and when you apply your color and top coat, be sure to “wrap the tips” by swiping the brush along the free edge of your nail. Reapplying your top coat every 2-3 days will dramatically increase longevity and shine.
What are some good Christmas nail ideas for very short nails?
Short nails look fantastic with simple, bold designs. A deep red or green, a full glitter nail, or a vertical gradient can create an elongating effect. For nail art, stick to minimalist motifs on an accent nail, like simple dots to look like snow, or a single, small vertical candy cane stripe. Avoid horizontal lines or cluttered designs.
What’s the easiest way to remove stubborn glitter polish?
The best method is the foil-soak technique. Soak a piece of cotton in 100% acetone, place it on your nail, and wrap your fingertip tightly in a piece of aluminum foil. Wait for 5-10 minutes. When you press down and pull the foil off, the glitter should slide off with the cotton, requiring minimal scrubbing.
Can I have Christmas nails that aren’t red or green?
Absolutely! Modern Christmas palettes are incredibly versatile. Consider an icy “Winter Wonderland” theme with blues and silvers, a glamorous look with black and gold, or a sophisticated style with winter whites, nudes, and rose gold accents. Even a moody dark plaid can feel perfectly festive.
Final Thoughts
This 2026, your nails can be the perfect accessory to your holiday spirit. Whether you choose a subtle snowflake or a full-glam glitter bomb, the goal is to have fun and express your unique style. The perfect Christmas nails are simply the ones that make you feel happy and festive.
Which of these ideas are you excited to try for the holidays? Let me know in the comments below
Last update on 2026-03-06 / Affiliate links / Images from Amazon Product Advertising API


