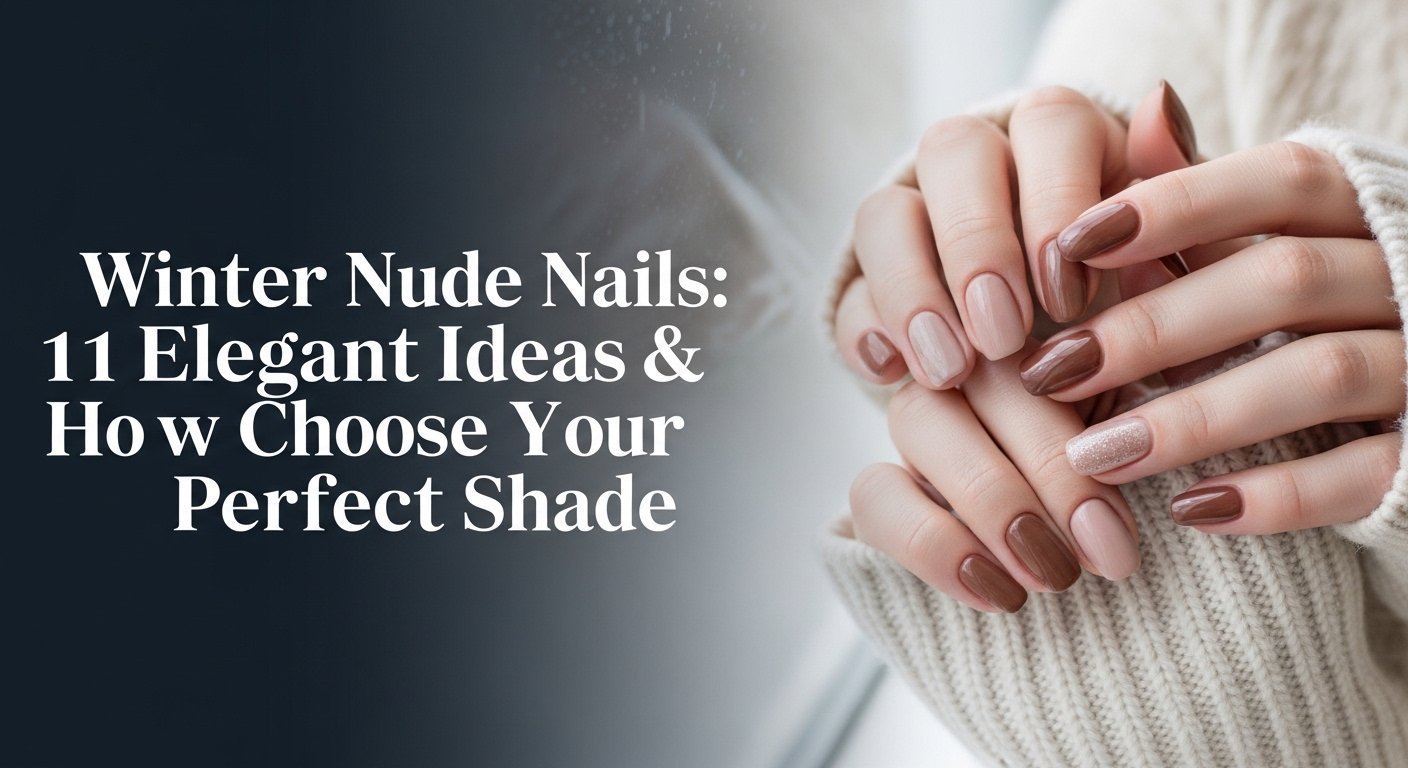
Have you ever found the perfect, cozy winter outfit, only to feel your manicure doesn’t quite match its sophisticated vibe? Finding the right winter nude nails can be a frustrating search, often leaving you with shades that look flat, boring, or completely wash out your skin tone in the softer winter light. You’re looking for elegance and versatility, but finding that perfect, chic neutral feels like a challenge.
A perfect winter nude manicure moves beyond basic beige, incorporating shades with cool, deep, or muted undertones that complement the season’s color palette. It focuses on sophisticated finishes like matte, subtle shimmer, or high-gloss shine to add dimension and elegance, ensuring the nails look chic and intentional, not washed out. This approach provides a versatile foundation that enhances any winter look.
Drawing from established best practices and current beauty trends, this guide will show you exactly how to find your ideal shade and give you stunning inspiration. You’ll discover how to select colors that flatter your unique skin tone and explore 11 elegant, achievable designs to try in 2026. Get ready to master the art of the perfect neutral winter manicure.
What Makes a Perfect Winter Nude Manicure?
The quest for the perfect winter nude nails marks a distinct shift from the bright, warm tones of summer. As the lighting becomes cooler and softer, our skin’s undertones can appear different, requiring a more nuanced approach to color selection. A truly successful classy nude nails winter look is defined by its ability to complement your skin and your wardrobe, adding a touch of understated elegance. It’s about choosing shades that have depth and character—think muted mauves, creamy beiges, and cool-toned taupes—that harmonize with the season’s richer fabrics and darker color palettes. The magic lies in the finish; a high-shine neutral nails look can feel crisp and modern, while a matte neutral winter nails finish provides a cozy, sophisticated touch. Ultimately, the perfect winter nude feels intentional, polished, and effortlessly chic, serving as a versatile accessory that completes any outfit.
How to Choose Your Perfect Winter Nude Shade
The single most important step to avoiding a “washed-out” look is undertone matching. A nude polish that clashes with your skin’s natural undertones can look jarring, but one that complements them creates a seamless, elongated, and elegant appearance. Based on the principles of seasonal color analysis, identifying whether your skin is cool, warm, or neutral will guide you to your most flattering nude color palettes. This knowledge empowers you to choose shades that enhance your natural beauty, making your manicure look expensive and custom-fit. Here’s a quick, pro-tested technique to find yours:
- Check Your Veins: Look at the veins on the inside of your wrist. If they appear mostly blue or purple, you have cool undertones. If they look greenish, you have warm undertones. A mix of both suggests neutral undertones.
- The White T-Shirt Test: Hold a pure white piece of clothing up to your face. If it makes your skin look rosy and bright, you’re likely cool-toned. If an off-white or cream shade is more flattering, you’re probably warm-toned.
- Jewelry Preference: Which jewelry metal makes your skin glow? Silver and platinum typically flatter cool undertones, while gold makes warm undertones pop. If you can wear both equally well, you’re likely neutral.
Once you know your undertone, select a winter nude nail polish from the corresponding family. For cool tones, look for nudes with pink, mauve, or blueish hints. For warm tones, seek out nudes with peach, golden, or caramel notes. Neutral undertones have the most flexibility and can often wear a wide range of shades successfully.
11 Elegant Winter Nude Nail Ideas to Try in 2026
Now that you know how to find your perfect base shade, it’s time for the fun part: inspiration. A nude winter manicure is the perfect canvas for a variety of styles, from the ultra-minimalist clean girl nails aesthetic to more detailed designs with a festive touch. These winter nail trends focus on texture, subtle shine, and sophisticated details to elevate the classic nude look. Below are 11 elegant and modern ideas, complete with product tips and step-by-step instructions, to inspire your next salon visit or at-home manicure session. Each design is crafted to be a chic winter manicure that feels both current and timeless.
1. Create a Sheer “Glazed Donut” Manicure

Pin this chic look to your ‘Winter Beauty’ board!
The viral glazed donut nails trend is perfect for winter. It uses a sheer nude winter manicure base and a dusting of chrome nail powder to create an ethereal, high-shine look that’s subtle yet captivating. The sheer nude winter manicure acts as a neutral base for the chrome, which enables the iconic iridescent finish.
Products & Tools Used
- A sheer nude winter manicure gel polish (like a milky white or pale pink)
- High-quality base coat essentials and a no-wipe glossy top coat shine
- White pearl chrome nail powder
- A UV/LED nail lamp
- A soft eyeshadow applicator or silicone tool
- Isopropyl alcohol and lint-free wipes for nail prep
Application/Styling Steps
- Prep your nails by shaping, buffing, and cleansing with alcohol.
- Apply one thin layer of base coat and cure under your UV/LED lamp as directed.
- Layer one to two coats of your sheer nude gel polish, curing after each layer.
- Apply the no-wipe top coat and cure. Do NOT wipe the tacky layer off.
- Using your applicator, gently buff a small amount of chrome powder onto the nail until a glazed sheen appears.
- Finish with another layer of top coat to seal the powder and cure for a final long-lasting nude manicure.
Pro-Tip: In my experience, the key to a perfect glazed look is the base color’s pigment saturation levels. For a true Hailey Bieber effect, use a polish that is about 80% transparent to let your natural nail show through.

2. Style a Matte Nude with a Glossy French Tip

Save this modern twist on a classic French manicure!
Playing with texture is one of the easiest ways to create modern winter nails. This look combines a velvety matte neutral winter nails base with a super shiny, glossy tip, offering a contemporary take on the classic French manicure. The textural contrast is subtle, sophisticated, and incredibly chic.
Products & Tools Used
- Your chosen creamy nude winter tones polish (gel or regular)
- A high-quality matte top coat
- A high-shine glossy top coat
- A very thin nail art brush
- Base coat
Application/Styling Steps
- Prep and apply your base coat.
- Apply two coats of your nude polish, allowing each to dry completely (or curing if using gel).
- Layer the matte top coat over the entire nail. Let it dry or cure until it has a flat, velvety finish.
- Pour a small amount of the glossy top coat onto a palette.
- Dip your nail art brush into the glossy top coat and carefully design a thin line along the free edge of your nail, creating the French tip.
- Finish by letting the glossy tip dry (or cure if using gel) for a stunning textural contrast.
Pro-Tip: To avoid flat looking nails, this matte-and-glossy combo is a game-changer. The textural difference creates an optical illusion of depth and dimension that makes any skin-tone polish look instantly more luxurious.

3. Elevate with Subtle Gold Foil Accents

Pin this festive yet minimal idea for your holiday parties!
For a touch of holiday glamour that isn’t over-the-top, nude nails with gold accents are a perfect choice. Using delicate gold leaf flakes on a warm nude winter shade provides a festive feel while maintaining an air of sophistication. The opaque nude serves as a canvas for the gold leaf, which adds subtle warmth and answers the question, “can nude nails look festive for Christmas?”
Products & Tools Used
- A warm nude winter shade of polish
- Edible gold leaf flakes or nail art foil
- A pair of fine-tipped tweezers
- Base coat and a glossy top coat
Application/Styling Steps
- Prep nails and apply a base coat.
- Apply two coats of your warm nude polish.
- While the second coat is still slightly tacky (or after applying a thin layer of nail glue/wet top coat), use tweezers to gently place small, torn pieces of gold foil onto the nail.
- Create an abstract pattern, focusing the foil near the cuticle or scattered randomly on just one or two accent nails.
- Gently press the foil flat with your finger or a silicone tool.
- Finish with one or two thick layers of glossy top coat to smooth and seal the design, ensuring a long-lasting nude manicure.
Pro-Tip: For a more integrated look, apply the foil between your first and second coats of a sheer nude winter manicure polish. This gives the gold a “floating” effect with more depth.

4. Design a Cool-Toned Winter Ombré

Master the ombré look with this tutorial!
An ombré or gradient effect is one of the most beautiful winter neutral nail designs. By blending a deeper, cool-toned nude with milky nude winter nails, you can create a soft, snowy look that is incredibly elegant. A simple makeup sponge is the secret tool to achieving this professional-looking faded color effect at home.
Products & Tools Used
- A cool-toned nude polish (e.g., a greige or mushroom color)
- A milky nude winter nails polish (e.g., a soft, off-white)
- A small, disposable makeup sponge
- Liquid latex or tape for skin protection (optional)
- Base coat and glossy top coat
Application/Styling Steps
- Prep nails and apply liquid latex around your cuticle and sidewalls to make cleanup easier.
- Apply one coat of the lightest nude shade (the milky white) to the entire nail and let it dry.
- On a flat surface, paint a stripe of the dark nude and a stripe of the light nude right next to each other.
- Use a toothpick to swirl the two colors together where they meet.
- Press the makeup sponge directly down onto the polish stripes.
- Gently dab the sponge onto your nail. The colors will transfer and blend. Repeat for more opacity.
- While the polish is still wet, peel off the liquid latex.
- Finish with a glossy top coat to further blend the gradient and add shine.
Pro-Tip: Don’t worry if the sponge texture looks rough at first. A good, thick glossy top coat will smooth everything out for a salon-quality result.

5. Add a Sparkly Neutral Glitter Fade

A touch of sparkle! Pin this for your next celebration.
A sparkly neutral winter manicure is the perfect compromise between festive and chic. A glitter fade, where the sparkle is concentrated at the cuticle and fades out, is a modern and elegant way to wear glitter. This is one of those subtle winter designs where the satin finish nude nails provide versatility and the glitter enhances natural beauty.
Products & Tools Used
- A satin finish nude nails polish as your base
- A fine sparkly neutral winter manicure glitter polish (champagne, silver, or rose gold works well)
- Base and top coat
Application/Styling Steps
- Prep nails and apply your base coat.
- Apply two coats of your nude base color and let it dry completely.
- Wipe most of the glitter polish off the brush back into the bottle.
- Apply a denser amount of glitter at the cuticle, then gently “feather” or drag the brush down towards the tip of the nail, lifting up as you go. This will naturally create a fade.
- For a more concentrated fade, you can use a small detail brush to place individual glitters.
- Finish with one or two layers of top coat to smooth out the glitter texture. This also helps prevent chipping.
Pro-Tip: To achieve salon-quality results, choose a glitter polish with various sizes of glitter particles. The mix of small and large flecks creates more dimension and a more professional-looking fade.

6. Embrace the “Clean Girl” Sheer Manicure

The ultimate minimalist look. Pin for your everyday style board!
The “clean girl nails” trend is the definition of simple nude winter nails. This bare nail look is all about enhancing your natural nails with a wash of sheer color, impeccable prep work, and a super glossy finish. The secret is less about the polish and more about nail health; excellent cuticle oil care and perfect shaping are essential.
Products & Tools Used
- A high-quality nail buffing tool (4-way buffer)
- Nourishing cuticle oil care product
- A very sheer nude winter manicure polish with a hint of pink
- A ridge-filling base coat (optional)
- A high-shine neutral nails top coat
Application/Styling Steps
- Prep is everything. Start by meticulously cleaning up your cuticles.
- Use a nail buffing tool to smooth ridges and create a natural shine on your bare nail.
- Hydrate with cuticle oil and wipe any excess from the nail plate with alcohol before polishing.
- Apply a ridge-filling base coat if you have uneven nail texture.
- Layer one single, thin coat of your sheer nude polish. The goal is a wash of color, not full opacity.
- Finish with a very glossy top coat to give that “wet look” shine and perfect application.
Pro-Tip: This look is all about nail health. To strengthen weak nails for the perfect bare nail look, consider using a builder gel overlay instead of regular polish for added structure and durability.

7. Try a Deep Nude with a Velvet Finish

Obsessed with this texture! Pin this cozy-chic nail idea.
For a moodier, more luxurious take on nude, try deep nude nails with a velvet effect. This look is achieved using a magnetic “cat-eye” gel polish in shades like chocolate brown nails or rich caramel. The nail magnet activates metallic particles in the polish, creating a stunning light-shifting, velvet texture neutral nails effect that looks incredibly cozy and high-end.
Products & Tools Used
- A deep, warm nude winter shade of magnetic “cat-eye” gel polish (like a rich caramel or chocolate brown)
- A powerful nail magnet wand
- Black gel polish (as a base, optional for depth)
- Base coat and a high-shine top coat
- UV/LED Lamp
Application/Styling Steps
- Prep nails and apply a base coat, then cure. For extra depth, apply one coat of black gel polish and cure.
- Apply one coat of the magnetic gel polish. Do not cure yet.
- Hover the nail magnet close to the nail (without touching it) for 10-15 seconds. Move the magnet around the edges of the nail to create the velvet effect.
- Once you’re happy with the shimmer, cure immediately to lock the design in place.
- Repeat with a second coat for a more dramatic effect, using the magnet again before curing.
- Finish with a glossy top coat and cure for a mesmerizing, deep winter nude nails look.
Pro-Tip: For a diffused, all-over velvet look, hold the magnet at a 45-degree angle at the tip and then at the base. This pushes the shimmer to the center and creates a softer effect than a sharp cat-eye line. This is a manicurist recommended trick.

8. Paint a Minimalist Half-Moon Design

A vintage vibe with a modern twist. Pin this chic design!
The half-moon manicure is a classic design that feels incredibly modern when done with a classy nude nails winter shade. This minimalist winter manicure features negative space at the base of the nail, which is not only chic but also cleverly disguises nail growth, extending the life of your manicure. A simple office supply provides the secret hack to a perfect curve.
Products & Tools Used
- A light taupe or beige nude polish
- Paper reinforcement stickers (from any office supply store)
- Base coat and a top coat of your choice (matte or glossy)
Application/Styling Steps
- Prep nails and apply a clear base coat. Let it dry completely.
- Place a paper reinforcement sticker at the base of your nail, covering the area of your natural half-moon (lunula). Press it down firmly.
- Paint two coats of your nude polish over the rest of the nail, painting right over the sticker.
- Allow the polish to become almost completely dry, then carefully and slowly peel off the sticker to reveal a crisp, clean line.
- Finish with a glossy or matte top coat to seal the design.
Pro-Tip: The key to a clean line is removing the sticker at the right time. Too wet, and the polish will bleed; too dry, and the polish edge might crack and lift with the sticker. Test the timing on one nail first. This is a proven nail health tip to avoid redoing your work.

9. Coordinate with Contrasting Nude Tones

Can’t pick one shade? Wear them all! Pin this gradient idea.
Why choose one nude when you can wear five? The “skittle” or gradient manicure is a trendy neutral nail ideas for cold weather that involves painting each nail a different shade from the same color family. This creates a beautiful, cohesive look that is both playful and sophisticated neutral nails. Arranging the polishes in a gradient reflects seasonal trends and looks effortlessly curated.
Products & Tools Used
- 3-5 different creamy nude winter tones of polish in the same color family (e.g., all warm-toned, from cream to caramel to brown)
- Base coat and top coat
Application/Styling Steps
- Prep your nails and apply a base coat.
- Choose your color order. A popular method is to go from darkest on the thumb to lightest on the pinky finger.
- Paint two coats of the chosen color on each nail, following your predetermined order.
- Let the polish dry completely.
- Finish with a high-gloss top coat to tie all the colors together and add a high-shine neutral nails finish.
Pro-Tip: To ensure your gradient looks intentional and not random, stick to polishes with the same undertone. Mixing a cool-toned nude with a warm nude winter shade can sometimes clash. Check your undertones first! This is a core concept of seasonal color analysis.

10. Weave in a Subtle Sweater-Knit Texture

Your nails can be cozy, too! Pin this ultimate winter texture.
Bring the cozy feeling of your favorite sweater to your fingertips with 3D nail art. This sweater nail art technique uses gel polish to create a raised, textured pattern that mimics the cables of a knit sweater. It’s a stunningly detailed and modern winter nails look that’s perfect as an accent nail.
Products & Tools Used
- A creamy nude winter tones gel polish
- A fine-line nail art brush
- A matte gel top coat
- Base coat and UV/LED lamp
Application/Styling Steps
- Prep nails, apply base coat, and cure.
- Apply two coats of your nude gel polish, curing each layer.
- Apply a layer of matte top coat and cure. This creates the perfect canvas.
- Put a small amount of the same nude gel polish onto a palette.
- Using your thin nail art brush, design a cable-knit pattern (like vertical wavy lines and ‘x’ shapes) on top of the matte nail.
- Do not apply a top coat. Cure the 3D design. The gel will be slightly raised. For a more pronounced effect, paint over the design a second time and cure again.
- The final look is a textured, matte sweater nail that feels as cozy as it looks.
Pro-Tip: This technique only works with gel polish. The viscosity in nail polish (regular polish) is too low, so it would self-level and flatten. Gel’s higher viscosity allows it to hold the 3D shape during the photopolymerization process (curing).

11. Go Classic with a Micro French Manicure

The definition of chic. Pin this timeless and minimal French mani!
The micro French manicure is the epitome of understated elegance. This look features a classic sheer nude winter manicure base with a razor-thin white tip. It’s a classic manicure that is particularly flattering as classy nude gel nails for short nails, as the fine line creates an illusion of length. It’s a top request in salons for its timeless, polished appeal.
Products & Tools Used
- A sheer nude winter manicure polish, like a translucent pink or peach
- A highly-pigmented, opaque white polish
- An ultra-thin, long-bristled liner brush for precision nail art
- Base coat and a high-shine top coat
Application/Styling Steps
- Prep nails and apply a base coat.
- Apply one or two coats of your sheer nude polish and let it dry or cure.
- Pour a tiny amount of white polish onto a palette.
- Dip just the very end of your liner brush into the white polish.
- With a steady hand, gently drag the brush along the very free edge of your nail to create a hairline-thin white tip. It should be barely there.
- Clean up any mistakes with a separate brush dipped in acetone.
- Finish with a glossy top coat to seal the design and provide that classic manicure shine.
Pro-Tip: For an even easier application, use the tip of a silicone nail art tool or even a toothpick. Dip it in the white polish and gently stamp it along the nail’s edge. This can provide more control than a long brush for beginners.
Key Takeaways: Your Quick Guide to Winter Nude Nails
- Match Your Undertone: The most critical step for elegant winter neutral nails is choosing a shade that complements your skin. Check your veins (blue/purple for cool, green for warm) to find your perfect nude.
- Texture is Everything: Elevate a simple nude winter manicure by playing with finishes. A mix of matte vs glossy nude nails or a ‘velvet’ magnetic polish adds instant sophistication and prevents the color from looking flat.
- Embrace Subtle Art: You don’t need bold colors for a statement. A sparkly neutral winter manicure with a glitter fade, subtle gold foil, or a micro French tip are all chic ways to make nude base nails feel special for winter.
- Prep and Health First: The secret to the trendy clean girl nails look is impeccable nail health. Prioritize cuticle oil care and proper nail prep to make any sheer polish look salon-quality.
- Don’t Be Afraid to Layer: For professional-looking results with designs like ombré or glitter fades, always finish with a good quality, thick top coat to smooth textures and add a high-shine neutral nails finish.
- Gel Offers More Options: For advanced textures like 3D sweater knit or for a guaranteed long-lasting nude manicure, builder gel or UV gel polish provides the durability and viscosity that regular polish can’t.
People Also Ask About Winter Nude Nails
Can you wear nude nails in winter?
Absolutely, nude nails are a sophisticated and chic choice for winter. The key is to select shades that have cool, deep, or muted undertones (like taupe, beige, or dusty rose) rather than bright, summery nudes. A classy nude nails winter look often serves as a perfect neutral base that balances darker outfits and heavy winter fabrics, making it a versatile and modern option.
How do I keep my nude nails from looking flat?
To avoid flat-looking nails, focus on texture and shine. Opt for a high-shine neutral nails top coat for a “wet look” finish. You can also try a textural contrast, like a matte neutral winter nails base with a glossy tip, or add a subtle shimmer with a ‘glazed donut’ chrome powder. These details add dimension and make the nude color appear more intentional and luxurious.
What is the difference between winter nude and summer nude nails?
The main difference is the undertone and saturation. Summer nudes are often warmer, brighter, and may have peachy or sandy undertones that complement sun-tanned skin. Winter nude nails typically lean cooler, deeper, or more muted, featuring shades like greige, mauve, and deep beige that harmonize with the softer light and richer colors of the winter season’s fashion.
Are glazed donut nails still popular in winter?
Yes, glazed donut nails are still very popular for winter, but with a slight twist. Instead of the bright white chrome of the summer, the winter version often uses a warmer champagne or pearly white chrome over a slightly deeper or cooler nude base. This creates a more subtle, ethereal shimmer that feels cozy and sophisticated, making it one of the top winter nail trends.
How do I make my nude manicure last longer?
Proper prep and sealing are crucial for a long-lasting nude manicure. Always start by cleansing the nail plate with alcohol to remove oils. Use a quality base coat, apply thin coats of polish, and “cap” the free edge of your nail with each layer. Finish with a durable, chip-resistant top coat to prevent chipping and reapply the top coat every 2-3 days to maintain shine and protection.
Should I choose a warm or cool-toned nude for winter?
This depends entirely on your skin’s undertone, not the season. If you have cool undertones (veins appear blue, silver jewelry suits you), choose nudes with pink, blue, or gray undertones. If you have warm undertones (veins appear green, gold jewelry is best), opt for nudes with yellow, peach, or golden undertones. Matching your skin’s undertone is the most important rule.
What designs go best with nude winter nails?
Minimalist designs work best to maintain the sophisticated feel of nude nails. Subtle gold foil flakes, a single small rhinestone at the cuticle, a very thin ‘micro’ French tip, or a delicate glitter fade are all excellent choices. These accents elevate nude nails for winter without overwhelming the clean, elegant aesthetic.
Is builder gel or dip powder better for nude nails?
Both are great for durability, but builder gel often provides a more natural look for nude nails. Builder gel is excellent for adding strength while maintaining flexibility and can be sculpted for a perfect shape. Dip powder is very strong but can sometimes appear thicker, which can avoid flat looking nails but may look less natural with sheer or clean girl nails styles.
How do you make nude nails look festive for Christmas?
You can easily make nude nails look festive without using red or green. Add a fine gold or silver glitter fade from the cuticle, place a few delicate gold foil accents on a ring finger, or paint a single, tiny star or snowflake in white on a nude base. A deep, shimmery nude nails polish can also feel festive in an understated way.
What top coat gives the best shine for nudes?
For the best shine, look for a gel-like plumping top coat. These top coats are slightly thicker and create a smooth, cushiony layer over the polish that reflects light intensely. They give the appearance of a durable gel nude nails manicure without the need for a UV lamp and provide that coveted, ultra-glossy finish that makes any nude color pop.
Final Thoughts on Embracing Nude Nails This Winter
Embracing winter nude nails is about more than just choosing a color; it’s about adopting a mindset of chic, understated elegance. As we’ve explored, the key to a flawless look lies in understanding your skin’s undertones, playing with sophisticated textures, and prioritizing nail health. From the ethereal shimmer of a glazed donut finish to the cozy detail of a sweater-knit accent, a neutral manicure is a versatile canvas that integrates with winter wardrobe essentials beautifully.
This season, move beyond the idea that nude is boring. By personalizing your shade and experimenting with these elegant designs, you can create a look that is polished, modern, and uniquely you.
Which of these sophisticated neutral nails ideas will you be trying first?
Last update on 2026-03-04 / Affiliate links / Images from Amazon Product Advertising API


