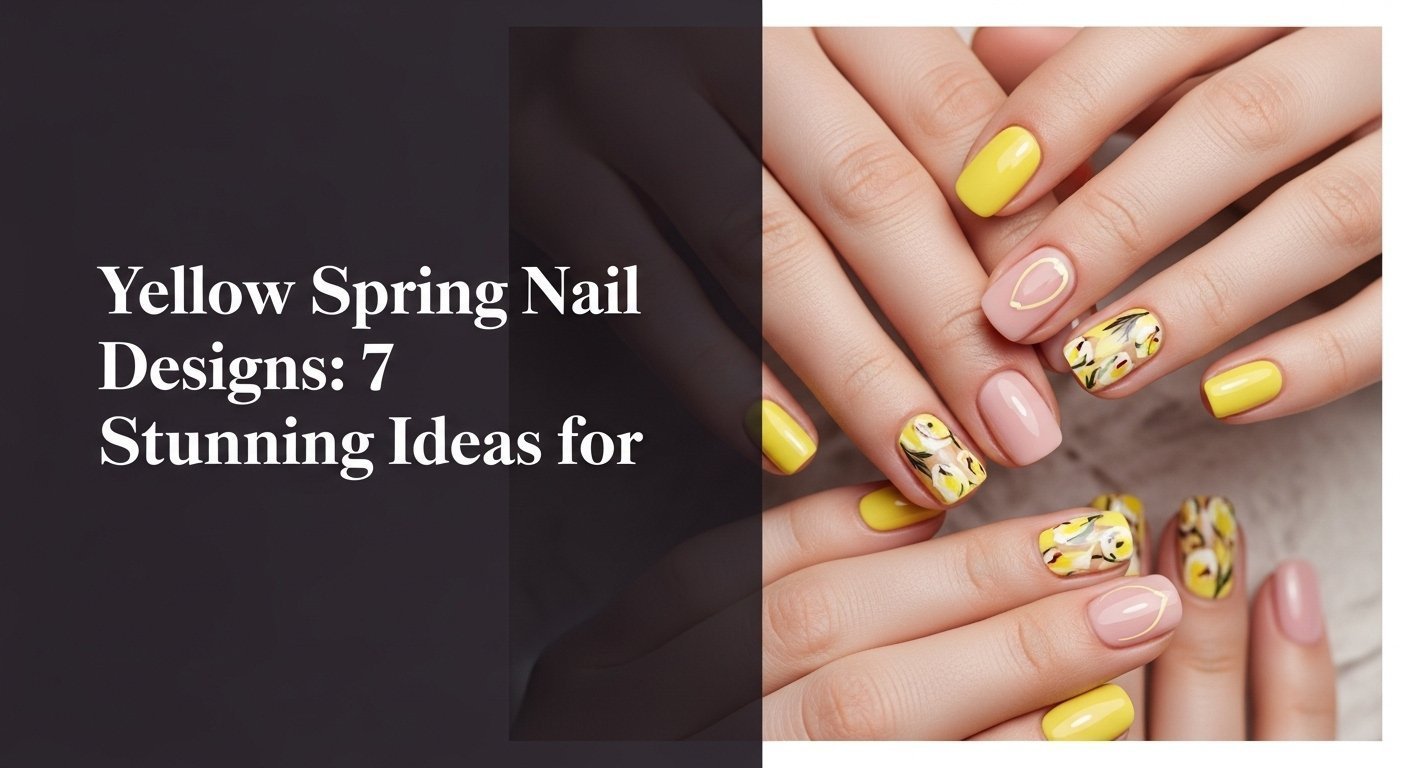
Tired of the same old winter manicure? As the days get longer and brighter, you’re likely craving a fresh, cheerful color to match the energy of the new season, and nothing says sunshine quite like the perfect yellow spring nail designs.
The trendiest yellow spring nail designs for 2026 include butter yellow french tips, pastel yellow floral art, sparkly lemon ombre, and chic geometric patterns. These styles offer a fresh, modern take on the classic spring manicure, embracing cheerful and sophisticated yellow hues. This variety ensures there is a perfect design for every style preference, from minimalist to bold.
Drawing from an analysis of current nail fashion and proven DIY methodologies, this guide will walk you through the top trends. We’ll explore seven stunning and achievable ideas that showcase the beauty of yellow nails for spring. Get ready to find your new favorite manicure and bring a dose of happiness to your fingertips.
What Are the Trendiest Yellow Spring Nail Designs for 2026?
Yellow has officially cemented itself as the go-to color for spring 2026, marking a delightful shift from moody winter tones to optimistic, sunny shades. The trend leans heavily towards more sophisticated and wearable versions of the color, with butter yellow nails leading the charge. This creamy, soft pastel is celebrated for its versatility, looking equally chic in a simple, full-coverage manicure as it does in more intricate nail art. This season is all about embracing yellow’s cheerful symbolism of happiness and renewal, making it the perfect way to refresh your look. Are you ready to find your perfect match?
7 Stunning Yellow Spring Nail Designs to Try in 2026
From subtle and chic to bright and sparkly, there’s a yellow nail design to fit every personality and occasion this spring. We’ve curated a list of seven stunning ideas that cover a wide range of styles, shades, and techniques. Each design includes a simple, step-by-step guide to help you create yellow spring nails at home or to show your nail technician for precise inspiration. Whether you love a minimalist look or a bold statement, you’ll find the perfect yellow nail inspo spring needs right here.
1. Create Chic Butter Yellow French Tips

Pin this chic butter yellow nail idea for your next spring manicure!
This design offers a modern, sophisticated twist on a timeless classic. The creamy butter yellow shade replaces the traditional white tip, creating a look that is both playful and elegant yellow spring nails. It’s the perfect way to dip your toes into the yellow trend without committing to a full-coverage color.
Products & Tools Used
- Sheer Pink or Nude Base Coat Polish (with a semi-transparent finish for a natural look)
- Opaque Butter Yellow Nail Polish (a creamy, pastel shade is ideal)
- French Tip Guide Stickers (for creating a sharp, clean line)
- Fine-Tipped Nail Art Brush (optional, for freehand application)
- Glossy High-Shine Top Coat (for a durable, gel-like finish)
Application/Styling Steps
- Prepare Nails: Prepare nails for yellow design by cleaning, filing into your desired shape (almond or squoval works beautifully), and pushing back cuticles.
- Apply Base: Apply one to two coats of your sheer nude or pink base coat. Let it dry completely.
- Position Guides: Once dry, place the French tip guide stickers firmly across each nail, leaving the tip exposed.
- Paint the Tip: Carefully paint yellow nails for spring by applying the butter yellow polish to the exposed nail tip. Apply two thin coats for full opacity, allowing drying time between each.
- Remove Guides: While the yellow polish is still slightly tacky, gently peel off the guide stickers to reveal a crisp line.
- Seal the Design: Finish with top coat by applying a generous layer over the entire nail to seal the design and add shine.
Pro-Tip: For an even crisper line without guides, dip a flat nail art brush in acetone and gently trace along the inner edge of the yellow tip to clean up any imperfections. This is a proven yellow nail technique used by professionals.

2. Design Pastel Yellow Nails with Dainty Daisies

So cute! Pin this floral nail art yellow idea for a dose of springtime sweetness.
Nothing says spring quite like flowers. This cute yellow spring nail designs with flowers and glitter idea is incredibly charming and surprisingly easy to achieve. A soft, pastel yellow spring nails base provides the perfect canvas for tiny white daisies, creating a delicate and whimsical look that’s perfect for the season.
Products & Tools Used
- Pastel Yellow Nail Polish (a soft, creamy, light yellow shade)
- Opaque White Nail Polish
- A brighter Yellow Nail Polish (for the daisy centers)
- Nail Art Dotting Tool (with at least two different sized ends)
- Glossy Top Coat
Application/Styling Steps
- Apply Base Color: Apply two coats of the pastel yellow polish to all nails and let them dry completely.
- Create Petals: Pour a small drop of white polish onto a piece of foil. Dip the larger end of your dotting tool into the white and create five dots in a circle on your chosen accent nail to form the daisy petals.
- Repeat Flower Pattern: Repeat the daisy pattern once or twice more on the nail, depending on nail length and desired density.
- Add the Center: Once the white petals are tacky, pour a drop of the brighter yellow polish onto the foil. Use the smaller end of the dotting tool to place a single dot in the center of each flower.
- Let Dry: Allow the daisy designs to dry for at least 10-15 minutes.
- Seal Design: Seal your yellow nail designs with a layer of glossy top coat to protect the art and add shine.
Pro-Tip: If you don’t have a dotting tool, the end of a bobby pin (for larger dots) and the tip of a toothpick (for smaller dots) work perfectly. This makes it one of the easiest yellow spring nail designs to try at home.

3. Achieve Dazzling Sparkly Lemon Yellow Ombre Nails

Add some sparkle! Pin this ombre nails yellow design for your next spring break nails.
For a touch of glamour, these sparkly yellow nails are an absolute showstopper. This design uses a makeup sponge to create a beautiful gradient effect, fading from a natural base to a densely packed lemon yellow glitter at the tips. It’s a fun, eye-catching look that’s perfect for a vacation or any time you want your nails to dazzle.
Products & Tools Used
- Sheer Nude or Clear Base Coat
- Lemon Yellow Fine Glitter Nail Polish
- Liquid Latex or Peel-Off Cuticle Guard
- A small, disposable makeup sponge wedge
- A high-gloss, thick Top Coat (like a gel-effect top coat)
Application/Styling Steps
- Prep and Base: Prepare and file your nails, then apply one coat of the sheer nude or clear base coat.
- Protect Skin: Apply liquid latex around your nail on the cuticle and side walls. Let it dry completely. This will make cleanup much easier.
- Apply Polish to Sponge: Paint a generous stripe of the lemon yellow glitter polish directly onto the tip of the makeup sponge.
- Create the Gradient: Gently dab the sponge onto the tip of your nail, starting about two-thirds of the way down. Concentrate the dabbing at the very tip to build up a denser layer of glitter, and use a lighter touch as you move towards the cuticle to create the ombre effect.
- Second Layer: Reload the sponge and repeat the process, dabbing slightly lower this time to intensify the glitter at the tip.
- Clean Up and Seal: While the polish is still wet, peel off the liquid latex. Finish with top coat by ‘floating’ a thick layer over the nail to smooth out the glitter texture and add intense shine.
Pro-Tip: For a smoother gradient, apply a very thin layer of the glitter polish to the entire nail before you start sponging. This creates a better base for the colors to blend into, an advanced application method for gradient yellow nails.

4. Style Minimalist Mellow Yellow Geometric Lines

For the modern minimalist: Pin this geometric nail art yellow idea.
If bold colors aren’t your style, this modern yellow spring nail designs idea is for you. It pairs a chic, muted mellow yellow with clean lines for a look that’s architectural and sophisticated. This is a perfect example of how to wear simple yellow spring nails in a way that feels intentional and high-style, making it ideal for the office or any professional setting.
Products & Tools Used
- Matte Nude or Beige Base Coat Polish
- Mellow Yellow Nail Polish (a soft, muted yellow)
- Ultra-thin Nail Art Striping Tape
- A long, thin Nail Art Liner Brush
- Glossy Top Coat (optional, for the line)
Application/Styling Steps
- Apply Matte Base: After prepping nails, apply two coats of your matte nude polish. Let it dry completely to a full matte finish.
- Place Striping Tape: Cut small pieces of striping tape and place them on the nail to create your desired geometric pattern. A single diagonal line or a vertical line off-center are great minimalist options.
- Paint the Line: Using the liner brush dipped in the mellow yellow polish, carefully paint within the lines you’ve created with the tape.
- Remove Tape: Immediately and carefully remove the striping tape while the yellow polish is still wet to ensure a crisp edge.
- Let Dry: Allow the yellow line to dry completely.
- Finish: You can leave the yellow line glossy for a mixed-texture look or apply a matte top coat over the entire nail for a fully uniform finish.
Pro-Tip: For a perfect line, don’t overload your brush. Wipe excess polish off the brush before you start painting. It’s better to do two thin, controlled coats on the line than one thick, messy one. This is a key to precision cuticle preparation for intricate yellow designs.

5. Rock a Bold Matte Mustard Yellow Accent Nail

Bold and beautiful. Pin this mustard yellow nail art idea for a chic color combo.
Embrace a richer, earthier tone with a mustard yellow nail art accent. This design pairs the deep yellow shade with a contrasting color like navy blue or cream for a look that is bold and fashion-forward. Adding a matte yellow nails finish to the accent nail provides a stunning textural contrast that feels incredibly modern and chic.
Products & Tools Used
- Rich Mustard Yellow Nail Polish
- A contrasting polish color (e.g., deep navy, forest green, or creamy white)
- A high-quality Matte Top Coat
- Standard Base Coat and optional Glossy Top Coat (for the other nails)
Application/Styling Steps
- Prep and Base Coat: Start with clean, prepped nails and apply a base coat to all fingers to prevent staining.
- Paint Main Nails: Paint the four non-accent nails (thumb, index, middle, pinky) with two coats of your chosen contrasting color. Let dry.
- Paint Accent Nail: Apply two coats of the mustard yellow polish to your ring finger (the accent nail). Ensure full, even coverage.
- Apply Glossy Top Coat: Apply a glossy top coat to the four contrasting nails to make them pop.
- Create Matte Finish: Once the mustard yellow nail is completely dry to the touch, apply one even coat of the Matte Top Coat. Watch as the finish transforms from glossy to a velvety matte.
- Final Dry: Let all nails dry completely for 15-20 minutes to avoid smudges.
Pro-Tip: Matte yellow nails can show oils from your skin. If your matte nail starts to look less matte after a few days, simply wipe it with a cotton pad soaked in rubbing alcohol to instantly restore the flat finish.

6. Curate Elegant Sheer Yellow Nails with Gold Flakes

Pure elegance. Pin this golden yellow spring nails idea for your next special occasion.
For a truly luxurious and elegant pale yellow almond shape nails for spring, this design is unmatched. It uses a “jelly” or sheer yellow spring nails polish to create a translucent, watercolor-like effect. By embedding delicate gold flakes between the layers, you achieve a stunning look of depth and opulence that’s perfect for weddings, parties, or any special event.
Products & Tools Used
- A Sheer Yellow or “Jelly” Nail Polish
- Nail Art Gold Leaf Flakes
- A pair of fine-tipped tweezers
- A clear Top Coat
Application/Styling Steps
- Base Layer: After prepping your nails, apply one thin coat of the sheer yellow polish and let it dry.
- Place Flakes: Apply a thin layer of clear top coat to the nail. While it’s wet, use tweezers to gently pick up individual gold flakes and place them randomly on the nail. Don’t aim for perfection; a scattered look is more organic.
- First Encapsulation: Apply another thin layer of the sheer yellow polish over the top of the gold flakes. This will ‘sandwich’ them and begin to create a look of depth.
- Add More Flakes (Optional): If you desire more depth, repeat step 2 and 3, adding another layer of flakes and another layer of sheer polish.
- Smooth and Seal: The gold flakes can sometimes create a bumpy texture. Finish with one or two thick layers of a glossy top coat to create a smooth, glass-like surface.
Pro-Tip: For a more diffused and subtle gold effect, mix a few crushed-up gold flakes directly into a small amount of your sheer yellow polish on a palette before applying it to the nail. This is an example of complex yellow nail art layering techniques.

7. Style Trendy Chrome Yellow Abstract Swirls

Catch the trend! Pin this chrome yellow spring nails design for a high-fashion look.
Capture one of the hottest latest yellow spring nail designs with these abstract chrome swirls. This advanced look uses yellow chrome powder to create a liquid-metal effect over a milky white base. The free-flowing, abstract swirls make each nail a unique piece of art, perfect for anyone who loves staying ahead of the trends. Note: this design requires gel polish and a UV/LED lamp.
Products & Tools Used
- A UV/LED Nail Lamp
- Milky White or Nude Gel Polish
- No-Wipe Gel Top Coat
- Yellow Chrome Nail Powder
- A long, fine-tipped Nail Art Liner Brush
- A small eyeshadow applicator or silicone tool
Application/Styling Steps
- Apply Gel Base: After prepping nails, apply two coats of milky white gel polish, curing each layer under the UV/LED lamp according to the polish instructions.
- Draw with Top Coat: Using the liner brush, dip into the No-Wipe Gel Top Coat and draw abstract swirl patterns on top of the cured white base. Do NOT cover the whole nail.
- Cure the Swirls: Cure the clear swirls under the lamp for only 15-30 seconds (or half the recommended full cure time). The top coat should be firm but slightly tacky.
- Apply Chrome Powder: Dip your eyeshadow applicator into the yellow chrome powder. Firmly rub the powder only over the areas where you drew the clear swirls. The powder will only stick to the cured top coat.
- Dust Off Excess: Use a fluffy brush to gently dust off all the excess powder. The chrome effect should now be visible only on your swirl pattern.
- Seal Everything: Apply a final, full layer of the No-Wipe Gel Top Coat over the entire nail to seal in the chrome art and prevent chipping. Cure for the full recommended time.
Pro-Tip: The key to a perfect chrome application is the cure time in step 3. If you over-cure, the powder won’t stick. If you under-cure, it will be a smudgy mess. Test your lamp’s timing on a swatch stick first. This is a crucial step in photopolymerization in yellow gel nails.

People Also Ask About Yellow Spring Nail Designs
Are yellow nails trending for Spring 2026?
Yes, yellow nails are a major trend for spring 2026, especially softer shades like butter yellow and pastel yellow. Fashion runways and social media have highlighted these cheerful yet sophisticated hues as a top choice for the season, moving away from the neons of past years towards more versatile, creamy tones.
What nail designs go with pastel yellow for spring?
Pastel yellow pairs beautifully with simple, delicate designs like small white daisies, thin glitter accent nails, or minimalist white lines. It also looks stunning in a color-blocking design next to other pastels like lilac, baby blue, or mint green for a classic springtime palette.
How do I choose the right yellow shade for my skin tone in spring?
For fairer skin tones, creamy butter and pastel yellows are very flattering. For medium or olive skin tones, brighter lemon and golden yellows can look stunning. For deeper skin tones, rich mustard and vibrant sunflower yellows provide a beautiful, bold contrast.
What are the best yellow nail designs for Easter?
The best yellow nail designs for Easter often incorporate other pastel colors and spring motifs. Consider a pastel yellow base with small, speckled “robin’s egg” dots in blue and pink, a subtle yellow and white gingham pattern, or a simple design featuring a single bunny silhouette on an accent nail.
How can I prevent streaky yellow nail polish?
To prevent streaky yellow polish, apply thin, even coats and allow each one to dry completely before applying the next. A good quality base coat also provides a smooth canvas. Shaking the bottle well and ensuring the polish isn’t too old or thick are also key to a smooth application.
Can I do yellow ombre nails for spring?
Absolutely, yellow ombre is a fantastic choice for spring. A popular combination is a gradient from a nude or milky white base at the cuticle to a vibrant yellow at the tip. You can also create an ombre effect that blends two shades of yellow, like pastel and lemon.
Are matte yellow nails suitable for spring?
Yes, matte yellow nails are a very chic and modern option for spring. A matte top coat can instantly elevate a simple mustard or mellow yellow manicure, giving it a sophisticated, high-fashion feel that contrasts beautifully with the usual glossy finishes of the season.
How to make yellow nails last longer in spring?
To make your yellow manicure last, proper prep and sealing are crucial. Always start with a clean, dry nail plate and use a quality base coat. After applying your color, wrap the tip of the nail with your top coat to prevent chipping. Re-applying a thin layer of top coat every 2-3 days can also extend the life of your manicure.
What are good yellow and pink nail designs for spring?
Yellow and pink are a cheerful spring combination. Consider a design with alternating yellow and pink nails, a pink-to-yellow gradient ombre, or a yellow base with small pink floral or heart details. A pastel yellow and a dusty rose pink create a particularly elegant look.
Is lemon yellow a good spring nail color?
Yes, lemon yellow is a great spring nail color if you’re looking for something bright and energetic. While softer butter yellows are trendier for a chic look, a vibrant lemon yellow is perfect for spring break nails or for anyone wanting to make a bolder, sunnier statement.
Final Thoughts on Your Perfect Yellow Spring Manicure
From creamy butter yellow french tips to dazzling chrome yellow swirls, it’s clear that yellow is the most versatile and joyful color for your nails this season. Whether you prefer a subtle, minimalist design or a bold, artistic statement, there is a perfect yellow manicure waiting for you. These seven ideas are just the beginning, so don’t be afraid to experiment with different shades, textures, and patterns to create a look that is uniquely yours.
Which yellow spring nail design will you try first?
Last update on 2026-03-04 / Affiliate links / Images from Amazon Product Advertising API


