Struggling to get that perfect, festive manicure for the holidays? You’ve seen the stunning Christmas bow nails on coffin shapes, but worry about 3D charms snagging or the design looking bulky on shorter nails. It’s a common frustration to want a salon-quality look that actually lasts through all the season’s events.
Christmas bow coffin nails are a trending holiday design that combines the elegant, tapered coffin nail shape with festive ribbon and bow motifs, often incorporating 3D charms or intricate painted art. This style is especially popular because it merges classic holiday cheer with the modern, hyper-feminine coquette aesthetic, offering a versatile canvas for both bold and subtle designs.
Drawing from proven methodologies and professional application techniques, this guide reveals the secrets to a flawless finish. You’ll discover how to perfectly scale bows for any nail length and secure 3D art for long-lasting wear. Get ready to master the ultimate holiday manicure.
Are Christmas Bow Coffin Nails Still the Ultimate Holiday Vibe?
Yes, the Christmas bow coffin nail trend is more popular than ever, and for good reason. According to certified nail artists, this specific combination perfectly marries the classic holiday aesthetic with the modern, tapered coffin shape. This shape provides an exceptional canvas for showcasing intricate designs like festive ribbon art, from miniature painted bows to stunning 3D charms. A major driver of this trend in 2026 is the rising influence of the coquette aesthetic, which favors delicate, feminine details like the bow motif. This guide will reveal the key secrets to mastering this look, addressing common issues like longevity and achieving a classy, professional finish.
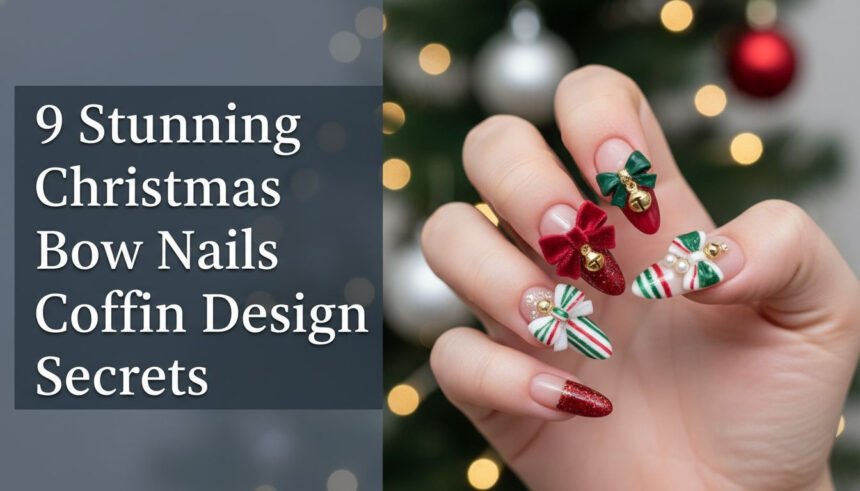
9 Stunning Christmas Bow Nails Coffin Design Secrets to Master This [Year]
To achieve a truly stunning bow coffin manicure, you need more than just inspiration—you need the technical secrets that professionals use. The following nine tips cover everything from design execution to crucial application techniques for longevity and perfect shaping. Gathered from professional application troubleshooting and long-term wear tests, these secrets will help you master elegant designs, secure 3D elements, and prevent common failures, whether you’re a DIY enthusiast or using press-ons.
1. The Proportional Secret: Scaling the Bow for Short Coffin Lengths

Pin this genius hack to your ‘Short & Chic Nail’ board!
The biggest challenge with short coffin nails is making the bow motif look elegant rather than cluttered. The secret is all about proportion and placement. Using miniature, low-profile bows and positioning them strategically creates a lengthening effect on the limited nail canvas.
Products & Tools Used:
- Miniature 3mm Resin Bow Charms: Avoid larger bows; look for flat-backed designs.
- Sheer Pink or Nude Base Coat: Required for an elegant, lengthening effect.
- Fine-Tip Builder Gel: Clear, low viscosity is best for securing charms.
- UV/LED Curing Lamp: Required to set the builder gel.
Application/Styling Steps:
- Prepare the short coffin nails by filing the shape and applying a sheer base coat, curing fully.
- Apply a small, controlled dot of builder gel to the intended placement spot (ideally near the cuticle line to maximize nail bed visual length).
- Using an orange stick or tweezers, gently press the miniature bow charm into the builder gel, ensuring it is level and straight.
- Cure the nail under the UV/LED lamp for a minimum of 60 seconds to fully set the adhesion.
- Apply a non-wipe top coat around the bow (avoid covering the charm itself to maintain its texture) and cure one final time.
Pro-Tip: Placing the bow at the cuticle line draws the eye upward, making the short coffin shape appear slightly longer and more elegant.

2. The Longevity Secret: Securing 3D Charms with Builder Gel

Save this clever organization idea!
A 3D bow charm falling off is a major pain point. The professional secret to ensuring your bow nails last 3+ weeks is using clear builder gel, not standard nail glue. Builder gel creates a much stronger bond and allows you to build a smooth, anti-snagging barrier around the base of the charm.
Products & Tools Used:
- High-Quality Clear Builder Gel: Medium viscosity is ideal for creating a strong base.
- 3D Bow Charms/Sculpted Acrylic Bows: Your desired design.
- Fine Dotting Tool or Nail Art Probe: For manipulating the gel.
- UV/LED Lamp (36W minimum): Essential for full, proper cure.
Application/Styling Steps:
- Apply two coats of cured gel color and wipe off the tacky layer of the base coat.
- Place a small bead of builder gel onto the precise spot where the bow will sit—this acts as an anchor.
- Press the 3D charm gently into the gel, ensuring the base makes full contact without forcing the gel out from the sides.
- Using the fine dotting tool, carefully pull a thin, clear layer of builder gel around the base perimeter of the bow charm, creating a smooth, gradual “ramp.” This is the anti-snagging barrier.
- Cure the nail under the UV/LED lamp for 120 seconds (a longer cure is often needed for the thick builder gel). Do not apply a top coat over the 3D element unless specifically instructed.
Lesson Learned: Never rely solely on standard nail glue for large or heavy 3D charms on long-wear manicures; builder gel is the professional-grade solution.

3. The Coquette Crush: Soft Pink Bases with Dainty Cream Ribbons

This is the must-try holiday trend! Pin it now!
To achieve the sophisticated and trending Coquette aesthetic, move away from traditional red and embrace soft, delicate colors. This look is all about a hyper-feminine vibe, using sheer pink bases and tiny, hand-painted cream-colored ribbon bows for a subtle, elegant holiday statement.
Products & Tools Used:
- Sheer Pink Gel Polish: A milky or jelly finish works best for the soft base.
- White or Cream Nail Art Gel/Polish: High opacity required for the bows.
- Fine Liner Brush (000 size): Essential for painting delicate, thin ribbon loops.
- Dotting Tool (Smallest size): To create the center knot of the bow.
Application/Styling Steps:
- Apply and cure two thin coats of the sheer pink gel base polish.
- Dip the fine liner brush into the cream polish and paint two small, symmetrical triangles (the bow loops) next to each other on the accent nail.
- Use the smallest dotting tool to add a tiny dot in the center, acting as the bow knot, covering the joining point of the triangles.
- For the true Coquette look, repeat this process, adding two more perfectly spaced miniature bows vertically below the first one.
- Seal with a high-shine top coat and cure fully.
Pro-Tip: For ultimate delicacy, restrict the Coquette bow design to a single accent nail or use only the ring and pinky fingers, keeping the thumb and index nails solid sheer pink.

4. The Classic Glam Secret: Red Velvet Matte Base with Glossy 3D Bows

Pin this dramatic look for your holiday party!
Elevate the classic red Christmas bow nails by introducing a high-impact textural contrast. The secret to a modern, glamorous look is pairing a deep, velvet matte finish on the coffin nail with a high-shine, glossy 3D bow charm. This contrast makes the bow pop and gives the entire manicure a luxurious, expensive feel.
Products & Tools Used:
- Deep Red Gel Polish: High opacity, cherry or wine red shade.
- High-Quality Matte Top Coat: Required to create the velvet base effect.
- 3D Resin Bow Charm (Red or clear, to be painted): Must be medium size for impact.
- High-Shine Top Coat: Used exclusively on the bow for gloss.
Application/Styling Steps:
- Apply and cure two thin coats of the deep red base color on all coffin nails.
- Apply the matte top coat over the color base of the nail and cure fully, creating the velvet effect.
- Secure your 3D red bow charm using the builder gel technique (Secret No. 2), curing thoroughly.
- Carefully apply a layer of the high-shine top coat only onto the surfaces of the 3D bow charm, making the bow pop against the matte base.
- Cure the final top coat on the bow (if applicable) and wipe any sticky residue if necessary.
Pro-Tip: The juxtaposition of the matte base and the high-gloss bow creates a sophisticated, expensive-looking texture that prevents the red design from looking too flat or simplistic.

5. The Elegant Reverse Secret: White Coffin Nails with Negative Space Ribbons

Pin this classy, work-appropriate holiday idea!
For a sophisticated, work-appropriate holiday look, the secret is subtlety. This design uses a negative space technique on a clean, opaque white base to create the illusion of a bow. It’s an elegant, high-end approach that is perfect for professional settings or anyone who prefers a minimalist festive touch.
Products & Tools Used:
- Opaque White Gel Polish: Requires full coverage in two thin coats.
- Thin Nail Art Stencil or Tape: Cut into thin strips to create the ribbon shape.
- Gold Metallic Liner Polish: Highly pigmented, fine brush attached.
- Cleanup Brush dipped in Acetone: For perfecting the edges.
Application/Styling Steps:
- Apply and cure the white base color fully (two thin coats).
- Apply a thin strip of tape or a stencil template in the desired bow shape onto the cured white layer. Ensure edges are firmly pressed down.
- Paint a thin layer of gold metallic liner polish only on the borders of the tape/stencil to create the outline of the bow, leaving the shape underneath bare.
- Carefully peel off the tape/stencil while the gold liner polish is still wet (or immediately after a flash cure for gel).
- Seal the entire design with a top coat and cure. The “negative space” area will appear as a clean white bow framed in gold.
Pro-Tip: For maximum crispness on the negative space bow, apply a peel-off latex barrier around the area you wish to protect instead of thin tape, especially if the white base is cured gel.

6. The Perfect Shape Secret: Achieving Symmetrical Coffin Tapering

Master the shape! Save this filing tutorial to your ‘Nail Goals’ board.
The foundation of any beautiful bow manicure is a perfectly symmetrical coffin shape. Any unevenness in the tapering is visually amplified by centered designs. The secret to achieving this shape lies in a precise, methodical filing technique that protects the nail’s structural integrity.
Products & Tools Used:
- Nail File (100/180 Grit): Essential for shaping acrylic or thick gel; use a less abrasive file for natural nails.
- Buffer Block (220/280 Grit): To smooth the surface after initial shaping.
- Straight Edge Guide (Optional): A small card or tool to check symmetry.
Application/Styling Steps:
- Establish the Length and Free Edge: File the tip of the nail flat and straight, perpendicular to the side walls, defining the final length of the coffin shape.
- File the Side Walls: File the side walls straight up from the nail bed, ensuring they remain strong. Avoid filing aggressively into the stress points.
- Create the Taper: Starting from the side walls near the middle of the nail bed, begin filing inward with a slight angle (around 30 degrees), moving toward the squared tip. The taper should be gradual and even.
- Check for Symmetry: Hold the nail straight and visually compare the width of the tapered sides, ensuring they match perfectly. The final tip should be significantly narrower than the base, but wider than an almond shape.
Expertise Tip: The biggest mistake is filing the side walls too aggressively at the base, which weakens the nail structure and leads to breaks. Keep the filing contained to the upper half of the nail for the taper.

7. The Time-Saver Secret: High-Quality Press-On Coffin Nails with Pre-Applied Bows

Need fast festive nails? Save this press-on guide!
For a last-minute holiday event or a quick, flawless look without the DIY effort, high-quality press-on nails are the ultimate secret weapon. Modern press-ons feature durable, pre-applied resin bows that look salon-quality. The key to making them last is a meticulous prep routine.
Products & Tools Used:
- Pre-Designed Coffin Press-On Set (with bows): Look for high-quality ABS or acrylic material for durability.
- High-Adhesion Brush-On Nail Glue: Often included, but supplementary purchase recommended for better hold.
- Prep Tools (Buffer Block, Alcohol Wipe/Pad): Essential for preparing the natural nail surface.
Application/Styling Steps:
- Prep the Natural Nail: File, gently buff the surface of your natural nails to create texture for the glue, and wipe clean with the alcohol prep pad to remove all oils.
- Size and Organize: Lay out the press-on nails and match them perfectly to your natural nail size. Never use a nail that is too small or too large.
- Apply Adhesive: Apply a thin, even layer of brush-on glue to both the natural nail and the underside of the press-on nail.
- Affix: Align the press-on against your cuticle line and press down firmly for 30 seconds, holding tightly until the glue cures. Repeat for all 10 nails.
Pro-Tip: If the press-on bows feel sharp or snag, apply a tiny, almost invisible bead of clear brush-on resin or gel top coat to smooth the edge where the bow meets the press-on surface, then cure.

8. The Dimensional Secret: Painting Symmetrical Flat Ribbon Bows

DIY perfect bows! Save this beginner-friendly tutorial.
If 3D charms aren’t practical for you, a perfectly painted flat bow offers superior durability with zero snag risk. The secret to achieving a clean, symmetrical design is using the right tools and a simple, step-by-step technique that starts from the center and works outward.
Products & Tools Used:
- Nail Art Polish/Gel (High Pigment): Black, red, or white, depending on contrast.
- Fine Liner Brush (000 Size): Crucial for thin, crisp ribbon tails.
- Dotting Tool (Smallest Tip): Used for the knot and ensuring symmetry.
- Palette or Foil: To thin and control the polish flow.
Application/Styling Steps:
- Apply and cure the base color and any background design (e.g., French tip).
- Dip the smallest dotting tool into the bow color and place a single dot where the center knot of the bow will be located. This dot acts as your center point and size guide.
- Clean the dotting tool and dip the fine liner brush into the polish. Start from the edge of the center dot and paint a small, curved triangle outward to the left for the first loop.
- Repeat the process, starting from the opposite edge of the center dot and painting a symmetrical curved triangle outward to the right for the second loop.
- Once dry, seal the entire design with two layers of top coat, ensuring the edges of the painted design are fully covered.
Pro-Tip: Ensure the fine liner brush is not overloaded with polish; slightly drag the brush tip on a palette before drawing to prevent bleeding and keep your lines thin and crisp.

9. The Ultimate Polish Secret: The Anti-Snagging Coffin Nail Cuticle Oil Routine

Keep your bows secure! Pin this essential maintenance routine.
The secret to preventing snagging, lifting, and premature detachment—especially for press-ons with 3D elements—is a diligent daily maintenance routine. Cuticle oil is the hero product that keeps the edges of your enhancements flexible and hydrated, preventing them from catching on hair and clothing.
Products & Tools Used:
- High-Quality Cuticle Oil (with Jojoba or Vitamin E): Required for flexibility and hydration.
- Gentle Buffer Block: For smoothing any sharp press-on edges.
- Small, Pointed Nail File: To address snags immediately.
Application/Styling Steps:
- Daily Moisturizing: Apply a generous drop of cuticle oil around the entire perimeter of each nail (cuticle and side walls) twice a day—once in the morning and once before bed.
- Massage and Seal: Gently massage the oil into the skin and the edges where the press-on or 3D element meets the natural nail. This prevents the enhancement from drying out and cracking or catching hair.
- Immediate Snag Repair: If you feel a sharp edge or a loose spot on a press-on or 3D charm, immediately smooth it down using a fine buffer or apply a small amount of liquid topcoat and cure/dry. Never pull or try to pry it off.
- Avoid Prolonged Soaking: Minimize exposure to long, hot baths or dishwater, which dissolves glue and weakens adhesion. Wear gloves for cleaning tasks.
Pro-Tip: Keeping the cuticle area super hydrated makes press-ons and acrylics more flexible, preventing the rigid edges from catching hair or clothes, which is the number one cause of premature lifting.

Key Takeaways: Your Quick Guide to Christmas Bow Longevity
- Bow Scaling Rule: For short coffin nails, restrict the bow size to 3-5mm and place it near the cuticle line to maintain an elegant, proportional aesthetic.
- 3D Charm Security: Always use a layer of clear builder gel, not just standard nail glue, to secure resin or acrylic 3D bows for anti-snagging and wear lasting 3+ weeks.
- Filing Symmetry: Ensure a perfectly symmetrical coffin taper by filing straight side walls first, then gradually angling the edges inward toward the squared tip.
- Anti-Lifting Routine: Apply cuticle oil twice daily along the nail perimeter to keep the edges flexible and prevent lifting, especially when wearing press-on nails.
- Aesthetic Choice: Use textural contrast (matte base vs. glossy bow) or subtle pink/cream palettes (Coquette) to elevate the design from ‘childish’ to ‘classy.’
People Also Ask About Christmas Bow Coffin Manicures
Are coffin nails still in style for Christmas 2026?
Yes, coffin nails remain one of the most popular and versatile nail shapes for the 2026 holiday season. They are highly favoured because the shape provides an excellent, large, blunt canvas for detailed nail art, perfectly showcasing intricate designs like the Christmas bow motif. The shorter coffin variation is particularly popular for combining trendiness with practicality.
How do I safely remove press-on coffin nails without damaging my natural nails?
The safest way to remove press-on coffin nails is through an oil-soaking method. Submerge your fingers in a bowl of warm, soapy water mixed with a few drops of cuticle oil for 15-20 minutes. The oil and heat will gently loosen the adhesive. Use an orange stick to slowly and carefully lift the edges, ensuring you do not peel or force the nail off, which can damage the natural nail plate.
What is the difference between a 3D bow and a painted bow in terms of longevity?
3D bows offer maximum dimension and visual impact but inherently have a higher risk of snagging and premature detachment. When secured properly with builder gel, they can last over three weeks. Painted flat bows, however, offer superior longevity and durability with virtually zero snag risk, often lasting as long as the base manicure remains chip-free.
Can I get the Christmas bow look on short coffin nails for a professional work environment?
Absolutely. To keep the look work-appropriate, opt for minimalist bow designs. Use flat decals or hand-painted bows in neutral colors like winter white, sheer nude, or metallic gold accents. Keep the length short and restrict the design to a single accent nail (ring or pinky finger) for a sophisticated, subtle festive touch.
Final Thoughts
The ultimate Christmas bow coffin manicure hinges on two factors: inspired design and flawless technical execution. By implementing the 9 secrets—from perfectly tapering the coffin shape to securing those beautiful 3D charms with professional-grade builder gel—you can achieve a salon-quality, long-lasting look that effortlessly captures the festive spirit and the delicate coquette aesthetic. Whether you choose the speed of press-ons or the customization of DIY gel, mastery of the proportional sizing (especially for short nails) is your final key to success.
Which of these 9 stunning secrets will you try for your festive manicure this June? Let us know in the comments
Last update on 2026-04-27 / Affiliate links / Images from Amazon Product Advertising API