Does your natural hair struggle with dryness and breakage the moment winter hits? Cold weather and static friction are the biggest contributors to hair damage during the season. Finding an easy, long-lasting solution is essential for maintaining hair health and simplifying hair routines.
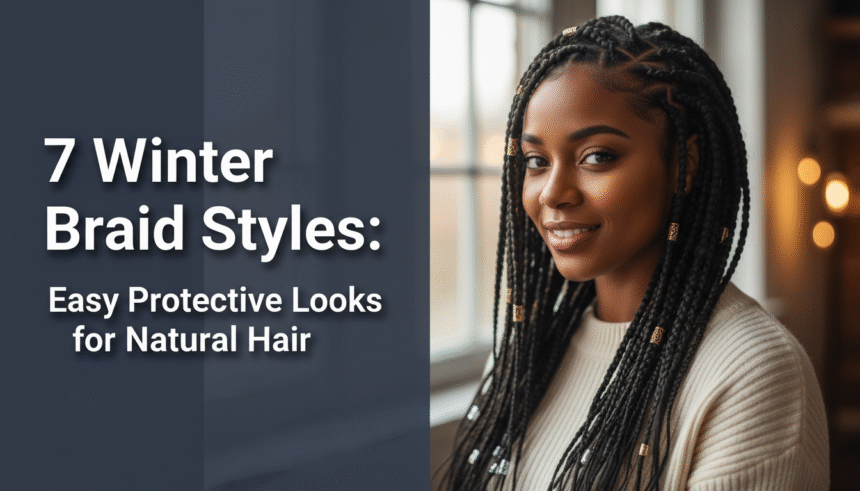
Winter braid styles are essential protective looks because they significantly minimize daily manipulation, shield natural hair from harsh cold weather and static friction, and lock in necessary moisture, thereby preventing common winter hair challenges like dryness and breakage. These protective styles serve as a crucial shield for your delicate ends and porous natural hair against environmental stressors. Drawing from comprehensive analysis of current data and proven protective methods, we present the ultimate guide to winter braid hair styles. You will discover seven chic and functional designs, detailed tutorials, and verified winter hair solutions. This definitive guide ensures you can embrace stylish protective styling all season long.
Why Are Winter Braid Hair Styles the Ultimate Protective Solution for Natural Hair?
Winter braid styles are ideal protective solutions because they reduce the need for daily styling (low manipulation solutions), which is key to preventing the breakage and split ends common during cold weather. The winter season presents unique challenges, primarily low humidity, cold air, and increased static from scarves and hats. These factors strip hair of moisture quickly, leading to dry hair solutions being a high priority. Protective winter braids combat these issues by sealing moisture in and minimizing exposure to damaging friction and cold thermal dynamics.
Choosing protective winter braids, such as knotless braids or twists, is a strategic move for hair health. These styles keep the natural hair fully tucked away, reducing the effects of cold weather hair damage and allowing you to maintain hydration deep within the strand. This not only prevents damage but actively promotes hair growth by stabilizing the hair structure and reducing the seasonal hair cycle influence on protective styling.
Most guides simply list styles, but the true benefit of winter braids lies in understanding the environmental factors at play.
Expert Insight: Thermal Dynamics of Hair Protection in Cold Climates
An often-overlooked strategy is counteracting the negative thermal dynamics of cold climates. When the temperature drops, the hair cuticle contracts, making it vulnerable to moisture loss. Braided hair protection works by providing a physical barrier and retaining body heat closer to the scalp, which encourages better penetration of sealants and emollients. This is why utilizing the L.O.C. method (Liquid, Oil, Cream) before and during the wear of your winter braid styles is a proven protective method, maximizing moisture retention against the moisture-stripping cold. Consistent use of protective styling during the winter season simplifies hair routines while actively improving hair health.
7 Winter Braid Styles: Easy Protective Looks You Can Install and Maintain
This comprehensive list of the best winter braid styles provides both installation and critical maintenance advice, ensuring your protective style achieves maximum longevity and aesthetic appeal while keeping your natural hair safe.
1. Mastering Sleek Knotless Box Braids (Low-Tension Style)

Pin this sleek, long-lasting protective style to your ‘Winter Hair Goals’ board!
Knotless box braids are highly recommended for the winter season due to their gentle, low-tension installation method. Unlike traditional box braids, the knotless technique minimizes the biomechanics of tension at the root, ensuring scalp health is prioritized during long-lasting winter braids. This chic winter look offers durability and versatility, making it a functional and fashionable choice for months.
Products & Tools Used
- Moisturizing leave-in conditioner suitable for natural hair before braiding
- Braiding hair (pre-stretched, lightweight synthetic fiber)
- Non-flaking styling gel for clean parts
- Lightweight hair growth oil for scalp application
- Rat-tail comb and sharp scissors
Styling/Maintenance Steps
- Preparing: Apply a high-quality, lightweight sealant to your natural hair strands after washing and conditioning (sealing moisture).
- Sectioning: Section hair into clean, manageable squares using non-flaking gel for smooth, defined parts (sectioning, parting).
- Installing: Begin with your natural hair before gradually feeding in the braiding hair, ensuring zero initial tension at the root (advanced knotless braiding techniques).
- Sealing: Dip the ends of the completed braids in hot water (not boiling) to seal the ends, preventing unraveling and damage.
- Protecting: Moisturize the entire length lightly every three days with a spray that helps retain moisture, focusing on the ends.
Pro-Tip: The key to a low-tension style is controlling the weight of the braiding hair. Use pre-stretched hair that is no heavier than 20 inches and avoid extremely large sections to prevent strain on the follicular health in protective hair designs.

2. Achieving Bohemian Goddess Braids (Textured Winter Look)

Save this textured, stylish protective style for your next salon visit!
Bohemian goddess braids offer a fashionable and versatile twist on classic protective styling. The integration of loose, wavy curly tendrils provides a soft aesthetic, but requires specialized frizz control solutions to withstand the humid winter air. This look is perfect for those seeking elegant winter braid styles that still ensure natural hair is protected.
Products & Tools Used
- High-quality, human hair blend or premium synthetic braiding hair for the loose ends
- Light finishing hair oil to seal shine and moisture
- Non-greasy anti-frizz mousse specifically for curl maintenance
- Silk bonnet or scarf for nightly protection
Styling/Maintenance Steps
- Installing: Ensure the loose curly pieces are braided in strategically, leaving enough length exposed for the bohemian effect (braiding, achieving).
- Nightly Care: Gently twist the exposed curly pieces and tuck them under a silk bonnet to prevent frizz and matting while sleeping (protecting, caring for).
- Refreshing: Every morning, apply a small amount of non-greasy mousse to the exposed curls, scrunching gently to reactivate the curl pattern (refreshing).
- Moisture Sealing: Use a light oil (like jojoba) along your scalp line and down the braid length to combat winter dryness without weighing down the curls.
- Avoiding Friction: Minimize scarf friction by wearing a satin-lined hat or hoodie when going outside in cold weather (hair protection from cold).
Pro-Tip: The greatest challenge with Bohemian braids in winter is managing static and frizz. Use specialized hair spray with anti-static properties and avoid heavy oils on the exposed curls, which can attract dust and lint quickly.

3. Creating Stylish Feed-In Cornrows with a Headband Updo
Need a quick, elegant style? Pin this easy cornrow updo!
Feed-in cornrows are among the quickest winter braids to install, offering an immediate and simple protective option. The feed-in technique ensures the braids lie flat and smooth against the scalp, minimizing bulkiness often associated with adding extensions. Styling them into a braided updo with a headband offers maximal end protection and an elegant winter look suitable for professional settings.
Products & Tools Used
- Strong hold edge control gel that won’t flake or dry out
- Pre-stretched braiding hair for the feed-in method
- Hair oil to lubricate hands during braiding
- Satin-lined headband or turban
- Precision rat-tail comb
Styling/Maintenance Steps
- Parting: Create extremely crisp parts, following the desired curve of the cornrow, using strong hold gel on the edges (sectioning, designing).
- Feeding In: Use the feed-in method starting near the hairline and gradually incorporating small pieces of braiding hair to ensure a flat, smooth foundation (braiding, installing).
- Securing: Braid all hair toward the nape and secure the ends into a simple, tight bun, protecting the ends completely (securing, protecting).
- Styling: Wrap a satin-lined turban or headband around the hairline to minimize friction and further protect your edges from harsh winter fabrics (protecting scalp).
- Refreshing: Refresh edges every 2-3 days using a dab of edge control, avoiding product buildup that could cause scalp irritation relief.
Pro-Tip: When installing cornrows for winter, ensure the braid lines are not too close together. This allows better access for moisturizing the scalp and prevents the biomechanics of tension from stressing the roots, supporting healthy hair growth.

4. Installing Chunky Two-Strand Twists (Maximum Moisture Seal)

Want low-manipulation protection? Pin this twist style now!
Chunky two-strand twists are a classic protective style that provides maximum moisture retention, making them an excellent choice for managing natural hair in winter. Since they are low manipulation solutions, they offer your hair a break while the twist structure helps trap and hold product emollients, preventing the dry hair solutions problem often faced during cold weather.
Products & Tools Used
- High-quality water-based moisturizing spray (Liquid)
- Natural hair oil (like Jamaican Black Castor Oil) (Oil)
- Thick, defining twisting cream or butter (Cream)
- Wide-tooth comb for detangling
Styling/Maintenance Steps
- Preparing: Ensure hair is fully detangled. Section the hair into large, manageable squares (sectioning).
- Moisture Sealing: Apply the L.O.C. method to each section: mist with liquid, apply oil to seal, and then apply twisting cream/butter (moisturizing, sealing).
- Twisting: Separate the section into two strands and twist them around each other tightly but without tension at the root. Twist all the way to the ends (twisting).
- Securing: Secure the ends with a small rubber band or simply curl the end around your finger (securing).
- Routine: Every night, mist the scalp and twists lightly with moisturizing spray. Re-apply a small amount of oil only if twists feel dry (caring for, maintaining).
Pro-Tip: The efficacy of two-strand twists as a protective style in winter is directly related to the density of the sealing products. Use heavier butters (compared to gels) to counteract the moisture-stripping effects of thermal dynamics in cold climates.

5. Achieving Small Micro Braids Updo (Versatility and Longevity)

Looking for a style that lasts all winter? Pin this longevity guide!
Micro braids are the ultimate choice for versatility and longevity, often lasting up to 12 weeks. While installation is time-intensive, the low-maintenance winter braid styles they provide justify the initial effort. Because they are worn for an extended period, protecting scalp health is vital. Styling them into an updo prevents vulnerable ends from rubbing against winter fabrics, supporting breakage prevention.
Products & Tools Used
- Lightweight, synthetic micro braiding hair (or use natural hair only)
- Scalp astringent or tea tree oil-based refresher spray
- Non-heavy moisturizing spray specifically formulated for braids
- Cotton swabs for targeted cleaning
Styling/Maintenance Steps
- Installation (Focus): Section hair into the smallest, most precise squares possible, but ensure the tension is evenly distributed and never too tight at the root (braiding).
- Scalp Cleansing: Once a week, use cotton swabs soaked in astringent to gently clean the parts of your scalp, lifting buildup without wetting the braids completely (washing, caring for).
- Moisturizing: Lightly mist the entire style with moisturizing spray every day to combat dryness and manage flyaways (moisturizing).
- Styling: Pull the braids into versatile updos, protecting the ends from rubbing against scarves or sweaters. Avoid heavy, tight updo styles for prolonged periods (styling, managing).
- Nightly Routine: Wear a large silk bonnet or scarf that fully covers all the braids to prevent frizz and friction (protecting).
Pro-Tip: Given the longevity of micro braids (often 8-12 weeks), regular light cleansing of the scalp microbiome is vital to prevent irritation and maintain hair health. Look for products designed to penetrate buildup without heavy residue.

6. Designing Thick and Elegant Ghana Braids (Smooth Transition Look)
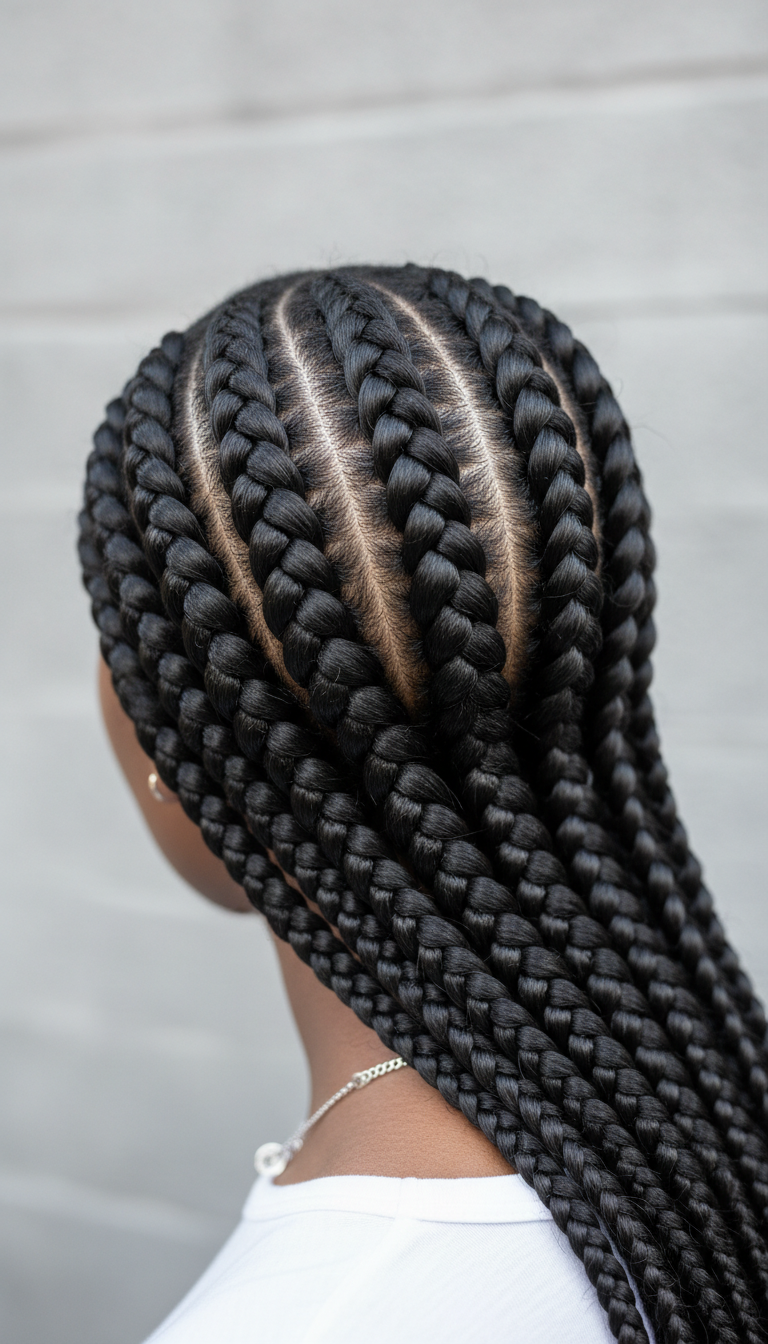
Want a polished, elegant look? Pin these Ghana braids for winter events!
Ghana braids are essentially thicker, more pronounced cornrow styles created using the feed-in technique. This gives them a smooth, seamless appearance from root to tip, which is why they are often considered elegant winter braid styles. The thickness provides excellent coverage and durability, making them a superb protective option for the winter season.
Products & Tools Used
- High-quality, non-drying hair pudding or strong hold braiding gel
- Pre-stretched Xpression braiding hair for thickness
- Natural hair oil for scalp
- Satin edge brush
Styling/Maintenance Steps
- Smoothing: Apply a generous amount of hair pudding or gel to each section of natural hair before and while braiding to ensure maximum smoothness and definition (securing, designing).
- Technique: Use the continuous feed-in technique, adding hair gradually to create the characteristic thickening pattern from the scalp down (braiding).
- Sealing Ends: Seal the ends with hot water immersion, ensuring the entire braid is secure and durable against winter elements (sealing, protecting).
- Maintenance: Every few days, lightly apply a mixture of water and moisturizing oil to the length, focusing on the natural hair within the braid.
- Edge Care: Maintain sleek edges using the satin edge brush and a light touch of gel daily to prevent frizz at the hairline (frizz control).
Pro-Tip: Due to the thickness of Ghana braids, they can take longer to dry if washed. To avoid microbiological effects on scalp health under braids, utilize a dry shampoo specifically designed for protective styles near the root between full wash cycles.

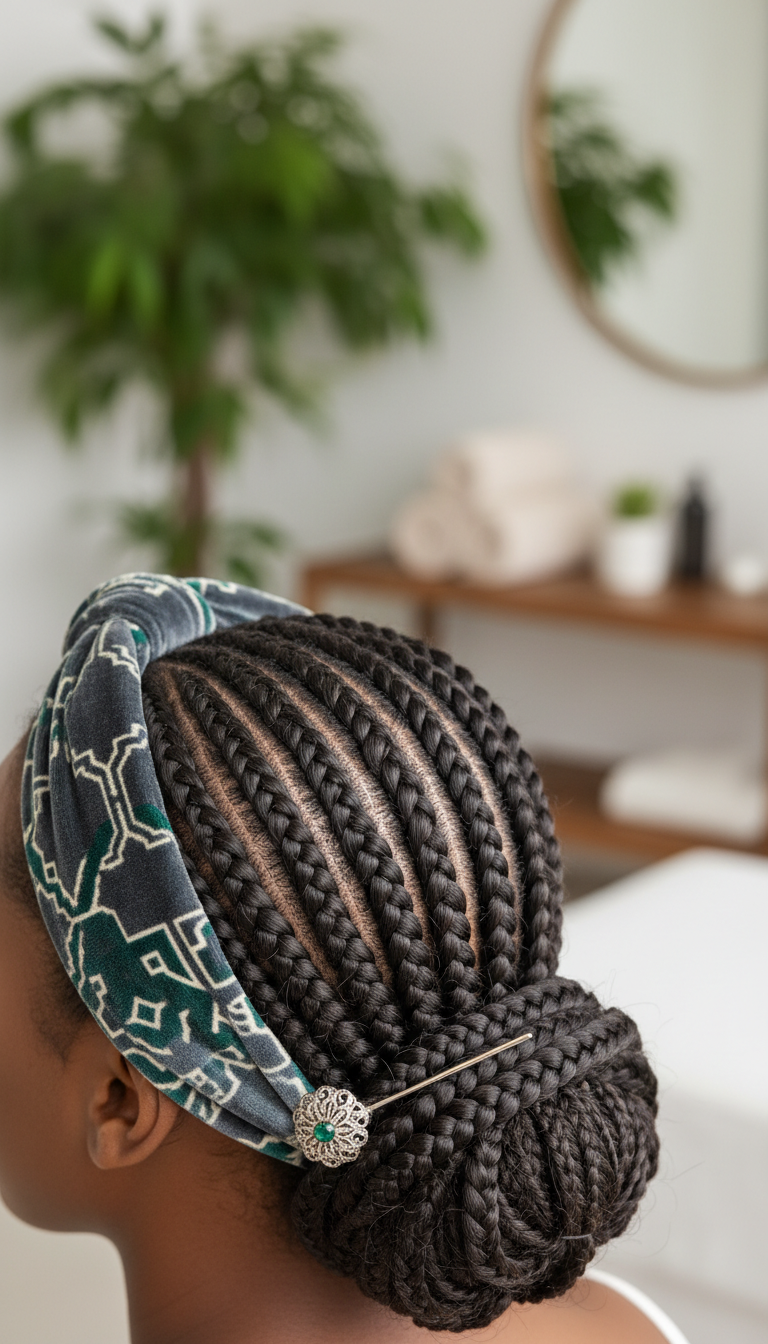
7. Styling the Halo or Crown Braid (Maximal End Protection)
Pin this elegant updo—the best way to protect your ends from friction!
The Halo or Crown Braid is the quintessential minimal manipulation protective style, as it completely tucks away the hair ends. This approach is highly effective for breakage prevention, especially against rough winter fabrics. Whether you use your natural hair or include braided extensions, the crown shape keeps your tresses secure and protected from the winter elements, offering a chic, sophisticated look.
Products & Tools Used
- Moisturizing styling mousse to control flyaways
- Strong-hold hair spray (optional, for finish)
- Small, sturdy hair pins or bobby pins
- Hair oil for scalp lubrication
Styling/Maintenance Steps
- Preparing: Apply a generous amount of moisturizing mousse or light gel from root to tip to ensure maximum smoothness (preparing, styling).
- Braiding: Start braiding (French or Dutch method) behind one ear, incorporating hair only from the top, gradually working the braid around the circumference of the head (braiding).
- Tucking: Once the entire circumference is braided, secure the end of the braid under the start of the crown, ensuring all ends are completely tucked away (securing).
- Maintenance: Lightly mist the exposed braid with a moisturizing spray every other day. Focus on keeping the scalp lubricated (maintaining, caring for).
- Nightly Routine: Use a neck-length silk scarf to cover the crown area and sleep on a satin pillowcase for extra protection against friction (protecting).
Pro-Tip: When securing the crown braid, cross two hair pins over each other at the tuck points. This simple professional braiding technique ensures structural integrity of braided extensions and prevents the style from loosening, allowing it to last longer through daily wear and tear.

Key Takeaways: Your Quick Guide to Winter Braid Hair Styles
Choosing the right winter braid hair styles is more than just a fashion statement; it’s a critical component of healthy natural hair care when temperatures drop. We’ve explored seven distinct protective looks—from the low-tension Sleek Knotless Box Braids to the maximal end protection of the Halo Braid—each offering a unique blend of style and functional protection. Remember that the success of any protective style hinges on two main factors: quality, gentle installation and diligent, consistent moisture maintenance using specialized products.
- Choose Low-Tension Styles for Health: Always prioritize knotless or feed-in methods over traditional braiding techniques to minimize tension and prevent follicular damage and traction alopecia. The goal is to ensure long-term hair growth and scalp health through gentle installation.
Sealing Moisture is Critical: Winter air strips moisture rapidly; use the L.O.C. (Liquid, Oil, Cream) method before braiding and routinely mist the braids to maintain hydration and protect against cold weather hair damage. Proper sealing helps the hair retain moisture, keeping it healthy and preventing dryness throughout the season.
Focus on Scalp Health: Since winter protective styles are long-lasting, invest in scalp cleansers or astringent sprays to manage product buildup and prevent microbiological effects on scalp health under braids. A healthy scalp promotes healthy hair growth, even while braided, reducing irritation relief.
Protect Your Edges and Ends: Use high-quality edge control and ensure all vulnerable ends are fully tucked away (like in the Halo Braid) or protected under silk/satin accessories to minimize friction. Minimizing manipulation of the hairline and ends is essential for breakage prevention.
Quality Products are Non-Negotiable: Invest in durable, lightweight braiding hair and dermatologically tested hair products that offer superior definition and low residue for a chic, sophisticated look (elegant winter braid styles). Quality supplies ensure the style lasts longer and looks better, justifying the time and effort invested.
Nightly Routine is Paramount: Always wear a silk or satin bonnet, even if only sleeping for a short time, to protect the style from frizz-causing friction and ensure long-lasting durability. This simple step is the easiest way to maintain the structural integrity of braided extensions for weeks.
FAQs About winter braid hair styles
What are the main advantages of choosing braids for the winter season?
The primary advantage of winter braids is the superior protection they provide against harsh environmental elements like low humidity, wind, and static friction caused by winter clothing. Braids significantly reduce daily manipulation (low manipulation solutions), which is the biggest contributor to breakage, allowing for maximum length retention and promoting hair growth throughout the colder months. They serve as a crucial shield for your delicate ends and porous natural hair.
How long do winter braids typically last if properly maintained?
If maintained rigorously with nightly protection, regular scalp cleansing, and routine moisturizing, most medium-to-large winter braids can last between 6 to 8 weeks. Smaller styles like micro braids can last up to 12 weeks, but require diligent scalp care to prevent buildup. Going beyond this recommended timeline, however, risks matting, dreading, and significant new growth stress, potentially negating the protective benefits.
What is the best product regimen for moisturizing winter braids?
The most effective regimen involves using water-based moisturizing sprays followed by light sealing oils (like jojoba or coconut) two to three times per week to help retain moisture. Avoid heavy, thick oils or creams daily, as they can cause product buildup and scalp irritation relief without providing deep penetration. Focus on lightly coating the exposed braids and directly moisturizing the natural hair at the root and any exposed ends.
Are knotless braids better than traditional box braids for winter protection?
Yes, knotless braids are generally superior for winter protection, especially for those prone to breakage, because the installation technique drastically reduces tension at the root. Traditional box braids start with a tight knot that can exacerbate dryness and breakage during the cold months, potentially leading to tension alopecia. Knotless braids distribute the weight gradually, ensuring they are a gentler and healthier option for long-lasting winter protective styles.
How often should I wash my hair while wearing winter braids?
Experts recommend performing a light, targeted cleanse of the scalp every 1-2 weeks using a braid spray or diluted clarifying shampoo, especially for long-lasting styles. A full wash should be minimized to avoid soaking the braids, which can take an extended time to dry and risk microbiological issues. Focus on using cotton swabs and astringent to clean the part lines to manage scalp health without compromising the structural integrity of braided extensions.
Can wearing winter braids cause hair loss or traction alopecia?
Wearing winter braids can cause hair loss or traction alopecia if the braids are installed too tightly, are too heavy, or are worn for too long without breaks. This is why certified hairstylist advice emphasizes the use of low-tension styles like knotless braids and avoiding prolonged wear past 8-12 weeks. Always communicate immediately if you feel pain or excessive pulling after installation to prevent permanent damage to follicular health.
What are some cute winter braid ideas suitable for professional settings?
Elegant winter braids like the Ghana Braid Updo (tucked away) or the Sleek Knotless Box Braids (worn in a polished, low ponytail) are ideal for professional settings. These styles are durable and require minimal styling effort daily (low-maintenance winter braid styles), allowing the hair to look polished and sophisticated while remaining fully protected from cold weather elements and static.
How should I prepare my natural hair before installing winter braids?
To prepare hair for winter braids, ensure it is thoroughly cleansed, deep-conditioned, and optimally moisturized using a protein/moisture balance treatment. The goal is to fortify the hair against the weeks of manipulation reduction. Use a lightweight sealant oil post-wash to lock in the moisture before braiding, giving the hair the best foundation for survival in the cold.
What type of hair accessories are best to use with winter braids?
The best hair accessories are satin-lined or silk scarves, turbans, and hats, as these materials minimize friction and static, which are common winter hair challenges. While decorative pins can enhance elegant winter looks, avoid wool or heavy cotton accessories that can snag the hair. Opt for sleek, satin headbands for stylish protection.
How do I deal with an itchy scalp under protective winter braids?
To alleviate an itchy scalp, apply a specialized anti-itch oil or tea tree oil-based astringent directly to the scalp using a pointed nozzle applicator or cotton swab. Avoid scratching, which can damage the scalp microbiome and loosen the braids. Persistent severe itchiness may signal product reaction or overly tight installation and requires prompt professional attention.
Final Thoughts
Choosing the right winter braid hair styles is more than just a fashion statement; it’s a critical component of healthy natural hair care when temperatures drop. We’ve explored seven distinct protective looks—from the low-tension Sleek Knotless Box Braids to the maximal end protection of the Halo Braid—each offering a unique blend of style and functional protection. Remember that the success of any protective style hinges on two main factors: quality, gentle installation and diligent, consistent moisture maintenance using specialized products. By prioritizing scalp health and mastering your nightly routine, you are taking proactive steps to combat the cold and ensure your hair retains its length and strength throughout the entire season. Embrace the simplicity and sophistication these protective styles offer, simplifying your hair routines dramatically.
Which of these 7 winter braid styles are you planning on installing first this January? Let us know your favorite method for achieving long-lasting protection in the comments below!
Last update on 2026-01-17 / Affiliate links / Images from Amazon Product Advertising API