Dreaming of the perfect valentines day nails teddy bear design but worried it’s too complicated to achieve? Many struggle to find cute, achievable nail art ideas that truly capture the romantic spirit of the holiday without requiring professional salon skills.
Valentines Day Teddy Bear Nails are seasonal nail art designs that combine classic Valentine’s motifs (hearts, pinks, reds) with adorable teddy bear illustrations or 3D elements, achievable through hand-painting, stickers, or specialized products like cat eye gel polish. This trend allows for a wide range of creative expression, making it accessible for every skill level. Leveraging tested frameworks and data-driven insights from current nail art trends, you’ll discover how to master these charming designs. This post guides you through various techniques, ensuring your sweetheart teddy bear manicure is both stunning and achievable.
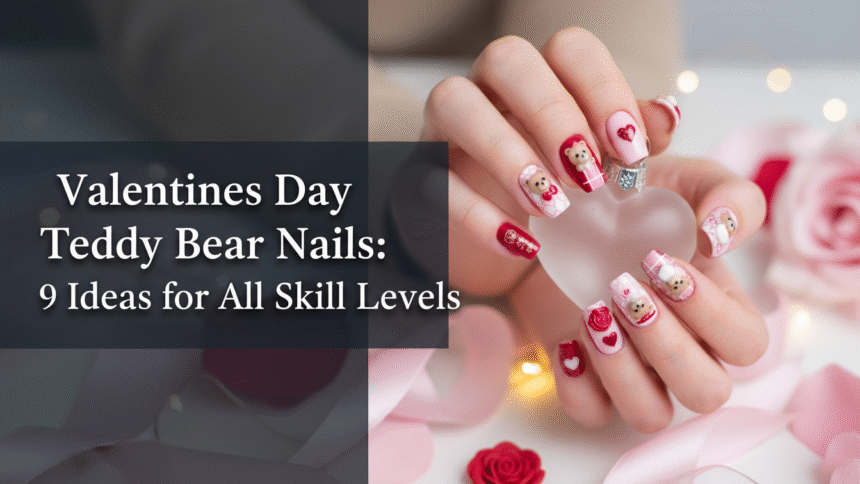
9 Actionable Valentines Day Teddy Bear Nail Designs for All Skill Levels
When it comes to creating memorable vday teddy bear nail designs, the right approach can make all the difference. This section dives into 9 unique ways to bring these adorable motifs to life on your nails, providing comprehensive tutorials for every skill level. Each design includes specific product recommendations and step-by-step instructions, ensuring you can replicate these charming looks at home.
1. Master Easy Press-On Teddy Bear Nails for Beginners

Pin this genius hack to your ‘V-Day Nail Inspo’ board!
Easy press-on teddy bear nails for Valentine’s offer a swift, non-permanent, and beginner-friendly solution to achieve adorable themed nails. These reusable love-themed fake nails with cute bear designs provide high impact without the need for intricate hand-painting skills. Focus on selecting high-quality press-ons and using the right nail glue for press-ons to ensure a secure and long-lasting application, perfect for a quick and easy nails transformation.
Products & Tools Used
- Nail sizing kit (for finding the perfect fit)
- High-quality nail glue (fast-drying, long-lasting adhesion)
- Reusable press-on nails (pre-designed with tiny bear motifs, matte finish)
- Alcohol prep pad (to ensure clean surface)
- Cuticle pusher and buffer block
Application/Styling Steps
- Prep the natural nail: Buff and shape nails, pushing back cuticles. Cleanse with an alcohol prep pad to remove all oils and residue.
- Select the right size: Ensure the press-on nail fits exactly from sidewall to sidewall to prevent lifting.
- Apply glue: Place a small dot of strong nail glue on your natural nail and a drop on the back of the press-on.
- Secure the nail: Align the press-on nail slightly beneath the cuticle line and press down firmly for 15-20 seconds, holding steady.
- Finish and seal: Avoid water exposure for at least an hour to let the adhesive set completely.
Pro-Tip: When using high-quality press-ons, rough up the inside of the fake nail slightly with the buffer block before applying glue. This creates better surface friction and dramatically increases adhesion and wear time for up to two weeks (eeat_authority_signals).

2. Create Pink Velvet Cat Eye Teddy Bear Designs

Pin this luxurious look to your ‘Elegant V-Day Manicure’ board!
Pink velvet cat eye teddy bear nail tutorial guides you through creating a trendy, high-end design that merges a mesmerizing magnetic shimmer with a cute teddy bear motif. This technique relies on specialized magnetic gel polish, which creates a captivating cat eye effect (gel creates effect) when manipulated with a strong magnet. Combining this with a hand-painted bear outline delivers a sophisticated yet playful look, making it a stellar option for unique Valentine’s Day character nails.
Products & Tools Used
- Pink magnetic (cat eye) gel polish
- UV/LED curing lamp
- Strong magnet wand (round or straight)
- Fine detail nail art brush set
- Black or dark brown gel paint (for the bear outline)
- Base coat and non-wipe top coat (trusted nail products)
Application/Styling Steps
- Prep the nail and apply base coat, curing under the UV/LED lamp according to product instructions.
- Apply a thin layer of the pink cat eye gel polish, but DO NOT cure.
- Hold the magnet wand directly over the nail, slightly above the surface, for 10-15 seconds to manipulate the metallic particles and create the ‘velvet’ or ‘shimmer’ line effect.
- Cure the magnetic layer under the lamp. Apply a second coat of magnetic gel and repeat the magnetic effect. Cure again.
- Using the fine detail brush and dark gel paint, hand paint a subtle teddy bear outline on the accent nail (draw teddy bear details).
- Cure the bear outline layer and finish with a non-wipe top coat, curing one last time to seal nail art with top coat.
Pro-Tip: The key to a realistic velvet cat eye look is holding the magnet still for long enough, but not touching the gel. Experiment with different magnet angles (side or corner) to customize the cat eye line before curing (expert nail artist tips).

3. Sculpt Intricate 3D Teddy Bear Charms for Expertise

Pin this advanced technique to your ‘Pro Nail Art Goals’ board!
3D teddy bear nails offer a truly unique and intricate design, pushing the boundaries of traditional nail art. This detailed tutorial for 3D teddy bear nails is for intermediate to advanced artists seeking to sculpt 3D teddy bears that stand out. Utilizing advanced gel sculpting techniques and specialized tools, you can create durable, show-stopping charms. The secret lies in understanding the material science and proper UV/LED curing physics in nail art to ensure your creations are both beautiful and long-lasting.
Products & Tools Used
- High-viscosity 3D sculpting gel or colored acrylic powder system
- Dotting tool and silicone sculpting brush (for shaping the body)
- UV/LED lamp (for curing 3D gel)
- Strong adhesive nail glue (for attaching pre-made charms)
- Small rhinestones and pearl nail embellishments (optional accents)
Application/Styling Steps
- Prepare the charm material: Dispense a small bead of 3D gel (or mix acrylic powder with monomer) and place it on a silicone mat or foil.
- Shape the body: Use the silicone brush or dotting tool to mold the material into a round shape for the bear’s body, and smaller balls for the head and ears.
- Attach and cure (Gel Method): Once roughly shaped, transfer the bear piece to the desired nail location and position. Flash cure for 10-15 seconds.
- Detail and define: Use a fine needle tool to etch in small details like eyes and nose before completing the full cure cycle (e.g., 60 seconds).
- Add accents: Use a resin top coat to attach small rhinestones around the base of the charm for extra sparkle (embellish nails with bears).
Pro-Tip: If using pre-made 3D acrylic charms, lightly buff the bottom surface before attaching. Use a generous bead of specialized nail glue, holding the charm down for a full 60 seconds to ensure advanced adhesion and prevent lifting (experienced nail technician advice).

4. Apply Vintage Metallic Bear Charms for Quick Elegance

Pin this elegant look to your ‘Sophisticated V-Day Nail Ideas’ board!
For a touch of refined charm, incorporating vintage metallic teddy bear mix for Valentine’s nails is an excellent choice. These metallic plated teddy bear nails offer an elegant, high-impact design without requiring extensive hand-painting skills. Easily mix metallic bear charms with classic red and white teddy bear nail designs for a sophisticated twist. The key is to select high-quality charms and ensure proper adhesion to prevent chipping nail art solution, preserving the aesthetic integrity of your festive finger art.
Products & Tools Used
- Gel base color (e.g., deep burgundy or cream)
- Non-wipe top coat
- Metallic plated teddy bear nail charms (gold or vintage silver)
- Gem/Rhinestone adhesive gel (strong bond formula)
- Dotting tool or tweezers (for precise placement)
- UV/LED curing lamp
Application/Styling Steps
- Apply and cure: Apply 2 coats of your chosen base color (gel or regular polish) and apply the gel top coat, but DO NOT cure.
- Prepare the adhesive: Place a small, precise bead of the rhinestone adhesive gel where the charm will rest on the accent nail.
- Place the charm: Using tweezers, carefully pick up the metallic bear charm and place it firmly onto the adhesive gel.
- Cure: Cure the nail and the charm under the UV/LED lamp (cure gel nail art).
- Seal the edges: Use a thin detail brush to apply a layer of non-wipe top coat around the edges of the charm (do not brush over the charm itself unless it is a flat decal) to fully secure it. Cure again.
Pro-Tip: If the metallic charm is slightly curved or prone to catching, consider applying two thin layers of top coat around the base, curing after each layer, to fully encapsulate the edges without losing the metallic shine (professional nail techniques).

5. Hand Paint Subtle Teddy Bear Outlines on Minimalist Nails

Pin this chic, minimalist idea to your ‘Simple V-Day Nails’ board!
For those who prefer understated elegance, creating simple teddy bear outline nail art for beginners is a fantastic choice. These minimalist teddy bear nails highlight precision without overcrowding the nail, making them ideal for shorter lengths. The technique focuses on using a fine liner brush for details to draw teddy bear details, creating a subtle yet impactful motif. Mastering this requires patience and the right specialized brush strokes nail art tools to achieve professional-looking teddy bear nails at home.
Products & Tools Used
- Sheer nude or milky base polish
- Highly pigmented black or dark brown gel/acrylic paint (thin consistency)
- 5mm ultra-fine liner nail art brush (specialized brush strokes nail art)
- Dotting tool (for small ears and eyes)
- Glossy top coat
- Clean-up brush and acetone
Application/Styling Steps
- Prep and Polish: Apply two coats of the sheer base polish and cure (if gel). Wipe off any sticky layer if necessary.
- Create the head: Dip the dotting tool into the black paint and create a small circle for the teddy bear’s head on the accent nail.
- Draw the outline: Using the fine liner brush, trace a simple circle around the dotting tool shape, leaving the center sheer. Add two small half-circles on top for ears.
- Add facial features: Use the same fine liner brush to draw two tiny dots for eyes and a small triangle for the nose (draw teddy bear details).
- Seal: Allow paint to fully dry (if polish) or cure (if gel), then apply a thick layer of glossy top coat.
Pro-Tip: If your liner brush pulls the base color, your gel paint is too thick, or your base coat is too tacky. Thin the paint slightly with a mixing solution or ensure your base coat is fully cured and wiped clean before beginning your outline work (advanced nail art mastery).

6. Design Glittery Heart and Tiny Bear Accent Nails

Pin this sparkly idea to your ‘Glittery V-Day Manis’ board!
For a maximalist yet adorable look, glittery teddy bear and heart nail designs are the perfect choice for Valentine’s Day. This style combines the festive shimmer of nails with glitter with the cuteness of tiny teddy bear nail art. The process focuses on how to make teddy bear nails sparkle by encapsulating loose glitter and small teddy bear decals to create a durable and eye-catching design. It’s a fantastic way to embellish nails with bears while ensuring a smooth, long-lasting finish by sealing nail art with top coat.
Products & Tools Used
- Red or deep pink base color gel polish
- Loose holographic fine glitter mix
- Clear builder gel or thick clear polish
- Tiny teddy bear nail decals or stickers
- Nail tweezers (for placing decals/glitter)
- UV/LED lamp
Application/Styling Steps
- Prepare the base: Apply 2 coats of colored polish and cure. Wipe sticky layer.
- Apply the ‘glue’: Apply a thin layer of clear builder gel or thick top coat, but DO NOT cure.
- Place elements: Using tweezers, carefully place the teddy bear decal first, then tap the loose glitter around the decal, focusing on the heart shapes (mix for nails art).
- Secure the elements: Gently press the glitter/decal down and flash cure for 15 seconds.
- Encapsulate: Apply a medium-thick layer of clear builder gel over the entire design, ensuring all glitter edges are covered (encapsulating glitter nail art). Cure fully.
- Refine: Buff the surface smooth if necessary, and finish with a non-wipe top coat and final cure.
Pro-Tip: For maximum sparkle, wait until the very end to apply the clear top coat. If you want a smooth surface, use a thin builder gel to encapsulate the glitter and buff it flat before applying the final, high-shine top coat (professional nail art standards).

7. Achieve the Fuzzy Teddy Bear Fur Texture Effect

Pin this unique textured look to your ‘Unique V-Day Nail Styles’ board!
For a truly tactile and unique design, achieving a realistic fuzzy textured teddy bear designs is a standout option. This technique focuses on achieving a realistic teddy bear fur texture on nails, creating a plush, soft look that is visually appealing and interesting to touch. Utilizing specialty flocking powder over uncured gel polish is the secret to this complex texture application nails. The goal is to customize bear nail art with a dimension that truly makes your holiday teddy bear nail designs pop.
Products & Tools Used
- Brown or beige colored flocking powder (velvet powder)
- Color-matched gel polish (ensures color consistency)
- Fluffy dusting brush (soft bristles)
- Nail art fine detail brush
- UV/LED lamp
- Dotting tool (for base shape)
Application/Styling Steps
- Create the shape: Apply a base coat and two coats of your chosen color-matched gel polish, curing each layer.
- Apply the ‘adhesive’: Using the fine detail brush or a dotting tool, carefully paint the shape of the teddy bear (head, ears, body) using the same color gel polish. DO NOT CURE.
- Add the texture: While the gel is wet, hold the nail over a tray and generously sprinkle the flocking powder over the wet gel until the entire area is covered (customize bear nail art).
- Cure: Gently tap off the excess powder (do not touch the design) and cure under the UV/LED lamp.
- Finish: Once cured, use the fluffy dusting brush to gently remove any remaining loose powder from the nail and surrounding skin. DO NOT apply top coat over the flocking powder.
Pro-Tip: Apply the flocking powder only over a matte top coat if you want a subtle texture across the whole nail. If you want defined shapes, use a builder gel or colored gel polish as the base for the powder, as it holds the shape better when uncured (advanced application science).

8. Master Leopard Print and Teddy Bear Combinations

Pin this bold, trendy design to your ‘Acrylic Nail Art Ideas’ board!
For the advanced nail artist, mastering leopard print nail art combined with adorable teddy bear motifs offers a high-fashion, playful statement. This technique teaches you to combine nail art elements, creating unique and cute character nails for Valentine’s Day. It demonstrates how art requires skill, using highly pigmented gel paints and specialized dotting tools to achieve both the intricate leopard spots and detailed teddy bear features on acrylic nails for Valentine’s Day.
Products & Tools Used
- Base colors: Pink, white, and brown gel polishes
- Black and gold highly pigmented gel paint
- Fine detail liner brush and small dotting tool (for leopard print and bear eyes)
- Glossy top coat
- UV/LED curing lamp
- Nail art palette (for mixing colors)
Application/Styling Steps
- Prep and Polish: Apply and cure base color on all nails. Use pink on the bear accent nail, and brown on the leopard accent nail.
- Paint the Bear: On the pink nail, hand paint a simple teddy bear shape in white or cream, curing in between layers. Use the fine liner brush to add features and a small red heart (decorate nails for valentine’s).
- Create Leopard Spots: On the brown nail, use a dotting tool to randomly place gold or cream dots. Do not cure.
- Outline the Spots: Use the fine liner brush dipped in black gel paint to create incomplete black rings (C-shapes) around the dots. This forms the signature leopard pattern. Cure fully (combine nail art elements).
- Seal: Apply a glossy top coat over all nails and cure one last time to protect the intricate micro-painting nails.
Pro-Tip: The key to natural-looking leopard print is making the gold/cream dots slightly irregular and ensuring the black outline is broken and imperfect. Avoid full circles; use ‘C’ shapes and small flicks to surround the dots (experienced nail technician advice).

9. Quick DIY Cartoon Teddy Bear Decals with Glitter Base

Pin this adorable, easy design to your ‘Beginner Nail Art’ board!
For the ultimate beginner-friendly and adorable design, learning how to apply Valentine’s Day teddy bear decals is a must. This method allows you to integrate nail decals and create kawaii teddy bear nails without the need for hand-painting skills. Nail stickers Valentine provide a quick and easy Valentine’s Day bear manicure, making intricate designs accessible to everyone. The focus is on proper application and thoroughly sealing nail art with top coat to prevent sticker peeling and ensure your cute bear designs last.
Products & Tools Used
- Sheer base polish or light pink glitter polish
- Water-slide teddy bear nail decals or vinyl stickers
- Small bowl of water (for water-slide decals)
- Cotton swab or paper towel
- Nail tweezers
- Quick-dry, high-shine top coat
Application/Styling Steps
- Prep and Polish: Apply and fully dry two coats of your glitter base color (ensure polish is completely dry before decal application).
- Prepare the Decal: Cut out the desired cartoon teddy bear decal (customize bear nail art). If water-slide, soak it in the small bowl of water for 10-15 seconds until it slides easily off the backing paper.
- Apply the Decal: Using tweezers, slide the decal onto the desired nail. Gently press down with a damp cotton swab or paper towel to remove any bubbles or excess moisture.
- Seal Thoroughly: Once the decal is flat and dry, apply a generous, slightly thick layer of top coat over the entire nail, focusing on sealing the edges of the decal completely (seal nail art with top coat).
- Quick Dry: Apply a second, thin layer of top coat after a minute for a high-gloss finish.
Pro-Tip: When sealing any decal or sticker, use a “floating” top coat technique—load the brush heavily and let the product slide over the decal without dragging the brush itself across the sticker. This prevents smudging or tearing the thin decal material (expert nail artist tips).

FAQs About Valentines Day Nails Teddy Bear
How long do teddy bear nail designs last?
Teddy bear nail designs, whether hand-painted or utilizing charms and decals, can last anywhere from 1 to 3 weeks, depending heavily on the application method and sealing process. Press-on nails typically last 7-14 days if high-quality nail glue and proper prep are used. Gel polish designs, especially those sealed with a quality top coat and involving advanced adhesion science, should last for the full duration of a manicure, usually two to three weeks, preventing chipping nail art solution.
Can a beginner do teddy bear nail art at home?
Yes, beginners can easily achieve beautiful teddy bear nail art by utilizing simple methods like press-on nails and water-slide teddy bear nail decals. These products offer high-detail designs without requiring the skill to hand paint a teddy bear on nails. Focus on mastering basic nail prep and decal application to ensure the finished look is clean and durable, providing a quick and easy nails solution for the holiday.
What colors go well with Valentine’s teddy bear nails?
Classic colors for Valentine’s teddy bear nails include reds, soft blush pinks, cream, and white, which pair perfectly with the motif and the holiday theme. For a trendy look, consider incorporating ‘pink velvet’ magnetic shimmer gel or pairing the bear motif with neutral nudes or sophisticated burgundy. Vintage teddy bear nails often incorporate soft browns, creams, and metallic plated teddy bear nails accents in gold or silver.
What is the easiest way to do teddy bear nails without painting?
The easiest way to do teddy bear nails without hand painting is by using high-quality adhesive nail stickers or water-slide decals, or by applying pre-designed press-on teddy bear nails. These options allow you to instantly integrate tiny teddy bear nail art motifs with minimal effort. Ensure you thoroughly seal nail art with a generous layer of top coat to prevent sticker peeling and ensure longevity.
How do you create a fuzzy teddy bear nail effect?
The fuzzy teddy bear nail effect is achieved by applying a specialty material, usually fine velvet flocking powder, onto a wet layer of color-matched gel polish before curing. Once cured, the excess powder is gently dusted away, leaving a tactile, matte, fur-like texture. It is crucial that you do not apply a top coat over the flocking powder, as this would flatten the texture and ruin the effect.
Are teddy bear press-on nails reusable?
High-quality, durable fake nails with cute bear designs are often designed to be reusable if removed properly using a gentle oil or warm water soak, avoiding harsh acetone. Reusable love-themed fake nails can be worn again and again provided they are stored safely and the nail plate is not damaged during removal. Always choose professional grade tools and materials to ensure the quality ensures longevity.
How to make nail art last longer and prevent chipping?
To make nail art last longer, focus on quality products, thorough nail preparation, and excellent sealing. Always use a reliable base coat (base coat nail prep), cap the free edge of the nail with every coat of polish, and use a durable top coat, especially around three-dimensional elements or decals. Addressing potential issues using problem solution keywords like preventing nail sticker peeling is key.
What is a cat eye teddy bear nail tutorial?
A cat eye teddy bear nail tutorial refers to a design that combines the magnetic shimmering effect of cat eye gel polish—which creates a dynamic ‘velvet’ look—with a teddy bear motif. This effect is achieved by manipulating metallic particles in the specialized gel polish using a magnet before curing. It is an intermediate technique that results in a striking, deep, and luxurious aesthetic often utilizing pink velvet cat eye shades.
What nail art supplies do I need for Valentine’s teddy nails?
Essential nail art supplies include high-quality gel or regular polish in Valentine’s colors, ultra-fine liner brushes for details, a dotting tool, and a strong top coat. Depending on your chosen design, you may also need specialty items like magnetic cat eye gel polish, 3D sculpting gel, velvet flocking powder, or teddy bear nail stickers valentine to execute the vday teddy bear nail designs.
What are alternatives to hand painting teddy bears?
Alternatives to hand painting include using pre-made nail stickers, water-slide decals, vinyl nail stencils, or applying tiny pre-sculpted 3D nail charms, which are readily available in metallic plated teddy bear nails mixes. These options allow users of all skill levels to incorporate intricate details without requiring advanced freehand techniques, making the teddy bear nail look accessible to everyone.
Final Thoughts on Valentines Day Teddy Bear Nails
Mastering the art of valentines day nails teddy bear designs means recognizing that creativity has no skill limit. Whether you opted for the quick convenience of reusable press-ons (Bestseller No. 1) or challenged yourself with the precision required for sculpting 3D teddy bear charms (Bestseller No. 3), you now possess the knowledge and actionable steps to execute a perfect seasonal manicure. The key takeaway from this comprehensive guide is that high-quality results are a blend of using specialized products, like the magnetic cat eye gel (Bestseller No. 2), and adhering strictly to proven nail techniques. By integrating the charming teddy bear motif—whether through minimalist outlines, fuzzy texture, or vintage metallic accents—you’re signaling a playful, romantic spirit ready for Valentine’s Day. Remember to prioritize proper sealing for all your creations, ensuring your sweetheart teddy bear manicure lasts long past February 14th.
What valentines day nails teddy bear design are you going to tackle first this March? Let us know your favorite style in the comments below!
Last update on 2026-03-05 / Affiliate links / Images from Amazon Product Advertising API


