Have you ever struggled to find that perfect piece of coastal decor that captures the serenity of the sea, or felt the itch to create something unique but didn’t know where to start? Many craft enthusiasts face the challenge of wanting to bring the beach home but lacking the specific inspiration or technical know-how to execute their vision on painted mugs ocean themes. Whether you are a seasoned DIYer or a beginner looking for a rewarding weekend project, the desire to transform a plain ceramic mug into a personal seascape is a creative journey waiting to happen.
Creating beautiful, food-safe painted mugs ocean designs at home involves selecting the right ceramic blanks, using non-toxic, oven-bake or heat-set paints, and following precise curing and sealing instructions to ensure durability and safety. This process requires attention to detail, specifically in surface preparation and temperature control during baking, to prevent peeling or fading. By mastering a few key techniques, you can produce professional-quality ocean coffee mugs that are both functional art pieces and cherished gifts.
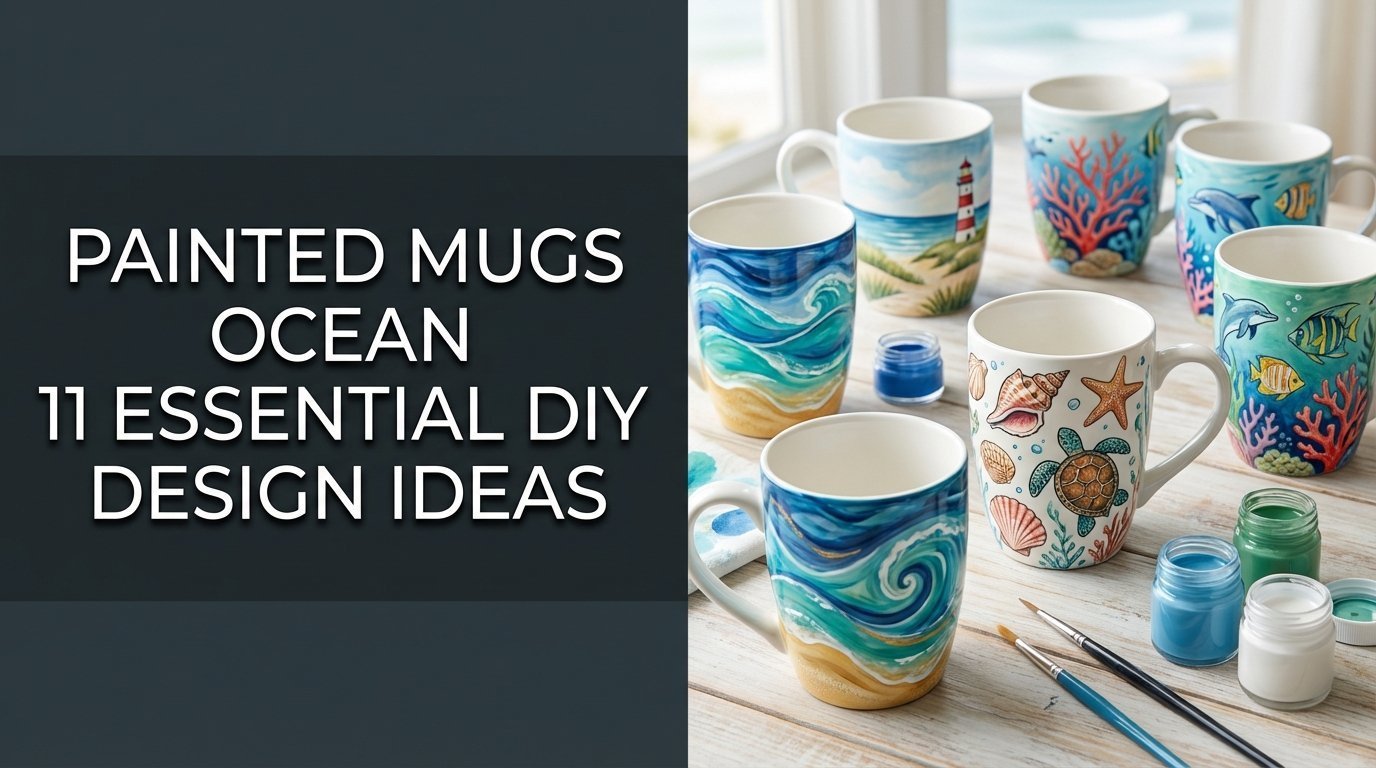
Drawing from comprehensive analysis of current ceramic art trends and proven methodologies for food-safe crafting, this guide compiles the essential techniques you need for success in 2026. We will explore everything from realistic wave mechanics to whimsical marine life, providing you with actionable steps to master this craft. Prepare to discover 11 distinct design ideas that will elevate your mug painting skills and bring the calming essence of the ocean to your morning coffee routine.
Unleash Your Creativity: 11 Essential DIY Painted Mugs Ocean Design Ideas for 2026
The allure of personalized ocean mugs lies in their ability to transport you to the coast with every sip, transforming a mundane daily ritual into a moment of seaside escape.
Embarking on a DIY mug painting project offers a unique blend of artistic expression and practical utility that store-bought items simply cannot match. While purchasing ocean design mugs is an option, creating them yourself allows for complete customization of color palettes, themes, and personal touches that resonate with your specific style. However, the transition from concept to a durable, food-safe reality requires more than just artistic flair; it demands a solid understanding of ceramic materials and the specific properties of ocean themes when translated onto curved surfaces.
In the sections that follow, we will bridge the gap between inspiration and execution. You will move from understanding the basic appeal of creative art coffee vessels to mastering the technical application of painted mugs that withstand daily use. We will explore how different painting techniques—from blending gradients for sunsets to stippling for sand textures—interact with ceramic surfaces, ensuring your finished pieces are not only beautiful but also safe for your favorite hot beverages.
Your Definitive Guide: 11 Essential DIY Painted Mugs Ocean Design Ideas
To successfully create painted mugs ocean designs, you must choose ceramic mugs designed for painting, use food-safe, oven-bake ceramic paints, clean and prep the mug surface thoroughly, apply ocean designs with desired techniques, cure the paint as per manufacturer instructions, and seal for durability if recommended.
Before diving into the specific tutorials, it is crucial to understand that the success of your DIY mug painting project hinges on preparation and the right materials. This comprehensive listicle is designed to be your go-to resource, providing step-by-step instructions for 11 distinct styles ranging from realistic seascapes to abstract interpretations. We have structured this guide to address the most common beginner mug painting challenges while offering advanced insights for seasoned crafters.
We will explore a variety of ocean elements—such as rolling waves, vibrant coral reefs, and delicate seashells—and demonstrate how to apply them to ceramic mugs using techniques that ensure a professional finish. Each design idea below includes a specific list of materials and a “Pro-Tip” derived from master crafters techniques, ensuring you have the expert knowledge required to create seascape art that lasts. Whether you are looking to customize coffee cups for your own kitchen or decorate mugs ocean theme for personalized gifts, these tutorials provide the actionable guidance you need.
1. Paint Realistic Ocean Waves

Pin this flowing wave design to your ‘Coastal Crafts’ board!
Creating realistic ocean waves on a curved surface requires understanding how to blend colors to mimic the depth and movement of water. This design focuses on gradients and the dynamic interplay between deep blues and foamy whites to achieve a ceramic wave art piece that looks professional and lively.
Materials Needed:
- White ceramic mug blank, ready for painting
- Food-safe ceramic paints in varying shades of blue (sky blue, navy, turquoise) and white, certified for mug use
- Fine-tipped detail paint brushes for wave crests and blending brushes for gradients
- Rubbing alcohol or glass cleaner for surface preparation
- Cotton swabs for error correction
- Oven for curing (if using oven-bake paints)
Step-by-Step Directions:
- Clean the mug surface thoroughly with rubbing alcohol to remove any oils or dust, ensuring optimal paint adhesion.
- Sketch light wave outlines with a pencil or a water-soluble marker if desired, though freehand works best for an organic look.
- Apply the darkest blue paint to the lower section of your desired wave shape, forming the base of the wave.
- Blend lighter shades of blue upward towards the middle of the wave, creating a natural gradient effect.
- Add touches of white paint to the crests of your waves, using a fine-tipped brush to simulate foamy spray and movement.
- Allow each layer of paint to dry slightly before adding the next to prevent smudging and achieve crisp lines.
- Cure the painted mug according to your paint manufacturer’s instructions, typically involving oven baking at a specific temperature for a set duration to make it durable and dishwasher safe (cure ceramic paint).
Pro-Tip: For truly realistic ocean waves, layer multiple thin washes of color rather than one thick coat. This builds depth and transparency, mimicking natural water. Use a damp brush to soften harsh lines, creating a seamless gradient characteristic of professional ocean art.

2. Create a Beach & Seashell Border

Save this charming beach mug idea to your ‘DIY Home Decor’ board!
For those who prefer a more subtle approach, a seashell border offers a delicate way to incorporate beach painted mugs into your collection. This design utilizes simple ocean themed mug painting ideas for beginners to create a refined look along the rim or base of the mug.
Materials Needed:
- Ceramic coffee mug or tea cup, plain and ready for custom work
- Food-safe ceramic paints in sandy beige, light brown, white, and soft pastels for shells
- Ultra fine-tipped paint brushes or ceramic art pens for intricate details
- Rubbing alcohol and cotton pads
- Small sponges or stencil brushes for sand texture
- Clear food-safe ceramic sealant (optional, but recommended for extra durability)
Step-by-Step Directions:
- Prepare the mug surface by cleaning with rubbing alcohol, ensuring a clean canvas for your beach scene.
- Apply a base layer of sandy beige paint along the desired border area (rim or base) using a small sponge to create a subtle textured effect. Let dry completely.
- Draw small outlines of various seashells (conch, scallop, spiral) and starfish using a fine-tipped ceramic pen or brush.
- Fill in the shell outlines with white and pastel colors, adding tiny details to mimic natural shell patterns.
- Use a very fine brush to add small dots of white or light brown paint to simulate sand grains for extra texture.
- Allow all painted details to cure fully according to paint manufacturer instructions, often requiring oven baking.
- Seal with a clear food-safe ceramic sealant if desired, applying thin, even coats.
Pro-Tip: To achieve realistic sand texture, lightly dab a small, stiff brush or sponge loaded with sandy-colored paint onto the mug. For detailed shells, work from light to dark colors, allowing each layer to dry to prevent colors from bleeding and achieve a smooth finish.

3. Design a Vibrant Coral Reef Scene

Pin this tropical coral reef mug art to your ‘Unique Mug Ideas’ board!
Dive into color with a vibrant coral reef scene. This design allows for high creativity and the use of vibrant ocean colors mugs, making it a standout project for those who love underwater world ceramics.
Materials Needed:
- Plain ceramic mug or wide coffee cup, preferably light-colored for vibrant paint
- Food-safe ceramic paints in a wide array of vibrant colors: blues, greens, yellows, oranges, pinks, reds
- Detail paint brushes in various sizes (round, flat, liner)
- Rubbing alcohol and paper towels
- Fine-tip paint pens (optional, for outlines)
Step-by-Step Directions:
- Clean the mug thoroughly with rubbing alcohol.
- Sketch light outlines of coral formations and fish placements with a pencil or water-soluble marker.
- Paint the background with a light, gradient blue to simulate water. Let it dry.
- Begin painting the larger coral structures, using different colors and brushstrokes to create diverse coral shapes and textures.
- Add smaller corals and marine plants around the larger formations, building up the complexity of the reef.
- Introduce various small, colorful fish, using different colors and simple shapes to suggest movement and variety.
- Add final details like bubbles, light reflections, or intricate patterns on fish scales with a fine-tip brush or paint pen.
- Cure the mug following the paint manufacturer’s specific instructions to ensure durability and food safety.
Pro-Tip: When designing a vibrant coral reef scene, use contrasting colors for fish against the coral to make them pop. Layering translucent paints can also create a beautiful depth effect, characteristic of gallery quality ocean mugs and utilizing color theory for ocean art.

4. Illustrate a Minimalist Sea Turtle

Pin this elegant sea turtle mug design to your ‘Simple Ocean Crafts’ board!
Sometimes less is more. A minimalist ocean mug featuring a sea turtle uses clean lines and open space to create an elegant, eco friendly painted mugs with sea turtle design aesthetic. This is perfect for those who want to draw ocean patterns without overwhelming the mug.
Materials Needed:
- Smooth ceramic mug in white or a pale neutral color
- Food-safe ceramic paints in a single shade of green or blue, and black for outlining
- Fine-tip paint brush or ceramic paint pen
- Rubbing alcohol
- Sea turtle stencil (optional, for perfect symmetry)
Step-by-Step Directions:
- Clean your mug thoroughly with rubbing alcohol and let it dry.
- Sketch a minimalist sea turtle outline directly onto the mug with a pencil, or use a stencil for a crisp shape.
- Fill in the body of the sea turtle with your chosen green or blue food-safe ceramic paint. Ensure an even coat.
- Use a fine-tip black paint pen or brush to carefully trace the outline of the sea turtle once the main color is dry.
- Add minimal details like a small eye or subtle shell patterns with fine lines.
- Allow the paint to dry completely between layers and before curing.
- Bake the mug in the oven according to paint instructions to harden the paint and make it dishwasher safe.
Pro-Tip: For a perfectly minimalist sea turtle, less is more. Focus on clean, bold lines and a simple color palette. Using a stencil can help maintain crisp edges and symmetry, a useful trick for overcoming beginner mug painting challenges.

5. Craft a Shimmering Mermaid Scale Pattern

Pin this enchanting mermaid mug to your ‘Fantasy Crafts’ collection!
Add a touch of magic with a shimmering mermaid scale design. This technique leverages iridescent paints to create oceanic motifs on mugs that change color in the light, perfect for custom personalized ocean design mugs.
Materials Needed:
- Ceramic mug (any color, but dark colors can enhance shimmer)
- Food-safe iridescent or metallic ceramic paints in teal, purple, and green
- Small, round paint brush
- Rubbing alcohol
- Fish scale stencil or a small, circular object for tracing scales
Step-by-Step Directions:
- Clean the mug thoroughly with rubbing alcohol.
- Use a fish scale stencil or manually draw overlapping “U” shapes to create the scale pattern. You can draw vertical lines first to guide the scales.
- Fill in each scale with alternating iridescent paints (teal, purple, green), ensuring smooth, even coats.
- Allow each color to dry slightly before applying the adjacent color to prevent bleeding.
- Build up the shimmer by applying a second thin coat of iridescent paint if desired.
- Add tiny dots of a contrasting metallic color (e.g., silver) for extra sparkle within some scales.
- Cure the mug according to the paint manufacturer’s instructions for durability and food safety (cure ceramic paint).
Pro-Tip: For a perfectly even shimmering mermaid scale pattern, use a small, rounded object (like a pencil eraser) dipped in paint to stamp each scale. Overlap them slightly to create depth. This method is excellent for achieving consistent results and avoiding uneven mug paint.

6. Paint a Serene Ocean Sunset Scene

Dream of golden hour? Pin this ocean sunset mug to your ‘Relaxing Crafts’ board!
Capturing the transition from day to night, an ocean sunset mug relies on smooth blending. This project breaks down easy steps to paint an ocean sunset on a ceramic mug, focusing on the gradient sky meeting a calm ocean beach.
Materials Needed:
- Smooth ceramic mug, ideally white or light-colored
- Food-safe ceramic paints in yellow, orange, pink, purple (for sunset sky), and deep blue (for ocean/silhouette)
- Soft blending brushes, flat brush for horizon
- Rubbing alcohol
- Small liner brush for silhouettes (optional)
Step-by-Step Directions:
- Clean the mug surface thoroughly with rubbing alcohol.
- Paint the upper half of the mug with horizontal bands of yellow, orange, pink, and purple, blending them gently while wet to create a smooth sunset gradient.
- Paint the lower half with deep blue, creating the ocean. You can blend the bottom edge of the sunset colors into the blue for a reflection effect.
- Allow the background to dry completely.
- Paint a silhouetted coastline, palm trees, or a boat along the horizon line using the deep blue or black paint.
- Add small, subtle reflections of the sunset colors onto the water if desired, using light dabs of paint.
- Cure the mug according to the paint manufacturer’s instructions to ensure it’s food-safe and durable.
Pro-Tip: Achieving a seamless sunset gradient requires working quickly while the paints are still wet. Use a damp brush to help blend colors effortlessly. This technique is key to preventing paint streaks on mugs and creating a professional finish.
7. Hand-Paint Whimsical Marine Life

Pin these adorable marine creatures to your ‘Kid-Friendly Crafts’ board!
For a fun, family-friendly project, try creating whimsical marine life. This style encourages creativity and is perfect when kids paint ocean mugs, focusing on draw ocean patterns that are playful and creative art coffee conversation starters.
Materials Needed:
- Ceramic mugs suitable for children or playful designs
- Food-safe ceramic paints in bright, cheerful colors (e.g., turquoise, yellow, orange, pink)
- Various paint brushes (round, flat) and ceramic paint pens for outlines
- Rubbing alcohol
- Pencil for sketching
Step-by-Step Directions:
- Clean the mug surface thoroughly.
- Sketch simple, rounded shapes for your chosen marine animals (e.g., a circle for a fish body, an oval for a dolphin) directly onto the mug with a pencil.
- Fill in the sketched shapes with solid blocks of your chosen colors. Let dry.
- Add simple details like eyes, fins, or tentacles using a fine-tip brush or paint pen.
- Create background elements like bubbles or wavy lines with lighter blue paint or a paint pen.
- Allow the paint to dry completely.
- Cure the mugs in the oven according to the paint manufacturer’s instructions to ensure durability and food safety.
Pro-Tip: When hand-painting whimsical marine life, don’t aim for perfect realism. Embrace simplified, cartoonish styles. Using a white or light-colored paint as a base coat for vibrant colors will make them pop more, ensuring vibrant ocean colors on your mugs and enhancing artistic ocean mug designs.

8. Apply an Abstract Ocean Swirl Design

Dive into creativity! Pin this abstract ocean swirl mug to your ‘Artistic Mugs’ board!
For a modern, artistic touch, an abstract ocean mug uses fluid movement to evoke the feeling of the sea. This method focuses on fluid ceramic art and marbling techniques to create unique ocean mug patterns.
Materials Needed:
- Ceramic mug (smooth surface is best for blending)
- Food-safe ceramic liquid paints in shades of blue, green, white, and a touch of deep teal
- Soft blending brushes, a fine-tipped brush for accents
- Rubbing alcohol
- Droppers or small spatulas for paint application
Step-by-Step Directions:
- Clean the mug surface thoroughly with rubbing alcohol.
- Apply a base layer of light blue or white paint to the mug, covering the entire area you wish to swirl. Do not let it dry completely.
- Drip small amounts of darker blues, greens, and teal paints onto the wet base layer using droppers or a brush.
- Use a clean, damp blending brush or a toothpick to gently swirl the colors together, creating a fluid, abstract pattern reminiscent of ocean currents.
- Add small touches of white for highlights or a “wave foam” effect while the paint is still wet.
- Allow the abstract design to dry completely without disturbing it.
- Cure the mug in the oven according to your paint’s instructions to ensure a durable, food-safe finish.
Pro-Tip: For a truly captivating abstract ocean swirl design, don’t over-blend! Let the colors naturally marble and flow. This creates organic patterns that mimic real ocean currents. Experiment with different viscosities of paint to achieve unique textural effects found in master crafters techniques.

9. Craft a Textured Sand & Sea Glass Design

Bring the beach to your mug! Pin this sea glass design to your ‘Coastal Decor DIY’ board!
Take your art to the next dimension with a textured sand and sea glass design. This advanced technique creates a tactile experience, making your textured ocean mugs feel as authentic as they look, perfect for sea glass art mugs.
Materials Needed:
- Ceramic mug (smooth surface for best contrast)
- Food-safe ceramic texture medium or fine craft sand and a food-safe sealant
- Food-safe frosted ceramic paints in soft blues, greens, and whites for sea glass effect
- Small sponge or flat brush for texture application
- Fine-tipped brush for sea glass shapes
- Rubbing alcohol
Step-by-Step Directions:
- Clean the mug thoroughly with rubbing alcohol.
- Apply the ceramic texture medium or a layer of strong food-safe adhesive (suitable for ceramics) to the lower portion of the mug where you want the “sand” to be.
- Sprinkle fine craft sand onto the wet medium/adhesive, pressing gently for even coverage. Tap off excess. Let dry completely.
- Paint irregular, rounded “sea glass” shapes on the upper part of the mug using the frosted ceramic paints. Overlap some for realism.
- Allow the sea glass paint to dry.
- Once all elements are dry, apply a final thin coat of clear, food-safe ceramic sealant over the entire design for durability (seal painted mugs).
- Cure the mug as per the sealant’s or paint’s instructions.
Pro-Tip: For authentic textured sand and sea glass design, use a fine grit sand for the sand texture. For the sea glass, apply frosted paint in multiple thin, irregular layers to build up a translucent, worn look, making sure to avoid paint chipping on mugs solution and ensuring the result is tested for durability.

10. Illustrate a Dynamic Ocean Current Pattern

Feel the power of the ocean! Pin this dynamic current mug to your ‘Powerful Art’ board!
Convey the raw energy of the sea with a dynamic ocean current pattern. This design uses bold, sweeping lines and high-contrast colors to create a deep blue spectacle, perfect for those interested in fluid ceramic art.
Materials Needed:
- Ceramic mug (can be white or a deep blue for added depth)
- Food-safe ceramic paints in deep navy, royal blue, aqua, and white
- Liner brushes, thin round brushes
- Rubbing alcohol
- Water for thinning paints (if necessary, check paint instructions)
Step-by-Step Directions:
- Clean the mug surface thoroughly.
- Start by painting broad, curving lines across the mug with a medium blue, mimicking the flow of a current.
- Immediately (while wet), add narrower lines of deep navy and aqua alongside the first lines, allowing the colors to bleed and blend slightly.
- Use white paint with a fine liner brush to add thin, sharp lines within the deeper colors, representing frothy movement or foam within the current.
- Continue to build up layers of curving lines, varying thickness and intensity, to create a sense of dynamic motion.
- Allow the paint to dry completely.
- Cure the mug in the oven according to the paint manufacturer’s instructions to ensure it is durable and food-safe.
Pro-Tip: To create a truly dynamic ocean current pattern, practice your fluid brushstrokes on paper first. Use contrasting shades of blue and white to emphasize motion and depth, avoiding flat, uninspired designs. This technique helps in creating original ocean artwork mugs akin to master crafters techniques.
11. Personalize with Ocean-Themed Monograms

Make it uniquely yours! Pin this ocean monogram mug to your ‘Personalized Gifts’ board!
The ultimate in personalized painted mugs, an ocean-themed monogram integrates lettering with marine motifs. This idea is perfect for custom ocean mugs meant as gift ideas for ocean lovers.
Materials Needed:
- Smooth ceramic mug (white or light-colored for best contrast with detail)
- Food-safe ceramic paints in coastal colors (blues, greens, sand tones, white)
- Fine-tipped paint brushes or ceramic paint pens
- Lettering stencils (optional, for crisp initials)
- Rubbing alcohol
- Pencil for light sketching
Step-by-Step Directions:
- Clean the mug thoroughly with rubbing alcohol and let dry.
- Lightly sketch the desired initial (monogram) onto the mug using a pencil or a stencil for accuracy.
- Carefully paint inside the initial’s outline using your chosen ceramic paint. Allow to dry.
- Once the initial is dry, begin adding small, delicate ocean elements around or integrated into the letter. Think tiny shells, a small wave crest, or a piece of coral, using fine brushes.
- Use a contrasting color for the ocean elements to make them stand out against the initial.
- Allow all paint to dry completely.
- Cure the mug in the oven according to your paint’s specific instructions to ensure durability and food safety.
Pro-Tip: For crisp, ocean-themed monograms, use a stencil for the initial and ensure it’s firmly secured before painting. For freehand elements, practice on paper first. This attention to detail elevates the personalized painted mugs from amateur to artisan quality.
Key Takeaways: Your Quick Guide to Painted Mugs Ocean
- Always use food-safe ceramic paints and follow curing instructions to ensure your painted mugs ocean designs are safe for use. – This prevents toxic paint alternatives for mugs and ensures durability.
- Proper surface preparation is crucial for long-lasting results, preventing common issues like paint chipping on mugs. – Clean ceramic mug blanks with alcohol before painting.
- Experiment with various techniques like blending, layering, and stenciling to achieve diverse ocean art mug styles. – From realistic waves to abstract swirls, variety is key.
- Consider integrating specific entity attributes descriptive like iridescent paints or textured mediums for unique tactile and visual effects. – These enhance the artistic ocean mug designs.
- Don’t forget the personal touch: custom ocean mugs with monograms or specific marine life make excellent gifts. – Elevates the handmade ocean mugs to personalized treasures.
- Patience with drying and curing times is paramount for a professional, durable finish that mimics gallery quality ocean mugs. – Rushing the process can lead to paint peeling or fading.
- Leverage detailed tutorials, especially for advanced designs, to master master crafters techniques and overcome beginner mug painting challenges. – Continuous learning improves your painted mug artistry.
FAQs About Painted Mugs Ocean
What paint to use for ceramic mugs?
For durable, food-safe results, use specialized oven-bake ceramic paints or paint pens designed specifically for pottery. These paints typically require curing in a household oven to set permanently, making the painted mugs ocean designs dishwasher-safe and long-lasting. Avoid regular acrylics unless explicitly labeled for ceramic and oven curing, as they often chip easily and are not food-safe.
Are painted mugs dishwasher safe?
Many food-safe ceramic paints are dishwasher-safe after proper curing, though hand-washing is generally recommended to extend the life of your ocean painted mugs. Always check the specific manufacturer’s instructions for the paint you used, as curing temperatures and times vary. High heat and harsh detergents in dishwashers can sometimes cause premature fading or chipping.
How to cure painted mugs?
To cure painted mugs ocean designs, most ceramic paints require baking in a conventional oven at a specific temperature and duration, typically between 300-375°F for 30-90 minutes. Always refer to your paint product’s instructions for precise details. Proper curing ensures the paint adheres permanently, becomes water-resistant, and is food-safe, preventing issues like paint won’t stick to mug.
What kind of mugs can you paint?
You can paint most plain, glazed ceramic, porcelain, or glass mugs with smooth surfaces, ensuring they are free from any existing artwork or highly textured finishes. White or light-colored mugs provide the best canvas for vibrant ocean design mugs. Avoid plastic or unglazed porous surfaces unless using specific paints designed for those materials.
How to make painted mugs last?
To make painted mugs ocean designs last, thoroughly clean the mug before painting, use only durable painted mugs specific food-safe ceramic paints, cure them properly according to instructions, and ideally, hand-wash them. Applying a food-safe ceramic sealant can also add an extra layer of protection against chipping and fading. Avoid harsh scrubbing or abrasive cleaners.
Are hand painted mugs food safe?
Yes, hand-painted mugs can be food-safe if you use non-toxic, food-grade ceramic paints and ensure the paint does not come into contact with the lip area or inside of the mug. Paint should be applied to the exterior and cured properly. Always look for paint labels indicating “food-safe” or “non-toxic” after curing, verifying certified food-safe paints.
Why do painted mugs peel?
Painted mugs typically peel due to improper surface preparation, using the wrong type of paint, or insufficient curing. If the mug wasn’t thoroughly cleaned, oils or dirt could prevent paint adhesion. Regular acrylic paints (not formulated for ceramics) often peel, as do ceramic paints that haven’t been baked at the correct temperature or for the specified duration.
Where can I find ocean themed mug painting tutorials?
Numerous ocean themed mug painting tutorials can be found on YouTube, Pinterest, and craft blogs, offering step-by-step guidance for various designs. Search for terms like “DIY painted mugs ocean tutorial,” “seascape coffee mug painting,” or “marine life mug art instructions.” These resources often demonstrate specific techniques for waves, corals, and sea creatures.
How much do custom painted ocean mugs cost?
Custom painted ocean mugs can vary significantly in cost, ranging from $25-$75 or more depending on the artist’s experience, complexity of the design, and size of the mug. Factors like personalization, multiple colors, and intricate details increase the price. Many artists sell their unique ocean mugs on platforms like Etsy or their personal websites.
What are popular ocean elements for mug designs?
Popular ocean elements for mug designs include realistic or whimsical waves, various marine animals like sea turtles, dolphins, and jellyfish, and vibrant coral reef scenes. Beach scenes with seashells, sand, and palm tree silhouettes are also common. Abstract swirls and gradients that evoke the ocean’s depth and movement are also popular artistic choices for ceramic ocean mugs.
Final Thoughts on Painted Mugs Ocean
Creating painted mugs ocean designs is a deeply rewarding craft that blends artistic expression with practical utility. This guide has provided you with 11 essential DIY ideas, from capturing the dynamic power of waves to illustrating the serene beauty of a coral reef, all while emphasizing the critical importance of food-safe materials and proper curing techniques. By following these detailed instructions and expert tips, you’re now equipped to produce professional, durable, and truly unique ocean coffee mugs that will bring a touch of the seaside to every sip.
Whether you’re crafting a personalized gift or enhancing your home decor, remember that patience and attention to detail are your best tools. Embrace the process, experiment with colors and textures, and let the vast beauty of the ocean inspire your next ceramic masterpiece. We’ve covered everything from basic supplies to advanced techniques, ensuring your creations are not only stunning but also long-lasting and safe for everyday use. What ocean-inspired design will you paint ocean mugs with first?
Last update on 2026-04-27 / Affiliate links / Images from Amazon Product Advertising API