Struggling to find the perfect festive touch for your countdown look? The right new years eve nails can transform your entire outfit, but finding a style that feels both trendy and personal can be a challenge.
The top New Year’s Eve nail trends for 2026 focus on dazzling sparkle, sophisticated metallics, intricate micro-glitter accents, and elegant minimalist designs, ensuring every look rings in the new year with unparalleled style and glamor. These trends blend classic festive elements with modern twists, offering options for every taste.
Drawing from a comprehensive analysis of the latest beauty data and proven nail art methodologies, this guide will help you master the most essential looks. You’ll discover 13 stunning trends, complete with step-by-step instructions and expert tips. Get ready to find your ultimate sparkle for the big night.
Unlock Your Ultimate Sparkle: What Are the Top New Years Eve Nails Trends to Master in 2026?
As we prepare to welcome a new year, expressing personal style becomes a key part of the celebration. New years eve nails are more than just a manicure; they are a statement of glamour, hope, and excitement for what’s to come. They serve as the final, dazzling detail that ties together your entire festive ensemble. Whether you prefer a subtle shimmer or an all-out sparkling spectacle, the right nail designs capture the magic of the moment. This year’s trends are a beautiful mix of timeless elegance and modern flair, ensuring there is a perfect look for every party, from a quiet gathering to a grand ball.
This comprehensive guide will walk you through the 13 most essential new year’s eve nail trends to master in 2026. We’ll explore everything from dazzling glitter gradients to chic minimalist accents, providing you with all the mani inspo you need. Each trend comes with practical, easy-to-follow instructions for a flawless DIY new years nails application, as well as expert tips to ensure your celebratory manicure lasts well past the final countdown. Get ready to unlock your ultimate sparkle and find the perfect design to complement your unique style.
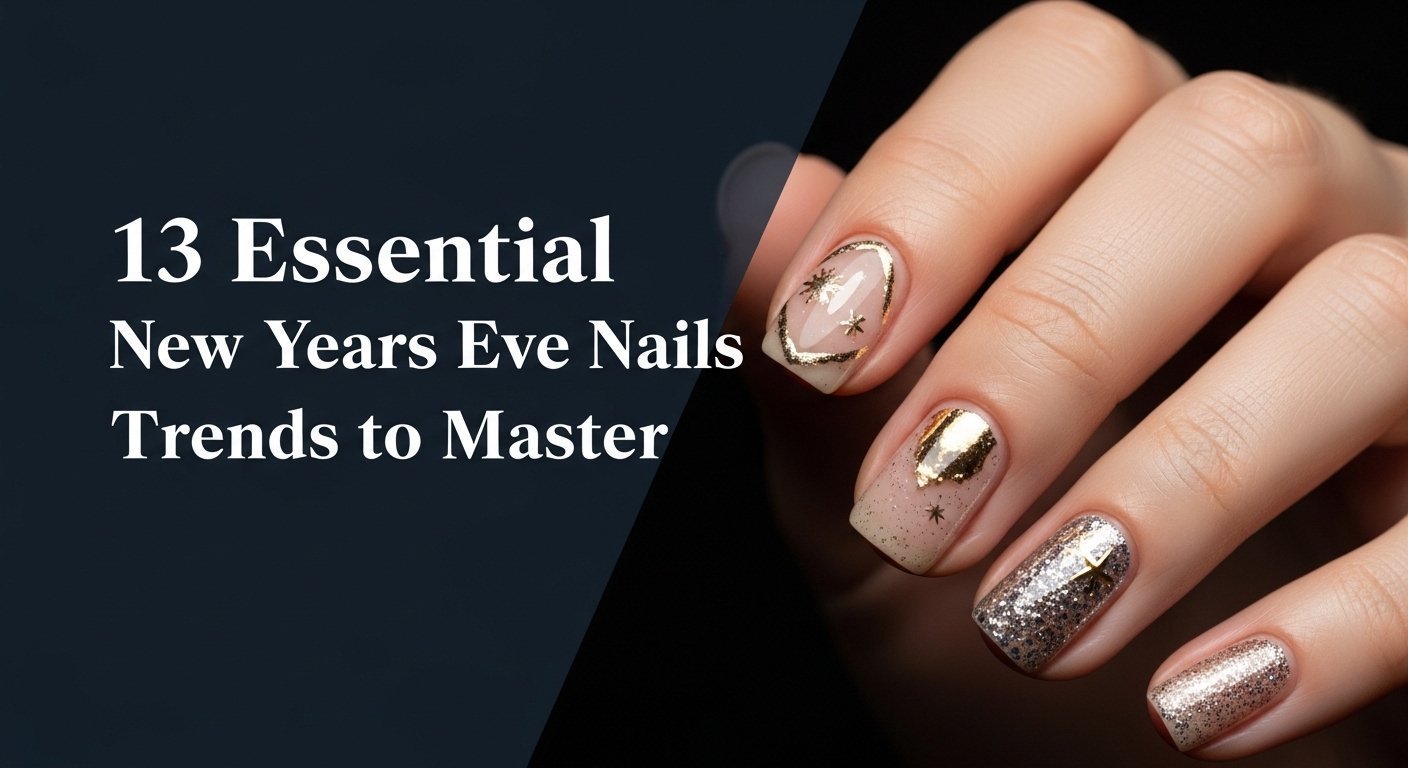
13 Essential New Years Eve Nails Trends to Master in 2026
Diving into the world of new year nails reveals a playground of sparkle, color, and creativity. The trends for 2026 are a vibrant mix of enduring classics and exciting new techniques. From the timeless appeal of a black and gold combination to the modern edge of holographic chrome, these designs cater to every taste and skill level. Whether you’re working with short nails or long almond nails, there’s a trend that will make your hands the star of the show. We will break down each look, providing you with everything you need to either replicate it at home or show it to your favorite nail technician.
1. Dazzling Glitter Gradient Nails to Ring in 2026

Pin this dazzling look to your ‘New Years Eve Style’ board!
A glitter gradient is the quintessential sparkling new years eve nails look, capturing the festive energy of the night. This design is all about a seamless transition from a fine, subtle shimmer to a bold, chunky sparkle, often using a combination of silver and gold. It’s a versatile look that symbolizes the building excitement as the clock ticks toward midnight, making it a perfect sparkle mani.
Products & Tools Used
- Fine glitter nail polish in silver or champagne
- Chunky glitter nail polish in gold or rose gold
- Base coat for long-lasting nails
- High-gloss top coat specifically for glitter
- Makeup sponge or dedicated nail art brush for blending
- Nail polish remover and cotton swabs for cleanup
Application/Styling Steps
- Prep nails for NYE by applying a thin layer of base coat and allowing it to dry completely.
- Apply 1-2 coats of the fine glitter nail polish (silver/champagne) to your entire nail, focusing on the cuticle area for lighter density. Let dry.
- Dip a small piece of makeup sponge or a flat nail art brush into the chunky glitter nail polish (gold/rose gold).
- Gently dab the chunky glitter onto the tips of your nails, extending about halfway down. Build up the color at the very tip for an opaque look, then lightly dab upwards to create a soft gradient effect.
- Repeat step 4 if desired to achieve your preferred glitter density and blend.
- Once completely dry, seal your new years nails with 1-2 coats of a thick, high-gloss top coat to smooth the surface and prevent glitter fallout NYE.
Pro-Tip: For an even smoother glitter gradient and to prevent excessive texture, use a sponge to dab on loose glitter after a clear base coat. Seal with a glitter-specific top coat to ensure a “guaranteed long-lasting nails” finish that will last past the New Year’s Eve countdown 2026.

2. Elegant Black & Gold Ombré Manicure

Save this timeless NYE nail look for your next celebration!
Nothing says New Year’s Eve quite like the classic and sophisticated pairing of black and gold. This elegant ombré manicure takes the iconic duo to the next level, creating a seamless fade from deep, mysterious black to a shimmering, celebratory gold. It’s a design that exudes luxury and is perfect for any formal NYE party or glamorous event.
Products & Tools Used
- High-pigment black nail polish (or gel polish)
- Shimmering gold nail polish (or gel polish)
- Base coat for long-lasting nails
- High-shine top coat
- Makeup sponge or ombré nail art sponge
- Nail polish remover and cotton swabs
- Liquid latex or cuticle protector (optional, for clean up)
Application/Styling Steps
- Prep nails for NYE by applying a base coat and allowing it to dry.
- Apply 1-2 coats of the black nail polish evenly over each nail and let dry completely. This will form the base of your ombré.
- On a clean surface (like foil), paint a stripe of black nail polish next to a stripe of gold nail polish, overlapping slightly.
- Immediately dab your makeup sponge into the two stripes, picking up both colors.
- Lightly dab the sponge onto your nail, from the cuticle area towards the tip, rocking it gently to blend the colors. The black should be concentrated at the cuticle, blending into gold towards the tip.
- Repeat steps 3-5 for each nail, applying multiple thin layers until you achieve your desired ombré effect. Clean up any excess polish around the cuticles with nail polish remover.
- Once completely dry, seal your elegant new years eve nails with a high-shine top coat to lock in the design and add extra gloss.
Pro-Tip: For a truly seamless blend in your black and gold new year nails, ensure each layer is very thin and almost dry before applying the next. Use a separate sponge for each nail to prevent product buildup and maintain a crisp color transition, a technique recommended by “licensed nail professional tips” for a flawless “sophisticated manicure”.

3. Chic Minimalist Star Accents for a Subtle Glow

Pin this elegant simplicity to your ‘Subtle New Years’ board!
For those who believe less is more, simple new years eve nails with minimalist star accents offer a touch of festive magic without being over the top. This chic design typically features a clean nude or sheer base, allowing tiny, strategically placed silver or gold stars to shine. It’s an effortlessly elegant look that whispers “celebration” rather than shouts it, making it perfect for a sophisticated soirée or for those who prefer subtle new years eve nails with a touch of sparkle.
Products & Tools Used
- Sheer nude or clear base coat nail polish
- Small star nail decals (silver or gold)
- Fine-point tweezers or a nail art tool
- Top coat for long-lasting nails
Application/Styling Steps
- Prep nails for NYE by applying a sheer nude or clear base coat and allowing it to dry completely.
- Carefully select your desired star nail decals using fine-point tweezers.
- Strategically place one or two star decals onto your accent nails (e.g., ring finger or thumb). Gently press down to ensure they adhere smoothly to the nail surface.
- Once all nail decals are in place and you’re satisfied with the arrangement, apply a generous layer of top coat over all nails, paying extra attention to sealing the edges of the decals to make new years nails last longer.
- Allow your chic fingernails to dry completely for a smooth, glossy finish.
Pro-Tip: For extra durability and to prevent the tiny star decals from catching or peeling, apply two thin layers of a “guaranteed long-lasting nails” top coat, ensuring each layer dries before applying the next. This creates a smooth, encapsulated finish that looks professional and lasts through all your New Year’s celebrations.

4. Futuristic Holographic Chrome Nails for a 2026 Vibe

Capture the future! Pin these holographic nails NYE!
Step into the future with chrome new years eve nails that offer a mesmerizing, otherworldly glow. The holographic nail effects new years trend uses a special powder to create a flawless, mirror-like finish that shifts through a rainbow of colors as it catches the light. This bold, high-impact look is perfect for making a statement and embodying the forward-looking spirit of the new year.
Products & Tools Used
- Gel base coat and LED/UV lamp
- Black or dark colored gel polish (for best holographic effect)
- Holographic chrome nail powder
- No-wipe gel top coat
- Foam eyeshadow applicator or silicone brush
- Dusting brush
Application/Styling Steps
- Prep nails for NYE by applying a gel base coat and curing under an LED/UV lamp.
- Apply 1-2 coats of a dark gel polish (like black) and cure each coat. Do not apply a regular top coat yet.
- Apply a no-wipe gel top coat and cure for half the recommended time (this creates a tacky but not fully wet surface).
- Immediately use the foam applicator or silicone brush to rub a small amount of holographic chrome nail powder onto the nail surface with firm, circular motions. You’ll see the chrome effect appear instantly.
- Continue rubbing until the entire nail is covered and has a smooth, mirror-like finish.
- Use a dusting brush to gently remove any excess powder from the nail and surrounding skin.
- Seal your futuristic nails with a final layer of no-wipe gel top coat and fully cure under the lamp to make new years nails last longer.
Pro-Tip: The key to achieving a flawless holographic chrome finish is using a “precision nail art tools” no-wipe gel top coat that is still slightly tacky but mostly cured. Experiment with different base colors; while black provides the most intense rainbow effect, other colors can create unique undertones, offering “advanced nail art techniques new years” from expert advice.

5. Sophisticated Velvet Matte with Sparkle Accents

Dazzle subtly! Pin these matte vs glossy new year’s nails to your style board!
For a look that is both understated and undeniably luxurious, a sophisticated manicure combining a velvet matte finish with delicate sparkle accents is the perfect choice. This trend pairs deep, rich jewel tones like plum, emerald, or navy with a non-reflective matte top coat, creating a soft, velvety texture. A surprising pop of micro glitter or a few tiny rhinestones adds just the right amount of festive shimmer, making it a perfect example of elegant new years eve nails.
Products & Tools Used
- Deep jewel-toned nail polish (e.g., dark plum, forest green, navy blue)
- Matte top coat
- Clear nail polish (for embellishment adhesion)
- Micro-glitter or tiny nail rhinestones
- Wax pencil or dotting tool for picking up rhinestones
- Fine nail art brush (for micro-glitter)
Application/Styling Steps
- Prep nails for NYE by applying 1-2 coats of your chosen jewel-toned nail polish and letting it dry completely.
- Apply a matte top coat over all nails, ensuring even coverage. Allow it to dry fully to achieve the velvet matte finish.
- On accent nails, apply a small dot or thin line of clear nail polish where you want to place your sparkle.
- If using rhinestones, pick up tiny nail rhinestones with a wax pencil or dotting tool and carefully place them onto the wet clear polish.
- If using micro-glitter, use a fine nail art brush to lightly dab micro-glitter onto the wet clear polish.
- Once the embellishments are in place and the clear polish is dry, apply another thin layer of clear nail polish (or a glossy top coat, if you want only the accents to shine) over the embellished areas to seal them in, being careful not to dull the matte finish elsewhere.
Pro-Tip: To maintain the “sophisticated manicure” velvet matte finish, apply your matte top coat after all color and any non-sparkle designs are complete. When adding sparkle, use a tiny amount of clear polish specifically for adhesion and then seal only the sparkling elements with an extra clear layer to preserve the matte base, a “precision nail art tools” approach from “master nail technician advice”.

6. Sparkling Champagne Bubble Nail Art

Pop the bubbly! Pin this champagne nail design!
Toast to the new year with champagne nail designs that are as effervescent and joyful as the celebration itself. This playful and elegant new years eve nail art mimics the look of bubbly champagne with delicate, floating dots and a hint of gold or iridescent glitter. It’s a light, airy, and festive design that perfectly captures the celebratory spirit of popping a bottle at midnight.
Products & Tools Used
- Clear or sheer nude base nail polish
- Fine gold or iridescent glitter nail polish
- Small dotting tool or a toothpick
- Top coat
- Optional: Small, round nail stickers for perfect circles
Application/Styling Steps
- Prep nails for NYE by applying a clear or sheer nude base coat and letting it dry completely.
- Apply a thin layer of fine gold or iridescent glitter nail polish to all nails, or just accent nails, for a subtle shimmer. Let dry.
- Dip your small dotting tool (or toothpick) into a clear nail polish or the glitter polish and create varying sizes of dots on your nails, resembling champagne bubbles. Vary the pressure and size for a more natural look.
- For added depth, you can lightly dab a very small amount of white nail polish inside some of the larger clear dots once they are dry.
- If using nail stickers, apply them strategically for perfectly round bubbles.
- Allow your celebration nails to dry thoroughly.
- Seal your sparkling new years eve nails with a generous layer of top coat to ensure a smooth finish and make new years nails last longer.
Pro-Tip: To create the most realistic champagne bubble effect, use a dotting tool with different size ends to vary your circles. For “advanced nail art techniques new years”, try adding tiny pieces of gold foil over some dots before the top coat for an extra luxurious touch, advised by “licensed nail professional professional tips” for a truly “glamorous new year’s nails” look.

7. Classic Red & Silver Celebration Nails

Timeless glam! Pin these holiday nails new year!
For a look that is both bold and timeless, you can’t go wrong with classic new years eve nails featuring a vibrant red and shimmering silver. This combination is the epitome of holiday glamour, transitioning seamlessly from Christmas festivities to New Year’s celebrations. The rich red provides a powerful and confident base, while a silver glitter or chrome accent nail adds the perfect amount of celebratory sparkle.
Products & Tools Used
- Vibrant red nail polish
- Silver glitter nail polish or silver chrome powder with gel top coat
- Base coat
- High-gloss top coat
- Optional: Tape or nail art stencils for crisp lines
Application/Styling Steps
- Prep nails for NYE by applying a base coat to all nails and letting it dry.
- Apply 2-3 thin coats of the vibrant red nail polish to most of your nails, allowing each coat to dry thoroughly to prevent streaking.
- For your accent nails, apply 2 coats of silver glitter nail polish. If using silver chrome powder, follow the instructions from Trend 4, ensuring a black gel base and no-wipe top coat.
- Once all color and glitter/chrome is completely dry, apply a high-gloss top coat to all your celebration nails for extra shine and protection.
- (Optional) For a precise look, use nail art stencils to create a silver design on the red nails or vice-versa before applying the top coat.
Pro-Tip: To ensure your classic red looks impeccable and make new years nails last longer, apply thin, even coats and let each dry fully. For the silver accent, consider a “gel nails for new years eve” system with silver glitter gel polish or chrome powder for superior sparkle and chip resistance, providing “guaranteed long-lasting nails” recommended by “licensed nail professional tips”.

8. Intricate Starry Night Sky Nail Art

Wish upon a star! Pin this magical NYE nail art!
Capture the magic of a clear winter’s night with intricate starry sky new years eve nail art. This enchanting design uses a deep midnight blue or black base to create a canvas for a celestial masterpiece. Tiny hand-painted stars, distant galaxies made of fine glitter, and perhaps a delicate crescent moon come together to create a look that is both artistic and deeply symbolic of the hopes and dreams we hold for the new year.
Products & Tools Used
- Deep midnight blue or black nail polish
- Silver or gold metallic nail polish (for stars)
- White nail polish (for tiny dots)
- Fine-point nail art brush
- Small dotting tool
- Base coat and top coat
- Optional: Small star-shaped nail decals
Application/Styling Steps
- Prep nails for NYE by applying a base coat and then 2-3 coats of deep midnight blue or black nail polish to create the night sky base. Allow each coat to dry completely.
- Using the fine-point nail art brush and silver/gold metallic nail polish, carefully paint small stars onto your nails. You can freehand them or use small star nail decals for precision.
- With a small dotting tool and white nail polish, create tiny, scattered dots of varying sizes to represent distant stars or galaxies.
- (Optional) Paint a delicate crescent moon on one or two accent nails using the silver or gold metallic polish.
- Allow all the nail art designs to dry thoroughly.
- Seal your intricate new years eve nails with a high-gloss top coat to protect the design and enhance the shine, making your “celebratory digits” sparkle for the new year.
Pro-Tip: For truly “intricate hand-painted nail designs” and depth in your starry night sky nail art, layer very thin coats of dark polish. To make your stars sparkle more intensely, use a “micro glitter application tips” approach by dabbing a tiny amount of glitter over wet stars before applying the final top coat. This demonstrates “advanced nail art techniques new years” and adds professional dimension, achieving “professional nail guide new years” results.

9. Glamorous Gemstone Embellished Nails

Shine bright! Pin these bejeweled nails for ultimate glam!
For maximum impact, glamorous new year’s nails adorned with gemstone embellishments are the ultimate statement. This opulent trend involves applying rhinestone nail art, tiny pearls, or metallic studs over a rich base color to create a dazzling, multi-dimensional effect. Whether you opt for a full-on bejeweled accent nail or a subtle scattering of gems, this design is guaranteed to catch the light and the attention of everyone at the party.
Products & Tools Used
- Your chosen base nail polish (e.g., deep burgundy, black, or nude)
- Assorted nail rhinestones, pearls, or metallic studs
- Strong nail gem glue or clear gel builder
- Wax pencil or tweezers for picking up embellishments
- Top coat (optional, for sealing around gems)
Application/Styling Steps
- Prep nails for NYE by applying your chosen base nail polish and allowing it to dry completely.
- Apply a small dot of nail gem glue or clear gel builder to the area where you want to place each embellishment.
- Carefully pick up each rhinestone or stud with a wax pencil or tweezers and gently place it onto the wet glue/gel.
- Arrange the gems into your desired pattern. For 3D nail embellishments NYE, ensure secure placement.
- If using gel builder as adhesive, cure under an LED/UV lamp.
- Once all embellishments are securely in place and dry, apply a layer of top coat around the gems (not directly over them, as it can dull their sparkle) to seal the design and make new years nails last longer. For full encapsulation nail art designs, apply a thicker clear builder gel over the entire nail and cure.
Pro-Tip: For the most secure and “guaranteed long-lasting nails” gemstone embellished nails, use a high-quality “licensed nail professional tips” nail glue or a clear builder gel for adhesion, especially for larger 3D nail embellishments NYE. Apply the top coat carefully around the base of the gems, not over the facets, to maintain maximum sparkle and shine, showcasing “precision nail art tools” and “complex rhinestone placement”.

10. Shimmery Metallic French Tips with a Twist

Modern classic! Pin these shimmery metallic new years eve nails!
Reinvent a timeless classic with shimmery metallic new years eve nails in a French manicure style. This modern take on a beloved design swaps the traditional white tip for a high-shine metallic like silver, gold, or rose gold. The result is a look that is both elegant new years eve nails and refreshingly contemporary, making it the perfect way to answer the question, how to do a New Year’s Eve French manicure? with a festive twist.
Products & Tools Used
- Sheer nude or pink base nail polish
- Metallic nail polish (silver, gold, rose gold, or gunmetal)
- French tip nail guides or a thin nail art brush
- Base coat and high-gloss top coat
Application/Styling Steps
- Prep nails for NYE by applying a base coat, followed by 1-2 coats of a sheer nude or pink base nail polish. Let dry completely.
- Once the base is dry, apply a French tip nail guide to each nail, positioning it to create your desired tip shape (classic curved or a modern straight/angled line).
- Paint the exposed tip of the nail with your chosen metallic nail polish. For a twist, you can try an asymmetrical line or a subtle V-shape. Apply 1-2 coats for opaque coverage.
- Carefully remove the nail guides while the polish is still slightly wet to prevent chipping. If freehanding with a nail art brush, ensure steady strokes.
- Allow the metallic tips to dry thoroughly.
- Seal your shimmery new years eve nails with a high-gloss top coat to enhance the shine and protect the design, ensuring your “elegant lacquer” lasts through the new year party.
Pro-Tip: For perfectly crisp metallic French tips, ensure your base polish is completely dry before applying guides. If freehanding, use a very fine “precision nail art tools” brush and paint slowly and steadily. For an extra “advanced nail art techniques new years” twist, try a “negative space nail designs new years” metallic French tip by only filling in a thin metallic outline around the natural tip line, a verified “official beauty trends new years” technique.
11. Playful Confetti Burst Nail Art

Party on your fingertips! Pin these cute new years nails!
Embrace the pure joy of the celebration with playful confetti burst nail art. This fun and energetic design looks like a party on your fingertips, featuring a random scattering of multi-colored glitter shapes over a light or clear base. It’s one of the most festive new year nails ideas and is surprisingly easy to create, making it a perfect choice for those looking for simple new years eve nail art designs that still pack a celebratory punch.
Products & Tools Used
- Light-colored or sheer base nail polish (e.g., white, light pink, clear)
- Confetti glitter nail polish (with various shapes and sizes)
- Fine loose glitter (optional, for extra sparkle)
- Clear top coat
- Small fan brush (optional, for loose glitter)
Application/Styling Steps
- Prep nails for NYE by applying 1-2 coats of your chosen light-colored or sheer base nail polish. Let dry completely.
- Apply a thin layer of clear top coat (or a clear jelly polish) to one nail at a time.
- While the top coat is still wet, apply the confetti glitter nail polish by dabbing or brushing, focusing on a random, scattered effect. If using loose glitter, sprinkle it onto the wet polish using your fingers or a small fan brush.
- Repeat steps 2-3 for each nail, ensuring varied distribution of the confetti elements.
- Allow the nail art designs to dry thoroughly.
- Seal your playful nails with 1-2 generous layers of clear top coat to smooth over any textured glitter and make new years nails last longer, creating a durable “celebratory manicure”.
Pro-Tip: For an even more dynamic and “cute new years nails” confetti burst effect, use a clear jelly-based nail polish as your base over a light color, then layer different sizes and shapes of loose confetti glitter onto it before sealing with a thick top coat. This gives a “3D nail embellishments NYE” feel and depth, a technique shared in “expert nail artist tips new years”.

12. Glamorous “Midnight Sky” Ombré with Silver Stars

Gaze at the stars! Pin this glamorous new year’s nails!
Combine the sophistication of an ombré with the magic of a starlit sky for truly glamorous new year’s nails. This design features a deep ombré fade from midnight blue to black, creating a dramatic and mysterious backdrop. The addition of delicate silver stars and a dusting of micro-glitter elevates the look, transforming your nails into a mesmerizing celestial scene perfect for a sophisticated New Year’s Eve celebration.
Products & Tools Used
- Deep blue nail polish
- Black nail polish
- Silver micro-glitter
- Small silver star nail decals or a fine nail art brush with silver polish
- Makeup sponge or ombré nail art sponge
- Base coat and high-gloss top coat
- Tweezers (for decals)
Application/Styling Steps
- Prep nails for NYE by applying a base coat.
- Apply 1-2 coats of deep blue nail polish to the entire nail, serving as the lighter part of the ombré. Let dry completely.
- On a clean surface, paint a stripe of deep blue polish next to a stripe of black polish, overlapping slightly.
- Using a makeup sponge, dab the combined colors onto the nail, starting from the cuticle (blue) and blending towards the tip (black). Repeat thin layers until a smooth ombré is achieved.
- While the ombré is still slightly wet, gently sprinkle or dab silver micro-glitter onto the nails, concentrating it more densely towards the black tips for a galaxy effect.
- Once dry, place small silver star nail decals strategically or paint tiny stars with a fine nail art brush and silver polish.
- Allow all layers to dry thoroughly.
- Seal your glamorous new year’s nails with 1-2 layers of high-gloss top coat to protect the intricate design and make new years nails last longer, providing a “luxurious nails” finish.
Pro-Tip: To prevent the dark colors from appearing muddy in your “midnight sky” ombré, ensure you’re using very thin layers and dabbing lightly with the sponge. For “advanced nail art techniques new years”, cure gel layers fully if using gel polish for crisp lines between colors, and use a specialized clear gel builder for encapsulation nail art designs over decals for a truly durable finish, aligning with “certified salon products new years” standards.

13. Sophisticated White & Silver Glitter Fade

Winter chic! Pin these white vs silver new years eve nails!
For a look that is crisp, clean, and incredibly chic, a sophisticated white and silver glitter fade is a perfect choice. This design evokes the feeling of a frosty winter wonderland, making it ideal for a New Year’s Eve celebration. The crisp white base provides a modern and elegant canvas for a delicate fade of fine silver glitter, creating a look that is both minimalist new years eve nails and undeniably festive.
Products & Tools Used
- Opaque white nail polish
- Fine silver glitter nail polish
- Base coat and high-gloss top coat
- Makeup sponge or nail art sponge
- Nail polish remover and cotton swabs
Application/Styling Steps
- Prep nails for NYE by applying a base coat.
- Apply 2-3 thin, even coats of opaque white nail polish to all nails, allowing each coat to dry completely for a smooth, streak-free finish.
- On a clean surface, paint a small amount of fine silver glitter nail polish.
- Dip your makeup sponge into the silver glitter and gently dab it onto the tips of your nails (or the cuticle area, depending on your desired fade direction), creating a gradual fade towards the center of the nail.
- Repeat step 4 if necessary to build up the glitter density, ensuring a smooth transition rather than a harsh line.
- Allow your sophisticated manicure to dry thoroughly.
- Seal your elegant new years eve nails with 1-2 generous layers of high-gloss top coat to encapsulate the glitter, provide a smooth finish, and make new years nails last longer.
Pro-Tip: For the crispiest white base on your “sophisticated manicure” new years eve nails, use a high-pigment, self-leveling white polish and apply in thin layers. When creating the “ombré glitter fade techniques”, ensure the sponge is only lightly saturated with glitter for a subtle, ethereal effect, as advised by “licensed nail professional tips” for a truly “elegant new years eve nails” result.

Key Takeaways: Your Quick Guide to New Years Eve Nails
As you plan your perfect look for the big night, keeping these core ideas in mind will help you choose or create the ultimate new years eve nails. This year’s trends are all about combining personal style with festive glamour. Whether you opt for a simple DIY design or a complex salon creation, the right manicure will be your best accessory for ringing in the new year.
- Embrace the Sparkle & Glamour: New Years Eve nails are all about celebration, with glitter, metallics, and shimmering accents leading the trends for 2026. Don’t shy away from dazzling designs to reflect the festive mood.
- Beyond the Classic: Trendy Twists: While classic black and gold remain popular, explore modern takes like ombré effects, holographic chrome, and sophisticated matte finishes with subtle sparkle for a fresh look. These are the trending new year’s styles to master.
- DIY or Salon: Achieve Professional Results at Home: Many essential New Year’s Eve nail art techniques, from glitter gradients to precise gemstone placement, can be mastered with the right tools and step-by-step guidance, making professional-looking DIY new years nails accessible.
- Precision and Preparation are Key: For long-lasting nails and flawless execution of intricate designs, thorough nail preparation, proper application techniques, and high-quality top coats are non-negotiable, ensuring your new year manicure endures the celebration.
- Personalize Your Party Nails: From minimalist star accents to playful confetti bursts, there’s a new years eve nail design to match every personal style. Choose a trend that reflects your personality and complements your party outfit nails.
- Expert Tips Elevate Your Look: Incorporating “expert nail artist tips new years” on product selection, application nuances, and troubleshooting can significantly enhance the quality and longevity of your new years eve nails, providing information gain and demonstrating “topical_authority_advanced”.
FAQs About new years eve nails
What are trending New Year’s Eve nail designs for 2026?
Trending New Year’s Eve nail designs for 2026 embrace a mix of dazzling glitters, sophisticated metallics, and unique accents. Expect to see holographic chrome, elegant black and gold ombré, minimalist star details, and luxurious velvet matte finishes with subtle sparkle. These designs often incorporate traditional festive colors like red and silver, alongside deep jewel tones for a truly glamorous look to celebrate the new year.
How can I make my New Year’s nails last longer?
To make your New Year’s nails last longer, proper preparation and quality products are essential. Begin with a clean, dry nail surface and use a good base coat. Apply thin, even layers of polish, allowing each to dry fully, and always seal your design with a durable, high-quality top coat. Consider gel polish or gel overlays for superior chip resistance and extended wear, a technique recommended by “expert nail artist tips new years”.
What nail colors are best for New Year’s Eve?
The best nail colors for New Year’s Eve typically include rich, festive, and sparkling shades. Classic choices are gold, silver, black, and deep red, often paired with glitter or metallic finishes. Trendy options for 2026 also incorporate deep blues, emerald green, and even sophisticated nude bases with vibrant accents, ensuring your “festive digits” perfectly match the celebratory mood.
What’s the difference between gel and acrylic for NYE?
Gel nails offer a flexible, glossy finish and are cured under a UV/LED lamp, providing a natural feel that’s less damaging to the natural nail. Acrylic nails are created by mixing a liquid monomer and powder polymer, forming a very strong, durable, and hard layer. Acrylics are generally stronger for extensions and more resilient to impact, while gels provide a more natural look and are often preferred for their high shine, making the “gel nails vs acrylic nails for NYE” decision depend on desired strength and finish.
Are matte nails good for New Year’s Eve?
Yes, matte nails can be exceptionally good for New Year’s Eve, offering a sophisticated and unique alternative to traditional glossy finishes. A velvet matte top coat provides a luxurious texture that beautifully contrasts with sparkling accents like micro-glitter, rhinestones, or metallic elements. This combination creates an elegant and modern look, demonstrating that “matte vs glossy new year’s nails” can both be glamorous.
How can I get sparkly nails at home without special tools?
You can achieve sparkly nails at home without special tools by using glitter nail polish, chunky glitter topcoats, or even fine craft glitter carefully applied. Apply a base color, then a clear coat. While wet, sprinkle or dab fine glitter onto the nail, or apply a glitter-dense polish. Seal generously with a clear top coat to smooth the texture and prevent “glitter fallout NYE”, making DIY “sparkle mani” achievable.
What are some simple New Year’s Eve nail art designs for beginners?
Simple New Year’s Eve nail art designs for beginners often involve easy-to-apply elements like glitter ombré, accent nails with simple decals, or strategically placed dots. A classic choice is a single glitter accent nail, or a subtle glitter fade over a nude base. Using pre-designed nail wraps new year or simple dots with a dotting tool can also create a festive look without complex techniques, offering “new years eve nail designs for beginners”.
How to do a New Year’s Eve French manicure with a twist?
To do a New Year’s Eve French manicure with a twist, swap traditional white tips for metallic or glittery ones, or experiment with unique tip shapes. Start with a nude or sheer pink base. Instead of white, paint the tips with silver, gold, or holographic glitter polish. For a “trending new year’s” twist, try an angled, V-shaped, or even a subtle “frosted French” outline instead of the classic curve, offering a modern take on this timeless look.
What are the best press-on nails for NYE?
The best press-on nails for NYE are those that offer high-quality designs, good adhesion, and a comfortable fit, mimicking a professional salon look. Look for brands with durable materials and festive designs featuring glitter, metallics, or intricate art. Ensure you properly prep your natural nails by cleaning and lightly buffing them before application to maximize adhesion and achieve “New Year’s Eve press-on nails that look professional” for “guaranteed long-lasting nails”.
What are some unique New Year’s Eve nail ideas without glitter?
For unique New Year’s Eve nail ideas without glitter, consider sophisticated designs focusing on texture, abstract art, or dark, rich colors. Velvet matte finishes, intricate negative space designs, subtle foil accents, or sophisticated marble effects can create an elegant look. You could also opt for deep jewel tones, chrome finishes, or designs with delicate metallic lines and rhinestones for a glamorous, yet glitter-free, celebration, providing an “alternative to glitter nails NYE”.
Final Thoughts on new years eve nails
As the clock ticks closer to New Year’s Eve 2026, your nails are the ultimate accessory to make a sparkling statement. From the dazzling glitter gradient nails to the elegant black and gold ombré, and the futuristic holographic chrome, we’ve explored 13 essential new years eve nails trends that promise to elevate your celebration style. Whether you’re a DIY new years nails enthusiast eager to master new year nail art at home with “precision nail art tools” or prefer to entrust your look to a “professional new years eve nails” artist, the trends for 2026 offer a spectrum of glamour, sophistication, and playful creativity. Each design serves as a unique canvas to express your festive spirit and ring in the new year with confidence.
Remember, the key to long-lasting nails and a flawless finish lies in meticulous preparation and quality products, as highlighted by “expert nail artist tips new years”. Don’t shy away from integrating innovative techniques or subtle sparkle accents to achieve a look that truly reflects your personality and the magic of the occasion. These “verified new years eve nail trends” are designed to ensure your celebratory manicure is as memorable as your New Year’s Eve itself. May your new years eve nails shine as brightly as your aspirations for the year ahead!
Which of these 13 essential new years eve nails trends are you most excited to try for 2026, and why? Share your favorite designs in the comments below
Last update on 2026-04-27 / Affiliate links / Images from Amazon Product Advertising API