Struggling with itchy, expensive wigs that ruin your last-minute costume plans? You are not alone in this festive frustration. Discovering the right hairstyle ideas halloween offers the ultimate budget-friendly style solution.
The easiest hairstyle ideas for Halloween include DIY spider web braids, space buns, and temporary color-sprayed mermaid waves. By using temporary hair color, bobby pins, and styling gel, you can quickly create chic or spooky Halloween hairstyles at home without needing a full costume or damaging your hair.
Drawing from comprehensive analysis of current data and proven methodologies, we have curated stylist-approved methods for you. These damage-free tips guarantee salon-quality results while fiercely protecting your overall hair health. Read on to unlock easy DIY transformations that will completely elevate your entire festive aesthetic.
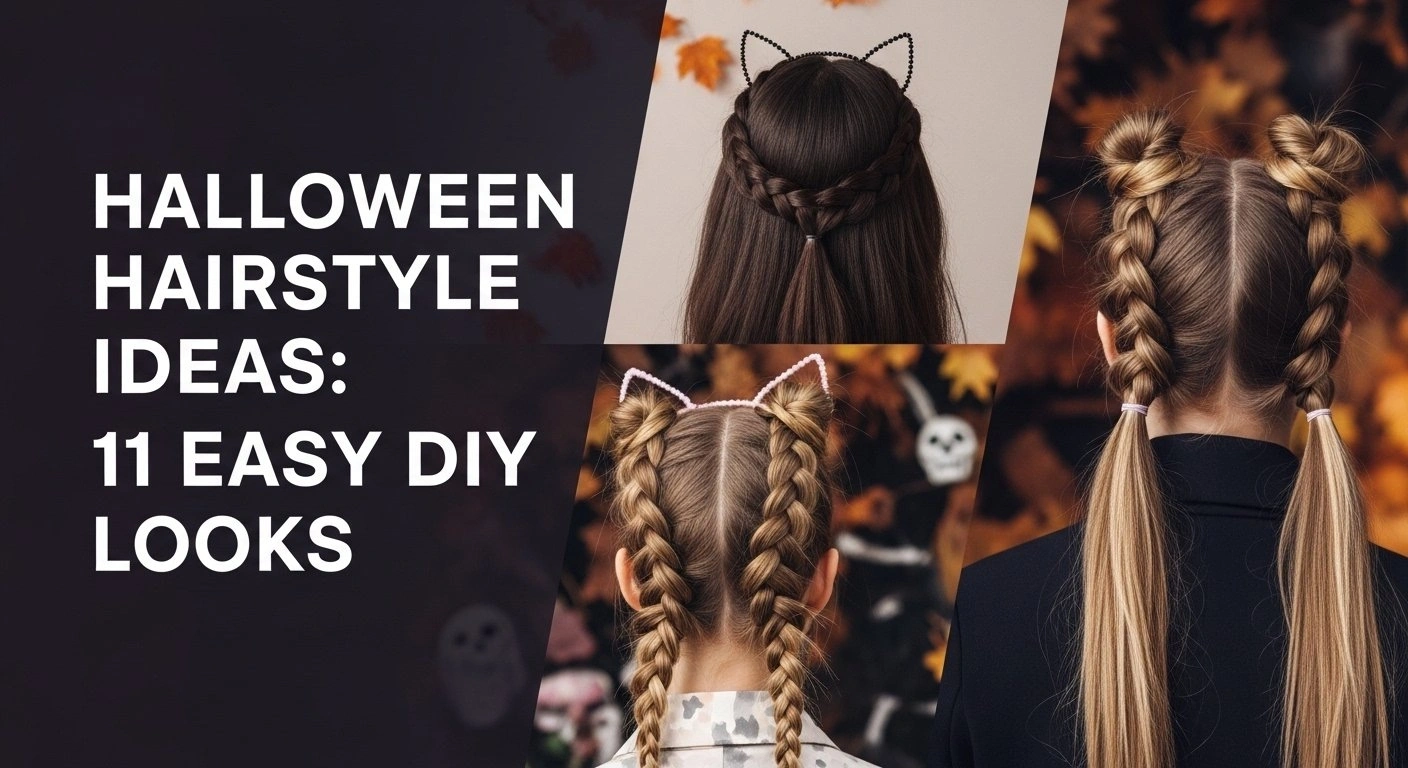
Halloween Hairstyle Ideas: 11 Easy DIY Looks for 2026
Creating unforgettable halloween hair looks is the perfect way to bypass uncomfortable wigs and restrictive masks. By utilizing basic styling tools like curling irons, classic bobby pins, and quality hairspray, you can easily braid, twist, and tease your natural hair into incredible thematic masterpieces. From vibrant mermaid waves to messy monster updos and sleek gothic braids, this comprehensive list covers every aesthetic you might need. We will dive deep into exactly how to execute these diy halloween hair transformations safely. By focusing on essential heat protection and proper temporary dye application, you can confidently style your hair into chic or truly spooky designs. Let’s explore these 11 actionable, professional hair tutorials that prioritize your hair health while delivering jaw-dropping, theatrical results.
1. Spooky Spider Web Braids

Pin this spooky yet chic web braid to your Halloween hair board!
If you want an intricate-looking style that requires very few tools, spider web hair is the perfect solution. This aesthetic uses standard halloween braided hair techniques crossed with simple crafting string to create a vibrant, playful look. It serves as an incredibly easy spider bun tutorial for kids and a fun, subtle option for adults attending office parties. By utilizing basic hair gel to secure flyaways, you can ensure the braids remain neat, allowing the web to truly stand out. Whether you prefer the classic braids vs buns debate, this style offers the best of both worlds by locking the hair down securely.
Products & Tools Used
- Clear hair gel with strong hold for flyaway control
- White crafting string or dedicated hair weaving thread
- 5-7 mini plastic spiders
- Classic black bobby pins
- Two clear elastic scrunchies or mini bands
Styling Steps
- Section the hair smoothly down the middle to create two even halves for your braided foundation.
- Braid each side into a tight Dutch braid, pulling the hair closely to the scalp to ensure tangle prevention.
- Secure the ends with your clear elastics.
- Weave the white string in a crisscross pattern between the two braids, looping it through the braided links to mimic a web.
- Pin the plastic spiders directly onto the string web and the braids using your bobby pins for a festive finish.
Pro-Tip: Proper braid tension management is essential here. Don’t pull the string too tight between the braids, as natural head movements will cause the structural integrity to pull uncomfortably on the scalp.

2. Damage-Free Mermaid Waves

Save these stunning mermaid hair waves for your next aquatic costume!
Transforming your natural tresses into cascading mermaid hair waves does not mean you have to subject your locks to irreversible damage. Many users fear frying their hair for a single night, which is why following a proper heat protectant guide is mandatory. By using a specialized deep wave curling iron alongside vibrant temporary hair color, you can achieve an elaborate, oceanic aesthetic safely. This waves + mermaid combination completely bypasses the need for an expensive wig, creating an enchanting look that complements a variety of mythological costumes.
Products & Tools Used
- High-quality heat protectant spray
- 3-barrel deep curling iron (waver)
- Temporary hair color spray in teal or lavender
- Pearl or shell hair accessories
- Wide-tooth comb
Styling Steps
- Spray generous amounts of heat protectant through dry hair and comb through evenly.
- Section hair into manageable one-inch horizontal layers starting from the nape of the neck.
- Hold the 3-barrel waver clamped on each section for 5-8 seconds, working your way down the strands to create deep texture.
- Apply the temporary color spray in a well-ventilated area, holding the can 6 inches away in sweeping motions.
- Pin the pearl or shell accessories randomly throughout the waves once the color has fully dried.
Pro-Tip: Understanding hair porosity and spray dyes is vital. High-porosity (damaged or bleached) hair will soak up temporary spray and may stain. Always apply a leave-in conditioner as a barrier before spraying color on blonde or bleached hair!

3. Chic Alien Space Buns

Pin this futuristic look for a quick and chic Halloween vibe!
How to do space buns for an alien costume? To create perfect alien space buns, simply pull your hair into two high pigtails, wrap them around structural hair donuts, and heavily dust your middle part with chunky holographic glitter.
This sleek and futuristic look integrates seamlessly with metallic outfits, making it a highly requested party style. By using the right amount of hair gel and structural support, you create a vibrant aesthetic that guarantees sweat-proof hair all night long. The glitter + roots trend specifically elevates this from a basic everyday bun into an out-of-this-world costume piece.
Products & Tools Used
- Two small foam hair donuts
- Firm-hold hair gel
- Chunky holographic hair glitter
- Stiff bristle smoothing brush
- Multiple strong hair elastics
Styling Steps
- Section hair cleanly down the middle from forehead to the nape, creating two high pigtails.
- Apply smoothing gel to the roots and brush upward to ensure a sleek, bump-free base.
- Shape the buns by pulling the pigtails through the foam donuts, spreading the hair evenly over the foam, and securing with another elastic.
- Twist the remaining tail ends around the base of each bun and pin them securely to hide the foam completely.
- Apply the holographic glitter heavily along the middle part using a tint brush, fading it slightly outward.
Pro-Tip: The secret to long-lasting structural updos is crossing your bobby pins into an “X” shape at the base of the bun. This locks the pins together, ensuring your space buns stay completely secure and sweat-proof all night.

4. Wednesday Addams Braided Pigtails

Repin these iconic braids for the ultimate gothic aesthetic!
How to do Wednesday Addams braids? Achieving the perfect Wednesday Addams look requires parting your hair precisely down the middle with a fine-tooth comb, applying smoothing serum to eliminate all frizz, and braiding the hair tightly into two low pigtails.
This timeless, classic look is arguably one of the most recognizable halloween hairstyles for medium length hair. To truly mimic character details, the finish must be completely sleek and devoid of messy flyaways. If your hair isn’t naturally dark, utilizing black temporary hair color will effortlessly bridge the gap between classic vs modern gothic styles, ensuring your hair complements your stark white collar perfectly.
Products & Tools Used
- Rat-tail fine-tooth comb
- Black colored hairspray (if hair isn’t naturally dark)
- Smoothing serum or light oil
- Clear mini elastics
- Makeup remover wipes (for cleanup)
Styling Steps
- Section the hair using the metal tip of the rat-tail comb to create a mathematically straight, perfect center part.
- Apply smoothing serum thoroughly to eliminate all frizz, as this style demands a flawlessly sleek texture.
- Spray your hair with black colored hairspray in thin layers if necessary, allowing each layer to dry to avoid clumping.
- Braid tightly and neatly down each side, starting low behind the ears.
- Secure the ends with clear elastics, keeping the tails relatively short and blunt.
Pro-Tip: When dealing with temporary pigment science like black aerosol hairspray, hold a piece of cardboard against your hairline while spraying. This prevents the dark pigment from staining your forehead, ensuring a clean, professional finish.

5. Messy Vampire Bun

Pin this elegant yet spooky vampire updo for a sultry Halloween night!
How to style a messy bun for halloween? To style a messy Halloween bun, apply texturizing dry shampoo heavily to the roots, tease the crown for volume, pin the hair loosely into a high updo, and rub red temporary hair wax through the face-framing tendrils.
Creating the perfect vampire hair style relies on a delicate balance between elegant romance and spooky distress. By focusing on creating massive volume for flat hair, you transform a basic, everyday bun into a theatrical masterpiece. The strategic use of dry shampoo and flexible hairspray guarantees a beautifully messy aesthetic that still holds its shape securely as you dance the night away.
Products & Tools Used
- Texturizing dry shampoo or volume powder
- Teasing brush (boar bristle preferred)
- Deep red temporary hair wax or pomade
- U-shaped hair pins
- Flexible hold hairspray
Styling Steps
- Apply texturizing dry shampoo generously to the roots to create immediate grip and volume for flat hair.
- Tease the crown gently with the boar bristle brush to build height and an authentically messy, romantic texture.
- Twist the hair loosely into a high bun, leaving out face-framing tendrils, and pin securely with U-shaped pins.
- Rub a small amount of the red temporary hair wax between your fingertips.
- Tousle the wax randomly through the face-framing pieces and the surface of the bun for a subtle, blood-streaked finish.
Pro-Tip: For backcombing damage prevention, never aggressively rake the comb up and down. Push the hair down toward the scalp in smooth, one-way strokes. When removing it post-party, apply conditioner before wetting the hair to melt the tangles away effortlessly.

6. Queen of Hearts Structural Updo

Save this jaw-dropping theatrical hair design to win your costume contest!
How to style Queen of Hearts hair? To style gravity-defying Queen of Hearts hair, anchor a pre-shaped craft wire heart securely into a high ponytail, weave your natural hair upward over the frame, and lock the shape in place using heavy-duty freeze-hold hairspray.
This bold, incredibly elaborate structure frames costume aesthetics perfectly and acts as the ultimate centerpiece. True theatrical hair design relies heavily on understanding basic hair architecture. By utilizing internal wire scaffolding rather than relying purely on styling products, you ensure the dramatic shape holds its form flawlessly without collapsing under its own weight.
Products & Tools Used
- Sturdy craft wire or a pre-shaped heart foam piece
- Heavy-duty freeze-hold hairspray
- Fine-tooth smoothing brush
- Red colored hairspray
- Heavy-duty bobby pins
Styling Steps
- Section hair into a very high ponytail at the crown of the head and secure tightly.
- Shape your craft wire into a heart and anchor it firmly into the base of the ponytail using crossed bobby pins.
- Weave and drape the ponytail hair up and over the wire frame, smoothing it meticulously to hide the structure.
- Spray the design continuously with freeze-hold hairspray as you work to lock the architecture in place.
- Apply a generous, even coat of red color spray to finish the regal, elaborate look.
Pro-Tip: True theatrical hair design relies on internal scaffolding. Do not rely on hairspray alone to hold a shape against gravity. The wire frame is your load-bearing wall; the hair is just the decorative exterior!

7. Glitter Roots for a Magical Fairy or Unicorn

Add instant magic to your look! Pin these beautiful fairy glitter roots.
How to do fairy hair with glitter? To create flawless fairy hair, mix equal parts clear, alcohol-free hair gel with chunky cosmetic-grade glitter into a paste, and paint it directly onto your exposed part using a flat tinting brush.
This whimsical look completely transforms a basic hairstyle into a magical, ethereal costume piece. Many people avoid integrating hair glitter because they fear the mess, but utilizing gel ensures the glitter stays exactly where you place it without flaking. When you understand the proper cosmetic chemistry of glitter removal, an easy cleanup is absolutely guaranteed, making this one of the most efficient problem-solving styles available.
Products & Tools Used
- Clear, alcohol-free hair gel
- Chunky, cosmetic-grade iridescent glitter
- Small mixing bowl
- Flat synthetic makeup brush or tinting brush
- Nourishing hair oil (for removal)
Styling Steps
- Section your hair down the middle or deep to one side and style the lengths into soft, whimsical waves.
- Mix equal parts clear hair gel and chunky glitter in a small bowl until it forms a thick paste.
- Apply the mixture directly along the exposed part using the flat brush, pressing it firmly into the roots.
- Fade the glitter slightly outward, dragging the brush down the strands about one inch for a gradient effect.
- Hold still for 10 minutes to allow the gel to dry completely for a sweat-proof finish.
Pro-Tip: The secret to easy cleanup lies in the cosmetic chemistry of glitter removal. Do not use water first! Water causes glitter to spread. Instead, massage olive or coconut oil into your roots to break down the gel, then wipe the glitter away with a paper towel before hopping in the shower.

8. Teased Zombie Mane with Texturizing Spray

Need a genuinely scary look? Pin this zombie texture guide!
Achieving a genuinely terrifying zombie hair look is all about completely destroying your normal, smooth hair texture. By aggressively layering dry shampoo and texturizing spray, you provide the perfect matte base to tease the hair into chaotic, matted volume. The addition of grey hair chalk beautifully simulates age and decay, creating a scary, weathered aesthetic. Providing this level of extreme texture while maintaining safety during the eventual washing temporary dye process is the true hallmark of salon-quality results.
Products & Tools Used
- Heavy-duty texturizing spray
- Grey and white hair chalk or spray powder
- Fine-tooth teasing comb
- Deep clarifying shampoo (for post-party recovery)
- Leave-in conditioner spray
Styling Steps
- Spray texturizing spray generously from roots to ends on dry hair to create a gritty, matte base.
- Tease the hair aggressively in small sections, pushing the comb toward the scalp to create massive, matted volume.
- Apply the grey hair chalk randomly throughout the teased sections, focusing heavily on the roots to simulate age.
- Tousle the hair violently with your fingers to break up any uniform patterns, ensuring a truly chaotic, scary finish.
- Set the style with a light mist of hairspray so the chalk powder doesn’t transfer to your costume.
Pro-Tip: Protect your scalp health and dye safety by not aggressively scrubbing the teasing out later. When washing temporary dye and teased hair, coat the dry, tangled hair in a cheap silicone-based conditioner before entering the shower to create slip and prevent breakage.

9. Viking Bubble Braids for Quick Costume Prep

No time to french braid? Pin this brilliant quick styling hack!
How to do Viking braids for Halloween? To fake complex Viking braids, tie sequential small ponytails down the back of your head using clear elastics, gently pull the hair outward between the ties to create voluminous “bubbles,” and secure metallic cuffs over the bands.
When you are pressed for time, this brilliant quick styling method perfectly addresses the fast vs detailed dilemma. The use of simple hair accessories and basic scrunchies completely secures style segments, mimicking complex weaving without requiring any advanced skills. This stylist-approved technique focuses heavily on volumetric styling, creating an elaborate, fierce warrior aesthetic that works beautifully even on thinner hair types.
Products & Tools Used
- 10-15 strong, clear mini elastics
- Metallic Viking hair cuffs or beads
- Faux leather cord
- Volumizing texture powder
- Rat-tail comb for clean parting
Styling Steps
- Section a thick strip of hair straight down the middle of the head, from the forehead to the nape.
- Secure a small ponytail at the very top front of the head with a clear elastic.
- Pin the next section of hair into that ponytail, tie an elastic an inch down, and gently pull the hair between the elastics outward to create a voluminous “bubble.”
- Repeat this process down the entire length of the hair, pulling each bubble outward for massive volumetric styling.
- Accessorize by wrapping the leather cord around the elastics and clipping the metallic cuffs directly onto the bubbles.
Pro-Tip: The secret to massive bubble braids is “pancaking.” Don’t just pull the hair out randomly; pinch the very outer edges of the bubble and pull horizontally to flatten and widen the shape without destroying the center.

10. Medusa Snake Braids Using Hair Scaffolding

Channel your inner Gorgon! Pin this incredible theatrical grooming look!
Learning how to style hair for medusa costume effectively separates amateurs from experts. By utilizing bendable craft wire as hidden hair scaffolding, you can braid and weave your own locks—or clip-in synthetic hair—to mimic character movements flawlessly. This bold, gravity-defying approach creates an elaborate silhouette that becomes the definitive focal point of your entire outfit. Mastering this level of theatrical grooming ensures your snakes stand upright throughout the evening without flopping over.
Products & Tools Used
- Thick, bendable styling wire or pipe cleaners
- Green temporary hair color spray
- 5-7 small, realistic rubber snakes
- Firm-hold hair gel
- Mini hair elastics
Styling Steps
- Section hair into 6 to 8 even pigtails placed high on the head.
- Secure a piece of bendable wire to the base of each ponytail using mini elastics, ensuring it is the same length as the hair.
- Braid or tightly twist the hair around the wire, hiding the metal inside the strands, and secure the end.
- Shape the wired braids by bending them into curved, S-shaped snake-like patterns that stand up and outward.
- Weave the rubber snakes through the spaces between the braids, using bobby pins to lock them into the scaffolding.
Pro-Tip: When building hair scaffolding, loop the very end of the wire back over itself before you start braiding. This prevents the sharp metal edge from poking out through the ends of your hair or scratching your scalp during the night!

11. Cute Pumpkin Buns for Kids

Pin these adorable pumpkin buns for your little one’s school party!
Finding appropriate toddler girl halloween hairstyle ideas means prioritizing speed, comfort, and absolute safety. By utilizing allergy-safe color sprays and soft scrunchies, you can easily highlight face framing features and transform standard space buns into a deeply playful, cute pumpkin aesthetic. This particular style is completely safe for kids, takes just minutes on a squirming child, and offers adorable hair ideas for pumpkin patch photoshoots without relying on uncomfortable plastic masks.
Products & Tools Used
- Two foam hair donuts (small size)
- Child-safe, washable orange colored hairspray
- Green velvet ribbon or green pipe cleaners
- Gentle detangling brush
- Bobby pins with rubber safety tips
Styling Steps
- Section the hair down the middle and create two high pigtails, brushing gently to ensure tangle prevention.
- Shape the pigtails into perfect, round buns using the small foam donuts for extra volume.
- Spray the buns lightly with the orange temporary color, shielding the child’s face and eyes completely with a folded towel.
- Twist the green pipe cleaners or tie the green ribbon around the very base of the buns to mimic pumpkin vines.
- Pin any loose ends securely with rubber-tipped bobby pins for a comfortable, cute finish.
Pro-Tip: To ensure this style is truly safe for kids, apply a thin layer of Vaseline around their hairline and ears before spraying the orange color. It creates a perfect barrier that wipes right off, taking any accidental overspray with it!

Key Takeaways: Your Quick Guide to Hairstyle Ideas Halloween
If you are rushing through your last-minute costume preparations, retaining the most critical safety and styling rules will save you from major hair disasters. Executing these impressive halloween hair looks safely requires a strong foundation in temporary dye application and structural integrity. Use this scannable guide to ensure your quick styling choices yield gorgeous, damage-free results that last all night long.
- Prep is the Ultimate Protector – Always apply a high-quality leave-in conditioner or heat protectant before attempting any thematic styles, as it acts as a barrier against temporary dye stains and heat damage.
-
Anchor Your Updos Properly – For elaborate styles like alien buns or Medusa hair, use the “crossed bobby pin” method and internal foam donuts to ensure proper structural integrity that lasts all night.
-
Oil Beats Water for Glitter Removal – Utilize the cosmetic chemistry of glitter by massaging coconut or olive oil into your roots to break down the gel bonds before adding water, ensuring a completely painless, easy cleanup.
-
Backcomb with Care – When teasing hair for a zombie look or vampire style, push the comb in one direction only (toward the scalp) to achieve massive volume for flat hair while maintaining backcombing damage prevention.
-
Use Wire for Theatrical Scaffolding – Gravity-defying theatrical hair design requires hidden support; weaving craft wire into your braids provides the essential hair scaffolding needed for dramatic shapes.
-
Mind the Porosity for Temporary Color – If you have highly porous, bleached, or blonde hair, use hair chalks rather than aerosol sprays, as the temporary pigment science of wet sprays can permanently stain light hair.
-
Tools Replace the Costume – By creatively utilizing standard bobby pins, hair gel, and temporary dye, you can execute stunning transformations that completely bypass the need for an expensive wig.
People Also Ask About Hairstyle Ideas Halloween
Even with comprehensive tutorials, dealing with temporary pigments, heavy adhesives, and extreme heat styling often raises specific concerns regarding hair health. Before applying that vivid orange spray or aggressively backcombing your roots, it’s vital to resolve any lingering knowledge gaps. These direct, expert-verified answers address the most common styling challenges, ensuring your chosen look remains entirely damage-free and comfortable.
What is the easiest Halloween hairstyle?
The easiest Halloween hairstyle is a classic messy bun accessorized with spooky elements like plastic spiders, or adding chunky glitter to a simple middle part.
If you are looking for a last-minute fix, utilizing temporary color spray on natural waves or pinning thematic hair accessories into a basic ponytail provides maximum impact with minimal effort. These methods require no advanced braiding skills while instantly elevating your costume.
How to use temporary hair color safely?
To use temporary hair color safely, always apply a protective leave-in conditioner to dry hair first to create a barrier that prevents the pigment from staining your cuticle.
When dealing with temporary pigment science, hold aerosol sprays at least six inches away from the head to avoid concentrated chemical buildup. Always perform a patch test on your skin first to ensure the product is allergy-safe color, especially if you have a sensitive scalp.
What are the best hairstyles for short hair at Halloween?
The best hairstyles for short hair at Halloween include slicked-back wet looks, intense glitter roots, heavily teased textures, or utilizing small clip-in colored extensions.
You don’t need long hair for an effective hair transformation. Focusing on heavy hair gel to sculpt a retro 1920s flapper wave or aggressively teasing a pixie cut with grey hair chalk for an undead look are brilliant short hair solutions.
How to keep Halloween hair in place all night?
Keep Halloween hair in place all night by building a strong foundation using texturizing powder, crossing your bobby pins into X-shapes, and finishing with a freeze-hold hairspray.
Maintaining the structural integrity of your style requires “dirtying up” clean hair. Freshly washed hair is too slippery for elaborate updos. Utilizing dry shampoo at the roots before you begin styling creates the necessary friction for a truly sweat-proof hair experience.
Is glitter hair spray safe for kids?
Yes, cosmetic-grade glitter hair spray is generally safe for kids, provided you shield their eyes and face during application and wash it out thoroughly before bedtime.
Always look for non-toxic, safe for kids labels. Instead of aerosol sprays which can be inhaled, a safer allergy-safe color alternative for toddler girl halloween hairstyle ideas is mixing loose cosmetic glitter with pure aloe vera gel and painting it gently onto the roots.
How to remove temporary hair dye fast?
Remove temporary hair dye fast by applying a deep clarifying shampoo directly to dry hair, massaging it in to break down the oils and pigment before adding water.
If you wet the hair first, water can push the temporary dye deeper into the hair shaft. For stubborn hair damage fix situations, mixing a tablespoon of baking soda into your shampoo acts as a gentle exfoliant, stripping away stubborn color for an easy cleanup.
How to get mermaid waves for Halloween?
Get mermaid waves for Halloween by using a 3-barrel hair waver tool on sections of dry hair protected by a heat spray, then finishing with sea salt spray for texture.
For brilliant mermaid hair waves, avoid using a traditional curling iron. The 3-barrel waver presses the hair into deep, uniform S-shapes. Add a vibrant touch by spraying the tips with temporary teal or purple color to complete the aquatic aesthetic.
What hairstyles go with a witch costume?
Hairstyles that go perfectly with a witch costume include heavily teased, chaotic long waves, sleekly straightened middle-parted dark hair, or a high, messy bun wrapped in faux spider webs.
For an easy hairstyles for witch costume look, focus on extremes. Either make the hair incredibly straight and shiny using a flat iron and serum for an elegant look, or use a teasing comb and texturizing spray to create a scary, feral volume.
How to make a spider web bun?
Make a spider web bun by creating a smooth high topknot, then draping and pinning white craft webbing or specialized hair string over the bun and securing fake spiders inside.
This is a fantastic easy spider bun tutorial for kids because it keeps the hair completely out of the face while acting as a standalone accessory. Use heavy-duty crossed bobby pins to secure the web deeply into the base of the bun so it doesn’t snag.
What are last minute hair ideas for Halloween?
The best last-minute hair ideas for Halloween involve leaning heavily into accessories like cat ear headbands, using temporary color sprays on natural hair, or creating simple space buns.
When pressed for time, focus on the quick styling aspects of a costume. Simply twisting hair into “devil horns” using strong hair gel or braiding ribbons into your standard pigtails offers a budget-friendly style that saves you from purchasing an uncomfortable wig.
Final Thoughts on Hairstyle Ideas Halloween
Mastering the perfect hairstyle ideas halloween aesthetic doesn’t require an expensive salon visit, nor does it require sacrificing the health of your hair for a one-night party. By choosing one of these 11 diy halloween hair looks, you can confidently transform your everyday style into a show-stopping costume centerpiece. Whether you opt for the intricate scaffolding of a Medusa updo, the whimsical simplicity of fairy glitter roots, or the classic perfection of Wednesday Addams braids, the power of theatrical styling is entirely in your hands.
The key to achieving these salon-quality results lies entirely in your preparation and your tools. By prioritizing tested methods—like using proper heat protectants, understanding how temporary color interacts with your hair’s porosity, and utilizing gentle removal techniques—you ensure that your hair remains healthy long after the spooky season ends. Remember that basic pins, holding gel, and a little creativity are often far more comfortable and striking than an itchy, store-bought wig.
Armed with these expert recommendations and step-by-step tutorials, you are officially ready to style, spray, and sculpt your way to a brilliant holiday look. We want to see how your DIY creations turn out! Which of these halloween hairstyles are you planning to attempt this June, and what costume are you pairing it with? Pin your favorite looks, gather your styling tools, and let your creativity run wild!
Last update on 2026-04-27 / Affiliate links / Images from Amazon Product Advertising API