Tired of the same bold red nails every February? You’re looking for a romantic manicure that feels modern and sophisticated, not loud or dated. It’s frustrating trying to find inspiration that aligns with a more refined, minimalist aesthetic.
Neutral Valentines nails are a sophisticated and modern alternative to traditional red and pink manicures. They focus on elegant nude, beige, or milky bases, often featuring minimalist accents like tiny hearts, delicate lines, or a touch of glitter. This aesthetic is perfect for those seeking a chic, subtle, and romantic look that feels both timeless and on-trend for 2026.
Drawing from current data and proven nail art methodologies, this guide breaks down the trend into actionable steps. We will explore seven gorgeous, achievable designs that showcase elegance and romance in an understated way. Get ready to discover your new favorite way to celebrate the season with style.
Why Choose Neutral Valentines Nails This Year?
Opting for neutral valentines nails this year is a deliberate choice for sophistication and modern elegance. This trend represents a significant shift in manicure trends 2026, moving away from the expected sea of reds and pinks toward a more personal and timeless expression of romance. The core idea is elevated minimalism, where a flawless base of sheer, milky, or nude nail polish becomes the perfect canvas for delicate and meaningful accents. This clean girl aesthetic prioritizes a polished and put-together look that feels both intentional and effortlessly chic. The neutral vs red nails debate comes down to personal style; while red is classic and bold, neutral offers versatility and an understated confidence. It’s a look that’s not just for a single day but can carry you through the entire season, seamlessly fitting in at the office or a romantic dinner.
7 Chic & Minimalist Neutral Valentines Nails for 2026
Now that you understand the “why” behind this sophisticated valentines nails trend, let’s dive into the “how.” This section delivers on the promise of valentines nail inspo, providing a curated list of seven distinct, achievable designs. Each idea is broken down into a mini-tutorial, complete with the specific products & tools you’ll need and a clear, step-by-step guide for application steps. Whether you plan to recreate these looks at home or are looking for the perfect reference to show your nail technician, you’ll find everything you need to master these beautifully minimalist valentines nails. These designs demonstrate that a romantic manicure is all about the delicate details and the quality of the execution.
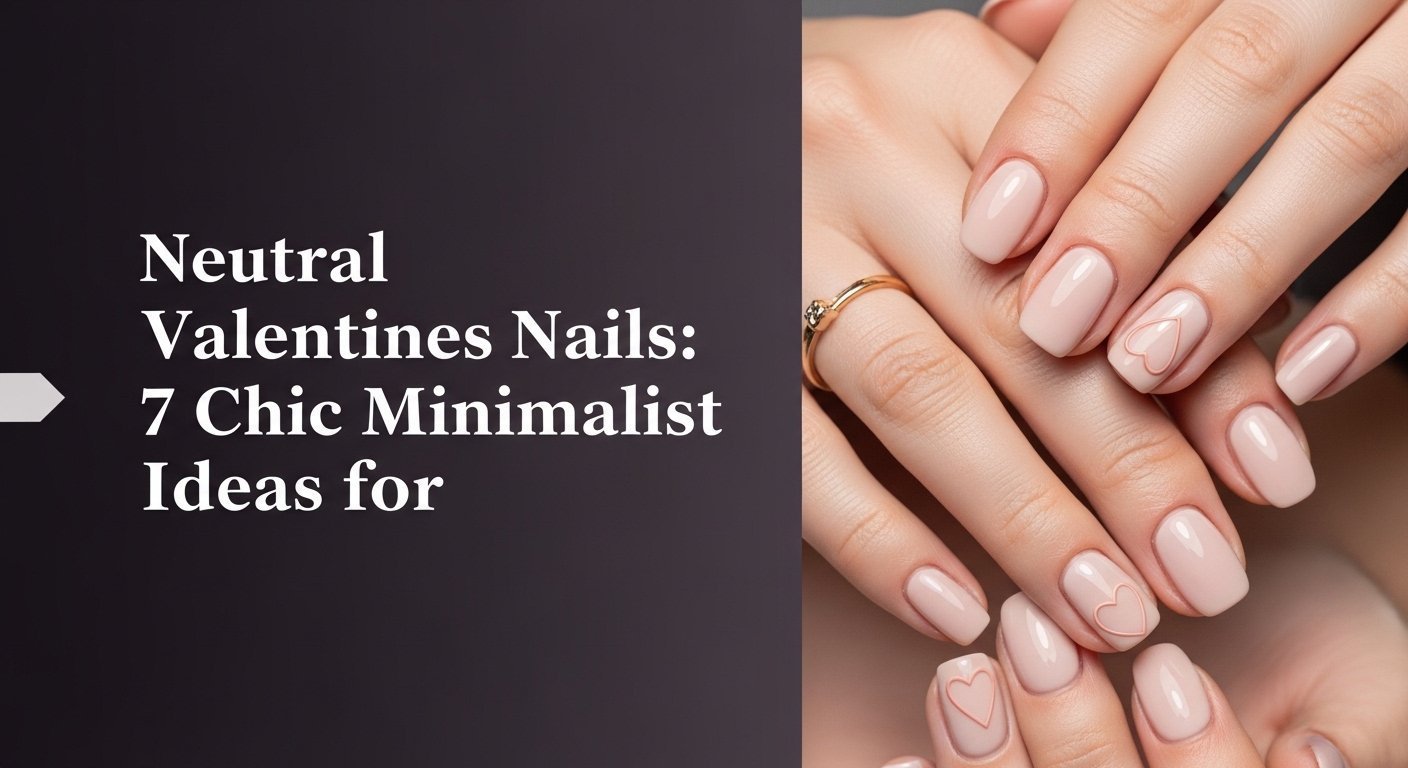
1. Create Delicate Micro-Hearts on a Milky Base

Pin this chic and minimalist valentines nails idea for your next manicure!
This design is the epitome of the clean aesthetic, combining the viral milky white nails for valentines day trend with a single, romantic accent. The semi-translucent base provides a soft, cloud-like canvas that makes the tiny red hearts pop in the most simple and elegant way. It’s a look that whispers romance rather than shouting it.
Products & Tools Used
- Sheer, milky white nail polish (gel polish or lacquer)
- Opaque red nail polish
- A fine-tipped dotting tool or a toothpick
- High-gloss top coat
- Base coat designed for long-lasting manicures
Application/Styling Steps
- Prep your nails by filing to your desired shape, pushing back cuticles, and buffing the nail surface.
- Apply one thin layer of your base coat and let it dry completely (or cure if using gel polish).
- Paint two to three thin coats of the milky white polish, allowing each layer to dry. This layering creates the translucent depth.
- Pour a small drop of red polish onto a piece of foil. Dip your dotting tool into the red polish.
- Dot two small, equal-sized dots side-by-side on your nail where you want the top of the heart to be.
- Drag each dot downwards and diagonally to meet at a single point, forming the heart shape. Clean up any mistakes with a brush dipped in acetone.
- Once the heart is fully dry, seal the entire design with a generous layer of glossy top coat.
Pro-Tip: For perfect heart symmetry, think of it as creating a “V” shape first with your dotting tool, then rounding out the two top points. This method, a form of the negative space technique, helps guide your hand and prevent a lopsided result.

2. Design a Subtle Gold Foil Accent Nail

Save this classy valentine nails idea for a touch of glam!
For a look that’s romantic without being overtly “Valentine’s,” neutral valentines nails with gold foil are a perfect choice. The warmth of the gold against a creamy nude nail polish base feels luxurious and special. This sophisticated valentines nails idea is ideal for the workplace and transitions beautifully to an evening out.
Products & Tools Used
- A nude nail polish in a beige or tan shade
- Nail art gold foil flakes
- Nail foil glue or a slightly tacky polish layer
- A pair of tweezers
- A high-quality matte or glossy top coat
Application/Styling Steps
- Prep your nails as usual and apply a base coat.
- Paint two coats of your chosen nude polish, allowing them to dry completely.
- For your accent nail (typically the ring finger), apply a thin layer of nail foil glue and wait for it to become tacky (it will turn clear).
- Use tweezers to gently tear off small, irregular pieces of gold foil.
- Press the foil pieces onto the tacky nail, arranging them in a scattered, abstract pattern near the cuticle or tip.
- Gently pat the foil down with a silicone tool or your fingertip to ensure it’s flat.
- Finish by applying one or two layers of top coat to seal the foil and prevent it from peeling. A matte top coat can create a beautiful contrast.
Pro-Tip: A common mistake is applying foil to a fully dry polish layer where it won’t stick. If you don’t have foil glue, apply your top coat, wait about 60 seconds for it to get tacky but not wet, and then press the foil on. This is a great salon-grade hack.

3. Paint a Minimalist ‘Floating Heart’ Outline

Obsessed with this clean look? Pin these minimalist valentines nails!
This design utilizes the negative space technique for an ultra-modern and artistic feel. A nude base with white heart outline creates the illusion of a heart floating on a bare nail. It’s an incredibly chic, subtle, and modern take on heart nail designs, perfect for true minimalists and lovers of subtle detail.
Products & Tools Used
- A high-quality sheer pink or flesh-toned base coat
- A highly pigmented white nail polish
- An ultra-fine, long-bristled striping brush
- A glossy top coat
Application/Styling Steps
- Apply one to two coats of your sheer nude base coat to clean, prepped nails. This look is about perfecting the natural nail.
- Pour a small drop of white polish onto a palette.
- Dip only the very tip of your long liner brush into the white polish. Wipe off any excess to prevent a thick line.
- Starting in the center of your nail, paint the “V” shape of the bottom of the heart. Use a light, steady hand.
- From the top of one side of the “V,” outline a curved line upwards and back towards the center, forming one lobe of the heart.
- Repeat on the other side to complete the heart outline. Do not fill it in.
- After the outline is completely dry, seal the design with a high-gloss top coat to complete the chic, aesthetic look.
Pro-Tip: To avoid shaky lines, rest the heel of your painting hand on a stable surface. Instead of moving the brush, try to keep your hand still and slightly rotate the finger you are painting. This gives you more control for a professional tip result at home.

4. Master the Neutral French Tip with a Heart Twist

Pin this genius french tip nails upgrade for Valentine’s Day!
This is a playful and modern update on the timeless French manicure. By swapping the classic white for a warm neutral like taupe or mocha and adding neutral nails with heart-shaped tips on an accent finger, you create a look that is both familiar and surprising. It’s the perfect design for those with almond shaped neutral valentine nails.
Products & Tools Used
- A sheer pink or beige polish for the base
- An opaque neutral polish (e.g., taupe, mocha, cream) for the tips
- French tip guide stencils or a fine liner brush
- A glossy top coat
Application/Styling Steps
- Apply your sheer pink or beige base color over a prepped, base-coated nail and let dry.
- For the regular French tips, place a guide stencil just below the free edge of your nail. Paint the tip with your chosen neutral color. Remove the stencil while the polish is still wet.
- For the heart-shaped tip, you can freehand it or use a stencil. To freehand, use a liner brush to paint two diagonal lines meeting in the center of your nail tip.
- Create the rounded tops of the heart, connecting them to the V-shape.
- Fill in the heart shape completely with your neutral polish.
- Wait for all tips to be completely dry, then seal with a top coat to smooth the edge and add shine.
Pro-Tip: For an ultra-crisp line without stencils, use a small, flat-edged brush dipped in acetone to clean up and sharpen the curve of your French tip or the outline of your heart. This is a manicurist approved technique.

5. Try Matte Mocha Nails with a Glossy Accent Heart

This matte vs glossy look is everything. Pin it to your nail art designs board!
This textural design is a high-fashion take on Valentine’s nails. Using a rich chocolate brown or mocha shade, the contrast between a velvety matte finish and a high-shine glossy heart creates a stunning, tactile effect. This is a top-tier choice for neutral coffin nails and proves that a sophisticated valentines nails look is often about finish, not just color.
Products & Tools Used
- A rich mocha or chocolate brown nail polish
- A high-quality matte top coat
- A high-quality glossy top coat
- A fine-tipped nail art brush
Application/Styling Steps
- Prep nails and apply your base coat.
- Paint two to three coats of the mocha brown polish on all nails. Let each coat dry thoroughly.
- Apply one even layer of your matte top coat over all your nails. Let it dry completely until there is no shine. This is your canvas.
- Using your fine-tipped brush, carefully paint a heart shape on your accent nail using the glossy top coat.
- Work carefully to create a crisp outline. The glossy coat will appear transparent but will create a shiny, raised effect once it dries.
- Let the glossy heart dry completely without touching it. Do not add another top coat over the entire nail.
Pro-Tip: If you make a mistake with the glossy heart outline, wait for it to dry, then gently buff only the heart area and re-apply the matte top coat to that small spot. Once that’s dry, you can try drawing the glossy heart again. This prevents having to redo the entire nail.

6. Curate a Dainty ‘Heartbeat’ Line Design

How delicate is this? Pin this subtle valentine nails idea now!
If you’re looking for subtle valentines day nails for beginners, this is your design. It’s one of the easiest yet most effective simple valentines day nail ideas. A delicate red line with a tiny heart integrated in the middle looks like a heartbeat on a monitor—a sweet and symbolic nod to romance that’s perfect for short square neutral nails with hearts.
Products & Tools Used
- A natural-looking sheer pink or beige polish
- A red nail polish with a built-in liner brush, or a separate liner brush
- A glossy top coat
Application/Styling Steps
- After your base coat, apply two coats of your sheer neutral polish and let dry.
- Using the red liner brush, draw a straight, thin horizontal line across the middle of your accent nail, but stop about one-third of the way across.
- In the center of the nail, create a tiny heart shape using the dotting method described in Idea #1, or simply draw a small “V”.
- From the other side of the heart/V, continue the straight, thin horizontal line to the other side of the nail.
- The goal is to make it look like one continuous “heartbeat” line.
- Once dry, finish with a glossy top coat.
Pro-Tip: If drawing a straight line is difficult, you can use a piece of nail art striping tape as a guide. Lay it down where you want your line, paint alongside it, and remove the tape while the polish is wet.

7. Achieve Pearly ‘Glazed Donut’ Nails with a Hidden Heart

The perfect understated valentine’s day look. Save this glazed donut idea!
The viral “glazed donut” nail gets a romantic update. This look combines the trendy pearly finish of white chrome powder over a sheer base with a tiny, almost hidden heart. This is the ultimate “if you know, you know” manicure, merging the chrome + pink trend with a subtle romantic secret. It’s the perfect answer to what is the trend for valentines nails 2026.
Products & Tools Used
- A sheer white or light pink gel polish
- A no-wipe gel top coat (this is essential)
- White pearl or iridescent chrome powder
- A small eyeshadow applicator or silicone tool
- A UV lamp for curing gel polish
Application/Styling Steps
- Prep your nails and apply a base coat, then cure.
- Paint one coat of your sheer white/pink gel polish. On your accent nail (like the pinky), draw a tiny heart with the same polish. Cure for 60 seconds.
- Apply a thin layer of the no-wipe gel top coat to all nails. Cure for the recommended time, but do not cure it for longer (usually 30-60 seconds). The surface needs to be warm and firm, not sticky.
- Dip your eyeshadow applicator into the chrome powder, picking up a small amount.
- Vigorously rub or “burnish” the powder onto the surface of the nail until it becomes a reflective, pearly mirror finish.
- Dust off all excess powder with a soft brush.
- Seal everything with one final layer of the no-wipe top coat and cure for a full 60-90 seconds to ensure a long-lasting manicure.
Pro-Tip: The key to the glazed donut effect is applying the chrome powder over a cured, non-sticky surface. A traditional tacky gel top coat will just clump the powder. If you only have a regular gel top coat, wipe the tacky layer off with alcohol before applying the powder.

Key Takeaways: Your Quick Guide to Neutral Valentines Nails
Embracing neutral valentines nails is all about celebrating romance with sophistication and personal style. These chic, minimalist designs prove that you don’t need bold colors to make a beautiful statement. Here are the main takeaways to remember.
- Embrace the Base: A perfect neutral valentines nails look starts with a flawless base. Choose a sheer, milky, or nude nail polish that complements your skin tone to achieve that clean aesthetic.
- Minimalism is Key: The most chic designs feature small, intentional accents. A single tiny red heart, a delicate line, or a touch of gold foil makes a bigger impact than a cluttered design.
- Tools Over Talent: You don’t need to be an artist. A fine-tipped dotting tool, a liner brush, and stencils are the key to creating salon-grade hearts and lines at home.
- Texture Adds Drama: Don’t forget to play with finishes. A matte vs glossy combination can create a stunning, high-fashion look using only one color, demonstrating that a sophisticated valentines nails design is about more than just color.
- Seal for Longevity: The final and most crucial step is to seal your design with a high-quality top coat. This prevents chipping, adds shine (or mattifies), and ensures your valentines day manicure lasts.
People Also Ask About Neutral Valentines Nails
You’ve got the inspiration, but you might still have a few questions. Here are the answers to the most common queries about achieving the perfect neutral Valentine’s Day manicure.
What is the trend for Valentines nails 2026?
The main trend for Valentines nails in 2026 is ‘elevated minimalism’. This moves away from bold reds and embraces neutral valentines nails with sophisticated, romantic accents. Think sheer nude bases with tiny red hearts, French manicures with a heart-shaped tip, and textural plays like matte nails with glossy details.
What nail shape looks best with neutral colors?
Almond and short, soft square shapes are most popular for neutral nail designs. These shapes enhance the natural, elegant look of a minimalist nail art style. Almond shapes elongate the fingers for a chic look, while short square nails offer a clean, practical, and modern aesthetic.
How do you paint tiny hearts on nails?
The easiest way to paint tiny hearts is with a dotting tool or toothpick. Place two small dots of polish side-by-side. Then, using the same tool, drag each dot down at an angle to meet at a point, forming a perfect heart. This is a simple proven technique for beginners.
Can I do neutral valentines nails at home?
Absolutely, neutral and minimalist designs are perfect for DIY manicures. Most of the designs in this list, like the ‘heartbeat’ line or micro-dots, require basic tools and a steady hand. The key is to work in thin layers and allow each coat of polish to dry completely.
What is the best nude polish for pale skin?
For pale skin, choose nude polishes with a soft pink undertone. These shades, often described as ‘ballet slipper’ or ‘milky pink’, add a touch of warmth and prevent your hands from looking washed out. Avoid nudes that are too yellow or beige.
What is the best nude polish for dark skin?
For dark skin tones, rich caramels, deep taupes, and chocolate browns look stunning. These warmer, deeper nudes provide a beautiful contrast and create a sophisticated, flesh-toned look. Sheer, milky browns are also a fantastic option for a softer manicure.
Is matte or glossy better for neutral hearts?
Both finishes work beautifully, but they create different effects. A glossy top coat makes the design pop and look fresh and clean. A matte top coat gives a velvety, modern, and more understated finish. A popular trend is to combine them, using a matte base and a glossy heart accent.
How do you make neutral nails look romantic?
You can make neutral nails look romantic by adding a single, deliberate accent. A tiny heart, a touch of gold + neutral foil, a line of fine glitter, or a pearly chrome finish adds a hint of romance and special occasion flair without overwhelming the minimalist design.
What are non-traditional valentine colors?
Non-traditional Valentine colors include soft browns, taupes, creams, and even muted pastels. Instead of bright red, consider a deep burgundy. Instead of hot pink, try a dusty rose or a sheer lavender. The key is to choose a color that feels romantic to you.
Why is ‘quiet luxury’ trending in nail art?
‘Quiet luxury’ is trending because it focuses on high-quality execution and timeless elegance over loud branding or trends. In nail art, this translates to perfectly prepped nails, flawless polish application, and subtle valentine nails designs that whisper sophistication rather than shout for attention, like a perfect nude manicure.
Final Thoughts on Your Chic Valentines Manicure
Choosing neutral valentines nails is a powerful style statement. It declares that romance doesn’t have to be loud to be felt and that elegance lies in the details. These seven designs are more than just tutorials; they are a starting point for you to express your own sophisticated version of holiday spirit. Remember that the best manicure is one that makes you feel confident and beautiful.
Which of these minimalist designs will you be trying for your Valentine’s Day look?
Last update on 2026-04-27 / Affiliate links / Images from Amazon Product Advertising API