Tired of the same dark and moody winter polishes? You’re searching for a manicure that feels fresh, modern, and exceptionally chic for the colder months. It’s time to embrace the crisp, clean elegance of white winter nails.
White winter nails are a top trend for 2026 because they offer a crisp, clean aesthetic that’s both elegant and modern. This versatile look can range from a solid milky white mani to intricate designs with silver accents or snowflakes, making it perfect for any occasion. It provides a touch of “winter magic” that is both sophisticated and fresh.
Drawing from comprehensive analysis of current beauty trends and proven nail art techniques, this guide establishes white nails as a premier winter choice. You will discover 9 distinct, classy ideas to achieve a flawless manicure. Prepare to find your perfect winter-white inspiration.
Why Are White Winter Nails the Ultimate Chic Statement This Season?
Moving beyond the expected deep reds and navy blues, white winter nails have solidified their status as the ultimate chic statement for the 2026 season. This trend, celebrated by beauty influencers and featured in top publications, reframes white as a color of sophisticated and serene power, perfect for the cold weather months. It’s not just a color choice; it’s a style declaration. An elegant white winter nails look provides a stark, beautiful contrast against cozy winter fashion—think oversized sweaters and dark wool coats. It acts as a bright, clean canvas that can be kept minimalistically simple or decorated with festive details, making it one of the most versatile options in any winter nail inspiration white gallery.
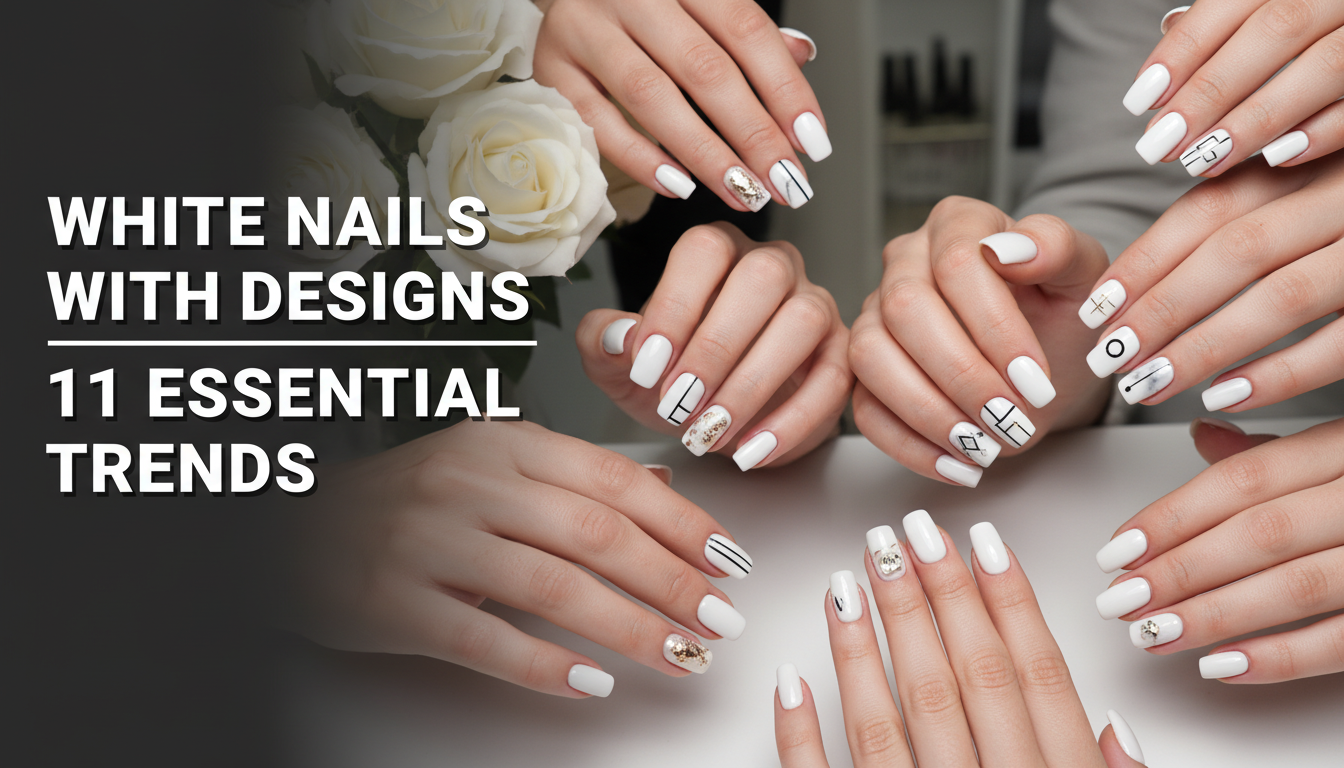
9 Classy White Winter Nail Ideas for a Pretty 2026 Mani
To help you achieve a pristine manicure, we’ve curated a list of the nine most beautiful and classy white winter nails for 2026. Each idea offers a unique take on the trend, from the understated elegance of a solid milky white mani to the festive sparkle of glitter and the modern edge of a matte finish. These designs range in complexity, but each comes with actionable steps and expert tips to help you or your nail technician recreate the look flawlessly. Whether you prefer a short, practical nail shape like a square or a dramatic look with long coffin nails, you’ll find the perfect style to complement your winter wardrobe.
1. Create The Perfect Solid Milky White Mani

Pin this effortlessly chic look to your ‘Winter Style’ board!
Products & Tools Used
- A high-quality milky white nail polish (e.g., a popular sheer white like OPI Funny Bunny or a dedicated milky formula)
- Nail Dehydrator and pH Bonder
- Gel polish base coat
- High-gloss, non-yellowing gel top coat
- UV/LED gel lamp
- Cuticle oil for hydration
Application/Styling Steps
- Prep nails for winter white: Start with clean, filed nails. Gently push back cuticles and cleanse the nail plate with a dehydrator.
- Apply a thin layer of gel base coat and cure under your gel lamp for 60 seconds.
- Apply white nail polish: Paint one thin coat of the milky white winter nails polish. The key is thinness to maintain the translucent look. Cure for 60 seconds.
- Apply a second thin coat. Two coats usually provide the perfect solid milky white mani effect. Cure again.
- Seal white nail art: Finish with a high-gloss top coat to prevent yellowing and chipping. Cure for 60-90 seconds.
- Apply cuticle oil to hydrate the skin around your nails.
Pro-Tip: The secret to a non-streaky milky white mani is patience. Allow each thin coat to ‘self-level’ for about 10 seconds before curing. For a DIY version, mix one drop of a sheer nude polish into your white to soften it.

2. Design Sparkling White and Silver Glitter Ombre Nails

Save this sparkly idea for your next holiday party!
Products & Tools Used
- An opaque, bright white winter nails gel polish
- High-quality, fine silver or holographic loose nail art glitter
- A small piece of a makeup sponge
- A fluffy brush for dusting off excess glitter
- Gel polish base and top coat
- UV/LED Lamp
Application/Styling Steps
- Prep nails and apply a cured base coat.
- Apply white nail polish: Paint two coats of the opaque white polish, curing each coat fully.
- Blend white ombre nails: Apply a thin layer of top coat (but do not cure). This gives the glitter something to stick to.
- Dip the corner of your makeup sponge into the silver glitter and gently dab it onto the tip of the nail, concentrating most of the glitter at the very edge and dabbing more lightly as you move down toward the cuticle to create the fade.
- Use the fluffy brush to gently sweep away any loose glitter from the nail and cuticle area.
- Cure the glitter layer.
- Seal white nail art: Apply one or two layers of top coat to smooth out the glitter texture and cure fully.
Pro-Tip: For a truly professional, smooth finish, use a technique called encapsulated glitter. After curing the glitter layer, apply a thin coat of builder gel or a thicker top coat to fill in the texture, cure it, gently file it smooth, and then apply your final shiny top coat. This is an expert nail technician advice staple.

3. Achieve a Chic Matte White Manicure

Pin this minimalist-chic look for instant sophistication.
Products & Tools Used
- An opaque crisp white winter nails gel polish
- A high-quality, non-staining matte gel top coat
- Gel base coat
- UV/LED Lamp
- Isopropyl alcohol and a lint-free wipe
Application/Styling Steps
- Prep nails and apply and cure a gel base coat.
- Paint white nails for winter: Apply two coats of your opaque white gel polish, curing each for 60 seconds. Ensure full, even coverage.
- Choose white nail designs: For this look, the finish is the design. Apply a thin, even layer of the matte top coat over the entire nail, making sure to cap the free edge.
- Cure the matte top coat for 60-90 seconds as recommended by the manufacturer.
- If it’s not a “no-wipe” formula, cleanse the tacky layer with isopropyl alcohol on a lint-free wipe to reveal the true matte finish.
Pro-Tip: One of the biggest challenges for matte nails is staining. Prevent staining white nails by choosing a high-quality, stain-resistant matte top coat. If you do get a mark, you can often buff it out gently with a magic eraser or wipe it with a bit of alcohol.

4. Design Delicate White Winter Nails with Snowflakes

Add this magical snowflake design to your ‘Christmas Nails’ board!
Products & Tools Used
- A soft white winter nails polish for the base color
- Method 1: A nail stamping plate with snowflake designs, a stamper, a scraper, and silver stamping polish.
- Method 2: Delicate snowflake nail art stickers.
- Method 3: A fine liner nail art brush and silver or light blue nail art paint.
- Optional: Tiny silver rhinestones and nail glue/gem gel.
- Glossy top coat.
Application/Styling Steps
- Style white nails for winter: Apply and cure two coats of your soft white base color.
- DESIGN METHOD 1 (Stamping): Apply stamping polish to the snowflake design on the plate. Scrape off the excess, pick up the design with the stamper, and roll it firmly onto your nail.
- DESIGN METHOD 2 (Stickers): Carefully peel a snowflake sticker with tweezers and place it on the nail. Press down firmly to secure it.
- DESIGN METHOD 3 (Hand-Painting): Using your liner brush and silver paint, draw an asterisk (*). Then, add small ‘V’ shapes to the end of each line to create the snowflake branches.
- Optional: Add a tiny dot of nail glue or gem gel to the center of the snowflake and place a rhinestone.
- Seal the design: Wait for any paint/polish to dry completely, then apply a generous layer of glossy top coat and cure.
Pro-Tip: When hand-painting, use a highly pigmented gel “art paint” instead of regular gel polish. It’s thicker and won’t spread, giving you much crisper lines. This is a secret weapon for professional nail art.

5. Reinvent the Classic with Modern White French Tips

A timeless classic, reimagined. Pin this chic French mani!
Products & Tools Used
- A sheer pink or nude gel polish for the base
- A highly-pigmented, opaque white winter nails art gel
- A thin liner brush or French manicure guides
- Gel base and top coat
- UV/LED Lamp
Application/Styling Steps
- Prep nails and apply a cured base coat.
- Apply one to two coats of your sheer pink/nude base color, curing each layer.
- How to do white french tips for winter: Using your liner brush and the opaque white art gel, paint a deep, curved “smile line” or a sharp “V” shape at the tip of the nail. For an easier method, apply a French tip guide sticker, paint the tip, and remove the sticker before curing.
- Perfect the line with a clean-up brush dipped in alcohol before curing the white tip for 60 seconds.
- Apply a glossy top coat over the entire nail to seal the design and cure.
Pro-Tip: For a truly advanced and trendy look, try a reverse french manicure. Paint the entire nail white, cure it, and then use the sheer pink polish to paint the nail bed area, leaving a crescent of white showing near the cuticle. This is a high-fashion twist that Vogue recommended last season.

6. Style Cozy White Sweater Knit Nails

Your nails can be cozy, too! Pin this adorable sweater-weather look.
Products & Tools Used
- A creamy white winter nails gel polish
- A matte top coat
- A fine liner nail art brush
- Optional: Clear acrylic powder or a white 3D sculpting gel.
- UV/LED Lamp
Application/Styling Steps
- Prep the nail and apply two coats of your white gel polish, curing each.
- Apply and cure a layer of matte top coat. This provides a non-slip surface for your design.
- Create white winter nails texture: Using your liner brush and the same white gel polish, begin drawing your sweater pattern (e.g., cable knit lines, dots). DO NOT CURE.
- Go over the lines a second time to build up the height.
- For a more textured effect: While the design is still wet, gently sprinkle clear acrylic powder over the nail. The powder will stick to the wet polish.
- Cure the 3D design for 60-90 seconds. The acrylic powder will create a raised, matte, sugary texture.
- Use a fluffy brush to dust off any excess powder. Do not apply a top coat over the 3D design to preserve the texture.
Pro-Tip: The easiest way to get a clean 3D effect is with a dedicated 3D sculpting gel or “pudding gel.” It’s much thicker than regular polish and holds its shape perfectly, allowing you to design white winter nails with incredible detail.

7. Add a Touch of Luxury with Pearl Embellishments

For a touch of timeless elegance, pin this pearl design.
Products & Tools Used
- A pearly white winter nails polish or a simple off-white color
- An assortment of small, flat-backed nail art pearls
- A strong rhinestone glue or gem adhesion gel
- A wax-tipped pen or tweezers for picking up pearls
- Gel base and top coat
- UV/LED Lamp
Application/Styling Steps
- Prep nails and apply two cured coats of your pearly white base color.
- Apply the gem gel: Place a small dot of rhinestone glue gel where you want to place your pearls (e.g., in a crescent shape along the cuticle). Do not cure.
- Place the pearls: Use the wax-tipped pen to pick up each pearl and gently press it into the uncured gem gel. Arrange them in your desired pattern.
- Once you are happy with the placement, cure the nails for 60-90 seconds to fully set the glue.
- Seal the design: Using a thin liner brush, carefully apply top coat around the base of the pearls to seal them in without covering their lustre. Cure one final time.
Pro-Tip: For perfect placement, especially with multiple gems, use a “flash cure” technique. After placing each pearl exactly where you want it, hold a small handheld LED light over it for 5-10 seconds to freeze it in place before moving on to the next one. This prevents them from sliding around.

8. Go Glam with White Chrome Nails

Ready for the spotlight? Pin this futuristic chrome look.
Products & Tools Used
- A white or off-white gel polish base
- A high-quality “no-wipe” gel top coat
- White pearl or iridescent chrome nail finish powder
- A small, soft eyeshadow applicator
- A fluffy brush to dust off excess
- UV/LED Lamp
Application/Styling Steps
- Prep nails and apply a cured base of one or two coats of white gel polish.
- CRITICAL STEP: Apply a thin layer of the no-wipe top coat and cure for only 15-30 seconds (not a full cure). The surface should be firm but slightly warm and receptive.
- Dip the eyeshadow applicator into the chrome powder, picking up a small amount.
- Burnish the powder: Vigorously rub the powder onto the nail surface until it becomes a reflective, mirror-like finish. Focus on getting full coverage.
- Use the fluffy brush to gently dust off all excess powder from the nail and surrounding skin.
- Seal the chrome: Apply another layer of the no-wipe top coat, carefully capping the free edge to prevent chipping, and perform a full 60-90 second cure.
Pro-Tip: The success of chrome white winter nails depends almost entirely on the top coat application. If you cure the no-wipe top coat for too long, the powder won’t stick. If you cure it for too little, it will be streaky. Curing for 15-30 seconds until just warm is the industry standard for a perfect burnish.

9. Incorporate Elegant Gold Foil Accents

A touch of gold makes everything better. Pin this luxe design!
Products & Tools Used
- An off-white or cool white winter nails gel polish
- Gold nail art foil flakes
- A clear foil transfer gel or a gel top coat
- Tweezers
- A matte or glossy top coat
- UV/LED Lamp
Application/Styling Steps
- Prep nails and apply two cured coats of your white base color.
- Apply a thin layer of foil gel or top coat where you want the foil to go. Do not cure.
- Apply the foil: Use tweezers to pick up small pieces of the gold foil and gently place them onto the wet gel. Press them down lightly with your finger or a silicone tool to ensure they lay flat.
- Cure for 60 seconds to set the foil in place.
- Encapsulate the design: Apply a generous layer of top coat over the foil to smooth out any edges and create a level surface. Cure fully.
- If desired, you can apply a matte top coat over the glossy one for a beautiful contrast between the matte white and metallic gold. Cure again.
Pro-Tip: For a more abstract, “broken glass” effect, apply the foil before your last coat of white. Apply one coat of white, cure, place your foil, cure again, and then apply a final, slightly sheer coat of the same white over top. This mutes the foil and makes it look like it’s suspended within the polish.

Key Takeaways: Your Quick Guide to White Winter Nails
- Versatility is Key: White winter nails are not a single look but a versatile category. You can choose from a solid milky white mani for subtle elegance, sparkly white winter nails for festive events, or a matte white winter nails finish for a modern, cozy vibe.
- The Top Coat Defines the Look: The final step is the most critical. A high-gloss top coat creates a pristine manicure, a matte top coat delivers a trendy, velvety finish, and a no-wipe top coat is essential for achieving a flawless chrome nail finish.
- Texture is a Major Trend: Elevate your manicure with 3D effects. A cozy white winter nails sweater pattern or securely placed pearl embellishments add a tactile, high-fashion element that is perfect for the season.
- Preparation Prevents Problems: The secret to a long-lasting white manicure is proper prep. Always use a quality base coat and ensure the nail plate is clean and dehydrated to prevent chipping white polish and ensure even color application.
- Don’t Be Afraid of DIY Art: Simple techniques can create stunning designs. Nail stamping plates for intricate white winter nails with snowflakes, makeup sponges for glitter ombre, and pre-made nail stickers make professional nail art accessible at home.
FAQs About white winter nails
Is white a good nail color for winter?
Yes, white is an exceptionally chic and popular nail color for winter. Far from being a summer-only shade, winter white nails evoke a sense of crisp snow and festive elegance. According to the pros, shades from milky off-white to sparkly, icy white winter nails are a major trend for the colder months, offering a fresh, modern alternative to traditional dark polishes.
How do you keep white nails from getting dirty or yellow?
To prevent yellowing, always use a high-quality, non-yellowing gel top coat and protect your nails from staining agents. For matte white winter nails, which can get dirty, a stain-resistant matte top coat is key. You can often clean minor smudges with a wipe of isopropyl alcohol or a gentle buff with a magic eraser.
What nail shape looks best with white polish?
White polish is incredibly versatile and looks stunning on virtually all nail shapes. A white winter nails almond or coffin shape creates a very elegant look. For a classic and practical style, white winter nails short square is an excellent choice. The neutral color complements every form beautifully.
What’s the difference between milky white and opaque white nails?
The main difference is translucency and coverage. A solid milky white mani is semi-sheer, allowing a hint of the natural nail to show through for a soft, delicate look. Opaque white polish, a crisp white winter nails style, provides full, solid coverage for a bolder and more graphic appearance.
Are white nails classy?
Absolutely; white nails are considered a symbol of classic, minimalist elegance. A well-done winter white manicure, whether a simple color or a design with subtle accents, is timeless and sophisticated. It’s a clean look that makes it a consistently classy white winter nails choice.
How do you make white nail polish not streaky?
The key to avoiding streaks is applying multiple thin coats instead of one or two thick ones. Allowing each layer to self-level for a moment before applying the next is crucial. Using a quality nail polish and a good base coat also provides a smoother canvas for an even pristine manicure.
What does white nail polish say about you?
Wearing white nail polish often signifies a personality that is confident, chic, and appreciates clean, modern aesthetics. It suggests a sense of order and sophistication. In winter, choosing white can also indicate a fashion-forward mindset, as you’re embracing a contemporary trend.
Do white nails make your hands look tan?
Yes, a bright, opaque white nail polish can create a strong contrast with your skin, making it appear tanner. This effect is more pronounced with a stark, bright white winter nails shade. A softer, milky white winter nails color will have a more subtle and natural effect.
What colors go well with white winter nails?
White winter nails are a neutral canvas that pairs beautifully with almost anything. They look especially chic with winter wardrobe staples like gray, camel, and black. For a festive touch, they are the perfect base for accents of silver, gold, or deep red, making them ideal for the holiday season.
How do I choose the right shade of white nail polish?
Consider your skin tone and desired look. Stark, cool white winter nails look striking against darker or olive skin tones. Those with fair skin may prefer a softer, creamy white winter nails color to avoid looking washed out. For a universally flattering option, a milky white is a safe and stylish bet.
Final Thoughts on Your Chic White Winter Manicure
As you can see, white winter nails are far more than a simple color choice; they are a versatile and sophisticated style statement for the 2026 season. From a simple and elegant white winter nails look to a glamorous chrome nail finish or a cozy white winter nails sweater texture, there is a perfect design to match your personal style and any occasion. The key is to focus on quality preparation and the right top coat to truly make your manicure shine.
Embracing this trend allows for endless creativity while maintaining an air of effortless class. Which of these white winter nail ideas will you be trying first?
Last update on 2026-04-15 / Affiliate links / Images from Amazon Product Advertising API