Struggling to keep those adorable bow charms on your nails? It’s so frustrating when your perfect Christmas bow french tip manicure pops off before the party even starts. You deserve a festive look that actually lasts through the holiday season.
The secret to long-lasting Christmas bow nails is using a high-viscosity builder gel to secure 3D charms, creating a structural bond that standard nail glue cannot replicate. This professional technique, paired with proper nail prep, ensures your festive design remains flawless for weeks.
Based on proven, licensed-technician-approved methods, this guide unlocks the secrets to durability. You’ll discover 7 genius, long-lasting 3D bow designs and the exact steps to create them. Get ready for a picture-perfect manicure that lasts.
Tired of Bow Charms Popping Off? The Secret to Long-Lasting Christmas Bow French Tips
That sinking feeling is all too familiar. You spend hours creating the perfect, festive holiday ribbon nail art, only to look down and find a missing bow charm. The culprit is almost always weak adhesion. Standard nail glues are simply not designed to withstand the daily wear and tear that 3D charms endure, leading to them snagging and popping off. This is a common frustration that can make even the most beautiful coquette Christmas nails feel like a waste of time and effort.
The solution used by professionals for a truly long lasting christmas manicure is builder gel. Unlike simple adhesives, builder gel is a structural product that, when cured under a UV/LED lamp, creates a hard, durable casing around the base of the charm. It physically embeds the charm onto the nail, providing a superior bond that resists snagging and lifting. This guide is built on this professional technique, ensuring every design we share is not just beautiful but engineered for longevity, so your festive french tip bow nails stay flawless.
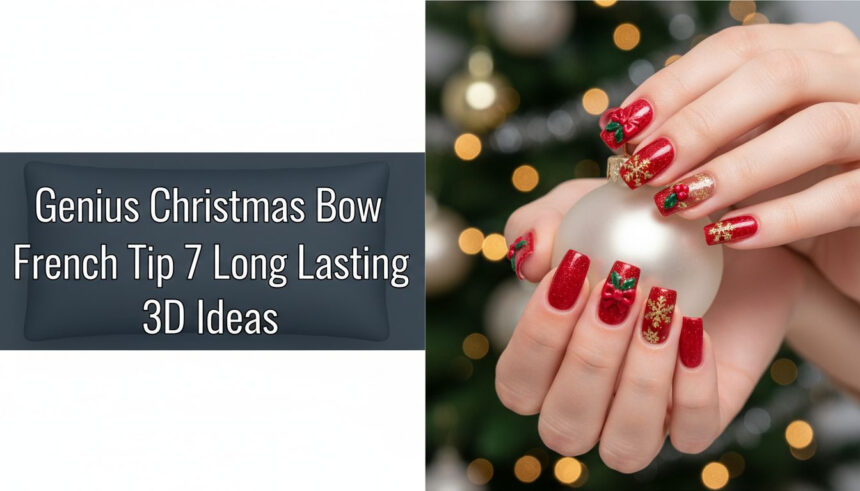
Genius Christmas Bow French Tip 7 Long Lasting 3D Ideas
To achieve genius Christmas Bow French Tips that last, focus on combining a strong foundation with stunning visuals. Based on 2026 holiday trend predictions, the best long-lasting ideas include: 1. Classic Red Almond Tips, 2. Coquette Pink Micro-Bows, 3. Forest Green Velvet Tips, 4. Icy Blue Rhinestone Ribbons, 5. Minimalist Gold Micro-French, 6. Candy Cane Stripe Bows, and 7. High-Contrast Black Ribbon Accents. Each of these concepts is designed for durability when paired with the proper builder gel application techniques outlined below.
1. Classic Red Almond Tips with Miniature White Bows

Pin this genius hack to your ‘Dream Holiday Nails’ board!
This elegant and classic christmas bow nails look combines a timeless deep crimson red French tip with a delicate miniature white bow. The elongated almond nail shape provides the perfect canvas for a sophisticated, festive design that is both recognizable and chic. It’s the go-to for a traditional yet high-impact holiday manicure.
Materials Needed:
- Sheer Pink Builder Gel Base (for structural integrity and longevity)
- Highly Pigmented Crimson Red Gel Polish (for the crisp tip line)
- Fine Detail Brush (3mm or smaller)
- Non-Wipe UV Top Coat
- Miniature White Resin 3D Bow Charms (lightweight for better adhesion)
Step-by-Step Directions:
- Prep the nail plate, apply non-acidic primer, and cure a thin layer of sheer pink builder gel base.
- Using the detail brush or a French tip guide sticker, create the crimson red smile line and cure for 60 seconds.
- Apply a small bead of the builder gel directly onto the area where the bow will sit, near the center of the smile line.
- Carefully embed the miniature white bow charm into the wet gel using tweezers, ensuring the base is fully submerged.
- Flash cure the nail for 15 seconds to lock the charm in place before proceeding to the next nail.
- Apply a non-wipe top coat, sealing the edges of the red tip and the base of the charm, but avoid coating the charm itself. Cure for 60 seconds.
Pro-Tip: The Almond shape naturally guides the eye, making it the perfect canvas for a single focal charm. Always use a lint-free wipe soaked in 99% alcohol to clean the cured base layer before applying the red tip for maximum adhesion.

2. Trendy Pink Coquette Micro-French with Sculpted Ribbons

Save this clever organization idea!
Embrace the fashion-forward coquette aesthetic with this delicate and feminine design. Combining a sheer, blushed pink base with a trendy micro french tip, this look is elevated by custom-sculpted baby pink ribbon nails. Sculpting the bows yourself ensures maximum durability and a truly unique, elegant finish that’s perfect for coquette christmas nails.
Products & Tools Used:
- Soft Pink Solid Sculpting Gel (or thick builder gel)
- Sheer Nude/Pink Gel Polish (Blush effect base)
- Fine Dotting Tool and Silicone Tip Tool (for sculpting the bow)
- UV/LED Nail Lamp (48W minimum)
- Acetone Correction Pen (for perfect smile line cleanup)
Application Steps:
- Create the Blushed Base by applying a thin layer of sheer pink gel, blending it slightly towards the cuticle, and curing.
- Apply a very thin white micro-French tip line using a fine liner brush for a minimal look and cure.
- Using the silicone tip tool, scoop a small amount of sculpting gel and roll it into two tiny loops on a silicone mat or foil. Flash cure the loops.
- Apply a small dot of builder gel near the cuticle (instead of the tip) for a modern placement.
- Place the two pre-cured loops onto the wet gel and add a small bead in the center for the ‘knot.’ Cure for 60 seconds.
- Seal the entire design with a non-wipe top coat, taking care not to fill the dips of the sculpted bow.
Lesson Learned: Placing the bow near the cuticle (reverse placement) minimizes snagging risks compared to placing it on the free edge, especially for complex sculpted bows.

3. Forest Green Velvet French Tips with Gold Accents

Try this unique color palette for Christmas!
For a sophisticated, non-traditional holiday look, explore this deep forest green design. The coffin nail shape provides a large canvas for a tactile velvet powder french tip, creating a plush, fabric-like texture. Subtle gold bow accents from metallic foil flakes complete this luxurious and high-end manicure.
Materials Needed:
- Deep Forest Green Gel Polish
- Green or White Flocking/Velvet Powder
- Gold Metallic Nail Foil or Flakes
- Specialized Fan Brush (for powder removal)
- Sticky Top Coat (Non-Wipe is not recommended for powder adhesion)
Step-by-Step Directions:
- Apply two thin coats of nude base gel and cure. Apply a layer of Forest Green polish for the French tip and cure (do not cap the edge yet).
- Apply a second layer of the Forest Green polish on the tip, but DO NOT CURE.
- Immediately pour or sprinkle the Velvet Powder liberally over the wet green tip, ensuring full coverage.
- Cure the nail for 60 seconds with the powder still adhered.
- Use a soft, clean fan brush to gently sweep away the excess powder, revealing the plush, velvet tip texture.
- Before final top coat, use a small amount of adhesive gel to place tiny flakes of gold metallic foil near the center of the tip, mimicking a bow knot, and cure.
Pro-Tip: For the best velvet effect, use a sticky (wipe-off) top coat beneath the powder, NOT a non-wipe top coat, as the powder needs a slightly inhibited layer to bond correctly.

4. Icy Blue French Tips with Silver Rhinestone Ribbons

Pin this Winter Wonderland nail look!
Channel a winter wonderland with these icy blue french tip nails. The frosted, shimmering blue tip on a bold square nail shape creates a cool, elegant base. The look is completed with highly-reflective silver rhinestone ribbons, which require strong structural support from builder gel to ensure the dimensional art is durable and dazzling.
Products & Tools Used:
- Icy Blue Gel Polish (with subtle shimmer)
- Silver Rhinestone Bow Charms (small, flat back for better adhesion)
- UV/LED Curing Lamp
- Precision Rhinestone Picker Tool (wax tip)
- High-Viscosity Clear Builder Gel (essential for heavy rhinestones)
Application Steps:
- Prepare the nail and apply base coat, followed by the Icy Blue French tip polish and cure.
- Apply a thin coat of non-wipe top coat over the entire nail and cure (excluding the tip area to prevent bulkiness).
- Using a small brush, apply a generous bead of High-Viscosity Builder Gel where the rhinestone ribbon is to be placed.
- Use the rhinestone picker tool to place the silver ribbon charm into the center of the gel bead, gently pressing it down.
- Use a fine-tipped brush to meticulously sculpt the builder gel around the edges of the charm without covering the top, creating a structural seal.
- Flash cure (15 seconds) to set the structure, then fully cure for 60 seconds. Seal the area with a non-wipe top coat, avoiding the actual rhinestones.
Pro-Tip: When placing heavy rhinestones or rhinestone bows, ensuring the high-viscosity gel fully encases the base of the charm is crucial for preventing snagging and ensuring it lasts 3+ weeks.

5. Minimalist Gold Micro-French with Painted Ribbon Detailing

Save this easy, elegant low effort bow design!
For those who prefer a simple, elegant, and low-effort design, this minimalist approach is perfect. It features an ultra-thin gold metallic micro-french tip on low-maintenance rounded nails. The festive touch comes from a tiny, painted 2D bow, which requires only a detail brush and polish, making it an easy christmas bow nails option without needing 3D charms or complex gels.
Products & Tools Used:
- High-Quality Metallic Gold Polish or Gel Liner
- Matte Black Gel Polish (for the painted bow)
- Extra Fine Detail Brush (liner brush)
- Sheer Nude Base Coat
- Non-Wipe Top Coat (Glossy)
Application Steps:
- Apply two coats of sheer nude polish base and cure (or dry, if using standard polish).
- Use the liner brush and the metallic gold polish to paint a very thin Micro-French tip line and cure/dry completely.
- Dip the fine detail brush into the matte black polish and place two tiny, opposing triangles on the center of the tip line to form the bow loops.
- Use a dotting tool dipped in black to create the small center knot.
- Wait 5 minutes for the black polish detailing to fully dry or flash cure if using gel.
- Apply a thin layer of top coat over the entire nail, ensuring the free edge is capped, and cure/dry.
Pro-Tip: When painting the 2D bow, thin your polish slightly with a dedicated thinner before dipping the brush. This ensures the line flows smoothly and prevents a thick, clumpy appearance.

6. Candy Cane Stripe Tips with Crystal Knot Bows

Try this bold, festive design for the ultimate holiday party nails!
Create the ultimate festive holiday aesthetic with these bold candy cane stripe tips. This design uses layering techniques with striping tape for precise red and white lines on a classic oval nail shape. The look is elevated with a visually striking clear crystal bow charm, secured at the center for a durable and sparkly finish perfect for any holiday party.
Products & Tools Used:
- Bright White and True Red Gel Polish
- Thin Nail Art Striping Tape (or fine liner brush)
- Small Clear Crystal Bow Charm (flat back)
- Strong Builder Gel Adhesive (clear)
- UV/LED Lamp
Application Steps:
- Apply the French tip using the Bright White polish and cure.
- Once cured, apply three strips of thin striping tape diagonally across the white tip area, creating three equal sections. Press down firmly.
- Apply the True Red polish over the entire white tip, including the tape.
- Immediately and carefully peel off the striping tape while the red polish is still wet. Cure the red and white stripes.
- Secure the small Clear Crystal Bow Charm at the center where the smile line meets the nail bed using a bead of Builder Gel (refer to Idea 1 for 3D securing technique).
- Seal the design with a non-wipe top coat.
Pro-Tip: For the cleanest candy cane stripes, ensure the white base coat is fully cured before applying the striping tape. Peel the tape off immediately after applying the red polish to prevent the tape from pulling off the design.

7. Last-Minute High-Contrast Black Ribbon Press-Ons

This is the perfect quick fix for last minute Christmas nails!
When you need a high-impact Christmas look in a hurry, press-on nails are the perfect solution. This design features a bold, high-contrast black ribbon charm on a crisp white French tip. The practical squoval shape is low-snagging, and using a professional-grade glue ensures the strongest possible adhesion for a fast, easy, and stylish last-minute application.
Materials Needed:
- High-Quality Pre-Designed Press-On Nail Kit (White French Tip with small black bow charm)
- Non-Acidic Nail Dehydrator/Prep Pad
- High-Strength Liquid Nail Glue (cyanoacrylate-based)
- Orange Wood Stick or Cuticle Pusher
- Nail File and Buffer Block
Application Steps:
- Gently push back cuticles using the orange wood stick and lightly buff the surface of your natural nails.
- Wipe all nails thoroughly with the prep pad/dehydrator to remove any oil, which is the leading cause of press-on failure.
- Select the correct size press-on nail for each finger, ensuring it fits snugly side-wall to side-wall without overlapping skin.
- Apply a generous, even layer of high-strength nail glue to the back of the press-on and a thin layer directly on your natural nail.
- Press the press-on nail firmly onto your natural nail from the cuticle area to the tip, holding steady pressure for 30 seconds.
- After application, avoid water for at least two hours for maximum longevity.
Lesson Learned: For press-ons, sizing is the most critical factor for longevity. If the press-on is too wide, it will lift easily, and the decorative bow may pop off prematurely.
Key Takeaways: Your Quick Guide to Long-Wear Holiday Bow Nails
5 Essential Secrets for Durable Christmas Bow Nails:
- Structural Adhesion is Non-Negotiable: Always use a high-viscosity clear Builder Gel to embed and secure 3D charms; standard nail glue is insufficient for long-term wear.
- Achieve a Crisp French Tip: Utilize stencils, stamping plates, or the reverse polish technique (using acetone to carve the line) for perfect smile line symmetry.
- Prevent Snagging: Meticulously seal the perimeter of all 3D charms with a fine brush dipped in builder gel or top coat, blending the edges into the nail surface.
- Prioritize Prep: Before applying any base coat, glue, or gel, thoroughly wipe the nail plate with a dehydrator (99% alcohol) to remove all oils and prevent lifting.
- Safe Removal Protocol: Never peel off gel or press-on nails. Always soak in pure acetone or gently file down to protect the natural nail plate from trauma.
People Also Ask About Christmas Bow Nails
How long do 3D bow charms secured with builder gel actually last?
When applied correctly using a high-viscosity builder gel, 3D bow charms can last for 3 to 4 weeks, matching the wear time of the underlying gel manicure. The key is ensuring the gel bead fully encapsulates the base of the charm for superior structural support against daily wear.
Can I paint my own tiny ribbon bows if I don’t have 3D charms?
Yes, you can paint tiny 2D ribbon bows using a fine detail or liner brush and a small dotting tool. Opt for highly pigmented gel paint or acrylic paint (sealed with a top coat) for precision. This method is faster and results in a smoother, less dimensional look.
What is the best nail shape to prevent 3D charms from snagging?
The Almond and Oval nail shapes are the best choices for minimizing snagging with 3D nail art. Their rounded edges are less likely to catch on clothing or hair compared to sharp shapes like Stiletto or Coffin, which require more caution when wearing dimensional art.
What is the safest way to remove 3D gel bow charms without damaging the natural nail?
The safest removal method is to gently file down the majority of the builder gel around and beneath the charm using an electric file or coarse hand file, and then soak the remaining product in 100% pure acetone. Never force, peel, or pry the charm off, as this leads to severe nail plate trauma.
What are the necessary safety precautions when using a UV lamp for builder gel?
Always apply broad-spectrum sunscreen to your hands or wear fingerless UV protective gloves before placing them under the lamp. Ensure the UV lamp has a high enough wattage (48W+) for proper and quick curing, and avoid skin contact with uncured gel products to prevent potential allergic reactions.
Final Thoughts
Achieving that viral, long-lasting Christmas bow French tip look is entirely possible at home when you move beyond standard glue and embrace the structural power of builder gel. This season, you don’t have to choose between beauty and durability. By using these 7 genius ideas and applying the techniques of the professional masterclass, your festive ribbon nails will stay picture-perfect from March to 2026. Now that you have the secret, which of the 7 designs will you be trying first for your holiday party?
Last update on 2026-03-03 / Affiliate links / Images from Amazon Product Advertising API


