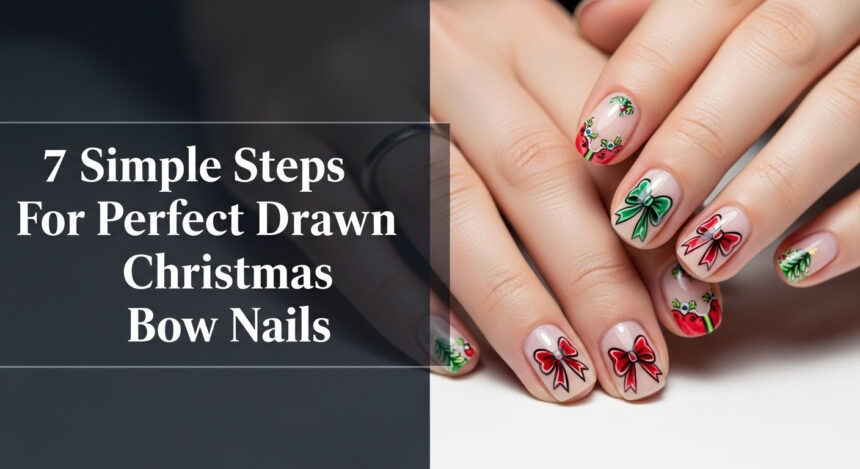
Struggling to create those perfect, dainty Christmas bows on your nails? You’ve tried holding your breath and using a toothpick, but the result is always a shaky, asymmetrical blob. It’s frustrating when you want that trendy, delicate holiday look but can’t get the clean lines you see all over Pinterest.
The secret to perfect Christmas bow nail art is a professional strategy that controls polish viscosity, stabilizes your hand with the ‘Pinky Anchor’ technique, and uses a symmetrical ‘X’ guide for drawing. This method, used by nail artists, eliminates the common issues of smudging and asymmetry, ensuring crisp, thin lines every time.
Drawing from established best practices and verified nail art methodologies, this guide breaks down the complex process into simple, actionable steps. You will discover the exact tools and techniques needed to transform your shaky attempts into a salon-quality drawn bow manicure. Prepare to create flawless, festive nails with confidence.
Tired of Shaky Lines? Why Your Drawn Christmas Bow Nails Need a Professional Strategy
If you’ve ever ended up with a lopsided or smudged design after spending an hour on a tiny detailed bow, you’re not alone. The delicate, trendy coquette aesthetic seems effortless online but often feels impossible to achieve at home. The problem isn’t a lack of artistic talent; it’s a lack of professional strategy. Drawn bow nail art fails due to improper brush loading, low polish viscosity that causes spreading, and a lack of hand stabilization.
This is where nail artist-verified techniques make all the difference. Professionals combat hand tremors and unpredictable polish by mastering stabilization, controlling their medium, and using guides for perfect symmetry. This 7-step process isn’t just a tutorial; it’s a complete system designed to address every common failure point, giving you the precision and control needed for a flawless holiday ribbon nail design.
7 Simple Steps To Master The Perfect Drawn Christmas Bow Nails 2026
Ready to leave shaky lines and asymmetrical loops in the past? This listicle is your complete workflow for achieving a professional, salon-quality drawn bow manicure at home. Each step is carefully structured to minimize error, especially around the crucial challenge of symmetry. By integrating professional standards like flash curing and proper brush maintenance, this guide ensures your dainty coquette nails will not only look stunning but will also have the durability to last through the entire holiday season.
1. Flawless Nail Bed Preparation & Base Coat Application

Pin this crucial prep step to your ‘Nail Care Routine’ board!
A perfect design starts with a perfect canvas. Proper nail bed preparation is the foundation for longevity, ensuring your intricate bow art adheres properly and doesn’t lift or chip prematurely. Removing oils and creating a smooth surface is non-negotiable for a lasting manicure.
Products & Tools Used:
- Nail file (180/240 grit)
- Buffer block (for smoothing surface)
- Isopropyl alcohol or nail dehydrator (to remove oils)
- Lint-free wipes
- High-quality, thin base coat (gel or lacquer)
- UV/LED Curing Lamp (mandatory for gel)
Application/Styling Steps:
- Gently file and shape the free edge of your nail, ensuring a smooth, consistent shape across all fingers.
- Carefully push back and clean up the cuticles, removing any non-living tissue from the nail plate.
- Swipe the nail plate with isopropyl alcohol and a lint-free wipe to completely remove residual dust and oils, maximizing polish adhesion.
- Apply a very thin layer of your chosen base coat, ensuring you ‘cap the free edge’ to prevent chipping.
- Cure or allow the base coat to fully dry according to product instructions before moving to the color coat.
Pro-Tip: Applying the base coat too thickly will cause the entire manicure, including the drawn bow, to lift prematurely. Thin layers are essential for longevity.

2. Selecting Precision Tools and Mastering Polish Viscosity

Save this professional tool guide for your next DIY manicure!
The difference between a crisp line and a thick blob comes down to two things: your tool and your medium. A 000-size detail brush is the industry standard for micro-bows, but the real secret is mastering polish viscosity—the thickness of your gel art paint.
Products & Tools Used:
- Detail Brush Set (specifically a 000 size liner brush for micro-bows)
- Highly Pigmented Gel Art Liner Paint (White or Red for maximum visibility)
- Small Dotting Tool (smallest size tip)
- Ceramic or metal palette (for controlling polish amount)
Application/Styling Steps:
- Choose Your Medium: Opt for dedicated liner gels or highly pigmented acrylic paint over standard lacquer for the best control and thinnest lines.
- Load the Brush: Dip only the very tip of the detail brush into the polish. Wipe excess polish off the ferrule onto your palette until the brush looks almost dry.
- Check Viscosity: If using standard gel polish, mix a tiny amount of high-pigment polish with a drop of matte top coat on the palette to thicken the consistency. The medium should cling to the brush tip without dripping.
- Practice Strokes: Before applying to the nail, practice a few straight, thin lines on the palette to verify your polish consistency and brush loading technique.
Pro-Tip: The key to a non-bulky, thin-lined bow is using an extremely dry brush. You should have to reload the brush frequently because so little polish is applied at a time.

3. Stabilizing Your Hand with the Expert ‘Pinky Anchor’ Technique

Fix shaky lines instantly! Save this stabilization hack now.
Shaky hands are the number one enemy of fine line nail art. The solution isn’t to hold your breath; it’s to create a stable, professional foundation for your drawing hand. The ‘Pinky Anchor’ is a non-negotiable technique used by artists for ultimate brush pressure control.
Tools/Resources:
- Stable, flat surface (desk or table)
- Manicure hand rest or pillow (optional, for comfort)
Application/Styling Steps:
- Sit Ergonomically: Ensure you are sitting upright with both elbows resting comfortably on the table surface.
- Grasp the Brush: Hold the detail brush close to the ferrule (the metal part) for maximum control and precision, like holding a scalpel.
- Establish the Anchor: Place the pinky finger of your dominant drawing hand firmly down onto the nail surface you are working on, or the adjacent finger. This is your anchor point.
- Maintain Contact: Keep the pinky anchor firmly pressed against the stable surface as you draw. Move your hand by rotating the pinky rather than lifting and floating your entire arm.
- Use Short Strokes: Instead of trying to draw one continuous, long line (which invites shaking), use several very short, controlled strokes, connecting them as you go.
Lesson Learned: Trying to draw a continuous curve in one motion is difficult even for pros. Use the stability of the pinky anchor and only focus on micro-segments of the line at a time.

4. Drawing the Perfectly Symmetrical Bow using the ‘X’ Guide

Master bow symmetry with this simple geometry hack!
The greatest challenge in drawing bows is making both loops identical in size and shape. The ‘X’ guide method is a beginner-friendly hack that uses simple geometry to create a perfect blueprint for your bow, guaranteeing symmetry before you even start forming the loops.
Materials Needed:
- Base Color (fully cured or dried)
- Contrasting Liner Gel or Acrylic Art Paint (White or Red)
- 000 Detail Liner Brush
Application/Styling Steps:
- Find the Center: Locate the precise spot on your nail (usually near the tip or cuticle for accent nails) where the center knot of the bow should sit.
- Draw the First Line: Using your detail brush, draw a very short, thin diagonal line (/) starting slightly above the center point and angling down.
- Draw the Second Line: Draw a second line () crossing the first, ensuring the intersection is exactly in the center point. You now have a small ‘X’ shape.
- Flash Cure (Gel Only): If using gel, flash cure the ‘X’ shape for 5-10 seconds to instantly set your guide and prevent any shifting during the next steps. This step is critical for precision.
Pro-Tip: The smaller the ‘X’ guide, the daintier your final bow will be. For a trendy coquette aesthetic, aim for the ‘X’ to be no wider than 1mm.

5. Forming the Dainty Loops and Clean Center Knot

Save this perfectly symmetrical bow for your holiday party inspiration!
With your symmetrical ‘X’ guide in place, forming the loops is a simple matter of connecting the dots. The key here is to create delicate curves that mirror each other perfectly and to use a dotting tool for a clean, non-blobby center knot.
Materials Needed:
- High-Pigment Art Paint (used for the ‘X’)
- Small Dotting Tool
- Cleanup Brush and Alcohol
Application/Styling Steps:
- Outer Loop Lines: Start your brush at the outer point of the top-left section of the ‘X’ and curve the line gently inward toward the center point. Do not touch the center point yet.
- Mirror the Loops: Repeat step 1 exactly on the top-right section, aiming to mirror the curve and size of the first loop perfectly. If one side is too large, use a clean detail brush dipped in alcohol to erase and refine the outer edge.
- Inner Loop Lines: Draw two small, short curved lines connecting the bottom points of the loops to the center point, completing the bow shape structure.
- Create the Knot: Use the smallest size dotting tool, dipped lightly in polish, to place a single, clean dot directly over the center intersection of the ‘X’. This creates a crisp knot, avoiding the messy blob look.
- Flash Cure: Cure the completed bow design for 30-60 seconds (gel) or let air dry fully (lacquer) before proceeding.
Pro-Tip: If you struggle with freehand curves, try the “dot-to-dot” method: place three tiny dots outlining the curve of the loop, then connect them with your brush.

6. Adding Dimension, Ribbon Tails, and Coquette Styling

Get the trending Coquette look! Pin this elegant design idea.
A basic bow is beautiful, but adding details like flowing ribbon tails and subtle shading elevates it to a professional level. This is also where you can lean into the trendy coquette style by pairing your white or nude bow with a tiny pearl accent for a touch of elegance.
Materials Needed:
- Lighter shade of art paint (e.g., white if the bow is red)
- Darker shade of art paint (e.g., black or gray for shadowing)
- Fine Detail Brush
Application/Styling Steps:
- Draw the Tails: Using light pressure, draw two thin, flowing lines extending from the bottom of the center knot down toward the tip of the nail. These should be slightly tapered. Add a small ‘V’ cut or inverted triangle shape at the end of each tail for the classic ribbon look.
- Create Faux Shadowing: Dip your brush into the darker shade (e.g., gray). Draw a tiny, very thin curved line underneath the bottom inner edge of each bow loop and underneath the center knot. This adds subtle depth, mimicking a shadow.
- Add Highlights (Optional): Use a clean brush and the lightest color (e.g., white). Apply a microscopic, curved line along the very top edge of the bow loops to simulate where light hits, increasing the dimensional effect.
- Style the Coquette: For the trendy coquette look, secure a tiny pearl or miniature rhinestone on the center knot or slightly above the bow using a dot of clear builder gel or sticky top coat. Cure fully.
Lesson Learned: Use the shadowing technique sparingly. If the shadow line is too thick, it will look like a messy outline rather than a dimension effect. Aim for a line half the thickness of the main bow line.

7. Sealing and Encapsulating Your Drawn Bow for Chip-Free Longevity

Make your bow art last all holiday season! Save this final step.
After investing time in your delicate artwork, the final step is to protect it. A common mistake is dragging the top coat brush and smearing the design. The encapsulation technique involves “floating” a generous layer of durable top coat over the art, sealing it without disturbing the lines underneath.
Materials Needed:
- High-Quality, No-Wipe Glossy Top Coat (or water-based sealant for acrylic paint)
- UV/LED Curing Lamp
- Rubbing Alcohol or Cleanser Solution (if using a wipe top coat)
Application/Styling Steps:
- Ensure Cure/Dryness: Verify that your bow art is completely cured (gel) or fully air-dried (lacquer/acrylic) before touching it with the top coat brush.
- Float the Top Coat: Load your top coat brush generously, but do not drag it. Gently place the brush onto the nail surface slightly away from the drawn bow and softly “float” the top coat over the design. This prevents the brush from dragging or smearing the delicate lines underneath.
- Cap the Edge: Turn your nail slightly and use the brush to gently cover the very edge (free edge) of the nail tip with the top coat. This seals all layers, which is crucial for preventing chipping.
- Final Cure: Cure the top coat fully under the UV/LED lamp according to the product’s recommended time (usually 60-120 seconds). If using a wipe-required top coat, remove the sticky inhibition layer with cleanser and a lint-free wipe.
Pro-Tip: If using an acrylic paint bow, be extremely careful, as a traditional lacquer top coat will dissolve and smear the art. You must use either a clear gel top coat (and cure) or a specialized water-based sealant first.

Key Takeaways: Your Quick Checklist for Perfect Bow Art
To ensure your drawn bow nail art is a festive success, keep this simple checklist handy. It covers the most critical methods and secrets for achieving a flawless, durable, and trendy holiday manicure.
- The Perfect Drawn Bow Checklist:
- Foundation: Always use a nail dehydrator/alcohol and cap the base coat to prevent premature lifting.
- Tools: Invest in a 000-sized detail brush and practice brush loading until the tip is almost dry to ensure the thinnest lines.
- Stability: Implement the “Pinky Anchor” technique to eliminate hand shaking and ensure controlled strokes.
- Symmetry: Use the invisible ‘X’ guide method as a blueprint for the loops before filling in the design.
- Longevity: Flash cure your gel lines (5-10 seconds) between steps, and generously float a top coat to encapsulate the final art, making sure to cap the free edge.
- Aesthetic: For a trending Coquette look, pair white or nude bases with a black or white micro-bow motif.
People Also Ask About Hand-Painted Nail Art
How do I stop my hand from shaking when drawing tiny details?
Use the ‘Pinky Anchor’ technique and controlled breathing to stabilize your movements. Rest the pinky finger of your dominant hand firmly on a stable surface (or the adjacent finger). Avoid caffeine beforehand and use short, controlled strokes rather than one continuous shaky line, relying on the stability point for support.
Should I use gel polish or regular polish for fine line bow art?
Highly pigmented gel art paint is strongly recommended for fine line work like drawn bows. Gel offers superior viscosity control, preventing the polish from spreading. Crucially, gel allows you to ‘flash cure’ the design instantly (5-10 seconds) after each thin line, eliminating the risk of smudging during the long drying time of regular lacquer.
How can I prevent my top coat from smearing the drawn bow design?
The key is proper curing and application method. If using gel, ensure the bow design is fully cured (or completely dry if using lacquer/acrylic) before applying the top coat. Then, use the ‘floating’ top coat technique: load the brush generously and gently place it onto the nail surface, floating the product over the art with minimal contact to avoid drag or smear.
What is the Coquette aesthetic in Christmas bow nails?
The Coquette aesthetic emphasizes dainty, hyper-feminine, and delicate elements. For Christmas bows, this typically translates to micro-bows drawn using thin black or white lines against pale, sheer pink or nude base colors, often incorporating tiny pearls or minimalistic ribbon tails for an elegant, vintage feel that avoids heavy, traditional holiday motifs.
What size detail brush is best for drawing micro-bows on short nails?
A 000 or 00 sized detail/liner brush is the industry standard for micro-bows. These brushes possess extremely fine, sharp tips essential for creating the thin, crisp lines and intricate details required for the dainty aesthetic, ensuring the bow does not look bulky or overwhelm the limited space on a short nail bed.
Final Thoughts
The secret to flawless drawn Christmas bow nails isn’t necessarily a steady hand; it’s the professional methodology—mastering the ‘X’ guide, controlling viscosity, and utilizing the stability of the pinky anchor. By following these 7 simple steps, you have successfully transformed a complicated art form into an achievable, professional-level holiday manicure. Go forth and wear your elegant, perfectly symmetrical bows with confidence this 2026!
Now that you’ve mastered the precision of the drawn bow, what festive color combination (classic red or delicate coquette white) are you trying first for your holiday party look? Tell us in the comments
Last update on 2026-03-03 / Affiliate links / Images from Amazon Product Advertising API


