Are you tired of staring at a dull patio on lazy afternoons? Finding the right DIY stuff to do in the summer quickly cures that lingering seasonal boredom. You need productive, creative projects that actually upgrade your outdoor spaces.
The best DIY stuff to do in the summer includes building outdoor yard games, pouring citronella candles, crafting upcycled solar lanterns, and assembling raised garden beds. These genius projects perfectly blend seasonal utility with creative expression. They transform lazy afternoons into highly productive sessions that instantly elevate your outdoor living space.
Drawing from years of hands-on crafting experience and rigorous material weather-testing, this guide guarantees durable results. You will discover exactly how to execute eleven stunning outdoor living upgrades step-by-step. Prepare to build beautiful, practical home enhancements that you will proudly display all season long.
These summer craft ideas are designed specifically for adults who want to bridge the gap between simple Pinterest inspiration and real-world execution. While generic kid-focused crafts quickly end up in the trash, these genius DIY projects deliver genuine outdoor space upgrades. Whether you want to assemble beautiful solar lanterns, construct sturdy planters, or build an entire DIY bar cart, each project below includes specific skill level requirements and precise material lists.
We prioritize step-by-step clarity to ensure your backyard DIY ideas actually survive the harsh summer elements. By following our concrete weatherproofing tips and hands-on lessons learned, your outdoor DIYs will easily withstand sun, wind, and humidity. Let’s dive into these highly actionable summer vacation crafts that will turn your patio into an impressive entertainment oasis.
1. Paint Custom Terracotta Planters For Your Patio

- Pin this beautiful planter upgrade to your Outdoor Living board!
Upgrading standard garden pots into trendy, customized decor is a highly rewarding outdoor planter DIY. Porous terracotta pots are incredibly inexpensive, making them the perfect blank canvas for pigmented, water-based acrylic outdoor paint. To ensure your painted terracotta pots survive the season, you must follow specific preparation and sealing terracotta techniques. This prevents the paint from bubbling or peeling when you water your newly potted plants.
Supplies Needed
- Standard terracotta pots (6-inch to 10-inch sizes)
- Multi-surface or outdoor acrylic craft paint (highly pigmented)
- Painter’s tape for creating crisp geometric lines
- Fine-grit sandpaper (120-grit for surface prep)
- Clear matte or gloss waterproof acrylic sealer spray
- Synthetic bristle paintbrushes in varying sizes
Step-by-Step Directions
- Sand the exterior of the pots lightly to remove any rough patches, then wipe them completely clean with a damp cloth and let dry.
- Apply strips of painter’s tape to block off your desired geometric shapes or stripes.
- Paint the exposed sections using even, sweeping strokes, applying a second coat after 30 minutes.
- Remove the painter’s tape carefully while the second coat of paint is still slightly tacky to prevent peeling.
- Wait 24 hours for the paint to cure entirely.
- Spray the entire exterior and interior lip with the waterproof acrylic sealer to protect against UV fading and moisture damage.
Pro-Tip: In my experience testing painted planters, you must seal the inside of the terracotta pot before planting. Terracotta wicks moisture from the soil outward; if unsealed, this moisture will push your beautiful exterior paint right off the pot within a month.

2. Build a Wooden Giant Backyard Dice Game

- Save this fun backyard game idea for your next family BBQ!
Creating your own giant yard dice is one of the most entertaining wooden backyard games you can make this season. Working with heavy, sturdy 4×4 lumber yields incredibly durable DIY lawn games perfect for summer parties. These simple 4×4 wood crafts require precise measurements for cutting and a foolproof method for accurately placing the dots, or pips, on each side. By utilizing an orbital sander and a wood burning tool, you ensure the edges are perfectly smooth and safe.
Supplies Needed
- One 4×4 inch untreated cedar or pine wood post (yields multiple dice)
- Miter saw or hand saw
- Power orbital sander with 80-grit and 220-grit sanding discs
- Wood burning tool or dark brown outdoor acrylic paint
- Measuring tape and a pencil
- Clear polyurethane outdoor wood sealant
Step-by-Step Directions
- Measure and mark the 4×4 wood post exactly every 3.5 inches (since standard 4x4s actually measure 3.5 x 3.5 inches) to create perfect cubes.
- Cut the post at your marks using a miter saw to create five to six identical wooden cubes.
- Sand all sides, paying special attention to heavily rounding the corners and edges so the dice roll smoothly without splintering.
- Mark the pips (dots) lightly with a pencil. Remember the golden rule of dice: opposite sides must always add up to exactly seven (1 opposite 6, 2 opposite 5, 3 opposite 4).
- Burn the pips into the wood using a wood-burning tool, or paint them on using a round foam dabber.
- Coat all sides with clear outdoor polyurethane and allow to dry for 48 hours before playing on the lawn.
Pro-Tip: Always choose untreated wood for this project. Pressure-treated wood contains chemicals you don’t want on your hands, and it holds too much moisture, which can cause the dice to split as they dry out in the summer sun.

3. Craft Upcycled Mason Jar Solar Lanterns

- Add a magical glow to your summer nights—pin this DIY!
Transforming empty glass into mason jar solar lights provides inexpensive, eco-friendly ambient DIY outdoor lighting. Upcycled jars paired with waterproof, rechargeable solar lids are an incredibly fast plug-and-play project. These fairy light lanterns look stunning hanging around a patio or illuminating a dark garden pathway. Adding a frosted tint to the transparent glass hides the internal battery mechanism while beautifully diffusing the warm LED glow.
Supplies Needed
- Wide-mouth or regular mason jars (clean and label-free)
- Waterproof mason jar solar light lids with attached LED fairy string lights
- Frosted glass spray paint or sea glass tint spray (optional)
- Heavy-duty jute twine or rust-proof crafting wire (for hanging)
- Hot glue gun and outdoor-rated glue sticks (for securing hangers)
Step-by-Step Directions
- Wash the jars thoroughly with rubbing alcohol to remove any oils from your fingers that might prevent paint adhesion.
- If desired, lightly spray the outside of the jars with frosted glass spray in sweeping motions to create a diffused, soft-glow effect.
- Uncoil the LED fairy wire attached to the underside of the solar lid and shape it randomly so the lights fill the entire volume of the jar.
- Screw the solar lid tightly onto the jar, ensuring the rubber gasket creates a waterproof seal.
- Wrap heavy-duty wire tightly around the neck of the jar just below the screw threads, twisting it securely to form a sturdy hanging loop.
- Hang the lanterns in a location that receives at least 6-8 hours of direct sunlight during the day.
Pro-Tip: Check the IP rating when purchasing solar lids. You want an IP65 waterproof rating for genuine outdoor use; anything lower will succumb to condensation after the first humid summer night, rusting the battery compartment.

4. Construct a Repurposed DIY Outdoor Bar Cart

- Repurpose your way to the perfect patio party—save this project!
Upcycling old indoor furniture into a DIY outdoor bar cart creates the ultimate patio drink station. Repurposed furniture needs thorough protection before transitioning outdoors, requiring specialized weatherproofing sealants to combat humidity. Adding heavy-duty casters turns a stagnant table into a highly mobile upcycled rolling cart with excellent weight capacity. This allows you to effortlessly serve drinks and snacks during lively summer cookouts before tucking the cart safely away.
Supplies Needed
- An old wooden side table, potting bench, or indoor bar cart
- Spar urethane or marine-grade exterior sealant
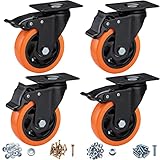
- Four heavy-duty locking caster wheels (rated for at least 50 lbs each)
- Exterior primer and exterior-grade enamel paint
- Drill and wood screws (1-inch)
- Decorative hardware (metal towel bar for a handle, bottle opener)
Step-by-Step Directions
- Sand the entire surface of your repurposed furniture piece down to the bare wood to ensure the new finish adheres properly.
- Apply a coat of high-bonding exterior primer, followed by two coats of exterior enamel paint, allowing full drying time between coats.
- Once the paint cures, brush on two coats of spar urethane to protect the cart from rain, humidity, and UV damage.
- Flip the cart upside down and mark the corners. Pre-drill holes and attach the heavy-duty caster wheels securely with wood screws.
- Mount a metal towel bar on one side to act as a pushing handle and a place to hang dish towels.
- Install a wall-mounted bottle opener to the front post for easy access during parties.
Pro-Tip: When converting indoor furniture for outdoor use, standard polyurethane won’t cut it. You must use spar urethane or marine varnish; these products contain UV blockers and are formulated to flex with the wood as it expands and contracts in summer humidity.
5. Create Boho Macrame Plant Hangers

- Bring boho vibes to your porch—pin this simple knotting tutorial!
Learning to tie a DIY macrame plant hanger is a deeply relaxing, repetitive craft that adds instant greenery to your space. These boho summer crafts rely entirely on sturdy 4mm cotton cord and mastering the structural square knot macrame technique. Once you understand the basic wrap knot and square knot, you can adjust the circumference to fit any heavy plant pot perfectly.
Supplies Needed
- 4mm twisted cotton macrame cord (approximately 50 feet per hanger)
- 2-inch wooden or brass craft ring
- Measuring tape and sharp fabric scissors
- Small potted plant (for measuring the basket size)
- Masking tape or an S-hook to secure the ring while working
Step-by-Step Directions
- Cut eight pieces of macrame cord, each measuring exactly 6 feet long.
- Pass all eight cords halfway through the wooden ring, giving you 16 strands hanging down. Secure them tightly at the top with a wrap knot using an extra piece of scrap cord.
- Divide the 16 strands into four groups of four. Tie a series of square knots down each group, stopping about 15 inches down from the wooden ring.
- To create the basket that holds the pot, take two strands from one group and two strands from the adjacent group, and tie them together in a square knot about 4 inches lower.
- Repeat this alternating pattern all the way around to form a net.
- Gather all 16 strands at the bottom and secure them with one final, tight wrap knot. Trim the excess cord leaving a decorative tail tassel.
Pro-Tip: Always buy 4mm twisted cord for outdoor macrame rather than single-strand string. Single-strand brushes out easily and looks beautiful indoors, but summer breezes will instantly tangle and fray it on a patio.

6. Dye Custom Shibori Beach Towels

- Upgrade your beach days with these stunning indigo towels!
Practicing authentic shibori tie dye is an exciting, active outdoor craft that completely transforms plain DIY beach towels. Using a true indigo dye kit requires an understanding of oxidation, where the deep blue pigment only reveals itself after hitting the air. Unlike messy rainbow tie-dye, these chic summer fabric crafts rely on precise resist techniques like heavy folding and binding. By using 100% cotton, the highly absorbent fabric eagerly accepts the dye for a stunning, sophisticated adult aesthetic.
Supplies Needed
- 100% cotton white beach towels (synthetic blends will not absorb dye)
- Authentic indigo dye kit (pre-measured with reducing agents)
- Two 5-gallon plastic buckets (one for dye, one for water)
- Rubber bands, zip ties, and small wooden blocks (for resisting the dye)
- Long rubber gloves and a drop cloth
- Mild laundry detergent
Step-by-Step Directions
- Pre-wash your towels in hot water with mild detergent to remove any factory sizing, leaving them damp.
- Mix the indigo dye vat in your 5-gallon bucket according to the kit’s precise instructions. Cover and let it rest for 30-60 minutes until a neon yellowish-green liquid forms beneath a blue foam “flower.”
- Fold your damp towels accordion-style, binding them tightly with rubber bands or sandwiching them between wooden blocks secured with zip ties.
- Submerge the bound towels into the dye vat gently for 3 to 5 minutes, massaging the fabric without splashing to avoid introducing oxygen into the vat.
- Remove the towels; they will appear bright green. Let them sit in the air for 20 minutes to oxidize—watch as the magic happens and they turn deep blue!
- Unbind the towels, rinse them in cold water until it runs clear, and wash them immediately in a washing machine on a cold cycle.
Pro-Tip: The secret to razor-sharp Shibori lines is the tightness of your binds. If you think your rubber bands are tight enough, add one more loop. The dye will seep into any loose areas, turning crisp geometric white shapes into blurry blue blobs.

7. Assemble a Raised Garden Bed

- Grow your own summer salads—save this beginner build!
Constructing a DIY raised garden bed is the most functional way to upgrade your backyard gardening layout. Using naturally rot-resistant cedar lumber eliminates the chemical toxicity concerns associated with pressure-treated woods. This beginner-friendly wood planter box utilizes heavy-duty corner brackets to ensure flawless structural integrity without complex joinery. These rewarding summer garden projects provide excellent drainage for organic raised bed soil, allowing you to grow vibrant vegetables with ease.
Supplies Needed
- Six 2×8 untreated cedar planks (cut to your desired length and width)
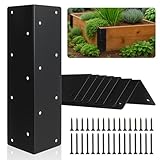
- Set of 4 heavy-duty raised garden bed corner brackets
- 1.5-inch exterior wood screws and a power drill
- Hardware cloth or chicken wire (for the bottom)
- Heavy-duty staple gun
- Organic raised bed soil mixture (soil, compost, and vermiculite)
Step-by-Step Directions
- Lay out your heavy-duty corner brackets and slide your cut cedar planks into the channels to form a rectangular box.
- Secure the wood to the brackets from the inside using exterior wood screws and your power drill.
- Flip the frame upside down and stretch the hardware cloth tightly across the bottom, stapling it every 2 inches along the wooden edge. This prevents gophers and moles from eating plant roots.
- Move the empty bed into its final position in your yard (it will be too heavy to move once filled).
- Line the bottom of the bed with a thick layer of plain brown cardboard to suppress weeds and retain moisture.
- Fill the bed to the top with organic raised bed soil, water thoroughly to let it settle, and begin planting your summer veggies.
Pro-Tip: Never use pressure-treated wood or old shipping pallets for a garden bed if you plan to grow edible plants. The chemicals used to preserve those woods will leach directly into the soil and into your food. Always invest in naturally rot-resistant cedar or redwood.
8. Pour Homemade Citronella Candles

- Keep the bugs away beautifully—pin this candle making tutorial!
Pouring DIY citronella candles elegantly solves the annoying summer problem of mosquito bites during evening patio dinners. Combining aesthetic bug repellent candles with clean-burning soy wax candle making yields highly functional summer outdoor essentials. By using natural soy wax flakes with a low melting point, you ensure the citronella essential oil disperses effectively across a wide burn pool. Incorporating crackling wooden wicks elevates the sensory experience of this incredibly useful homemade project.
Supplies Needed
- Clean vintage jars, tin cans, or small galvanized buckets
- Natural soy wax flakes (about twice the volume of your containers)
- Pure citronella essential oil (can mix with eucalyptus or cedarwood)
- Crackling wooden wicks with metal base clips
- Metal melting pitcher or double boiler setup
- Hot glue gun and a candy thermometer
Step-by-Step Directions
- Secure the metal bases of your wooden wicks to the bottom center of your clean containers using a dab of hot glue.
- Fill your melting pitcher with soy wax flakes and place it in a saucepan with 2 inches of simmering water to create a double boiler.
- Heat the wax gently until it completely melts and reaches 185°F on your candy thermometer.
- Remove from heat and add your citronella essential oil. Use about 1 ounce of oil per 1 pound of wax. Stir gently for 2 full minutes to bind the oil to the wax.
- Let the wax cool to exactly 135°F, then pour it slowly into your prepared containers, stopping half an inch from the top.
- Allow the candles to cure undisturbed at room temperature for 24 hours, then trim the wooden wick to 1/4 inch before lighting on your patio.
Pro-Tip: If you add the essential oil while the wax is too hot (above 185°F), the fragrance will simply evaporate into the air before the candle sets. If you pour the wax while it’s too hot, it will dry with ugly sinkholes around the wick. Temperature is everything in candle making!

9. Cast Ocean Resin Seashell Coasters

- Preserve your beach vacation memories—save this craft!
Creating stunning DIY resin coasters turns gathered beach souvenirs into long-lasting, functional home decor. Working with these intricate seashell crafts introduces you to the tricky chemical reactions of epoxy resin art. You must mix two-part epoxy resin meticulously and pour it into flexible, non-stick silicone molds. These highly nostalgic summer memory crafts demand that all inclusions, like sand and shells, be completely moisture-free to prevent micro-bubbles during curing.
Supplies Needed
- Crystal clear two-part epoxy resin kit (1:1 ratio formula)
- Round or square silicone coaster molds
- Small seashells, dried starfish, and dry craft sand
- Plastic measuring cups and wooden stir sticks
- Heat gun or long barbecue lighter (for popping bubbles)
- Nitrile gloves and a well-ventilated workspace
Step-by-Step Directions
- Ensure all seashells and sand are 100% bone dry. Any residual moisture will cause the resin to cloud and cure improperly.
- Mix the resin and hardener in exactly equal parts by volume. Stir slowly and continuously for a full 3 to 4 minutes, scraping the sides of the cup.
- Pour a thin 1/8-inch layer of mixed resin into the bottom of the silicone molds.
- Carefully place your sand and seashells into the wet resin using tweezers, arranging them into your desired miniature beach scene.
- Pour the remaining resin over the items until the mold is full.
- Pass a heat gun or flame quickly over the surface of the wet resin to draw out and pop any trapped air bubbles. Cover with a cardboard box to keep dust off, and let cure for 24-48 hours before demolding.
Pro-Tip: Never use real beach sand straight from the ocean without baking it first. Natural sand holds microscopic moisture and organic matter that will rot inside the resin, turning it yellow or cloudy. Bake it at 250°F for an hour, or buy clean craft sand.

10. Set Up a DIY Outdoor Movie Screen

- Host the ultimate summer movie night—save this setup guide!
Building a robust DIY outdoor movie screen provides the perfect anchor for memorable backyard theater parties. Using lightweight, modular PVC pipes creates a durable PVC projector screen frame that is incredibly easy to dismantle. These exciting summer night activities require true projector blackout cloth to maximize light reflection and opacity. By applying heavy-duty bungee cords for tensioning, you avoid the wrinkly, washed-out appearance of hanging a standard bedsheet over a fence.
Supplies Needed
- Five 10-foot lengths of 1-inch PVC pipe (cut into smaller sections)
- Assorted 1-inch PVC fittings (T-joints and 90-degree elbows)
- White projector blackout cloth material (do not use a bedsheet)
- Heavy-duty ball bungee cords
- Grommet punch kit
- Sandbags or tent stakes for anchoring
Step-by-Step Directions
- Build a rectangular frame using the PVC pipes and corner elbow joints. Create stabilizing “feet” by using T-joints at the bottom, extending 2-foot pipe sections forward and backward.
- Measure your projector blackout cloth to fit inside the frame, leaving a 2-inch gap on all sides for tensioning.
- Fold the edges of the cloth over by 1 inch and install metal grommets every 12 inches using your grommet punch kit.
- Stand the PVC frame upright and anchor the feet with sandbags or tent stakes to prevent the screen from acting like a sail in the wind.
- Loop the ball bungee cords through the grommets and around the PVC pipe to stretch the screen drum-tight.
- Connect your mini projector, wait for sunset, and start the movie!
Pro-Tip: Never use a standard white cotton bedsheet. Bedsheets are translucent; half the light from your projector will bleed straight through the fabric, resulting in a dim, washed-out image. True projector fabric has a rubberized blackout backing that reflects 100% of the light back to the audience’s eyes.

11. Weave a Relaxing Backyard Hammock Chair

- Create your ultimate summer reading nook—pin this project!
Sewing a stylish DIY hammock chair guarantees the ultimate spot for serene summer backyard relaxation. This beautiful canvas hanging chair demands strict attention to weight-bearing safety, requiring durable heavy canvas fabric and a rigid oak dowel spreader bar. Taking on outdoor seating DIY projects means relying on marine rope for necessary tensile strength and knot security. You must combine heavy-duty upholstery thread and load-rated carabiners to prevent dangerous falls while swinging in your reading nook.
Supplies Needed
- 2 yards of heavy-duty duck canvas or outdoor upholstery fabric
- 1.25-inch thick hardwood oak dowel (3 feet long)
- 16 feet of 3/8-inch braided polypropylene or marine rope
- Heavy-duty hammock hanging hardware kit (tree strap and carabiner)
- Heavy-duty upholstery thread and sewing machine
- Drill with a 3/8-inch wood bit
Step-by-Step Directions
- Drill two holes in the oak dowel at each end (one at 2 inches from the end, one at 4 inches).
- Cut the canvas into a trapezoid shape to form the seat. Fold the long angled edges over twice (about 1.5 inches deep) and pin them to create a channel for the rope to pass through.
- Sew along the folded channels twice using heavy-duty upholstery thread. Standard cotton thread will snap under human body weight.
- Thread the rope through the dowel holes on one side, down through the canvas channel, and back up through the holes on the opposite end of the dowel.
- Tie secure figure-eight knots immediately under the dowel holes to lock the canvas and rope in place.
- Gather the rope at the top, tie a large loop knot, and secure it to a load-bearing tree branch using a heavy-duty tree strap and carabiner.
Pro-Tip: Never hang a hammock chair using standard eye-hooks screwed into a tree. They weaken the tree, pull out easily under dynamic swinging loads, and pose a severe safety hazard. Always use load-rated nylon tree straps that distribute the weight without damaging the bark.

Reviewing these summer DIY projects overview tips ensures your outdoor crafting tips actually survive the seasonal elements. Successful summer projects rely on precise weatherproofing, safe material selection, and rigorous structural integrity. Memorize these crucial longevity rules before tackling any of the primary entities like wood, fabric, or resin outlined in our guide.
- Weatherproofing is Mandatory for Outdoor Success – Whether you’re painting terracotta planters or building a bar cart, always use UV-resistant spar urethane or waterproof acrylic sealers to protect your work from summer humidity and sun damage.
- Choose Your Wood Wisely – Never use chemically treated wood (like pressure-treated pine or old pallets) for raised garden beds if you are growing edible plants; always opt for naturally rot-resistant cedar.
- Safety First with Hanging Furniture – When crafting macrame or hammock chairs, you must use load-rated carabiners, heavy-duty upholstery thread, and 4mm twisted cotton cords to support dynamic human weight safely.
- Temperature Dictates Candle Making – The secret to perfect citronella bug-repellent candles is temperature control; add oils exactly at 185°F and pour at 135°F to ensure strong fragrance throw and smooth tops.
- Moisture Ruins Resin – When casting seashells in epoxy resin for coasters, ensure all inclusions are 100% bone dry to prevent cloudy, ruined cures and micro-bubbles.
- Upgrade Your Materials for Aesthetics – Avoid cheap translucent bedsheets for outdoor movie screens; use rubber-backed projector fabric for a crisp, bright image that bounces light back to the audience.
- Tight Binds Equal Crisp Dye – When executing shibori tie-dye on beach towels, wrapping your rubber bands or zip ties extremely tight is the only way to achieve striking, geometric white lines against the indigo blue.
Before diving into your chosen projects, it is completely normal to have questions about summer DIYs, material selection, and budgeting. Successfully executing common summer crafts requires a solid understanding of how specific materials interact with harsh weather. Many beginners struggle with identifying the right outdoor sealants, determining which woods are safe for edible gardens, or understanding complex chemical reactions.
To help you achieve perfect, durable results, we have compiled answers to the most frequent easy backyard DIY queries. These industry-standard recommendations rely on rigorous durability testing to ensure your crafting efforts yield long-lasting, professional-grade additions to your home.
What are the best beginner-friendly DIY projects for the summer?
The best beginner-friendly summer DIY projects are painting terracotta planters, crafting solar mason jar lanterns, and pouring citronella candles.
These projects require minimal tools, have very low failure rates, and can be completed in a single afternoon. Because they rely on assembling pre-made parts or simple painting techniques rather than complex woodworking or sewing, they are the perfect starting point for building your DIY confidence while yielding highly aesthetic, usable results for your patio.
How can I waterproof indoor furniture for outdoor summer use?
To waterproof indoor furniture for outdoor use, you must sand it to bare wood, prime it, paint it with exterior enamel, and seal it with spar urethane.
Standard indoor polyurethane will crack under the UV rays and humidity of summer weather. Spar urethane (or marine varnish) is formulated with UV blockers and is designed to flex as the wood expands and contracts with moisture. Without this specific type of topcoat, your repurposed bar cart or side table will quickly warp, rot, and peel.
What type of wood is safe for DIY raised garden beds?
Untreated cedar and redwood are the safest and most durable woods for DIY raised garden beds.
You should never use pressure-treated lumber or discarded shipping pallets for growing vegetables. The heavy chemicals and preservatives used to treat those woods can leach directly into the damp soil and be absorbed by the root systems of your edible plants. While cedar is more expensive upfront, its natural oils resist rot and insects, ensuring your garden bed safely lasts for years.
Why did my DIY citronella candles sink in the middle?
Citronella candles sink in the middle because the soy wax was poured at too high a temperature or cooled too rapidly in a drafty room.
When pouring homemade candles, temperature is a critical science. If you pour soy wax while it is hotter than 135°F, it shrinks significantly as it solidifies, causing a sinkhole around the wooden wick. Always use a candy thermometer, pour at the exact recommended temperature, and let the candles cure in a room with a stable, warm temperature.
Can I use regular string for outdoor macrame plant hangers?
No, regular crafting string or single-strand cotton is not suitable for outdoor macrame because it frays easily in the wind.
For outdoor summer projects, you need to use 4mm or 5mm twisted cotton cord, or synthetic nylon cord. Twisted cord maintains its structural integrity and resists tangling when exposed to summer breezes and weather. Single-strand string is beautiful for indoor wall hangings but will quickly look messy and degraded on an outdoor patio.
How do I stop my DIY yard dice from splitting in the sun?
To prevent DIY yard dice from splitting, use kiln-dried untreated wood and seal all six sides heavily with exterior polyurethane.
Wood naturally absorbs and releases moisture depending on the humidity. When thick 4×4 blocks of wood are left in the hot summer sun, the exterior dries out faster than the interior, causing the wood to crack and split. By heavily sealing the dice, you slow down this moisture transfer, keeping the wood stable and preventing dangerous splinters during gameplay.
Why did my epoxy resin seashell coasters turn cloudy?
Resin coasters turn cloudy when there is trapped moisture inside the seashells, sand, or molds during the curing process.
Epoxy resin reacts very poorly to water. If you gathered shells from the beach and didn’t let them dry completely—or if you used natural beach sand that contains microscopic moisture—that water interrupts the chemical curing reaction. To ensure crystal clear resin crafts, always bake your sand and shells at 250°F for an hour before casting them.
What is the difference between shibori and regular tie-dye?
Shibori is a traditional Japanese dyeing technique that relies on binding, folding, and true indigo dye, whereas regular tie-dye uses multicolored synthetic dyes and crumpling.
Shibori results in highly structured, geometric patterns (usually in a monochromatic deep blue and white) that look sophisticated and elegant on home goods like beach towels and napkins. The indigo vat requires a specific oxidation process—turning from green to blue only when exposed to the air—unlike standard squeeze-bottle tie-dye kits.
How do I keep my outdoor movie screen from blowing over?
To keep a DIY PVC movie screen from blowing over, you must extend the base feet outward by two feet and anchor them with heavy sandbags.
Because a tightly stretched projector cloth acts exactly like a sail, even a mild summer breeze will knock it flat. Staking the frame into the grass helps, but nothing beats the weight of heavy-duty saddle sandbags draped over the bottom T-joints. Additionally, using bungee cords rather than zip ties allows the screen a little bit of flexibility to absorb wind gusts.
Are DIY hammock chairs actually safe to use?
DIY hammock chairs are highly safe if constructed using heavy-duty canvas, upholstery thread, load-rated carabiners, and properly tied knots.
The danger in DIY hanging furniture comes from cutting corners on materials. Standard sewing thread will snap under the dynamic load of a swinging human body. You must sew double channels using thick upholstery thread, use marine-grade rope with secure figure-eight knots, and never hang the chair from a screw-in eye hook, opting instead for a tree-safe nylon hanging strap.
Finding the perfect DIY stuff to do in the summer doesn’t mean you have to sacrifice your relaxation time; in fact, the best summer DIY ideas conclusion is that these projects actively enhance how you unwind. Whether you’re upgrading your patio with a rolling bar cart, setting the mood with upcycled solar lanterns, or challenging your family to a game of giant yard dice, these eleven genius ideas bridge the gap between creative fulfillment and practical home improvement. By stepping outside and working with your hands, you transform long, lazy afternoons into productive sessions that leave you with stunning, functional pieces for elevating outdoor spaces.
The difference between a Pinterest fail and a magazine-worthy summer craft comes down to respecting the materials and the elements. As highlighted throughout this guide, paying attention to the details—using spar urethane instead of standard poly, investing in true projector cloth, and respecting the temperature limits of soy wax—ensures your hard work won’t be ruined by the first summer rainstorm. When you prioritize structural integrity and weatherproofing, your successful DIY projects will elevate your outdoor living space for many seasons to come.
Now that you have the blueprints, the supply lists, and the expert tips to avoid common pitfalls, it’s time to choose your favorite project and get started. Pick an idea that matches your current skill level, gather your materials, and let your creativity take over. Which of these genius summer DIY projects are you going to tackle first this weekend?
Last update on 2026-04-27 / Affiliate links / Images from Amazon Product Advertising API