Ready to give your look a cozy, chic update for the new season? Finding the perfect fall nail designs can feel overwhelming when you want something trendy yet timeless. You’re looking for inspiration that’s both beautiful and achievable.
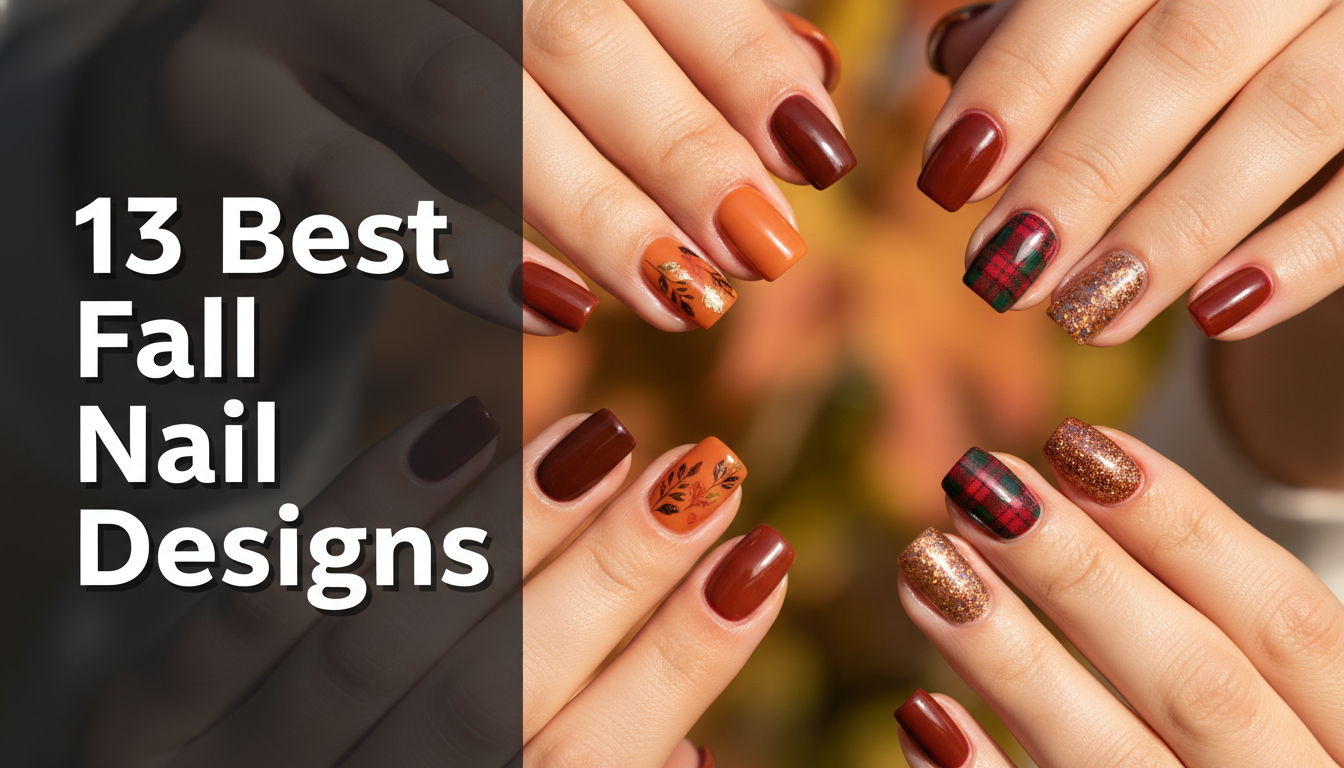
Fall nail designs for 2026 embrace warm, earthy tones, featuring popular finishes like velvet, chrome, and matte, often incorporating motifs such as autumn leaves and subtle plaid patterns. These designs are characterized by rich colors like burgundy, brown, and burnt orange, offering a perfect blend of cozy and chic for the season.
Drawing from an analysis of current 2026 trends and proven nail art methods, this guide provides everything you need to know. You’ll discover 13 stunning, expert-vetted designs, complete with step-by-step instructions. Get ready to find your perfect autumn manicure.
Elevate Your Autumn Style: Unveiling 13 Best Fall Nail Designs for 2026
As the air turns crisp and the leaves begin to change, it’s the perfect time to transition your style, and your nails are no exception. The fall manicure trends for 2026 are all about capturing the season’s essence, blending cozy autumn vibes with sophisticated elegance. This year’s top fall nail art 2025 moves beyond simple solid colors, exploring rich textures and dynamic finishes that make a statement. From the plush, dimensional look of velvet nails to the reflective sheen of pumpkin spice chrome, the designs are more artistic and expressive than ever. We’re seeing a celebration of earthy tones, moody palettes, and intricate details that can elevate any outfit. Whether you prefer simple fall designs or more complex patterns, this guide will walk you through the most coveted looks of the season, showing you how to achieve salon-quality results right at home.
13 Best Fall Nail Designs for 2026 You Must Try This April
Get ready to discover your next favorite manicure. This curated list features the 13 best fall nail designs that are defining the 2026 season. We’ve gathered everything from minimalist and elegant looks perfect for short natural nails to bold, glamorous styles for those who love to stand out. Each design is broken down with a “What You Need” list and a “How to Create” tutorial, making these trendy fall colors and patterns accessible for every skill level. You’ll find inspiration for cozy plaid patterns, rich burgundy ombre, and even advanced techniques like aura nails and the mesmerizing cat eye effect. Let’s dive into the ultimate guide for your perfect autumn manicure.
1. Cozy Velvet Fall Nails

Pin this plush velvet nail design to your ‘Fall Mani Inspo’ board!
The velvet fall nails trend offers a unique textured finish that looks and feels incredibly luxurious. This cozy nail art is often created using a special magnetic gel polish that results in a deep, plush effect reminiscent of soft fabric, making it a design that perfectly complements cozy sweaters and warm autumnal outfits.
What You Need
- Magnetic gel polish in a rich fall shade like bordeaux or deep plum
- Strong magnet tool for velvet effect
- Gel base coat and non-wipe top coat
- UV/LED nail lamp
- Nail file and buffer
- Cuticle oil
How to Create
- Prepare nails by filing, buffing, and applying cuticle oil, then pushing back cuticles.
- Apply a thin layer of gel base coat and cure under UV/LED lamp.
- Paint a thin layer of magnetic gel polish, but do not cure yet.
- Immediately hold the magnet tool over the wet polish for 10-15 seconds to create the velvet magnetic texture.
- Cure the magnetic gel polish under the lamp.
- Seal the design with a non-wipe top coat and cure for the final glossy or matte finish.
- Finish with a generous application of cuticle oil for nail health.
Pro-Tip: For the most dramatic velvet effect, use two coats of magnetic gel polish, applying the magnet after each coat. This also enhances the 3D nail art illusion and depth of color.

2. Chic Pumpkin Spice Chrome Nails

Save this dazzling chrome nail art for a trendy autumn manicure!
Pumpkin spice chrome nails offer a modern twist on classic trendy fall colors. Using a fine chrome powder, you can create a stunning metallic, high-shimmer finish over a warm base. This look is a cornerstone of popular fall manicure trends, especially on elegant coffin nails.
What You Need
- Gel polish in a warm base color (e.g., orange or light brown)
- Pumpkin spice chrome powder
- Non-wipe gel top coat
- UV/LED nail lamp
- Chrome applicator (silicone brush or eyeshadow applicator)
- Nail buffer
- Cuticle oil
How to Create
- Prepare nails as usual, then apply gel base coat and cure.
- Paint two thin coats of your chosen base color, curing each layer.
- Apply a non-wipe gel top coat and cure for only 30-40 seconds (it should still feel slightly tacky). This is crucial for chrome adhesion.
- Using the chrome applicator, buff a small amount of pumpkin spice chrome powder onto the nail surface until a smooth, mirror-like finish is achieved.
- Brush off any excess powder with a soft brush.
- Seal the chrome design with another layer of non-wipe gel top coat and cure thoroughly.
- Finish by moisturizing cuticles with oil.
Pro-Tip: The key to flawless chrome is a perfectly cured, slightly tacky non-wipe top coat layer. Experiment with curing times to find the optimal tackiness for your lamp and polish, which significantly enhances the chrome’s metallic effect.

3. Elegant Matte Espresso Nails

Pin this sophisticated matte espresso look for timeless fall nail style!
Nothing says elegant fall manicures quite like a deep, rich color with a modern finish. The espresso shade provides one of the most popular dark moody fall nail colors, and when paired with a matte top coat, it enhances its sophistication. This look is effortlessly chic, especially on classic square nails.
What You Need
- Nail polish in a rich espresso brown shade
- Matte top coat
- Base coat
- Nail file and buffer
- Nail polish remover
- Cuticle oil
How to Create
- Prepare nails by shaping them into square nails and gently buffing the surface.
- Apply a base coat to protect nails and prevent staining, then let it dry completely.
- Paint two thin, even coats of the espresso nail polish, allowing each coat to dry fully to avoid streaks.
- Once the color is completely dry, apply a generous layer of matte top coat, ensuring even coverage.
- Allow the matte top coat to dry completely until the glossy shine transforms into a smooth, velvety matte finish.
- Finish with cuticle oil to keep surrounding skin hydrated, as matte finishes can sometimes emphasize dryness.
Pro-Tip: To achieve an ultra-smooth matte finish that enhances the deep espresso color, ensure your nails are well-buffed before applying polish. A high-performance matte top coat will also provide better durable wear and prevent chipping.

4. Modern Abstract Fall Foliage Nails

Capture the beauty of fall foliage with this artistic nail design!
This modern abstract take on fall leaf art is perfect for those who want a creative yet sophisticated manicure. The design features a free-flowing pattern using a classic palette of burnt orange and brown, which embodies the quintessential autumnal aesthetic. It’s a stunning look that pairs beautifully with elegant almond-shaped nails.
What You Need
- Base coat
- Neutral nail polish (e.g., beige or nude)
- Nail polishes in burnt orange, deep brown, and golden yellow
- Fine nail art brush or dotting tool
- Top coat
- Nail polish remover with acetone
- Cuticle oil
How to Create
- Prepare nails and apply a base coat.
- Paint two coats of the neutral nail polish and allow to dry completely.
- Using the fine nail art brush, create abstract leaf shapes or swirls with the burnt orange polish. Don’t aim for perfection; imperfection adds to the abstract charm.
- Before the orange dries completely, layer small strokes of deep brown and golden yellow over and around the orange shapes to blend and create depth.
- Continue to design several abstract leaf patterns on each nail, varying the sizes and shapes.
- Once the fall leaf art is dry, seal the design with a glossy top coat for long-lasting wear.
- Finish by hydrating cuticles with oil.
Pro-Tip: For a truly modern abstract look, focus on irregular shapes and varying stroke lengths rather than perfect leaf outlines. This technique enhances the artistic flow and embodies the natural randomness of fall foliage.

5. Glamorous Deep Plum Aura Nails

Pin this ethereal plum aura nail design for ultimate fall nail art elegance!
Aura nails are one of the most talked-about advanced nail art techniques, and they take on a glamorous new life for fall. This design features a soft gradient effect, using deep plum as the base color, which highlights a central glowing orb of a lighter shade. The combination of plum + silver or a lighter plum helps to create an ethereal, sophisticated look, especially on dramatic stiletto nails.
What You Need
- Gel base coat
- Gel polish in deep plum and a lighter, shimmering plum or silver shade for the aura
- Non-wipe gel top coat
- UV/LED nail lamp
- Small sponge, eyeshadow applicator, or mini airbrush machine
- Detail nail art brush
- Cuticle oil
How to Create
- Prepare nails and apply a gel base coat, then cure.
- Paint two coats of the deep plum gel polish, curing each layer. This creates the solid outer color.
- On a small palette, place a small amount of the lighter shimmering gel polish. Using a sponge or airbrush, gently dot or spray a small circle of the lighter color onto the center of each nail, blending outwards to create the glowing aura effect.
- For a softer blend, lightly dab the edges of the aura with a clean, dry sponge.
- Cure the aura design thoroughly.
- Seal the entire design with a non-wipe gel top coat and cure for a glossy, durable finish.
- Finish with cuticle oil to enhance nail health.
Pro-Tip: The key to a striking aura effect is the contrast between your base color and the inner glow. Using a lighter, shimmering shade for the aura enhances its radiance and creates a more glamorous, otherworldly look.

6. Classic Tortoise Shell Nails

Pin this timeless tortoise shell nail design for an effortlessly elegant fall manicure!
The tortoise shell pattern is a timeless and classic fall nails design that never goes out of style. It’s characterized by its translucent layers of amber, mahogany, and black, which embodies a deeply sophisticated autumnal aesthetic. The depth and dimension of this pattern make it a perennial favorite.
What You Need
- Gel base coat
- Sheer gel polishes in amber, light brown, and dark brown/black
- Non-wipe gel top coat
- UV/LED nail lamp
- Fine detail nail art brush
- Dotting tool
- Cuticle oil
How to Create
- Prepare nails and apply a gel base coat, then cure.
- Paint one thin layer of sheer amber gel polish and cure. This forms the base of your tortoise shell.
- On a palette, mix small drops of sheer light brown and dark brown/black gel polish. Using the detail brush, dot and drag irregular blobs of these mixed colors onto the nail, creating a mottled pattern over the amber base. Don’t cover the entire nail.
- Immediately apply a second thin layer of the sheer amber gel polish over the mottled pattern and cure. This blends and layers the colors, creating the translucent tortoise shell effect.
- Repeat steps 3 and 4 once or twice more, building up layers until you achieve the desired depth and pattern. Remember to cure after each amber layer.
- Seal the design with a non-wipe gel top coat and cure thoroughly for a shiny, durable finish.
- Finish with cuticle oil to maintain nail health.
Pro-Tip: The key to authentic tortoise shell nails is translucency and layering. Using sheer gel polishes allows light to pass through, creating a multidimensional effect that truly embodies the classic look.

7. Minimalist Negative Space Fall Leaves

Pin this subtle yet stylish negative space design for minimalist fall nail ideas!
For those who love elegant fall manicures, the negative space technique applied to fall leaf art offers a chic and understated option. This minimalist approach highlights the natural nail, creating a modern aesthetic that perfectly suits short natural nails. It’s one of the best simple fall nail designs for short nails.
What You Need
- Base coat
- Clear nail polish or a sheer nude polish
- Nail polish in a subtle fall color like deep olive green or muted gold
- Fine detail nail art brush
- Top coat
- Nail polish remover
- Cuticle oil
How to Create
- Prepare nails and apply a base coat. If desired, paint one coat of sheer nude polish for an even base and let dry.
- Using the fine detail brush and your chosen fall color, carefully draw the outline of small fall leaves on different parts of each nail. The key is to leave the center of the leaf unpainted, creating the negative space effect.
- Vary the size and placement of the leaves for an organic, minimalist look.
- Allow the painted outlines to dry completely.
- Seal the design with a glossy top coat for protection and shine.
- Finish with cuticle oil to maintain healthy cuticles.
Pro-Tip: For crisp negative space lines, ensure your brush isn’t overloaded with polish and use a light hand. A quick-drying polish enhances precision and prevents smudging, crucial for minimalist designs.

8. Cozy Plaid Fall Nails

Pin this charming plaid nail art for true cozy autumn vibes!
Nothing embodies the feeling of sweater weather quite like plaid nails. This design features classic intersecting lines, often in a color palette of burgundy, navy, and cream, which perfectly complements your favorite cozy sweaters. Learning how to do plaid nails is a great way to master a quintessential fall aesthetic.
What You Need
- Base coat
- Nail polishes in a base color (e.g., cream) and two contrasting fall colors (e.g., burgundy and navy)
- Fine striping brush or nail art striping tape
- Top coat
- Nail polish remover
- Cuticle oil
How to Create
- Prepare nails and apply a base coat.
- Paint two coats of the cream base color and let dry completely.
- Using the fine striping brush and burgundy polish, paint thin vertical lines down the nail. Space them evenly. Let them dry.
- Next, with the same burgundy polish, paint thin horizontal lines across the nail, intersecting the vertical lines. Let them dry.
- Repeat steps 3 and 4 with the navy polish, making slightly thinner lines or placing them strategically to create the layered plaid effect.
- Alternatively, if using striping tape: apply tape to create lines after the base color, paint over, remove tape carefully, and repeat with different colors.
- Once all lines are dry, seal the plaid design with a generous layer of top coat for durability and shine.
- Finish with cuticle oil.
Pro-Tip: For the most authentic plaid look that complements your cozy sweaters, ensure the base color is completely dry before painting the lines. Using striping tape can help achieve perfectly crisp, symmetrical lines for a salon-quality finish.

9. Rich Burgundy Ombre Nails

Pin this elegant burgundy ombre for a sophisticated fall manicure!
Ombre nails are a timeless technique that features a seamless gradient of colors. For fall, a rich burgundy ombre that transitions from dark to light helps to create an incredibly sophisticated and moody fall nail design. This look can also incorporate burgundy + gold for an even more luxurious feel on a graceful almond shape.
What You Need
- Base coat
- Two gel polishes in burgundy shades (one darker, one lighter) or a deep burgundy and a gold accent
- Small makeup sponge or ombre brush
- UV/LED nail lamp
- Non-wipe top coat
- Nail polish remover (for cleanup)
- Cuticle oil
How to Create
- Prepare nails and apply a base coat, then cure.
- Paint two coats of the darker burgundy shade on your entire nail and cure each layer.
- On a small palette, paint a stripe of the darker burgundy and immediately adjacent to it, a stripe of the lighter burgundy or gold.
- Gently dab the makeup sponge onto the two stripes to pick up both colors, ensuring a slight overlap.
- Lightly dab the sponge onto your nail, starting from the tip and working towards the middle, or from the cuticle area. Continue to dab until you achieve a smooth gradient effect.
- Cure the ombre layer. Repeat steps 3-5 for a second ombre layer to intensify the colors and blend.
- Seal with a non-wipe top coat and cure thoroughly for a shiny, durable finish.
- Finish with cuticle oil for hydrated nail health.
Pro-Tip: For a seamless ombre that truly transforms your nails, ensure your sponge is slightly damp with polish remover (not wet) before dabbing. This helps blend the colors more naturally and prevents harsh lines.

10. Sparkling Gold Leaf Accent Nails

Pin these gorgeous gold leaf nails for a touch of fall sparkle!
Adding gold leaf flakes is a simple way to create a sparkling and luxurious fall nail design. This glitter element enhances a deep base color like emerald + gold, creating an effortlessly elegant fall manicures. An accent nail with gold leaf is the perfect way to add a touch of glamour without being overwhelming.
What You Need
- Base coat
- Nail polish in a deep fall color (e.g., emerald green or navy blue)
- Gold leaf flakes (nail art grade)
- Gel or regular top coat
- Tweezers or a wax pencil (for picking up gold leaf)
- Small nail art brush (for placement)
- Cuticle oil
How to Create
- Prepare nails and apply a base coat.
- Paint two coats of your chosen fall color and allow them to dry completely.
- While the last color coat is still slightly tacky (for regular polish) or after a thin layer of sticky gel base coat (for gel), use tweezers or a wax pencil to carefully pick up small pieces of gold leaf flakes.
- Place the gold leaf onto your accent nails in a random or concentrated pattern. Use the small nail art brush to gently press the flakes flat onto the nail surface.
- Once the gold leaf is securely applied, seal the entire nail with a generous layer of top coat. For gel, cure the gel top coat. Ensure the top coat covers all edges of the gold leaf to prevent chipping.
- Finish with cuticle oil.
Pro-Tip: To truly enhance the sparkling effect and prevent chipping, float a generous amount of top coat over the gold leaf without dragging the brush too much. This seals the delicate flakes effectively for a durable, long-lasting finish.

11. Hailey Bieber-Inspired Glazed Donut Fall Nails

Pin this iconic glazed donut nail trend for your fall aesthetic!
The viral glazed donut nails phenomenon gets a seasonal update. This Hailey Bieber-inspired look is created by layering an iridescent chrome powder over a sheer, milky base. The technique transforms a simple manicure into a trendy, shimmering fall aesthetic that is both subtle and eye-catching.
What You Need
- Gel base coat
- Sheer, milky beige or pink gel polish (for the “donut” base)
- Iridescent white chrome powder
- Non-wipe gel top coat
- UV/LED nail lamp
- Chrome applicator tool
- Cuticle oil
How to Create
- Prepare nails and apply a gel base coat, then cure.
- Paint one to two thin coats of the sheer, milky beige gel polish, curing each layer. This forms the “donut” base.
- Apply a non-wipe gel top coat and cure for 30-40 seconds (it should still be slightly tacky).
- Using the chrome applicator, gently buff the iridescent white chrome powder onto the tacky surface until a smooth, pearlescent glazed donut effect is achieved.
- Brush off any excess powder.
- Seal the entire nail with another layer of non-wipe gel top coat and cure thoroughly to protect the chrome.
- Finish with cuticle oil for hydrated cuticles and a healthy shine.
Pro-Tip: The secret to the perfect glazed donut effect is the tackiness of the non-wipe top coat before applying the chrome powder. Too wet, and it streaks; too dry, and it won’t adhere. Experiment to find the sweet spot with your lamp for a flawless shimmer.

12. Dark & Moody Cat Eye Nails

Pin this edgy cat eye nail art for an unforgettable moody fall manicure!
For a dark, moody, and utterly glamorous look, the cat eye effect is unmatched. This advanced technique is created using magnetic gel polish, which features a shimmering, light-reflecting line that moves as you tilt your nails. It transforms a simple dark base into a mesmerizing and dynamic fall nail design, perfect for edgy stiletto nails.
What You Need
- Gel base coat
- Magnetic gel polish in a dark, moody fall color (e.g., deep green, black, or dark purple)
- Strong magnet tool (single line or dual-head)
- Non-wipe gel top coat
- UV/LED nail lamp
- Cuticle oil
How to Create
- Prepare nails and apply a gel base coat, then cure.
- Paint one thin layer of the magnetic gel polish and cure. This creates your base color.
- Apply a second, slightly thicker layer of the magnetic gel polish, but do not cure yet.
- Immediately hold the magnet tool very close to the nail surface (without touching) for 10-20 seconds. Angle the magnet to create your desired cat eye line (e.g., diagonal, vertical, or curved). The magnetic particles will shift.
- Once the cat eye effect is visible, cure the nail thoroughly under the UV/LED lamp.
- Seal the design with a non-wipe gel top coat and cure for a glossy, long-lasting finish.
- Finish with cuticle oil for nail health.
Pro-Tip: For the most dramatic cat eye effect that truly transforms your nails, use a very strong magnet and hold it perfectly still. Experiment with different magnet angles to create various looks and enhance the moody depth.

13. Sweet Caramel Ombre Nails

Pin this delicious caramel ombre for your next fall nail art look!
The caramel ombre design features a soft gradient of warm brown and orange tones, perfectly embodying a cozy and inviting autumnal aesthetic. This delicious-looking manicure is ideal for those who love warm, neutral colors and looks particularly stunning on almond-shaped nails.
What You Need
- Gel base coat
- Gel polishes in a warm caramel brown and a creamy nude or light orange shade
- Small makeup sponge or ombre brush
- UV/LED nail lamp
- Non-wipe top coat
- Nail polish remover (for cleanup)
- Cuticle oil
How to Create
- Prepare nails and apply a gel base coat, then cure.
- Paint two coats of the caramel brown gel polish on your entire nail and cure each layer.
- On a small palette, paint a stripe of the caramel brown and immediately adjacent to it, a stripe of the creamy nude gel polish.
- Gently dab the makeup sponge onto the two stripes to pick up both colors, ensuring a slight overlap.
- Lightly dab the sponge onto your nail, focusing on the area where you want the colors to blend, creating a smooth gradient from the caramel to the nude.
- Cure the ombre layer. Repeat steps 3-5 for a second ombre layer to intensify the colors and blend.
- Seal with a non-wipe top coat and cure thoroughly for a shiny, durable finish.
- Finish with cuticle oil for hydrated nail health.
Pro-Tip: To achieve that perfectly sweet caramel ombre that truly blends seamlessly, apply a thin layer of base coat or clear polish before dabbing your second ombre layer. This helps the sponge glide and create a softer gradient.

Key Takeaways
- Embrace the 2026 Fall Color Palette: Focus on warm, earthy, and moody tones like burgundy, espresso, burnt orange, and deep plum for truly autumnal nail colors.
- Master Trendy Finishes: Experiment with velvet (magnetic gel), chrome (powder for metallic sheen), and matte (top coat) to elevate your fall nail art 2025.
- DIY is Achievable: Many best fall nail designs, from simple fall designs for short nails to intricate plaid patterns and ombre, can be created at home with the right tools and techniques.
- Don’t Forget Nail Health: Always prepare your nails properly with a good base coat and finish with cuticle oil to protect and maintain long-lasting manicures and prevent chipping.
- Advanced Techniques Add Edge: Incorporate elements like negative space, aura nails, or cat eye effect to demonstrate topical authority advanced and create unique, head-turning fall nail styles.
- Seasonal Styling is Key: Coordinate your fall nail designs with cozy sweaters and fall outfits for a cohesive and sophisticated autumn aesthetic.
People Also Ask About Fall Nail Designs
What are the best fall nail designs for 2026?
The best fall nail designs for 2026 blend classic autumnal motifs with modern trends, featuring rich, earthy color palettes and innovative finishes. Popular choices include cozy velvet textures, shimmering chrome accents in shades like pumpkin spice, elegant matte espresso, and sophisticated abstract fall foliage. Trends also lean towards minimalist negative space designs and the enduring allure of classic tortoise shell or deep plum aura nails.
How to do fall nail designs at home for beginners?
Beginners can achieve stunning fall nail designs at home by starting with simple techniques like solid matte colors, easy negative space outlines, or applying nail decals for autumn leaves. Focus on thorough nail prep, thin polish coats, and a good top coat for longevity. Practice gradient effects with a sponge for ombre or use striping tape for clean plaid patterns, gradually building up your skill set.
What nail colors are in for fall 2026?
For fall 2026, popular nail colors include deep burgundies, warm caramel browns, rich forest greens, and sophisticated espresso shades. Metallics like bronze and gold, alongside creamy nudes and muted oranges (think pumpkin spice), are also highly trending. The emphasis is on cozy, inviting hues that complement the changing season and reflect a moody fall aesthetic.
Is plum a good fall nail color?
Yes, plum is an excellent fall nail color, embodying a sophisticated and deep hue that perfectly captures the moody elegance of the autumn season. It pairs beautifully with both gold and silver accents and can be incorporated into various designs, from solid polished looks to glamorous aura nails or subtle ombre effects, making it a versatile and trendy choice.
How to make fall leaf nail art?
To make fall leaf nail art, apply a base color, then use a fine detail brush and autumn-toned polishes (like burnt orange, deep brown, and golden yellow) to paint abstract leaf shapes. For a simpler approach, use fall leaf nail decals. Ensure each layer dries completely and seal the design with a durable top coat for a smooth, long-lasting finish that protects your art.
What are some fall nails with sparkles?
Fall nails with sparkles often incorporate fine glitter top coats over deep fall colors, or feature delicate gold or silver leaf accents for a touch of glamour. Chrome powders also offer a sparkling metallic finish, such as pumpkin spice chrome. Rhinestones or subtle shimmer polishes in autumnal shades like ruby or emerald can further elevate the sparkling effect, creating festive and elegant fall manicures.
Can you do fall nails on short nails?
Absolutely, many fall nail designs are perfectly suited for short nails, with minimalist and simple designs being particularly effective. Think elegant matte finishes, delicate negative space leaf outlines, subtle ombre gradients, or single-color manicures in rich fall hues. Short nails can still showcase trendy patterns like tiny plaid or sophisticated chrome effects beautifully.
What is the best matte top coat for fall?
The best matte top coat for fall is a high-performance, non-yellowing formula that provides a smooth, velvety finish and is durable enough to prevent chipping and peeling. Look for brands known for their streak-free application and long-lasting wear. A quality matte top coat will enhance the moody depth of your fall nail designs, particularly for dark colors like espresso.
How to transition summer nails to fall?
To transition summer nails to fall, gradually shift from bright, vibrant colors to deeper, muted, and earthy tones. Start by swapping neons for pastels, then move to warmer neutrals, and finally embrace the rich burgundies, browns, and greens. Incorporate subtle seasonal elements like abstract leaves or a touch of gold sparkle to bridge the gap between seasons effortlessly.
What are minimalist fall nail ideas?
Minimalist fall nail ideas focus on understated elegance, utilizing neutral base colors with subtle autumnal accents. Think sheer nudes with delicate single-line designs, negative space leaf outlines, small dot patterns in fall colors, or a single accent nail with a simple metallic stripe. The key is clean lines, muted tones, and thoughtful placement that complements a sophisticated aesthetic.
Final Thoughts on Fall Nail Designs
As we wrap up our expert guide to the 13 best fall nail designs for 2026, it’s clear that this season offers a vibrant palette of possibilities. From the luxurious depth of cozy velvet fall nails to the shimmering elegance of pumpkin spice chrome nails, and the sophisticated simplicity of elegant matte espresso, there’s a fall nail design to suit every taste and occasion. We’ve explored how to create these autumnal nail ideas at home, leveraging proven methods and high-performance products to ensure salon-quality results.
Remember, the true beauty of fall nail art 2025 lies in its versatility. Whether you’re drawn to minimalist negative space for an understated charm or the bold statement of dark & moody cat eye nails, each design transforms your manicure into a seasonal masterpiece. By embracing the right tools, techniques, and the rich fall nail colors we’ve highlighted, you can confidently design your way through April and beyond, constantly updating your fall aesthetic nails with ease and expertise.
Which of these fall nail designs are you most excited to try this April? Share your favorites in the comments below
Last update on 2026-04-06 / Affiliate links / Images from Amazon Product Advertising API