Are you tired of standard single-tone hair? Choosing a new look is exciting, but figuring out hair color ideas two colors can feel overwhelming. You want a fresh style without risking patchy results or a clashing mess.
Two-Tone Hair: The best two hair colors are ones that either complement or contrast each other effectively based on the color wheel. For a bold, high-contrast look, choose opposite colors like blue and orange. For a more subtle, harmonious look, select analogous colors that are next to each other, such as blue and purple. Always consider your skin’s undertone—cool, warm, or neutral—to ensure the final blend enhances your natural features.
Drawing from established color theory expert principles and verified professional techniques, this guide breaks down everything you need. Two-tone hair involves the simultaneous application of two distinct shades for a completely custom aesthetic. You will discover exactly how to choose, section, and apply these stunning blends safely. Get ready to transform your look with absolute confidence today.
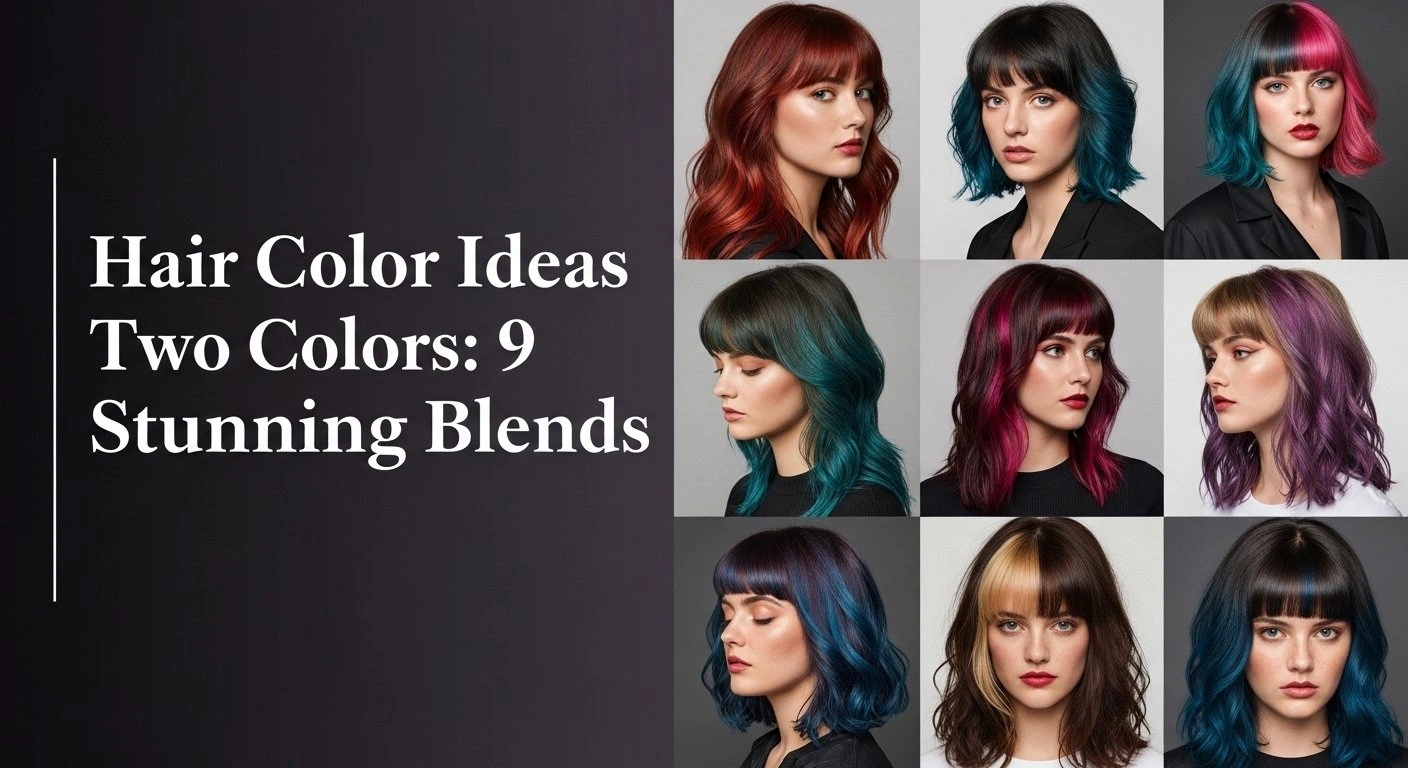
What Two Hair Colors Look Good Together? Your Ultimate Guide to Stunning Blends
Two color hair combinations require a basic understanding of color theory to truly shine. Selecting the perfect pair isn’t just about picking your favorite shades; it involves knowing how those hues interact with your natural skin undertones and eye color. Whether you want a subtle transition or a high-contrast shock of color, mapping your choices on the color wheel prevents clashing and guarantees a flattering result.
This professional approach helps you avoid common mistakes like color bleeding while ensuring your new style looks intentional and perfectly balanced. The secret to a beautiful dual-tone look lies in deciding whether you want to complement or contrast your base color. Let’s explore how to match colors effectively for your next stunning dual-tone transformation. Have you ever tried a color combination that surprised you? Share it below!
Hair Color Ideas Two Colors: 9 Stunning Blends You Need to Try in 2026
The best two-toned hairstyles combine artistic vision with precise application. Transitioning from a single shade to dual tone hair color opens up a world of creative possibilities. From hidden panels to bold face-framing streaks, these nine techniques map out exactly how to achieve your dream look.
Each method requires specific sectioning and processing steps to prevent damage and ensure vibrant, lasting results. Whether you are aiming for a trendy Y2K aesthetic or a modern color melt, mastering the application process is essential for salon-quality success. Let’s dive into these vibrant blends and explore the tools you need to recreate them at home.
1. Master the Bold Half and Half Hair Color Look

Pin this dramatic split dye idea to your ‘Bold Hair’ board!
The Classic Split Dye: A half and half hair color parts your hair perfectly down the middle, dyeing each side a completely different, high-contrast shade. This dramatic look requires meticulous central partitioning to ensure the two colors never mix.
Creating split dye hair is the ultimate statement in modern hair fashion. This high-contrast aesthetic often pairs a vivid shade with a neutral one, like a striking blue + purple mix or black and platinum. The success of this style relies entirely on precise sectioning and strict adherence to safety protocols when dealing with different oxidative dyes.
Products & Tools Used
- Color 1: A high-pigment semi-permanent dye (e.g., Arctic Fox Poseidon Blue)
- Color 2: A platinum blonde toner or a contrasting semi-permanent dye (e.g., Manic Panic Virgin Snow)
- 30 Volume developer and hair bleach powder (if lightening is needed)
- Barrier cream (like Vaseline) to protect your hairline
- Precise pintail comb for sectioning
- 4-6 strong sectioning clips
- Two separate mixing bowls and dye brushes
- Gloves and a protective cape
Application/Styling Steps
- Start with clean, dry hair. Use the pintail comb to create a perfectly straight, crisp center part from your forehead to the nape of your neck.
- Securely clip one half of your hair away. This entire half will be for Color 1.
- Apply barrier cream along your hairline, ears, and neck on the side you’ll be working on first.
- If needed, carefully apply bleach to the first section, ensuring not to cross the center part. Process according to instructions, then rinse, wash, and dry completely before dyeing.
- Mix Color 1. Starting at the roots, begin saturating the first half of your hair. Ensure every strand is covered right up to the part line, but not over it.
- Clip the fully saturated side up and out of the way. Carefully clean your gloves and tools.
- Repeat steps 3-5 on the second half of your hair with Color 2.
- Process both sides according to the dye instructions. When rinsing, use cold water and tilt your head so the water runs off one side at a time, preventing colors from mixing.
Pro-Tip: To prevent color bleeding during the first few washes, always wash with cold water and consider co-washing (using conditioner only) to gently cleanse without stripping the vibrant pigments.

2. Create Subtle Peek-a-Boo Hair Color

Save this hidden hair color idea for your next salon visit!
Subtle Peek-a-Boo Color: Peek-a-boo hair applies a vibrant or pastel dye to the bottom layer of your hair, keeping it hidden beneath your natural top layer. This creates a fun surprise of color that only shows when your hair moves or is styled up.
Peek-a-Boo hair color is an ingenious form of color layering that contrasts with a natural top layer. This technique provides the perfect solution for a subtle two tone hair color for brunettes who want a pop of hidden color without committing to a full-head transformation. Using stylist recommended sectioning ensures the top layer falls seamlessly over the hidden panel for a professional result.
Products & Tools Used
- Base Color: Your natural hair color or a dark dye
- Peek-a-Boo Color: A vibrant or pastel dye (e.g., lavender, teal, or rose gold)
- Bleach kit (if your hair is dark)
- Hair foil to isolate the bottom section
- Multiple sectioning clips
- Dye brush and mixing bowl
- Color-safe shampoo and conditioner
Application/Styling Steps
- Identify where you want the hidden panel. A common placement is the bottom third of your hair.
- Create a clean, horizontal part from ear to ear across the back of your head. Clip the entire top section of your hair securely on top of your head.
- The loose hair underneath the part is your peek-a-boo section. Place a piece of hair foil underneath this section to protect the hair above it.
- If needed, apply bleach only to this bottom section. Let it process, then rinse, wash, and dry this section completely.
- Mix your chosen peek-a-boo color and fully saturate the lightened bottom section.
- Fold the foil up and around the section to keep it separate while it processes.
- After processing, rinse the colored section carefully with cold water, trying to keep it separate from the top hair.
- Wash and condition with a sulfate-free shampoo to protect the new color from fading.
Pro-Tip: The key to perfect peek-a-boo color is the lift and deposit process. Ensure the bottom section is lightened to the correct level (usually a pale yellow for pastels) to allow the underlying pigments to be neutralized for a true-to-tone result.

3. Apply Bright Face-Framing Money Piece Highlights

Pin this look for an instant face-brightening effect!
Face-Framing Money Piece: Money piece highlights isolate the front two tendrils of your hair to apply a much lighter color, instantly brightening your face. This modern alternative to traditional chunky highlights requires precise foiling right at the hairline.
Applying money piece highlights is an excellent way to achieve a face-framing glow without coloring your entire head. This two tone balayage technique highlights your facial features beautifully. A cosmetologist approved tip is to adjust the thickness of the money piece based on your face shape, ensuring it perfectly complements your natural structure.
Products & Tools Used
- A high-quality hair bleach kit
- Toner to neutralize brassiness (e.g., Wella T18)
- 20 Volume developer
- Hair foil
- A small, precise dye brush
- Sectioning clips
- A hydrating deep conditioner or hair mask
Application/Styling Steps
- Start with dry, unwashed hair. Part your hair where you normally wear it.
- On one side of your part, take a thin vertical section of hair right at your hairline, from the part down to your ear. The thickness can range from 1/2 inch to 2 inches, depending on how bold you want the look.
- Clip the rest of your hair back and away from this section.
- Place a piece of foil under the section. Mix your bleach and developer.
- Using the dye brush, fully saturate the section on the foil, from root to tip.
- Fold the foil carefully to enclose the hair.
- Repeat the exact same process on the other side of your part, ensuring the section is the same size for symmetry.
- Check the hair every 5-10 minutes until it reaches a pale yellow. Rinse thoroughly, then apply toner to achieve your desired shade of blonde and neutralize unwanted yellow tones.
- Finish with a deep conditioning treatment to restore moisture.
Pro-Tip: The angle of your painting matters. For a softer, more blended look similar to two tone balayage, slightly feather the bleach upwards near the root instead of applying it in a harsh line. This helps with a more graceful grow-out.

4. Rock the Edgy Skunk Stripe Hair

Dare to be different! Pin this bold skunk stripe inspiration.
Edgy Skunk Stripe Hair: A skunk stripe isolates a specific section of hair, like the bangs or crown, to create a high-contrast platinum block against a dark base. This intense color blocking technique delivers a striking, alternative aesthetic.
Skunk stripe hair is a fearless nod to early 2000s counter-culture, often utilizing a black + red or platinum and black palette. Sometimes referred to affectionately as Cruella hair dye style, this method requires extreme care to prevent overlapping bleach on pre-lightened hair during touch-ups, which is crucial for damage prevention.
Products & Tools Used
- Base Color: A rich black or dark brown permanent dye
- Stripe Color: A powerful hair bleach kit and a white/platinum toner
- Hair foil
- A precise dye brush
- Sectioning clips
- Gloves and cape
Application/Styling Steps
- Decide on the placement and size of your stripe. Common placements are a thick money piece, the bangs area, or a block on one side of the crown.
- Carefully section out the hair you intend to be the stripe. Use clips to secure all other hair tightly out of the way.
- Place foil underneath and around the stripe section to create a protective barrier.
- Mix and apply bleach meticulously to only the hair within the foil packet. Ensure it is fully saturated.
- Fold the foil to keep the bleach contained and allow it to process. Check frequently.
- Once lifted to a very light blonde, rinse the stripe section only, avoiding the rest of the hair.
- Apply your toner to the bleached section to achieve the final crisp white or platinum color.
- If you are coloring the rest of your hair black, do this after the stripe is finished and rinsed, carefully avoiding the newly lightened section.
Pro-Tip: Your hair’s porosity levels will be very high after bleaching. This means it will absorb color very quickly. When toning, watch it like a hawk—it may only need 5 minutes to go from yellow to the perfect platinum. Leaving it too long could result in a grey or purple tint.

5. Perfect Trendy Dip-Dyed Ends

Add a pop of color! Pin this cute dip dye idea.
Trendy Dip-Dyed Ends: Dip-dyeing applies a contrasting color solely to the bottom tips of your hair, creating a playful, two-tone finish. Using a teasing brush helps blend the transition, avoiding a harsh horizontal line for a more professional look.
Creating dip dyed ends is a fantastic temporary two tone hair color ideas option that transitions to a different color effortlessly. Unlike a harsh, blocky dye job, employing a color melting technique at the boundary line enables a smooth gradient. A stylist recommended method is to adjust the height of the dip dye based on your hair length to achieve the most flattering proportions.
Products & Tools Used
- Your chosen color for the ends (works great with bold or pastel semi-permanent dyes)
- Bleach kit (if your ends need to be lightened first)
- A teasing brush
- Gloves
- Dye brush and bowl
- Hair foil (optional, for neatness)
Application/Styling Steps
- Decide how high you want the color to go. Section your hair into 4-6 manageable ponytails, secured with elastics where you want the color to start.
- If you need to lighten the ends, apply bleach from the elastics down to the tips.
- Once lightened and dry, prepare your color. For a soft, blended transition, take one section and use the teasing brush to gently backcomb the hair right at the elastic.
- Apply your color to the hair below the teased section. The teasing creates an uneven surface, which results in a soft, melted transition rather than a hard line.
- Repeat for all sections.
- Allow the color to process according to the instructions.
- Rinse the ends with cold water until it runs clear.
Pro-Tip: For a true color melting technique, after applying the main color to the ends, mix a little of the color with conditioner and apply it just above the first application line, feathering it upwards. This creates a third, lighter shade that perfects the gradient.

6. Style Dimensional Underlights Hair

The perfect hidden color! Pin this underlights idea for a surprise pop.
Dimensional Underlights: Underlights involve coloring the entire bottom half of your head while leaving the top layer your natural shade. This creates massive dimension and contrast, especially when you wear your hair in a half-up style.
When comparing peek-a-boo vs underlights, underlights hair covers a significantly larger area, often encompassing the entire lower hemisphere of the head. This serves as an incredible two color hair dye for dark hair, especially when paired with cool jewel tones that complement dark ash brown bases. Color theory experts highly recommend this pairing for maximum visual impact.
Products & Tools Used
- A bold semi-permanent color (jewel tones like emerald, sapphire, or ruby work well)
- A powerful hair bleach kit
- At least 4-6 large sectioning clips
- Hair foil
- Dye brush and bowl
- A color-depositing conditioner for maintenance
Application/Styling Steps
- Create a clean part that separates the top half of your hair from the bottom half. A good guide is to part from the top of your ears, going around the crown of your head.
- Twist the entire top section of hair into a tight bun and clip it securely out of the way. This section will remain your natural color.
- The loose hair at the bottom is your target section. If your hair is dark, you will need to lighten this entire bottom half.
- Working in smaller sub-sections, apply bleach from root to tip throughout the bottom layer. Use foil if it helps keep the application clean.
- Process, rinse, and dry the bleached section completely.
- Apply your chosen vibrant color to the entire lightened bottom layer, ensuring full saturation.
- Let it process, then rinse carefully with cold water, keeping the top bun out of the water stream to prevent any dye staining.
Pro-Tip: The difference between peek-a-boo vs underlights is often about scale. Peek-a-boo can be a small, hidden panel, while underlights typically refers to coloring the entire bottom half/third of your hair for a more dramatic, dimensional effect when styled in updos.

7. Achieve a Modern Reverse Ombré

Flip the script! Pin this unique reverse ombré style.
Modern Reverse Ombré: A reverse ombré flips the traditional gradient, starting with light platinum roots that seamlessly transition into dark charcoal or black ends. This requires careful upward blending to ensure a flawless, melted gradient.
The reverse ombré is a visually striking form of gradient hair that requires a masterfully executed color melting technique. Unlike traditional ombre, this transitions to a deeper shade at the tips. Understanding the molecular weight of dye is crucial here—semi-permanent direct dyes used on the dark ends have larger molecules and must be applied carefully to avoid accidentally staining the pre-lightened blonde sections.
Products & Tools Used
- Light Color for Roots: A permanent platinum or light blonde dye
- Dark Color for Ends: A dark semi-permanent dye (e.g., dark brown, black, or navy)
- Gloves
- A clean, dry dye brush for blending
- Dye brush and bowl for application
Application/Styling Steps
- This style works best on hair that is already fully lightened to a platinum or light blonde level. If your hair is dark, this is a multi-step process that should ideally start with a professional stylist.
- Assuming your hair is already light, section it into 4 quadrants.
- Apply your dark semi-permanent color to the ends, working your way up to the mid-lengths. Decide where you want the transition to happen.
- Apply the color heavily on the ends, and more sparsely as you move up.
- Take your clean, dry blending brush and use vertical strokes to “pull” the dark color upwards into the blonde, softening the line of demarcation. This creates the dual-chromatic gradient.
- Work quickly and methodically through all sections.
- Process according to the dark dye’s instructions. Rinse with cold water.
Pro-Tip: To ensure a flawless blend, have a friend help with the back sections. The key to a good reverse ombré is a consistent transition point all the way around your head. Mark your desired transition point on a dry section of hair with a small clip before you start.

8. Recreate Y2K Chunky Highlights

The 2000s are back! Pin this Y2K chunky highlights look.
Y2K Chunky Highlights: Chunky highlights weave thick, 1-inch to 2-inch ribbons of blonde through a darker base for a boldly striped, retro finish. Unlike modern micro-weaves, this style embraces thick, highly visible contrast.
Riding the wave of resurrected Y2K fashion, chunky highlights offer a nostalgic yet trendy approach to two-tone coloring. When questioning modern vs Y2K styles, the primary distinction lies in the deliberate, thick weave that creates a striped effect rather than a sun-kissed blend. Stylist recommended placement focuses on mirroring your specific hair cut to ensure the chunky ribbons fall perfectly around your face.
Products & Tools Used
- A home highlighting or hair bleach kit
- Toner if you are aiming for a specific blonde shade
- Hair foil cut into long strips
- A weaving comb (pintail comb)
- Sectioning clips
Application/Styling Steps
- Section your hair into the classic 4 quadrants.
- Start in a front quadrant. Take a horizontal slice of hair about 2 inches thick.
- Using the tail of your comb, “weave” it through the slice, picking up about a 1-inch section of hair and leaving the rest. The hair you picked up will be your highlight.
- Place a foil underneath the woven section, right up to the scalp.
- Apply your bleach to this hair, fully saturating it on the foil.
- Fold the foil neatly.
- Drop down about 1-2 inches and repeat the process, creating another highlight. Continue this pattern through all four quadrants.
- Process until the desired lightness is achieved, then rinse, tone, and condition.
Pro-Tip: The key difference between modern vs Y2K styles is the weave. For modern balayage, you’d use a fine micro-weave. For this look, embrace the chunkiness! The sections you weave should be thick and clearly defined for that authentic retro feel.

9. Design an Artistic Asymmetrical Color Block

For the truly bold. Pin this artistic hair color statement!
Artistic Asymmetrical Color Block: An asymmetrical color block uses bold dye to accentuate a specific geometric haircut, like coloring just one long sweeping bang. This avant-garde style relies entirely on the architectural lines of your specific cut.
If you are searching for what are unique hair colors to try, look no further than an artistic color block. This method coordinates beautifully with asymmetrical hair to enhance its sharp lines. Because this level of precision color mapping is entirely customized to your unique haircut, it is often best executed by a professional stylist to ensure flawless salon quality results.
Products & Tools Used
- Your natural base color
- A bold, artistic color of your choice
- Bleach kit if needed
- A very small, precise art brush or detail dye brush
- Barrier cream
- Sectioning clips
Application/Styling Steps
- This technique is entirely dependent on your haircut. The goal is to use color to highlight a specific feature.
- For example, if you have an undercut, section off the longer top hair and clip it away. Apply the bold color only to the short, buzzed section.
- If you have an asymmetrical bob, section off the longer side and color it, leaving the shorter side natural.
- For sweeping bangs, use clips and foil to precisely isolate the entire bang section from the rest of your hair before applying your bold color.
- The key is extremely precise sectioning. Use barrier cream on your scalp along the part lines to prevent the bold color from staining your skin and creating a messy line.
- Apply bleach (if needed) and color only to your chosen, isolated section.
- Rinse the colored section separately to prevent any bleeding.
Pro-Tip: Before you start, use white chalk or a temporary color spray to draw the lines of your intended color block on your hair. This lets you visualize the final result and adjust the shape and placement before committing to permanent dye, a technique used by salon quality professionals.

Key Takeaways: Your Quick Guide to Hair Color Ideas Two Colors
Understanding the nuances of a dual tone hair color overview helps you make the best styling decisions. Whether you are aiming for vivid high-contrast or a soft gradient, knowing the core rules of application and maintenance is crucial. Review these main takeaways to ensure your coloring process is smooth, safe, and stunning.
- Choose Your Technique Wisely: Styles range from bold Split Dye Hair to subtle Peek-a-Boo Hair Color. Decide if you want a high-impact or low-commitment look before you start.
- Sectioning is Everything: The success of any two-toned hairstyles depends on clean, precise parting. Use a pintail comb and strong clips to keep your two colors completely separate during application.
- Prevent Color Bleeding with Cold Water: Always rinse your hair with cold water, especially after the initial application. This helps seal the hair cuticles and minimizes color running and fading.
- Lighten Safely: Most vibrant two color hair combinations require bleaching first. To minimize hair damage, don’t overlap bleach on previously lightened hair and always follow up with a deep conditioning treatment.
- Placement Enhances Your Features: Techniques like Money Piece Highlights are designed to brighten your face, while artistic color blocks can accentuate a unique haircut. Use color placement strategically.
- Invest in Color-Safe Products: To maintain your new look, use sulfate-free shampoo and color-depositing conditioners. This will protect your investment and keep colors vibrant.
People Also Ask About Hair Color Ideas Two Colors
Even after reviewing stunning visual galleries, you might still have questions about two tone hair application and maintenance. From preventing hair dye from bleeding to hiding vibrant colors for work, we have compiled answers to your most pressing concerns. Let’s dive into the specifics of caring for your new look.
How do you dye hair two colors without them bleeding?
The best method is to work in two completely separate stages and always rinse with cold water. First, apply bleach and/or color to one section, letting it fully process. Then, rinse that section carefully while keeping the other section dry and clipped away. Only after the first section is done should you begin the process on the second. Using hair foil or plastic wrap to create a barrier between the sections is a crucial professional formulation technique.
What is split dye hair?
Split dye, also known as half and half hair color, is a style where the hair is parted down the middle and each half is dyed a different, often contrasting, color. This creates a bold, symmetrical look. Popular combinations include black and white (Cruella hair dye), black and red, or pastel pairings like pink and blue. It is one of the most dramatic two tone hair ideas.
Is two tone hair in style for 2026?
Yes, two-tone hair is very much in style for 2026, with a focus on bold, intentional placements. While subtle balayage remains popular, high-contrast styles like the money piece, skunk stripe hair, and peek-a-boo hair color are major trends. They have evolved from simple highlights into more artistic and personalized statements.
How do you maintain two tone hair?
Maintenance requires using a sulfate-free, color-safe shampoo and washing with cool water to prevent fading. For styles with a very light color next to a very dark one, consider washing each section separately for the first few washes. Using a color-depositing conditioner or mask weekly can also help refresh the vibrancy of one or both of the shades between salon visits.
What is the difference between highlights and two tone hair?
Highlights are typically thin, woven strands of lighter color designed to blend in and create a natural, sun-kissed look. Two tone hair, on the other hand, involves coloring larger, distinct sections of hair in two different shades. The goal is often a deliberate, noticeable contrast rather than a subtle, natural blend.
Can I dye my hair two colors without bleach?
Yes, but your options will be limited to colors darker than your current hair. If you have naturally light hair, you can apply two different dark semi-permanent dyes without bleach. However, if you have dark hair and want a vibrant or lighter second color (like pink, blue, or blonde), you will absolutely need to use hair bleach on that section first to lift the existing pigment.
What are the best two color combos for brown hair?
For a subtle look, caramel, auburn, or honey blonde are excellent choices that create a warm, dimensional effect. For a bold, high-contrast look on brown hair, vibrant colors like deep red, sapphire blue, or emerald green peek-a-boo sections are very popular. A blonde money piece is also a classic and flattering option for brunettes.
How do you section hair for two colors?
The key is to create crisp, clean part lines using a pintail comb and secure the sections with strong clips. For a split dye, create a perfect center part. For underlights, create a horizontal part from ear to ear. For money pieces, create two vertical parts at the front hairline. Always keep the hair you aren’t working on tightly clipped and out of the way.
What is peek-a-boo hair color?
Peek-a-boo hair is a technique where a panel of color is applied to a hidden, underlying section of hair. The color is not visible when the hair is worn down naturally but is revealed—or “peeks out”—when the hair moves, is styled, or is put in an updo. It’s a great option for a more professional-looking two tone hair idea that can be hidden for work.
How long does two tone hair last?
The longevity depends on the type of dye used. Permanent colors will last until they grow out, requiring root touch-ups every 4-8 weeks. Semi-permanent vibrant colors, which are often used for the second tone, will fade over time and typically last anywhere from 4 to 20 washes, depending on the brand, shade, and how you care for your hair.
Final Thoughts on Your Two-Color Hair Journey
Embracing a two color hair dye style is a fantastic way to showcase your unique personality and creativity. Whether you choose an edgy split dye or subtle underlights, proper technique and strict adherence to safety protocols make all the difference in achieving breathtaking results.
Your journey into dual-tone coloring empowers you to break free from standard aesthetics. With the right tools and a solid understanding of color matching, you can confidently craft a style that turns heads. Start planning your custom combination today, and don’t be afraid to experiment with your look. Which stunning blend will you try for your next big hair transformation? Let us know in the comments below!
Last update on 2026-04-27 / Affiliate links / Images from Amazon Product Advertising API