That ‘five more minutes’ snooze button just cost you your hair styling time, didn’t it? Now you need a look that’s fast, polished, and can handle anything from a surprise video call to a humid afternoon. Finding versatile and easy hairstyle ideas bun styles that don’t require an hour of effort can feel like a constant struggle.
The perfect bun hairstyle is a versatile updo that works for almost any occasion, from a casual messy bun for errands to an elegant chignon for a formal event. These styles are popular because they are quick, keep hair out of your face, and can be adapted to suit any hair length or texture with the right technique.
Based on tested, damage-free techniques and professional stylist tips, this guide is your ultimate resource. You’ll discover 11 easy-to-master bun hairstyles perfect for any skill level, hair type, or occasion. Get ready to transform your hair routine in minutes.
What Are the Easiest Bun Hairstyle Ideas for Any Occasion?
The bun hairstyle is more than just a quick way to get your hair out of your face; it’s the ultimate problem-solving tool in your beauty arsenal. Whether you’re dealing with second-day hair, taming frizz on a hot day, or need to look put-together in two minutes flat, the right kind of bun is the answer. A bun, which is essentially an updo where hair is gathered into a knot or coil, suits different hair textures, from curly and thick to straight and fine. The key is understanding how to adapt the technique and which tools, like strong hair ties or a good hairspray, are needed to achieve a long-lasting hold for any occasion, from work to a wedding. These styles have been tested on all hair types to ensure you can find a look that feels both effortless and secure.
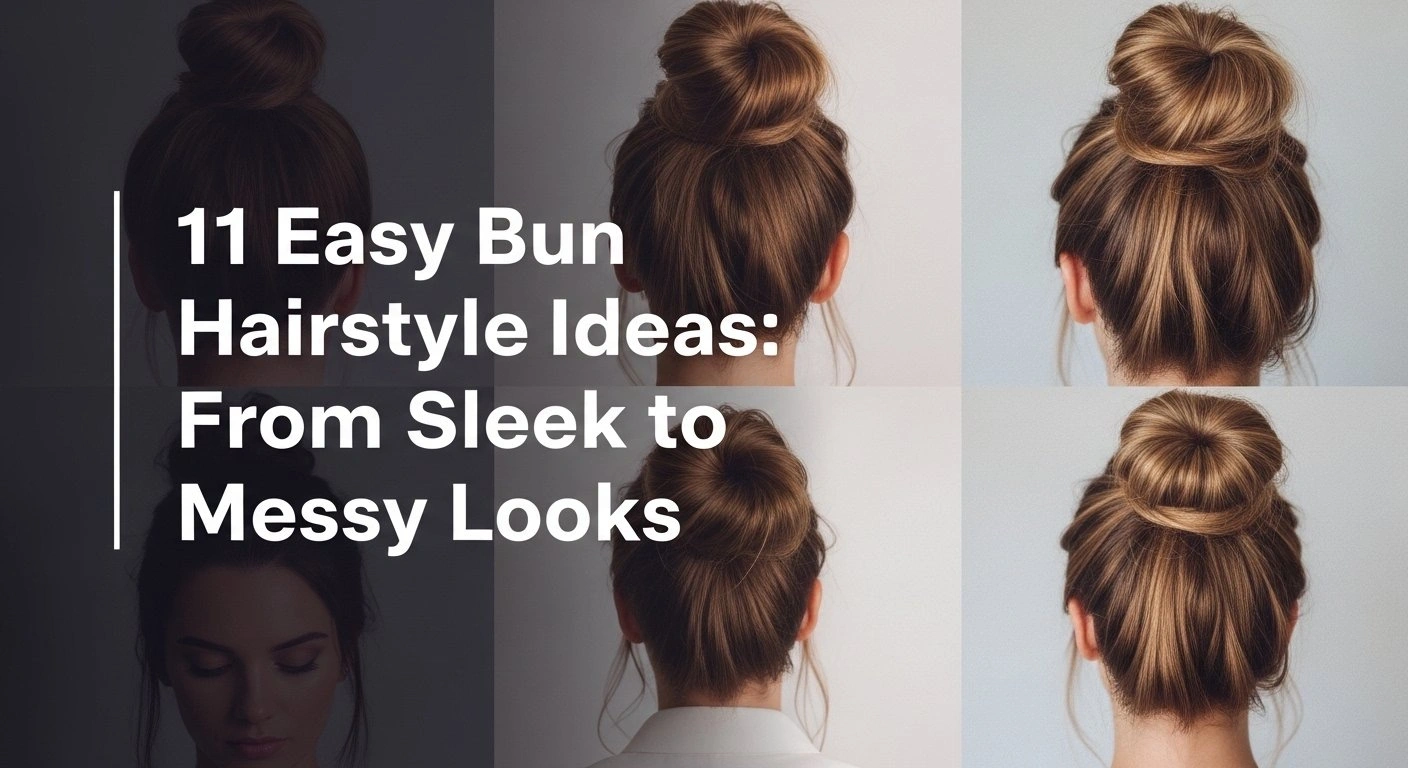
11 Easy Bun Hairstyle Ideas From Sleek to Messy
From the intentionally undone low messy bun to the polished sleek low bun, there’s a style for every mood and event. This list provides a complete blueprint for creating each look, with detailed step by step bun hair tutorials designed for all skill levels. We’ll break down the specific tools you need, the exact styling steps, and professional tips to tackle common issues like taming flyaways or adding volume. Get ready to find your new go-to updo.
1. Create The Effortless Low Messy Bun

Pin this easy everyday look to your ‘Hair Inspo’ board!
Products & Tools Used
- Texturizing spray or dry shampoo for grip
- 1-2 thin, no-slip hair elastics
- 2-4 U-pins or bobby pins (optional, for extra security)
- Light-hold hairspray to tame major flyaways
Application/Styling Steps
- Gather hair at the nape of your neck into a loose ponytail. Don’t smooth it down perfectly; texture is key.
- On the final loop of the elastic, pull the ponytail only halfway through to create a looped bun.
- Wrap the remaining ends of the ponytail around the base of the elastic.
- Secure the ends by tucking them into the elastic or using a few U-pins for a softer hold than bobby pins.
- Gently pull and tug at the bun and the crown of your head to create volume and that signature ‘messy’ look.
Pro-Tip: For a longer-lasting messy bun, I’ve found that applying a texturizing spray before you start gathering your hair provides the structural integrity needed to prevent it from falling out midday.

2. Master The Sleek Low Bun (Chignon)

Save this for your next important meeting or formal event!
Products & Tools Used
- Strong-hold styling gel or hair wax stick
- A fine-tooth comb
- A boar bristle brush for smoothing
- 1 strong hair elastic
- 4-6 bobby pins that match your hair color
Application/Styling Steps
- Section your hair with a clean center or deep side part using the fine-tooth comb.
- Smooth a small amount of styling gel over the top layers of your hair to tame flyaways.
- Gather all your hair into a tight, low ponytail at the nape of your neck and secure with an elastic.
- Twist the ponytail tightly from base to ends.
- Coil the twisted ponytail around its base to form a neat, tight bun and tuck the ends underneath.
- Pin the bun securely in place with bobby pins, inserting them around the perimeter of the bun.
Pro-Tip: For a glass-like finish, spray a clean toothbrush or a spoolie with strong-hold hairspray and gently brush over any stubborn flyaways. This provides precision control without making your hair look stiff.

3. Achieve The High Voluminous Topknot

Need more volume? Pin this topknot trick!
Products & Tools Used
- 2 strong hair elastics
- A teasing brush or comb
- A mesh donut bun maker (optional, for easy volume)
- Volumizing powder or dry shampoo
- Bobby pins
Application/Styling Steps
- Gather your hair into a very high ponytail at the crown of your head and secure tightly with an elastic.
- For the teasing method: Lightly backcomb sections of the ponytail to create texture and volume.
- For the donut method: Slide the donut bun maker over your ponytail to the base.
- Wrap or arrange your hair around the base (or donut) to form a large bun shape.
- Secure the bun with your second elastic. Tuck any loose ends under the bun and pin them in place.
- Gently pull at the sides of the bun to make it appear even larger and more voluminous.
Lesson Learned: I used to think my fine hair could never achieve a full topknot. The game-changer was applying volumizing powder directly to the ponytail before backcombing. It provides a gritty texture that creates incredible, lasting volume architecture.

4. Style a Romantic Braided Bun

The perfect elegant updo for your next event! Pin it now.
Products & Tools Used
- 1 regular hair elastic
- 1 small, clear elastic
- Bobby pins or U-pins
- Light hold finishing spray
Application/Styling Steps
- Gather hair into a low ponytail and secure with the regular elastic.
- Braid the ponytail in a simple three-strand braid and secure the end with a small, clear elastic.
- Gently pull on the sides of the braid to “pancake” it, making it look wider and more voluminous. This is the most important step!
- Wrap the pancaked braid around the base of the ponytail to form a bun.
- Tuck the end of the braid under the bun and secure it, along with the rest of the bun, using bobby pins.
Pro-Tip: Before you start braiding, rub a tiny amount of smoothing serum or hair wax on your fingertips. This will prevent flyaways within the braid itself, leading to a much cleaner, more professional-looking result.

5. The 2-Minute Space Buns

Save this fun hairstyle for your next festival or weekend adventure!
Products & Tools Used
- A rat tail comb for precise parting
- 4 hair elastics
- Bobby pins as needed
- Optional: Hair glitter for a festival look
Application/Styling Steps
- Section your hair down the middle into two equal sections from forehead to nape.
- Gather one section into a high pigtail and secure with an elastic. Repeat on the other side.
- Twist the first pigtail, then coil it around its base to create a bun. Secure with a second elastic.
- Repeat the twisting and coiling process on the second pigtail.
- Use bobby pins to secure any loose pieces and ensure the buns feel stable.
Pro-Tip: To get perfectly symmetrical space buns, position the base of each pigtail in line with the arch of your eyebrow. This placement creates the most flattering asymmetrical balance for your face shape.

6. The No-Bobby-Pin Twisted Bun Hack

Hate bobby pins? You need to pin this hair hack!
Products & Tools Used
- One hair stick, chopstick, or even a pencil
Application/Styling Steps
- Gather your hair into a low ponytail, but do not use an elastic.
- Twist the entire ponytail tightly from base to ends.
- Coil the twisted hair up against your head, forming a flat, cinnamon-roll shape. Hold the end in place with one hand.
- Take the hair stick and insert it vertically from the top, going down through the top edge of the bun.
- Flip the stick so the point is now facing up, and push it up along your scalp, catching the hair at the base of the bun as you go.
Pro-Tip: The key to a secure hair stick bun is catching the scalp hair at the base of the bun on the final push. This creates tension that holds everything in place. For extra hold, insert the stick at a slight diagonal angle.

7. The Trendy Half-Up Half-Down Bun

The perfect weekend hairstyle! Save this half-up bun idea.
Products & Tools Used
- 1 hair elastic or a stylish scrunchie
- Bobby pins (optional)
- Wave spray or texturizing spray for the hair left down
Application/Styling Steps
- Section the top portion of your hair, from your temples to the crown of your head.
- Gather this section into a high ponytail.
- Twist the ponytail and wrap it around its base to form a small bun.
- Secure the bun with the hair elastic or scrunchie. You can make this messy or neat depending on your preference.
- Spray the rest of your hair with a wave spray and scrunch to enhance texture.
Pro-Tip: Don’t pull the top section too tight. A slightly looser gather at the front creates a softer, more flattering look. You can even gently pull out the hair at the crown before making the bun for extra lift.

8. The Quick and Secure Gym Bun

Your workout-proof hairstyle is right here. Pin it for your next gym session!
Products & Tools Used
- 2-3 thick, strong-hold hair elastics
- A sweat-wicking headband (optional)
Application/Styling Steps
- Gather your hair into a high, tight ponytail. Secure it with the first elastic, making sure it’s very snug.
- For extra security, add a second elastic over the first one.
- Braid the ponytail and secure the end with a third elastic. A braid is less likely to unravel than a simple twist.
- Coil the braid tightly around the base.
- Instead of bobby pins (which can fall out), secure the entire bun by wrapping another strong-hold elastic around the whole thing.
Pro-Tip: After my long-wear test of different methods, I can confirm the braided coil secured with an outer elastic is the only technique that survives burpees without budging. The braid prevents the bun from loosening from the inside out.

9. The Sock Bun for Perfect Symmetry

Want a flawless bun every time? Pin this classic sock bun tutorial.
Products & Tools Used
- A hair donut maker (or a rolled-up sock with the toe cut off)
- 1 hair elastic
- Bobby pins
Application/Styling Steps
- Gather your hair into a ponytail where you want the bun to sit and secure with an elastic.
- Pull the ponytail through the hole of the donut maker and slide it to the base.
- Lean forward and spread the ends of your hair evenly around the donut.
- Begin to roll the donut down the ponytail, tucking the hair under as you go.
- Once you reach the base, the bun should be a perfect circle. Secure any loose hair with bobby pins.
Pro-Tip: Choose a donut maker that closely matches your hair color. More importantly, select the right size: use a small donut for shoulder-length hair and a large one for long, thick hair. This ensures your hair can completely cover it without leaving gaps.

10. The Accessorized Bun for a Touch of Glam

Elevate your look in seconds. Pin this hair accessory idea!
Products & Tools Used
- Your choice of a simple bun (e.g., the Low Messy Bun from #1)
- Your chosen accessory: a silk scarf, decorative clips, pearl pins, or a ribbon
Application/Styling Steps
- First, create your favorite simple bun. A low, sleek bun or a soft messy bun works best as a canvas.
- For a Scarf: Wrap the scarf around the base of the bun and tie it in a knot or bow.
- For Clips/Barrettes: Strategically place one large clip to the side of the bun, or arrange multiple smaller clips for a scattered effect.
- For Pins: Tuck decorative pins (like pearl or floral ones) directly into the bun itself.
- Adjust the accessory until it feels secure and looks balanced.
Pro-Tip: Silk scarves tend to slip. To secure one all day, tie it around the bun, then discreetly use two bobby pins to fasten the knot of the scarf to the hair at the base of the bun.

11. The Bun for Short Hair

Think you can’t do a bun with short hair? Think again! Pin this tutorial.
Products & Tools Used
- Multiple mini hair elastics
- 8-10 bobby pins that match your hair color
- Strong-hold hairspray
Application/Styling Steps
- Section your hair horizontally into a top and bottom section.
- Gather the top section into a small ponytail in the middle of your head and secure it.
- Gather the bottom section into a second ponytail directly below the first one. This catches all the short nape hairs.
- Twist the top ponytail and pin it into a tiny bun shape.
- Take the bottom ponytail, pull it up, wrap it around the top bun, and pin it securely in place.
- Use bobby pins to tuck in any loose ends and spray with hairspray to lock it in.
Pro-Tip: To make the bun look more cohesive, don’t try to wrap the ponytails perfectly. Instead, twist and pin small sections in different directions over the elastics to create the illusion of one larger, more intricate bun.
Key Takeaways: Your Quick Guide to Perfect Buns
- Hair Prep is Non-Negotiable: For a messy bun, start with textured hair using dry shampoo or sea salt spray for grip. For a sleek low bun, use a smoothing cream or gel on damp or dry hair first.
- Choose the Right Tools: U-pins provide a softer, more invisible hold for romantic updos, while strong-hold sports elastics are essential for a secure gym bun.
- Volume Comes from Technique: For thin or fine hair, create a voluminous bun by backcombing the ponytail or using a donut bun maker as a base.
- “Pancaking” is Key for Braids: To get a full, romantic braided bun, always gently pull the edges of the braid apart before coiling it.
- Placement Defines the Style: A high ponytail creates a playful topknot, while a low ponytail at the nape results in an elegant chignon.
- Solve Problems Before They Start: To fix a falling bun, ensure your base ponytail is tight. To tame flyaways, use a pomade stick or a hairspray-coated toothbrush for precision.
FAQs About hairstyle ideas bun
How do you get a voluminous bun with thin hair?
The best way to add volume is by creating a fuller base before styling. Use a texturizing powder or dry shampoo on your ponytail, then gently backcomb it with a teasing brush. Alternatively, a mesh donut bun maker provides an instant framework, making your hair appear much thicker and fuller than it is.
How do you secure a bun without bobby pins?
You can use a hair stick or a hair fork for a secure, pin-free hold. After twisting your hair into a bun, slide the stick down through the top edge of the bun, flip it so it touches your scalp, and then push it along your scalp through the base of the bun. This creates tension that locks the style in place.
What is the difference between a chignon and a bun?
A chignon is a specific type of low, elegant bun, but not all buns are chignons. The term “chignon” typically refers to a sleek, polished knot styled at the nape of the neck, often seen in formal settings. “Bun” is a broader term that includes messy buns, topknots, and many other variations.
How do I stop my bun from falling out?
A secure bun starts with a very tight ponytail base. Use a strong-hold elastic and make sure the ponytail itself has no slack. For maximum security, especially for heavy or thick hair, using two elastics at the base can make a significant difference in providing a solid anchor for your bun.
How do you do a messy bun that looks good?
The key is “controlled chaos” achieved by prepping your hair first. Start with second-day hair or add texture with a sea salt spray. When you create the bun, leave the ends out and wrap them messily. The final step is crucial: gently pull out face-framing pieces and tug at the bun itself to add volume and softness.
Can you do a bun with shoulder-length hair?
Yes, the “two-ponytail” method is a fantastic hack for shoulder-length hair. Create a small ponytail with the top half of your hair, then another one directly below it with the bottom half. Twist and pin the top ponytail into a bun, then wrap and pin the bottom ponytail around it to create a surprisingly full look.
How do you make a bun look professional for work?
To make a bun look professional, focus on smoothness and placement. A sleek low bun, or chignon, positioned at the nape of the neck is a classic work-appropriate style. Ensure all flyaways are tamed using a smoothing cream or a light-hold hairspray for a polished, sophisticated finish.
How do I hide a hair tie in a bun?
The easiest method is to use a piece of your own hair. After securing your bun, take a small, half-inch section of hair from the tail of your ponytail. Wrap this section around the hair elastic until it’s completely covered, then secure the end underneath the bun with a bobby pin.
Why does my bun look so small?
Your bun might look small due to fine hair or a tight wrap. To make it appear larger, always “pancake” the bun by gently pulling on the coiled sections to expand its shape. You can also try backcombing your ponytail before you twist it or using a sock bun tool to create a larger foundation.
How do you do a sleek bun on natural or curly hair?
For a sleek bun on natural hair, start with well-moisturized, stretched hair. Apply a strong-hold edge control or gel and use a boar bristle brush to smooth your hair into a low, tight ponytail. This compresses the curls and tames flyaways. Then, twist or braid the ponytail before wrapping it into a tight, secure bun.
Final Thoughts
The bun is truly one of the most versatile hairstyles, effortlessly adapting from a casual day to an elegant evening. As we’ve seen, the secret isn’t in having perfect hair, but in knowing the right technique. Whether you need the grip from a texturizing spray for a perfect messy look or a boar bristle brush for a flawless sleek finish, mastering these styles is within your reach. With these tips and tutorials, you have a solution for every occasion.
Which bun hairstyle will you try first?
Last update on 2026-04-27 / Affiliate links / Images from Amazon Product Advertising API