Are you tired of struggling with flat, lifeless strands that refuse to hold shape? Finding the perfect hairstyle ideas for layered hair often feels frustrating when your locks lack bounce. We understand the daily battle of trying to boost volume effortlessly.
The best way to style layered hair for fullness is by utilizing proper blow-drying techniques, volumizing products, and strategic cuts that lift your roots while enhancing the natural texture of your ends. This involves blow-drying with a round brush, applying volumizing mousse, and choosing dynamic styles. These simple steps prevent your beautiful layers from falling flat.
Drawing from professional stylist advice and proven results, this guide unlocks your haircut’s true potential. You will discover actionable tutorials designed to seamlessly elevate your everyday look. Get ready to transform your limp locks into voluminous masterpieces at home.
How Do You Style Layered Hair To Make It Look Fuller?
The best way to style layered hair for fullness is by using techniques and products that lift the roots and enhance the texture of the ends. If you are battling thin hair that falls flat, the right styling approach changes everything. Layered hair is a foundational cutting technique designed to create movement, but it requires proper management to unlock its full potential.
By incorporating a round brush, volumizing mousse, and a targeted blow-drying routine, you can significantly boost volume. Whether you are rocking a modern wolf cut or a classic butterfly cut, these professional stylist tips offer proven results. We will show you exactly how to transform your everyday look. You do not need to visit a salon to achieve breathtaking, dynamic fullness.
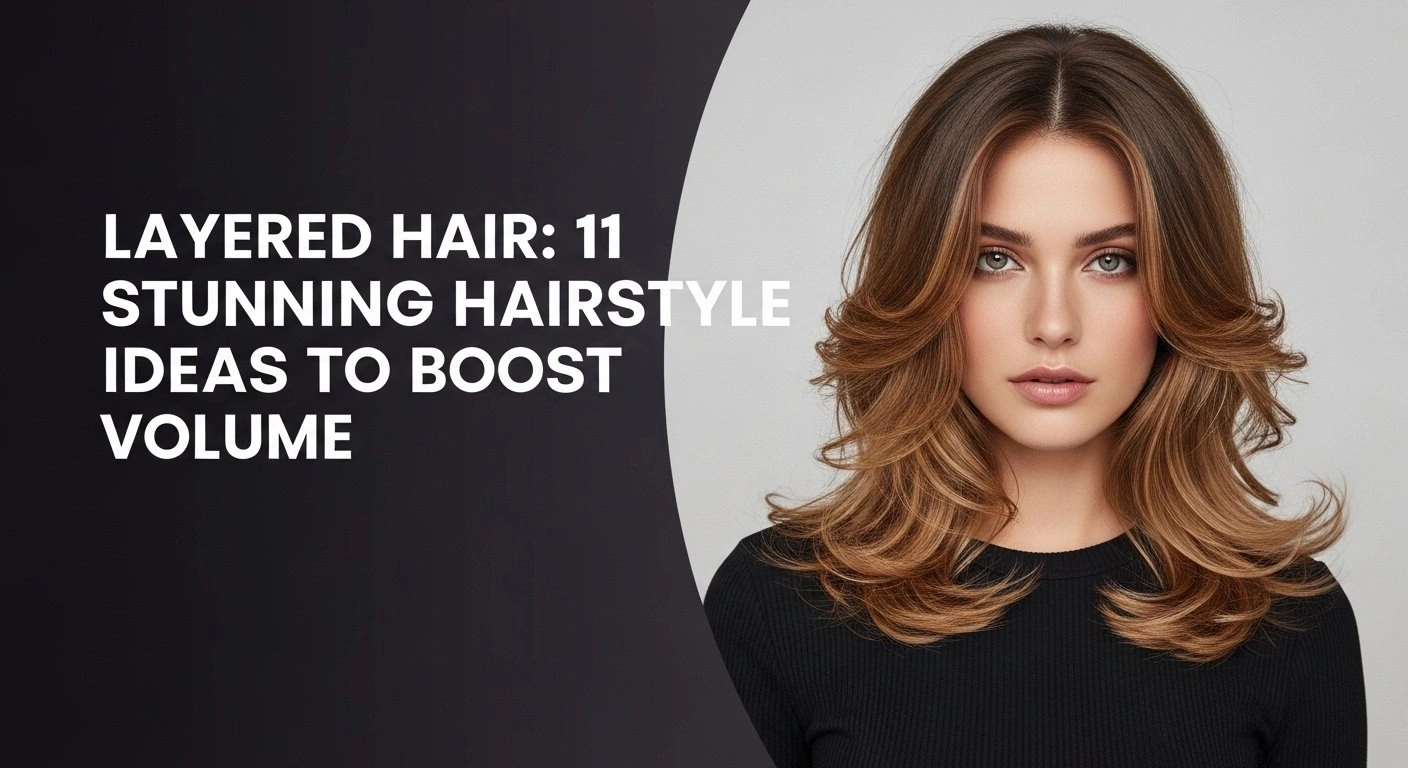
Layered Hair: 11 Stunning Hairstyle Ideas to Boost Volume
Maximizing the potential of your cut means exploring the best layered hairstyles that complement your specific hair type. These 11 stunning looks are carefully curated to add volume to your roots and enhance texture of your lengths. From a bouncy 90s blowout to effortless beach waves, each tutorial provides a complete step-by-step styling guide.
Whether you have short layered haircuts, medium length hair, or long cascading locks, these styles are easy to maintain. Let’s dive into these comprehensive, actionable routines that guarantee gorgeous, salon-quality results right at home.
1. Create a Voluminous 90s Blowout

Pin this classic blowout look to your ‘Hair Goals’ board!
The iconic 90s blowout is the ultimate way to create voluminous hair that turns heads. This timeless style enables movement and provides a beautiful, face-framing effect that highlights your best features. By mastering the round brush technique, you easily lift the roots and curl the ends under. The result is a breathtakingly bouncy finish that lasts for days.
Products & Tools Used
- A powerful blow dryer with a concentrator nozzle
- Volumizing mousse or blowout cream
- A large ceramic round brush (2-3 inches in diameter)
- 3-4 large hair clips for sectioning
- Large velcro hair rollers for setting the style
- A light-hold hairspray for finish
Application/Styling Steps
- Start with damp, towel-dried hair. Apply a golf-ball-sized amount of volumizing mousse from roots to ends.
- Rough-dry your hair with your head flipped upside down until it is about 80% dry to create initial root lift.
- Divide your hair into 3-4 manageable sections using the clips.
- Using the round brush, take a 2-inch wide piece of hair from the first section. Place the brush at the root and aim the blow dryer’s nozzle (pointing downwards) at the brush.
- Pull the brush through the hair with tension, following it with the dryer. As you reach the ends, roll the brush inwards to create that classic bouncy curve.
- For maximum volume, while the hair is still warm, wrap the section around a large velcro roller and secure it.
- Repeat for all sections. Let the rollers cool completely for 10-15 minutes before removing. Gently shake out the curls and finish with a spritz of hairspray.
Pro-Tip: A key master stylist technique is over-direction. When blow-drying the top sections, pull the hair up and forward (over-directing it from its natural fall) to create maximum lift at the crown. This prevents the style from falling flat.

2. Master Effortless Beach Waves

Save this easy wave tutorial for your next vacation look!
Creating beach waves is the perfect way to enhance the dynamic texture of your haircut. This lightweight style effortlessly conceals split ends and beautifully complements a balayage with layers. Using a flat iron gives you precise control when curling layered hair. Leaving the ends straight provides a modern, effortless finish that looks incredibly natural.
Products & Tools Used
- Heat protectant spray
- A 1-inch to 1.25-inch flat iron or curling wand
- Sea salt or texturizing spray
- A wide-tooth comb
- Light-hold finishing spray
Application/Styling Steps
- Start with dry hair. Liberally apply heat protectant spray throughout your strands.
- Section your hair into a top and bottom half.
- Take a 1-2 inch piece of hair from the bottom section. Clamp the flat iron near the root, and as you pull it down, twist your wrist 180 degrees away from your face.
- Hold for a few seconds and then gently slide the iron down the hair shaft, leaving the last 1-2 inches of the ends straight.
- Alternate the direction of the waves (some away from the face, some towards) for a more natural, less uniform look. This is key for beautifully textured results.
- Once all hair is waved, let it cool completely. Then, spritz texturizing spray all over, focusing on the mid-lengths.
- Gently break up the waves with your fingers or a wide-tooth comb. Do not use a brush.
Pro-Tip: To solve the problem of unruly layers control, lightly spray your texturizing spray before you curl. This gives the hair some grit and hold, ensuring the shorter layers form a cohesive wave with the longer pieces instead of sticking out.

3. Style the Trendy Wolf Cut

Pin this edgy Wolf Cut inspiration for your next salon visit!
The wolf cut is an incredibly popular hybrid of the classic shag haircut and a mullet. It relies on heavy layering at the crown to create massive volume and texture. Meanwhile, the thinner, wispy ends reduce weight in thick hair. The key to styling this edgy look is enhancing its natural choppiness with the right texturizing products and embracing your curtain bangs.
Products & Tools Used
- Volumizing mousse or styling foam
- A blow dryer with a diffuser attachment
- Texturizing paste or pomade
- Light-hold hairspray
Application/Styling Steps
- Apply a generous amount of volumizing mousse to damp hair, focusing on the roots and the heavily layered top section.
- Flip your head upside down and use the diffuser on a low speed, high heat setting. Gently scrunch the hair towards the scalp with the diffuser. This motion enhances the natural wave and texture.
- When hair is about 90% dry, flip it back up. Use your fingers to shape the curtain bangs and face-framing pieces.
- Take a pea-sized amount of texturizing paste, warm it between your palms until it is invisible.
- Rake your fingers through the top layers, lifting at the root to create that signature shaggy volume.
- Use the remaining product to pinch and define the ends, emphasizing the choppy, piecey texture.
Pro-Tip: The key to a great look lies in the cut itself. When talking to your stylist, use terms from our topical_authority_advanced list. Ask for “heavy internal layering for volume at the crown” and “soft, slide cutting on the ends” to create that wispy perimeter.
4. Achieve the Elegant Butterfly Cut Blowout

Obsessed with the Butterfly Cut? Pin this styling tutorial now!
The butterfly cut perfectly creates dimension by combining short, face-framing layers with gorgeous long layers. This clever technique preserves length while still providing the sweeping movement of a shorter cut. To style long hair with layers effectively, you must address both the top and bottom tiers. Using a combination of a round brush and a large barrel curling iron yields spectacular, feathered results.
Products & Tools Used
- Volumizing spray or root lifter
- A medium ceramic round brush (1.5-2 inches)
- A large barrel curling iron (1.5-2 inches)
- Large velcro hair rollers
- Shine serum or light hair oil
Application/Styling Steps
- On damp hair, spray a root lifter directly at the scalp.
- Section off the shorter, top layers of the butterfly cut and clip the longer layers away.
- Using the round brush, blow dry the shorter layers, curling them away from the face to create that feathered, bouncy effect. Immediately set these sections in velcro rollers while they cool.
- Unclip the bottom, longer section of hair. Once dry, take large vertical sections and curl them away from the face with the large barrel curling iron. The goal is a soft, sweeping bend, not a tight curl.
- Remove the rollers from the top section.
- Apply a drop of shine serum to your palms and gently run your fingers through all your hair to blend the two sections and tame flyaways. The layers should cascade seamlessly.
Pro-Tip: For salon-quality results, the direction of the curl is everything. Always direct the top, face-framing layers away from the face. For the bottom, you can alternate directions, but keeping them mostly away from the face provides that cohesive, glamorous sweep.

5. Perfect a Chic Half-Up, Half-Down Style

Need an easy, elegant style? Pin this half-up, half-down look!
A chic half-up style provides incredible versatility for managing shorter top pieces while beautifully showcasing your length. This approach easily enables movement in the bottom section while keeping your face clear. Mastering half up half down hairstyles for layered hair solves the problem of hiding short layers that often slip out of traditional ponytails.
Products & Tools Used
- Dry shampoo or texturizing spray
- A teasing comb or brush
- A stylish claw clip, barrette, or clear elastic tie
- Bobby pins that match your hair color
- Light-hold hairspray
Application/Styling Steps
- This style works best on hair that isn’t freshly washed. If your hair is clean, spritz dry shampoo at the roots to add grip and volume.
- Section off the top part of your hair, from your temples to the crown of your head. Clip it out of the way for a moment.
- Take a thin layer of hair at the crown (underneath the section you just made) and gently backcomb or teasing it at the root to create a volumetric base.
- Release the top section and smooth it back over the teased portion.
- Secure the hair with your chosen accessory. For a truly effortless look, use a claw clip. For a more secure hold, use a clear elastic.
- Gently pull on the hair at the crown to loosen it and enhance the volume. This creates a softer, more modern look.
- Use bobby pins to discreetly tuck in any short layers that refuse to stay put.
Pro-Tip: The solution for hiding short layers is all in the sectioning. Instead of a sharp horizontal part, gather the top section with your fingers in a slightly jagged, organic way. This helps the shorter pieces blend in and look intentional.

6. Create a Textured, Voluminous Ponytail

Transform your ponytail from flat to fabulous! Pin this tutorial.
If you struggle with thin hair volume when pulling your hair back, the textured ponytail is your new best friend. This clever double-ponytail trick adds massive volume to the base and body of the style. By utilizing light backcombing and taming flyaways strategically, you easily solve the problem of a skinny, lifeless ponytail.
Products & Tools Used
- Texturizing spray or dry shampoo
- A teasing brush
- Two strong hair ties
- A fine-tooth comb for smoothing
- Finishing hairspray
Application/Styling Steps
- Start by spraying texturizing spray throughout your dry hair to give it grip.
- Part your hair horizontally from ear to ear, creating a top and bottom section. Clip the top section up.
- Create a small, tight ponytail with the bottom section of your hair in the middle of your head.
- Unclip the top section. Use the teasing brush for some light backcombing at the crown to build height.
- Smooth the top layer of hair over the teased section and gather it into a second ponytail directly on top of the first one.
- The hair from the top ponytail will now fall over the bottom one, completely hiding it and creating the illusion of a single, incredibly thick and voluminous ponytail.
- Pull and pancake the ponytail to enhance its fullness. Take a small strand of hair from the underside, wrap it around the hair ties to conceal them, and secure with a bobby pin.
Pro-Tip: This is the ultimate flat hair fix. To make it look even fuller, gently pull the two ponytails apart (one up, one down) to tighten the base and force more lift at the crown. This adds instant, secure volume.

7. Braid Your Layers (Without Them Popping Out)

Finally, a braid for layered hair that actually works! Save this tip.
Braiding easily manages thick hair with layers, but it often creates the frustration of short pieces poking out everywhere. If you want to know how to braid layered hair beautifully, preparation is the key. Using a styling cream before you begin helps anchor the strands, making braided styles for thick layered hair look intentional and romantic rather than messy.
Products & Tools Used
- A light-hold styling cream or pomade
- A clear elastic band
- Bobby pins
- Finishing hairspray
Application/Styling Steps
- The secret to a clean braid with layers is prep. Work a dime-sized amount of styling cream or pomade through your dry hair. This will give the strands grip and help them stick together.
- We recommend a Dutch braid. Start with a section of hair at your hairline and divide it into three equal strands.
- Begin braiding, but instead of crossing the side strands over the middle strand (like a French braid), you will cross them under the middle strand.
- Each time you cross a strand under, add a small new piece of hair from the side to it. Keep the braid tight as you go to lock in the layers.
- Continue braiding down the back of your head until you run out of hair to add, then finish with a regular three-strand braid and secure with an elastic.
- Now for the magic: Gently pull on the outside edges of each braided section, starting from the top. This technique, called pancaking, makes the braid look much thicker and helps tuck in the ends of any layers that did pop out.
Pro-Tip: If you have very choppy layers that still poke out after pancaking, use a bobby pin. Open the pin and slide it inside the braid loop, parallel to the braid itself, to anchor the stray piece from within. It will be completely invisible.

8. The Effortless Top Knot for Layered Hair

Your go-to messy bun, but better. Pin this layered hair hack!
Can you put layered hair in a bun without it falling apart? Absolutely. The top knot is a fantastic quick updo solution, but layers can make the bun look thin or cause pieces to fall out from the nape. The fix involves creating a secure two-step base and using pins strategically to control the shape while taming flyaways.
Products & Tools Used
- Dry shampoo or texture spray
- One strong hair tie
- Several large and small bobby pins
- Strong-hold hairspray
Application/Styling Steps
- For the best result, start with second or third-day hair. Add texture and absorb oil by spraying dry shampoo at the roots.
- Flip your head upside down and gather your hair into a high ponytail, positioned at the crown of your head. Secure it tightly with a hair tie.
- Do not pull the hair all the way through on the last loop. Instead, create a looped bun, leaving the ends of your hair sticking out.
- Now, take those ends and wrap them around the base of the hair tie, tucking them in.
- Use your fingers to gently pull and expand the looped bun, creating a fuller, more undone shape. This is where you get the volume.
- Use large bobby pins to secure the shape of the bun to your head.
- For the shorter layers at the nape of your neck that have fallen out, twist them, pull them up towards the bun, and secure them flat against your head with smaller bobby pins.
- Pull out a few face-framing tendrils around your face and finish with a strong-hold hairspray.
Pro-Tip: To make messy hairstyles for short layered hair look instantly fuller, use two hair ties. After making your initial ponytail, add a second hair tie directly over the first. This props up the base of the ponytail, giving the bun a stronger foundation.

9. Style Your Layers Without Heat (Air-Dry Waves)

Healthy hair is in! Pin this heatless styling method.
Learning how to style layers without heat is essential for maintaining excellent hair integrity. Air-drying perfectly enhances the texture of your hair while protecting it from thermal damage. The secret to this heatless hairstyle ideas for layered hair is using a targeted leave-in conditioner to control flyaways and encourage your natural wave pattern as it dries.
Products & Tools Used
- A gentle, moisturizing leave-in conditioner
- A curl cream or wave-enhancing spray
- A microfiber towel or an old cotton t-shirt
- Two soft hair ties (like scrunchies)
Application/Styling Steps
- After showering, gently squeeze excess water from your hair. Do not rub it with a regular towel, as this causes frizz.
- While your hair is still very damp, apply a leave-in conditioner, followed by a curl or wave cream. Rake it through with your fingers to ensure even distribution.
- Lay a microfiber towel or t-shirt on a flat surface. Flip your hair forward onto the center of the fabric, so it is “plopped” in a pile.
- Wrap the fabric around your head like a turban and let it sit for 15-20 minutes. This absorbs excess water without disrupting your hair’s natural pattern.
- Unwrap your hair. It should be damp, not dripping.
- Part your hair as you normally would and create two loose, three-strand braids. Secure the ends with soft ties that will not create a crease.
- Allow your hair to air dry completely. This can take a few hours. Once fully dry, gently undo the braids and shake out your new heatless waves.
Pro-Tip: The ultimate frizzy layers solution is targeted moisture. If your ends still feel a bit frizzy after air-drying, take a single drop of hair oil, warm it in your palms, and gently scrunch it into the ends only. This will add shine and seal the cuticle.

10. The Modern Shag Style

Embrace your inner rockstar. Pin this modern shag styling guide.
The modernized shag brilliantly uses heavy layering to integrate beautifully with your fringe. It dramatically adds volume to the crown while effectively reducing weight in the ends. Knowing how to style a shaggy layered bob properly ensures it looks intentionally textured, not just messy. Emphasize root-lifting products and finger-styling over perfect brushing to nail this vibe.
Products & Tools Used
- Root lift spray
- A salt spray or texturizing mist
- A hair wax stick or pomade
- A blow dryer with a nozzle
Application/Styling Steps
- On damp hair, spray the root lift spray directly onto the scalp, focusing on the crown area where the shag has its shortest layers.
- Lightly mist the texturizing spray through the mid-lengths and ends.
- Using just your fingers, lift and tousle the roots at the crown while hitting them with a blast of heat from your blow dryer. This creates instant, voluminous texture.
- Direct the airflow of the dryer to shape your fringe into place.
- Once the hair is dry, take a hair wax stick and warm it on the back of your hand.
- Use your fingertips to apply the wax, piecing out and defining the ends of the layers around your face and through the lengths. This creates that shaggy, separated look. Avoid applying wax at the roots.
Pro-Tip: Many stylists use a razor to cut shags because it creates a much softer, more feathered end than scissors. If you love this look, ask your stylist if they are comfortable with razor cut vs scissor cut layers for your next trim to enhance the texture.

11. The Sleek and Polished Look

Proof that layered hair can be sleek too! Save this for a polished look.
Straightening layered hair does not have to result in choppy, disjointed ends. A sleek style beautifully softens harsh cuts and proves the incredible versatility of your cut. By using a flat iron and high-quality shine serum, you create a seamless, blended look. This technique ensures your layers curve softly instead of sticking out awkwardly.
Products & Tools Used
- A high-quality heat protectant spray with anti-frizz properties
- A good quality flat iron (ceramic or titanium)
- A fine-tooth comb
- Anti-frizz shine serum or finishing oil
Application/Styling Steps
- Start with completely dry hair. Apply heat protectant spray from roots to ends.
- Section your hair. The smaller the sections, the sleeker the result will be.
- Take your first section. Run a fine-tooth comb through it, and immediately follow the comb with the flat iron. This is called the “comb chase” method and it ensures a super-smooth finish.
- Pass the flat iron over the section from root to mid-length.
- As you approach the last 2-3 inches of the section, slightly turn your wrist inward, beveling the flat iron. This will make the layers curve under softly instead of sticking straight out.
- Repeat this process for your entire head.
- To finish, dispense 1-2 drops of shine serum into your palms, rub them together, and lightly smooth over the surface of your hair to tame any remaining flyaways.
Pro-Tip: This is the best way of correcting choppy layers if you feel your cut is too harsh. The beveling technique helps blend the layers together visually, creating a softer, more seamless transition between the different lengths.

Key Takeaways: Your Quick Guide to Styling Layered Hair
Reviewing the main points of layered hair summary tips ensures you get the most out of your salon visits. The true magic of any layered style lies in the styling execution, particularly when your goal is to boost volume and manage texture.
Key Takeaways:
- Volume Starts at the Root: The most critical technique for layered hair is lifting the roots. Whether using a round brush, volumizing mousse, or backcombing, you must create height at the scalp to prevent layers from falling flat.
- Product is Not Optional: To achieve a textured, controlled look, products like texturizing spray, styling cream, and mousse are essential. They provide the necessary grit and hold to define layers and fight frizz.
- Embrace Heatless Styling: You do not always need heat to make layers look good. Techniques like braiding damp hair or using plopping methods can enhance your natural texture and are a great flat hair fix while maintaining hair integrity.
- Technique Defines the Style: The same haircut can look completely different based on your styling. A 90s blowout creates bouncy volume, while beach waves provide a shaggy, lived-in feel. Master a few key techniques for ultimate versatility.
- Direction is Everything: When styling, always direct face-framing layers away from the face for the most flattering, modern look. This simple rule elevates any style from amateur to salon-quality.
- Manage, Don’t Fight, Short Layers: For updos and braids, the key is not to eliminate short layers but to manage them. Use styling cream for grip, bobby pins for strays, and pancaking techniques to make them look intentional.
People Also Ask About Hairstyle Ideas for Layered Hair
Clarifying common layered hair queries helps you make informed decisions about your next cut and daily maintenance routine. These expertly answered questions address the most frequent concerns.
Are layers good for thin hair?
Yes, layers are excellent for thin or fine hair as they are a powerful flat hair fix. By removing weight, layers create movement and the illusion of more volume and fullness. The key is getting the right kind of layers; long, soft layers work best to make hair look thicker without sacrificing density.
How do you blow dry layered hair for volume?
The best way to blow dry layered hair for volume is with a round brush, focusing on lifting the roots. Start by rough-drying your hair upside down until it is 80% dry. Then, working in sections, use a ceramic round brush to lift the hair at the root, aiming the blow dryer’s nozzle down the hair shaft to seal the cuticle and add shine.
What is the difference between a Wolf Cut and a Butterfly Cut?
The main difference is the layering pattern and overall shape. The wolf cut is a variation of the shag and mullet, featuring short, choppy layers on top for volume and longer, thinner layers at the bottom. The butterfly cut is less edgy, with shorter, feathered layers concentrated around the face to mimic a bob, while preserving very long layers in the back.
Is layered hair hard to style?
Layered hair is not necessarily hard to style, but it does require some technique. It cannot always be left to air-dry without product if you want a polished look. However, learning a few basic methods, like round-brushing or creating heatless waves, makes styling very manageable and versatile.
How do you curl layered hair so it looks good?
When curling layered hair, it is best to curl away from the face and alternate directions. This creates a more natural, blended look. Also, focus on creating a soft bend in the mid-lengths rather than a tight curl from root to tip, and always leave the last inch or so of the ends straight for a modern finish.
Are layers in style for 2026?
Yes, layers are absolutely in style for 2026 and are considered a timeless technique. Trendy variations like the wolf cut, shag, and butterfly cut are extremely popular right now, proving that layers continue to be the foundation for the most requested modern hairstyles.
How do you hide short layers in an updo?
To hide short layers, prep the hair with a texturizing spray or pomade for grip. When creating an updo like a bun or ponytail, twist and pin any shorter, fallen pieces at the nape of the neck flat against your head with bobby pins. For half-up styles, a well-placed claw clip can be very effective at gathering and holding shorter pieces.
What is the difference between layers and a blunt cut?
Layers involve cutting hair to different lengths throughout the style, while a blunt cut means all hair is cut to a single, straight line. Layers are designed to create texture, movement, and volume. A blunt cut creates a strong, sharp perimeter and gives a look of thickness and density at the ends.
Should I get layers if I have thick hair?
Yes, layers are one of the best solutions for managing thick hair. They are incredibly effective at reducing weight in heavy hair, which can make it more manageable, add movement, and prevent the “triangle” or “bell” shape that thick, one-length hair can sometimes create.
What products are best for layered hair?
The best products for layered hair are those that enhance texture and add volume without weighing it down. Key essentials include a good volumizing mousse for blowouts, a sea salt or texturizing spray for waves, a light-hold pomade or wax for defining ends, and a quality heat protectant.
Final Thoughts on Your Voluminous Layered Hair
Mastering these hairstyle ideas for layered hair proves that incredible volume and texture are entirely achievable at home. Your layered hair is an incredibly versatile canvas, and utilizing the right blowout techniques, products, and heatless methods unlocks its full potential. You no longer need to settle for flat, uninspired styles.
Remember that stunning, salon-grade results come from managing your hair’s natural texture, not fighting it. As professional stylist advice frequently highlights, the right technique transforms any cut into a masterpiece. Experiment with these looks, adjust the product usage to your specific hair type, and enjoy your renewed confidence. Which of these voluminous styles will you try for your next night out?
Last update on 2026-04-27 / Affiliate links / Images from Amazon Product Advertising API