Does your character’s hair look more like a solid plastic helmet than flowing, organic strands? You aren’t alone; struggling with stiff, lifeless hair is one of the most common frustrations when searching for hairstyles art reference material. Every artist faces the challenge of translating complex textures and movement into believable 2D forms, often feeling stuck between over-rendering every strand and creating vague, unconvincing shapes.
Drawing better hair for art involves understanding its underlying structure, movement, and how light interacts with its forms rather than just rendering individual strands. This guide provides a curated approach to using drawing hair reference effectively, moving beyond simple copying to mastering the physics and aesthetics of hair. By focusing on mass before detail and observing natural flow, you can transform flat sketches into dynamic, realistic illustrations.
Drawing from comprehensive analysis of current professional hair drawing methodologies and expert techniques, we have compiled the definitive guide for 2026. In this post, you will discover 11 essential tips that bridge the gap between basic sketching and advanced rendering. Prepare to elevate your character designs with techniques that solve common problem_solution_keywords like stiffness and lack of volume, giving your art the professional polish it deserves.
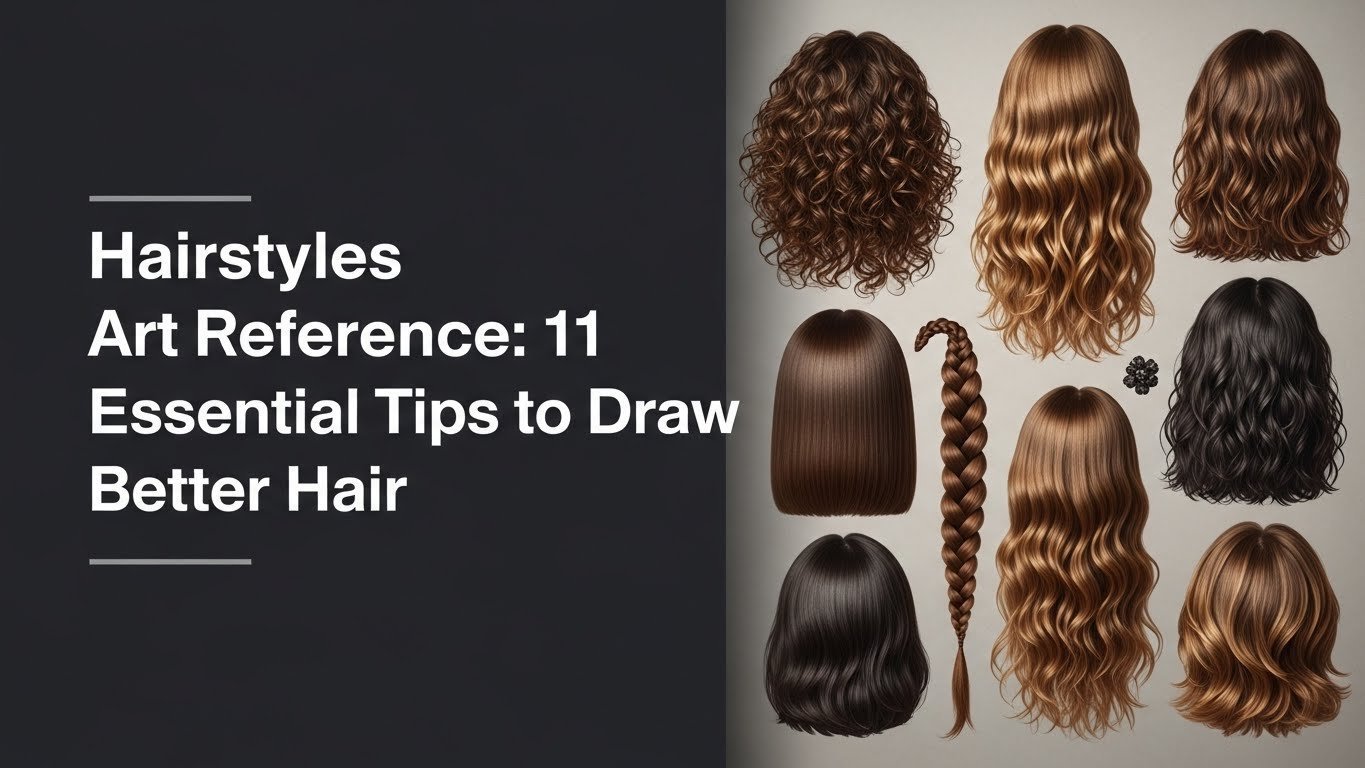
11 Essential Tips to Draw Better Hair in 2026
Drawing hair styles effectively requires a shift in mindset from replicating individual lines to sculpting organic forms with volume and flow. Many artists jump straight into the details, but how to draw hair successfully starts with a solid foundation of understanding mass, gravity, and texture. This comprehensive section breaks down the process into actionable steps, providing you with a structured approach to learn hair drawing and expand your visual library hair. By mastering these fundamental principles, you can tackle everything from different hairstyles art reference to complex, dynamic motion. Whether you are struggling with flat hair art or simply want to refine your technique, these tips serve as a hair drawing tutorial designed to build your confidence and skill set layer by layer.
1. Understand Hair Flow and Gravity for Dynamic Drawings

Pin this genius insight to your “Art Techniques” board for instant reference!
Understanding hair flow and gravity is essential because hair is a loose material that always reacts to external forces, never defying gravity unless styled with heavy product. To analyze hair flow correctly, you must visualize hair as a fluid substance that originates from a specific point and cascades downward, interacting with the shoulders and back. Using dynamic hair reference helps you capture this movement, preventing the “wig-like” appearance that often plagues beginner drawings.
When you hair movement art reference, think of hair as a series of ribbons rather than individual threads. Gravity pulls these ribbons down, while wind or motion might push them sideways or upwards. This approach allows you to sketch hair that feels alive. Start by drawing light, confident lines that map the general direction of the flowing hair art. These “flow lines” should dictate where the major clumps will sit. Remember that hair in motion often clumps together; drawing these larger masses first ensures your character’s hair has weight and presence.
Pro-Tip: Drawing hair effectively isn’t about rendering every single strand; it’s about convincingly portraying the illusion of thousands of individual strands moving as one coherent mass, a key hair flow dynamics concept that elevates professional hair drawing.

2. Simplify Hair into Large Shapes for Foundational Structure

Save this step-by-step hair drawing tip to refine your art!
Simplifying hair into large shapes is the most effective way to establish a solid foundation, preventing the chaos of drawing millions of strands. Before worrying about texture, you should block out hair into 3 to 5 major masses that define the hair silhouette design. This technique, often used in easy hair drawing tutorials, ensures that the hair reads clearly from a distance and sits correctly on the head.
To practice this, look at your reference and squint your eyes to blur the details. What are the dominant shapes you see? Sketch these blobs or ribbons first. By focusing on the overall volume, you avoid the common mistake of “spaghetti hair” where lines look disconnected. Whether you are doing beginner hair drawing or advanced illustration, this blocking phase is critical. Once the major shapes are accurate, you can subdivide them into smaller clumps, but the primary silhouette must work first. This method naturally creates volume and helps you simplify hair for any style.
Pro-Tip: Many beginners try to draw individual strands too early, leading to flat, stiff results. By simplifying complex hair into 3-5 major shapes first, you establish a strong underlying form, which is crucial for achieving voluminous hair reference and realistic depth, a core concept in advanced hair texturing.

3. Master Basic Hair Anatomy & Structure for Believable Forms

Click to save this essential hair drawing anatomy guide!
Mastering basic hair anatomy involves understanding that hair grows in directional patterns from specific points on the skull, such as the crown or part line. To draw convincing hair structure art reference, you must first visualize the skull underneath. Hair is not a hat that sits on top; it grows out of the scalp. You need to study hair anatomy to see how follicles group strands together, creating natural partings and whorls.
When creating hair anatomy art, locate the crown of the head. From this point, hair typically radiates outward and downward. Identifying the parting line is equally crucial, as this is where the hair separates and falls in different directions. By observing these growth patterns, you can create hair studies that look organic. Pay attention to the hairline as well; it frames the face and varies significantly between individuals. Understanding these biological anchors ensures your hair art techniques remain grounded in reality, even when stylizing.
Pro-Tip: Think of hair as individual leaves on a tree, grouped into branches, which form the tree’s overall canopy. This analogy helps visualize the hierarchy of hair structure art reference, from fine strands to large masses, a principle used in advanced hair rendering and hair groom tools.

4. Add Volume & Texture Accurately for Realistic Results

Pin this tip to your “Digital Art Inspiration” for better hair textures!
Adding accurate volume and texture requires treating hair as a 3D object that occupies space, using specific stroke types to differentiate materials. To capture voluminous hair reference, you must draw the hair rising away from the scalp before gravity pulls it down. This “lift” at the roots is key to conquering hair volume. Whether you are working on curly hair reference or straight hair drawing, the texture is defined by the rhythm of your lines.
For wavy hair art reference, use loose “S” curves that flow into one another. For thick hair drawing reference, rely on broader shapes and fewer internal lines to suggest density. When you add texture, avoid drawing every single hair. Instead, use directional strokes on the shadowed side of hair clumps to suggest the grain. Use negative space—the gaps between curls or strands—to create depth. This is essential for getting hair to look real; the empty space is just as important as the drawn lines in defining the texture and volume.
Pro-Tip: For specific textures like black hair art reference or african american hair art reference, understanding their unique coiling patterns and volume is crucial. Don’t treat all hair textures the same; each has its own “grammar” of strokes and shapes, which is a key aspect of advanced hair texturing.

5. Utilize Light & Shadow for Depth and Form in Hair

Boost your hair art realism: Pin this lighting guide!
Utilizing light and shadow correctly transforms flat outlines into three-dimensional forms by defining the curves and recesses of the hair mass. To shade hair effectively, you must first identify your light source. This determines where the “halo” of highlights will sit—usually on the crown or the curves where hair bends. Light and shadow hair techniques require you to establish core shadows where the hair turns away from the light, and cast shadows where one clump overlaps another.
Hair rendering tips often emphasize the “ribbon” effect. Imagine a ribbon twisting; the flat part facing the light is bright, while the twist away is dark. Apply this to hair clumps. Use highlights sparingly to indicate shine, but don’t overdo it, or the hair will look metallic. Remember to include reflected light in the shadows to soften the look and increase volume and density. By mastering these values, you solve the problem of getting hair to look real and grounded in the environment.
Pro-Tip: Hair often has an anisotropic hair reflections property, meaning highlights appear as streaks following the hair’s direction, not just a single spot. Emphasize these elongated highlights to suggest movement and shine, a hallmark of advanced hair rendering and micro-facet hair shading techniques.

6. Draw Diverse Hair Types & Styles for Inclusive Character Design

Expand your art: Pin these diverse hair style references now!
Drawing diverse hair types is crucial for creating authentic characters, as different ethnicities and cultures feature distinct textures that affect volume, gravity, and styling. To avoid the lack of hair variety in your portfolio, you must actively study diverse hair styles. Curly hair reference behaves very differently from straight hair drawing; coils stack up and defy gravity to create volume, while straight hair hangs closer to the head.
When you short hair drawing reference or long hair drawing reference, pay attention to the specific physical properties. For black hair art reference, observe how light interacts with afro-textured hair—it often creates a soft, diffused sheen rather than sharp, high-contrast highlights. Similarly, male hair reference might involve sharper hairlines and shorter cuts that reveal the skull shape more clearly than some female hair reference. By expanding your repertoire to include everything from braids to fades, you elevate your character design and move closer to getting hair to look real for every subject.
Pro-Tip: Actively seek out finding diverse black hairstyles art reference and other underrepresented hair types. A truly comprehensive visual library goes beyond common styles and enriches your character designs, ensuring your hairstyles art reference is inclusive and authentic, a hallmark of recognized hair art authority.

7. Convey Hair in Motion & Dynamic Poses Effectively

Level up your character’s action shots: Pin this hair movement guide!
Conveying hair in motion involves applying principles of animation like drag and follow-through to show how hair reacts to speed and environment. Static hair on a moving character looks stiff and breaks the illusion of action. To capture dynamic hair reference, you must exaggerate the curves. Hair in motion often lags behind the character’s movement; if the head turns sharply left, the hair should swing right.
Hair flow dynamics dictate that hair strands separate more when moving fast. Use trailing lines to indicate the path of motion. Hair creates movement visually by guiding the viewer’s eye through the composition. When studying hair reference for action poses, notice how wind pushes hair against the head on the windward side and fans it out on the leeward side. By making hair flow dramatically, you enhance the energy of the pose. Use “squash and stretch” concepts—elongating the hair mass in the direction of speed—to create impactful hair movement studies.
Pro-Tip: When drawing hair in strong motion, focus less on individual strands and more on the overall “ribbon-like” flow. This creates more impact and conveys motion without overwhelming detail. Hair flow dynamics and understanding how hair creates movement are crucial for rendering hair in action poses.
8. Develop a Robust Visual Library of Hair References

Curate your art: Pin these ideas to build your ultimate hair reference library!
Developing a robust visual library is a proactive habit where you collect and organize images of various hairstyles to serve as immediate inspiration and technical guidance. You cannot draw what you haven’t seen or studied. To build library assets effectively, use platforms like pinterest hair reference and artstation hair concepts to gather diverse examples. Don’t just look for “hair”; search for specific hair reference ideas like “windblown braid,” “wet curly hair,” or “historical updo.”
When finding references, organize them into folders by texture, length, and gender. Creating a personal hair reference collection prevents you from defaulting to the same three hairstyles for every character. Analyze these images: trace over the major shapes to understand the structure. This visual library hair becomes your external brain. The more you study these hair reference images, the more intuitive your drawing becomes, allowing you to eventually invent styles that look grounded in reality.
Pro-Tip: Don’t just search for “hair.” Search for specific attributes like “short curly hair men reference” or “braided updo wedding art reference.” This will yield more targeted and useful results, helping you create a personal hair reference collection that truly serves your needs, reflecting expertly curated hair references.
9. Practice Stylization & Invent New Hairstyles for Creative Freedom

Unlock your artistic potential: Pin these unique hair design ideas!
Practicing stylization allows you to interpret reality through your own artistic lens, exaggerating or simplifying forms to create unique character designs. Once you understand the rules of realism, you can break them to stylize hair. Whether you are looking for anime hair styles reference or futuristic hair art reference, the key is shape language. Manga hair styles reference often relies on sharp, gravity-defying spikes, while fantasy hair art reference might involve impossible volume or flowing liquid-like forms.
To invent hairstyles, focus on the silhouette. A strong character hair design should be recognizable by its outline alone. Create unique hairstyles for characters by mixing historical influences with modern trends or nature-inspired shapes. Remember that stylization isn’t just about simplification; it’s about intentional design choices. By pushing the boundaries of physics while maintaining a consistent internal logic, you can achieve true creative freedom and make your characters unforgettable.
Pro-Tip: When inventing new hairstyles, don’t be afraid to pull inspiration from unexpected places. A plant, a piece of clothing, or even a cloud formation can spark a unique character hair design. The goal is to stylize hair in a way that is visually appealing and consistent with your character’s world, showcasing your advanced hair texturing prowess.

10. Refine Hair Details Without Overworking or Overcomplicating

Master subtle hair detail: Pin this tip to avoid over-rendering!
Refining hair details effectively means placing strands and texture strategically to suggest complexity without drawing every single hair, which prevents the drawing from looking busy or stiff. A common pitfall is overcomplicating hair by rendering everything with equal intensity. To refine hair details, focus on focal points—usually around the face, the part line, or where the light hits. In shadow areas, details should be lost or simplified.
Getting hair to look real is about the suggestion of detail. Add a few loose flyaways at the edges of the silhouette to break up the “helmet” look. Use lighter, thinner lines for these details compared to the main structural lines. This hierarchy of line weight helps in avoiding ‘noodle’ hair. By being selective, you create a cleaner, more professional look. Realistic hair art balances high-detail areas with areas of rest, guiding the viewer’s eye and maintaining advanced hair rendering standards.
Pro-Tip: Resist the urge to draw hair like spaghetti. Focus on conveying the impression of many hairs through careful rendering of clumps, light, and shadow. Adding a few well-placed, wispy refine hair details near the edges or partings is often more effective than attempting to render every single strand, which is key to authentic hair rendering and avoiding ‘noodle’ hair.

11. Leverage Digital Tools & Brushes for Efficient Hair Rendering

Unlock digital hair art mastery: Pin these essential tool tips!
Leveraging digital tools allows artists to speed up the rendering process and achieve specific textures through the use of custom brushes and layer management. If you are working in digital hair art, software like Procreate or Photoshop offers immense advantages. Procreate hair brushes can mimic individual strands or clumps with a single stroke. Photoshop hair tutorials often recommend using layers to build depth: a base layer for the main shape, a shadow layer, and a highlight layer.
When deciding what kind of brushes to use for digital hair, look for ones that have pressure sensitivity for tapering. Clip studio paint hair assets are fantastic for comic artists. Digital painting hair becomes efficient when you use blending modes like “Overlay” or “Add” for intense highlights. However, tools are just aids; you still need to understand the underlying form. Digital art software hair features should enhance your workflow, not replace fundamental drawing skills.
Pro-Tip: When using procreate hair brushes or photoshop hair tutorials, don’t rely solely on them to draw the hair for you. Use them to enhance your understanding of form and flow, not replace it. Combine specialized brushes with your knowledge of light, shadow, and volume for truly impactful digital hair art, leveraging hair groom tools for maximum effect.

Key Takeaways: Your Quick Guide to Hairstyles Art Reference
Navigating the complexities of hair drawing can feel overwhelming, but summarizing the core principles helps solidify your learning. Below is a quick recap of the main takeaways hair design strategies covered in this guide. Keep these points in mind as you practice, and use them as a mental checklist whenever you sit down to sketch hair.
- Hair Flow and Structure are Fundamental: Always start by understanding how hair is influenced by gravity and internal structure, simplifying it into large, flowing masses before adding detail.
- Volume and Texture Define Realism: Master techniques to convey hair volume and specific textures (curly, straight, wavy) using directional strokes and light/shadow to give hair a realistic, three-dimensional quality.
- Light and Shadow Create Depth: Utilize light sources to define form, highlights, and shadows, transforming flat hair into dynamic, volumetric shapes.
- Diversity Enriches Your Art: Actively seek and draw diverse hair types and styles, building a rich visual library to create inclusive and compelling characters.
- Practice Stylization for Creative Freedom: Don’t be afraid to invent hairstyles and stylize existing ones, pushing creative boundaries while maintaining foundational principles.
- Strategic Detailing Prevents Overworking: Learn to add refine hair details selectively, focusing on focal points and avoiding over-rendering individual strands, which can lead to stiff or unnatural hair.
- Embrace Digital Tools for Efficiency: Leverage specialized digital painting hair software and custom brushes to render hair more effectively and explore new creative possibilities.
People Also Ask About Hairstyles Art Reference
When diving into hairstyles art reference, artists often have specific questions that go beyond general tips. Here are clear, direct answers to the most common queries found in the question_based_all_types cluster, designed to resolve specific doubts and improve your drawing confidence immediately.
How to draw hair realistically?
Drawing hair realistically involves understanding its fundamental forms, flow, and how light interacts with its surfaces rather than focusing solely on individual strands. Begin by simplifying hair into large masses, then define volume and texture with directional strokes, and finally apply light and shadow to create depth. Utilize diverse hairstyles art reference to observe natural patterns.
What are good hair references for artists?
Good hair references for artists include high-quality photographs of diverse hair types in various lighting conditions, anatomical diagrams of hair growth, and stylized examples from experienced concept artists. Platforms like Pinterest and ArtStation are excellent for building a visual library hair, as are real-life observation and expertly curated hair references from books and tutorials.
What makes hair look natural in drawings?
Hair looks natural in drawings when it conveys a sense of weight, volume, and movement, responding believably to gravity and light. This is achieved by understanding hair anatomy art, simplifying hair into clumps instead of individual hairs, and using varied line weights and subtle textures, avoiding stiff or spaghetti-like rendering.
Why is drawing hair so difficult for artists?
Drawing hair is often difficult because it involves simultaneously depicting a multitude of individual strands, behaving as a cohesive mass, and reacting dynamically to external forces like gravity and wind. Artists often struggle with drawing hair difficulties related to making it look natural, avoiding stiffness, and rendering various textures without overworking the details.
How can I simplify hair for comics or stylized art?
To simplify hair for comics or stylized art, focus on blocking out strong, iconic shapes that represent the overall hair mass and flow, rather than rendering every detail. Emphasize the silhouette, exaggerate key features, and use cleaner lines. This stylize hair approach creates impactful character hair design while reducing rendering time, a key to effective manga hair drawing.
What are common hair drawing mistakes to avoid?
Common hair drawing mistakes include drawing hair too stiffly or flatly, treating it like a helmet, over-rendering individual strands, and failing to account for its natural flow and volume. Avoiding the “noodle” hair effect, understanding the interaction of light and shadow, and using hair reference for diverse textures are key to fixing hair drawing mistakes.
How do you draw different hair textures like curly vs. straight?
To draw different hair textures, adapt your strokes and forms to their unique characteristics: use C- or S-shaped strokes for the bounce of curly hair, and long, smooth, flowing lines for straight hair. Focus on curly hair reference and straight hair drawing to capture the distinct way light reflects off each texture and how they clump.
What tools help with hair art references in digital painting?
In digital painting, specialized custom hair brushes within software like Photoshop, Procreate, or Clip Studio Paint significantly aid hair art references by mimicking various textures and strand dynamics. Utilizing layers and blending modes also helps build depth and color variation efficiently, making digital painting hair more realistic and less laborious.
How to convey hair volume in drawing?
To convey hair volume in drawing, emphasize the space hair occupies around the head, using curved lines that suggest roundness and overlapping clumps that create depth. Employ light and shadow to define its three-dimensional form, and use negative space strategically. This approach helps achieve a voluminous hair reference and avoids hair looking flat.
What are some tips for drawing hair from different angles?
For drawing hair from different angles, always start by sketching the head’s underlying form from that perspective, then build the hair mass upon it, ensuring the flow and volume are consistent with gravity and movement. Study hairstyles art reference from various viewpoints and observe how partings and hairlines shift in perspective to maintain believability.
Final Thoughts on Hairstyles Art Reference
Mastering hairstyles art reference is a journey of observation, understanding, and consistent practice. By applying these 11 essential tips, you are not just learning to draw hair; you are developing a deeper comprehension of form, movement, and texture that will elevate all aspects of your character art. From simplifying complex masses to adding subtle, impactful details, each technique builds upon the last, transforming stiff, unnatural hair into dynamic, expressive forms.
Remember that a robust visual library hair and a willingness to stylize hair are as crucial as understanding basic hair anatomy art. Don’t be afraid to experiment with new hair art techniques or leverage powerful digital painting hair tools. The ultimate goal is to improve hair drawing so that it seamlessly integrates with your character design, enhancing personality and storytelling. Keep practicing, keep observing, and watch your characters come alive with believable, captivating hair.
What’s the one hair drawing tip that has made the biggest difference in your art? Share your insights in the comments below
Last update on 2026-04-21 / Affiliate links / Images from Amazon Product Advertising API