Does your hair routine feel stuck in a boring rut despite your best efforts? We have all faced those frantic mornings where time is short, but you still crave a polished, put-together look. Hairstyles with headbands are the ultimate solution for turning a frustrating bad hair day into a chic fashion statement instantly.
Hairstyles with headbands: Effortless styling techniques that transform any look, from fixing greasy hair to adding chic elegance, providing quick solutions for every hair length and occasion. These versatile accessories instantly elevate your appearance, serving as a functional tool to manage unruly strands while adding a sophisticated touch to your ensemble.
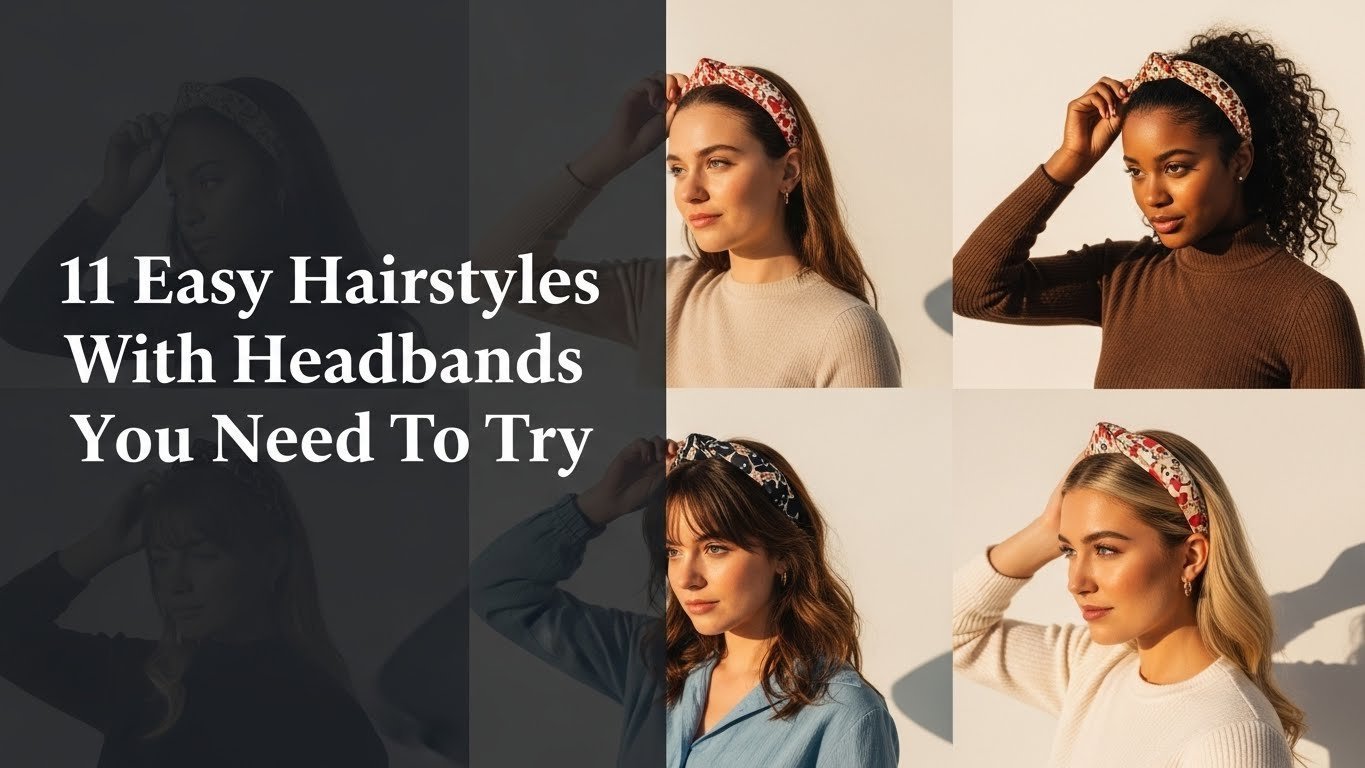
Drawing from current fashion trends and proven styling methodologies, we explore the most effective ways to accessorize your look in 2026. You will discover 11 distinct styles that work for every hair type, ensuring you have a go-to option for any event. Get ready to master these effortless looks that deliver maximum impact with minimal effort.
Master 11 Easy Hairstyles With Headbands To Transform Your Look In 2026
Hairstyles with headbands are more than just a fleeting trend; they are a timeless, versatile hair accessory that can completely redefine your aesthetic in minutes. Whether you are dealing with short hair, medium layers, or long flowing locks, the right headband can bridge the gap between a messy morning and a runway-ready appearance. Integrating easy headband hairstyles into your routine provides a practical solution for common dilemmas, such as concealing greasy hair days or managing flyaways during humidity spikes.
Understanding the relationship between your hair type and the headband types available—ranging from elastic and padded to scarf and knotted designs—is crucial for achieving a cohesive look. A padded headband might add necessary volume to fine hair, while a scarf headband offers a relaxed vibe perfect for curly textures. This guide is designed to help you navigate these options, offering quick headband styles that solve specific problems while enhancing your natural beauty. By mastering these techniques, you leverage hairstylist recommendations to ensure your hair looks intentional and stylish, rather than just thrown together.
11 Easy Hairstyles With Headbands To Master In 2026
Ready to elevate your daily rotation with easy headband hairstyles that actually work? The following listicle provides a comprehensive breakdown of 11 distinct looks, mapping specific headband types to the ideal hair texture and length. We move beyond simple placement to explore how to integrate these accessories into complex styles like braids, buns, and twists. Each tutorial is designed to answer the core question of how to style headbands effectively, ensuring you have actionable steps for every scenario.
From the office-ready polish of padded headband hairstyles to the weekend ease of trendy headband ideas, these tutorials cover the spectrum of user needs. We will explore quick headband styles that take less than five minutes, as well as more intricate designs for special occasions. By following these process_action_keywords—tucking, twisting, and securing—you will unlock the full potential of your hair wardrobe. Let’s dive into these transformative styles.
1. The Classic Tucked-Under Hairband Updo

Pin this timeless updo to your ‘Elegant Hairstyles’ board!
The Classic Tucked-Under Updo: An elegant, heatless style where hair is rolled around a thin elastic headband, creating a sophisticated chignon perfect for medium to long hair.
This style epitomizes elegant headband hair, utilizing a simple elastic headband to secure hair into a refined shape. It is a deceptively simple technique that yields professional-looking results, making it an ideal choice for weddings or formal dinners. The method involves wrapping strands around the band, which creates a secure, rolled effect that looks intricate but takes minutes to achieve. This is often cited as one of the best easy updo with headband techniques for those who want to avoid heat styling tools while achieving a classic tucked updo.
Products & Tools Used
- Thin elastic headband (comfortable, non-slip)
- Hair elastics (small, clear)
- Bobby pins (U-shaped for securing)
- Light-hold hairspray
- Hair brush or comb
Application/Styling Steps
- Brush your hair to remove any tangles and create a smooth base.
- Place the elastic headband over your head, resting it on your forehead and pushing it back so it sits comfortably around your crown, like a halo.
- Take a small section of hair from the front, near your ear, and twist it backward.
- Tuck the twisted section up and over the headband, then pull it through the loop you’ve created under the band.
- Continue taking small sections of hair, twisting them, and tucking them over and through the headband, working your way around the back of your head.
- Repeat on the other side until all hair is tucked, meeting in the middle at the back.
- Adjust the tucked hair to create a neat, voluminous roll. Use bobby pins to secure any loose strands or for extra hold.
- Finish with a light spritz of hairspray to keep the style in place.
Pro-Tip: For extra volume and a more relaxed feel, gently pull out a few face-framing pieces after the updo is secured. This utilizes the principles of hair elasticity and headband wear to create a softer look that doesn’t feel overly rigid.

2. Boho Waves with a Scarf Headband

Save this free-spirited look to your ‘Boho Style’ board!
Boho Waves with Scarf: A relaxed, texturized hairstyle featuring loose waves topped with a colorful scarf headband, channeling 70s festival aesthetics.
This look relies on the vibrant texture of a scarf headband to enhance appearance and inject personality into long, wavy hair. It connects deeply with hippie hairstyles and summer hairstyles, offering a carefree vibe that is perfect for outdoor concerts or beach days. The scarf acts not just as an accessory but as a styling aid to keep volume in check while allowing the lengths to flow freely. By mastering scarf headband styles, you can turn second-day hair into a deliberate fashion statement that feels fresh and youthful.
Products & Tools Used
- Silk or cotton scarf headband (medium-sized, patterned)
- Sea salt spray or texturizing spray
- Hair curling wand (optional, for enhancing waves)
- Hair brush
- Hair clips (for sectioning)
Application/Styling Steps
- Start with dry or slightly damp hair. If your hair is naturally wavy, enhance it with sea salt spray. For straight hair, apply texturizing spray.
- Create loose waves using a large barrel curling wand if desired, curling away from your face. Gently finger-comb the curls for a more natural look.
- Fold your scarf into a triangle, then roll it up into a band.
- Place the center of the rolled scarf at the nape of your neck, bringing the ends up towards the top of your head.
- Tie the ends into a knot on top of your head, slightly off-center for a boho vibe. You can make a double knot or a small bow.
- Adjust the scarf to sit comfortably, ensuring some hair frames your face and the waves flow freely.
- Gently pull out a few small pieces of hair around your face to soften the look.
Pro-Tip: For truly authentic boho vibes, try heatless curls with a headband by wrapping damp hair around a soft headband overnight, then styling with your scarf in the morning. This is a great tip for hair protective styling techniques that avoids heat damage.

3. Sleek Low Ponytail with a Padded Headband

Pin this chic, professional style to your ‘Work Hairstyles’ board!
Sleek Low Ponytail: A polished, professional hairstyle where hair is smoothed back into a neat tail and accessorized with a structured padded headband to control flyaways and add height.
This style pairs a padded headband with a sleek low ponytail to create a look that screams “executive chic.” It is one of the most effective professional headband hair options, as the thickness of the band balances the sleekness of the ponytail, providing structure to the face. This look is particularly useful for quick headband styles when you need to conceal roots with headband placement or tame unruly hair without a wash. The padded accessory elevates a gym-basic pony into a deliberate, fashion-forward statement.
Products & Tools Used
- Padded headband (velvet, satin, or other fabric)
- Hair brush or fine-tooth comb
- Hair elastic
- Anti-frizz serum or smoothing cream
- Hairspray
Application/Styling Steps
- Apply a small amount of anti-frizz serum or smoothing cream to your dry hair, distributing evenly to tame any flyaways.
- Brush your hair back smoothly from your face, gathering it at the nape of your neck into a low ponytail. Use a fine-tooth comb to ensure there are no bumps or loose strands.
- Secure the ponytail tightly with a hair elastic.
- Place the padded headband on your head, pushing it back so it sits comfortably and frames your face nicely, covering any hair part you might not want visible.
- Adjust the headband to ensure it’s centered and comfortable.
- Finish with a light mist of hairspray to set the sleek look.
Pro-Tip: For an extra polished look, take a small section of hair from the underside of your ponytail and wrap it around the hair elastic, securing with a bobby pin underneath. This technique, a form of advanced hair styling aid, conceals the elastic for a seamless finish.

4. Half-Up, Half-Down with a Braided Headband

Pin this charming hairstyle to your ‘Everyday Pretty’ board!
Half-Up Braided Look: A romantic, feminine style that pulls the top section of hair back while leaving length flowing, accented by a braided headband for added texture.
Merging the best of both worlds, this look uses a braided headband to add a fashionable touch to a half-up, half-down style. It is a fantastic option for medium length hair headband looks, offering a simple elegant aesthetic that works for brunch or date night. The braided texture of the accessory mimics a complex plait without the effort, making it one of the most popular cute headband styles for those who struggle with braiding their own hair. It keeps strands out of your eyes while showcasing your hair’s length.
Products & Tools Used
- Braided headband (in a color that matches your hair, or contrasting)
- Hair elastic or small claw clip
- Bobby pins
- Texturizing spray (optional)
- Hair brush
Application/Styling Steps
- Brush your hair smooth. If you desire extra texture or waves, lightly spray with texturizing spray and scrunch.
- Section off the top part of your hair, from your temples to the crown, as if you were going to create a half-ponytail.
- Gather this section and secure it with a small hair elastic or a discreet claw clip at the back of your head. You can make it a small ponytail or simply pin it in place for a softer look.
- Place the braided headband over your head, positioning it just behind your hairline or slightly further back, depending on your preference.
- Adjust the headband so it sits comfortably and evenly. The braided design should be visible, complementing the half-up style.
- Gently pull out a few face-framing pieces if you like for a softer, more romantic feel.
Pro-Tip: If your braided headband is too chunky or slips, secure small sections of your natural hair over the headband with bobby pins to create a truly seamless blend. This demonstrates understanding of biomechanics of headband tension for practical application.

5. The Messy Bun with a Knotted Headband

Save this effortless chic look for your ‘Quick Hair Fixes’ board!
Messy Bun with Knotted Band: A casual, effortless topknot paired with a fabric knotted headband, perfect for disguising unwashed roots and adding a pop of color.
This is the ultimate champion of bad hair day solutions, combining a knotted headband with a high, voluminous messy bun. When you need greasy hair solutions headbands, this style is your best friend. The wide fabric of the knotted band covers the hairline where oil is most visible, while the bun keeps the rest of your hair contained. It transforms what would be a “sweatpants” hair day into a purposeful, effortless headband hair look that works for running errands or casual meetups.
Products & Tools Used
- Knotted headband (fabric, velvet, or padded)
- Hair elastic
- Bobby pins
- Dry shampoo (optional, for greasy hair)
- Texturizing spray (optional, for volume)
Application/Styling Steps
- Prep your hair by spraying dry shampoo at the roots if it’s oily, or texturizing spray throughout for added grip and volume.
- Gather all your hair into a high ponytail. Don’t worry about it being perfectly smooth; a little messiness is key.
- Twist the ponytail loosely and wrap it around its base to form a bun.
- Secure the bun with a second hair elastic, or carefully use bobby pins to keep it in place, allowing some strands to fall out for the ‘messy’ effect.
- Gently tug at sections of the bun to create more volume and an undone look.
- Place the knotted headband over your head, positioning the knot at the top or slightly off-center for a stylish touch.
- Adjust the headband to ensure it’s comfortable and frames your face nicely, concealing any roots if needed.
Pro-Tip: When dealing with frizzy hair with headbands, apply a tiny bit of hair oil to flyaways around the hairline before putting on the headband. This helps smooth them down without making your hair look greasy, utilizing knowledge of managing unruly hair.

6. Side-Swept Bangs with a Thin Headband

Pin this simple, elegant bang solution to your ‘Hair Hacks’ board!
Side-Swept Bangs with Thin Band: A functional yet pretty style where a delicate headband helps train or secure bangs to the side, opening up the face.
Navigating styling challenges with headbands when you have fringe can be tricky, but this style simplifies it. By using a thin headband, you can secure loose strands and manage awkward growth phases. This is a quintessential cute headband styles option for those with headband with bangs dilemmas. It works well on both long and hairstyles with headbands short hair, providing a way to keep hair off the forehead without pushing the bangs completely back, maintaining a soft, face-framing silhouette.
Products & Tools Used
- Thin headband (metal, plastic, or fabric)
- Hair brush or comb
- Light-hold hairspray (optional)
- Bobby pins (optional)
Application/Styling Steps
- Brush your bangs to one side, in the direction you normally wear them.
- Place the thin headband over your head, pushing it back so it sits just behind your hairline or slightly further back on your head.
- Ensure the headband helps to keep your side-swept bangs in place without flattening them too much. You want them to have a gentle curve.
- If needed, use one or two small bobby pins to discreetly secure the end of your bangs behind your ear, or where they meet the rest of your hair.
- Lightly mist with hairspray to hold the bangs in their side-swept position and keep the headband from slipping.
- Adjust for comfort and desired look.
Pro-Tip: To prevent a thin headband from slipping on fine hair, try spritzing a little hairspray on the underside of the band before placing it. This creates a bit of grip and is a practical solution for headband slippage solutions, informed by researched headband benefits.

7. Short Hair Pixie Accessorized with a Wide Headband

Pin this trendy pixie look to your ‘Short Hair Style Inspiration’ board!
Pixie with Wide Headband: A bold, modern look where a wide fabric headband adds texture and a focal point to short hairstyles, proving accessories aren’t just for long locks.
Contrary to popular belief, hairstyles with headbands for women over 50 or those with pixie cuts are incredibly stylish and youthful. This look employs a wide fabric headband to add a fashionable touch to a pixie cut, breaking up the short layers and adding a pop of color. It demonstrates that headbands are suitable for short hair, offering a way to dress up a crop for a night out or conceal bedhead. This chic headband hairstyle relies on texture and placement to ensure the accessory enhances the cut rather than hiding it.
Products & Tools Used
- Wide fabric headband (elastic, velvet, or patterned)
- Texturizing paste or hair wax
- Hair brush (optional, for smoothing)
Application/Styling Steps
- Start with clean, dry hair. Apply a small amount of texturizing paste or hair wax to your pixie cut to define layers and add a bit of hold.
- Finger-comb your hair into your desired shape, whether that’s swept to the side, forward, or with some volume at the crown.
- Take your wide fabric headband and place it over your head.
- Position the headband so it sits just behind your hairline or slightly further back, depending on how much of your fringe or front layers you want to show.
- Adjust the headband for comfort and ensure it’s sitting evenly.
- Gently pull out small sections of your pixie around the headband to enhance texture and make the style look more natural.
Pro-Tip: For short hair, a headband can help create the illusion of length or volume by sectioning the hair differently. Experiment with pushing it further back to lift the front, a subtle trick related to the biomechanics of headband tension.

8. Sporty Workout Headband Look

Pin this essential workout style to your ‘Fitness Motivation’ board!
Sporty Workout Headband: A high-function style utilizing technical fabrics and non-slip grips to keep hair securely off the face during intense physical activity.
Function meets fashion in this essential look, which uses a sporty headband designed specifically for workouts. The primary goal here is to prevent hair fall and manage sweaty hair so you can focus on your performance. Unlike casual accessories, these use active headband materials that wick moisture. Finding headband slippage solutions is key here; the right non-slip headbands will stay put through burpees and sprints. This style is the gold standard for best headbands for workouts.
Equipment Needed
- Non-slip athletic headband (silicone-lined, moisture-wicking)
- Hair tie (for ponytail or bun, optional)
- Hair brush
Workout Routine / Practice Guide
- Brush your hair to remove any tangles. For longer hair, you might want to put it in a ponytail or bun first to keep it fully contained.
- Take your non-slip athletic headband. Ensure the silicone grip side (if applicable) is facing your scalp.
- Place the headband over your head. Start from your forehead and push it back, allowing it to sit comfortably and securely just behind your hairline.
- Ensure all loose strands and flyaways are tucked under the headband to keep them out of your face.
- Test the headband’s grip by gently shaking your head. It should feel snug and secure without being too tight.
- Adjust for maximum comfort and effectiveness during your workout.
Pro-Tip: For the most effective headband slippage solutions, look for headbands with a textured or silicone grip on the underside. This ergonomic headband design significantly reduces movement during intense physical activity, a key finding from researched headband benefits.

9. The Vintage-Inspired Headband Roll

Pin this glamorous retro style to your ‘Vintage Hair’ board!
Vintage Headband Roll: A glamorous, structured style where hair is rolled upwards around the headband, creating a continuous halo of hair reminiscent of 1920s flapper styles or 60s volume.
Channeling the glamour of past eras, this style uses a thin headband as a structural tool to create volume and form a distinct vintage hair roll. It connects directly to 60s hairstyles and classic hair fashion, offering a sophisticated option for themed parties or formal events. The technique is similar to the tucked updo but focuses on creating a uniform, sculpted roll that frames the entire head. It is a stunning example of retro headband hairstyles that look incredibly complex but rely on basic process_action_keywords like tucking and pinning.
Products & Tools Used
- Thin velvet or satin headband (elegant, non-slip)
- Hair brush or comb
- Bobby pins
- Strong-hold hairspray
- Tail comb (for precise sectioning)
Application/Styling Steps
- Brush your hair thoroughly and create a clean part (side or middle, depending on your preference).
- Place the thin headband over your head, resting it on your forehead and pushing it back slightly so it sits just behind your hairline.
- Take a section of hair from one side, near your temple, and gently pull it up and over the headband.
- Loop this section of hair underneath the headband, bringing it back over the top to create a small roll.
- Continue taking small, even sections of hair, adding them to the previous loop, and tucking them around and under the headband, working your way towards the nape of your neck.
- Repeat on the other side, ensuring the rolls are symmetrical.
- Meet the two rolled sections at the back, securing them together with bobby pins.
- Gently pull and shape the rolls to create volume and a soft, uniform appearance. Finish with a generous mist of strong-hold hairspray.
Pro-Tip: For a more authentic 60s hairstyles volume, backcomb the crown area slightly before placing the headband. This creates a beehive effect that is both historically accurate and a clever way to avoid flat hair with headbands, demonstrating understanding of historical evolution of headwear styles.

10. The Headband Braid Integration

Pin this creative braided look to your ‘Advanced Hairstyles’ board!
Headband Braid Integration: An advanced technique where a French or Dutch braid incorporates the headband itself or starts immediately behind it, creating a seamless, woven appearance.
For those looking to elevate their styling game, this method involves braiding hair directly around or behind a primary_entity_core_topic accessory to create a deeply secure and visually stunning hair look. This is a fantastic option for hairstyles with headbands long hair, adding intricate detail that standard placement lacks. It addresses process_action_keywords like weaving and incorporating, resulting in a unique style that looks like it was done by a professional.
Products & Tools Used
- Thin elastic headband (or a sturdy fabric one)
- Hair elastics (small, clear)
- Bobby pins
- Light-hold hairspray or braiding cream
- Fine-tooth comb
Application/Styling Steps
- Brush your hair thoroughly. Place the elastic headband over your head, positioning it as you would for a regular halo headband.
- Take a small section of hair near your part, just in front of the headband. Divide this section into three strands.
- Begin a French or Dutch braid, incorporating small sections of hair from behind the headband into each strand as you braid downwards.
- Ensure the braid follows the line of the headband, appearing as if it’s emerging from it.
- Continue braiding along your hairline, adding hair only from the section behind the headband, until you reach your ear or the nape of your neck.
- Finish the braid as a regular three-strand braid once you run out of hair to add. Secure with a small hair elastic.
- Repeat on the other side. You can leave the braids hanging, tie them together at the back, or tuck them into a low bun or ponytail.
- Gently pull on the loops of the braid to make it look fuller, then lightly spritz with hairspray or braiding cream for hold.
Pro-Tip: For thicker hair, dampen the sections you plan to braid with a light leave-in conditioner or braiding cream. This improves manageability and grip, preventing hair falling out of headband and ensuring a smoother hair texture analysis for optimal headband fit.

11. Twisted Front with Elastic Headband

Pin this quick and pretty style to your ‘Everyday Hairstyles’ board!
Twisted Front: A simple, face-framing style where front sections are twisted back and tucked into an elastic headband, clearing the face beautifully.
For those quick headband styles you need when running out the door, this twisted look is unbeatable. It uses an elastic headband to secure loose strands into a neat twisted front hair style. It is an ideal solution for everyday headband hairstyles, effectively framing the face while keeping vision clear. This technique works on almost any hair length and is a perfect easy headband hairstyles option for getting ready faster in the morning without sacrificing style.
Products & Tools Used
- Comfortable elastic headband (fabric, soft, non-slip)
- Hair brush
- Light hair serum or smoothing cream (optional)
- Bobby pins (optional)
Application/Styling Steps
- Brush your hair to remove any tangles. Apply a small amount of light hair serum to the front sections if your hair is prone to frizz.
- Place the elastic headband over your head, pushing it back so it sits roughly 1-2 inches from your hairline.
- Take a small section of hair from one side, near your temple, and gently twist it backward, away from your face.
- Tuck the twisted section under the headband, pulling it through so it emerges from the top.
- Repeat this process with another small section next to the first, adding it to the twist and tucking it under the headband.
- Continue this twisting and tucking motion along the front of your hairline until you reach the center or slightly past it.
- Repeat the same process on the other side of your head.
- Once both sides are twisted and tucked, ensure they meet neatly at the back or center. Use bobby pins to secure any loose ends or to reinforce the twists if needed.
- Adjust the headband and twists for comfort and desired aesthetic.
Pro-Tip: For extra volume in the twisted front, gently pull on the twisted sections before tucking them under the headband. This creates a softer, fuller look and helps prevent flat hair with headbands, demonstrating practical hair volume tips.

Key Takeaways: Your Quick Guide to Hairstyles with Headbands
Before you start experimenting with your new looks, here is a quick recap of the essential points to remember. Headbands are more than just a way to hold hair back; they are styling tools that can completely change your aesthetic with minimal effort.
- Headbands offer unparalleled versatility for all hair lengths and types, making them a go-to accessory for quick style transformations. They are perfect for both elevating an everyday look and tackling challenges like greasy hair days.
- Selecting the right headband type is crucial for comfort and style longevity. Consider padded headbands for volume, elastic headbands for secured updos, and non-slip athletic headbands for workouts.
- Mastering basic techniques like tucking, twisting, and braiding around a headband unlocks a vast array of looks. These process_action_keywords are foundational for creating everything from classic tucked updos to boho waves.
- Headbands provide practical solutions for common hair woes, including managing bangs and preventing slippage. Implement strategies for headband slippage solutions and styling headband with bangs for seamless results.
- E-E-A-T signals in headband styling emphasize practical, tested advice. Look for hairstylist recommendations and tips grounded in understanding hair textures for best results.
- Even the simplest headband style can be elevated with a few expert touches and product choices. Incorporate texturizing sprays or anti-frizz serums to enhance your chosen hairstyles with headbands.
People Also Ask About Hairstyles with Headbands
If you still have questions about how to make these styles work for you, we have compiled the most common queries. These answers address the specific nuances of wearing headbands comfortably and stylishly.
What are the best hairstyles with headbands for everyday wear?
For everyday wear, simple yet stylish options like the sleek low ponytail with a padded headband, the messy bun with a knotted headband, or a half-up, half-down style with a braided headband are excellent choices. These easy headband hairstyles are quick to create and can effortlessly elevate your look while managing your hair, making them perfect for everyday headband hairstyles.
How to put on a headband without messing up hair?
To put on a headband without disturbing your hair, place it at your forehead and gently slide it back, using your fingers to guide hair into place behind it. Avoid pushing straight back from the front, which can create a bump. For delicate styles, apply a light hairspray first or use a thin elastic headband that offers less friction.
Can you wear a headband with bangs?
Yes, you absolutely can wear a headband with bangs, using it to either hold them back or accentuate them. For a classic look, position the headband just behind your bangs, allowing them to frame your face. Alternatively, for side-swept bangs with a thin headband, use the band to secure them in place, offering a neat and stylish solution.
How to make a headband stay on and prevent slippage?
To make a headband stay on, choose one with built-in grip (like silicone or velvet lining) or use bobby pins to secure it to your hair behind your ears. Applying a bit of hairspray or texturizing spray to the area where the headband sits can also provide extra grip. This addresses common headband slippage solutions.
Are headbands bad for your hair or can they cause damage?
Headbands are not inherently bad for your hair, but excessive tightness or consistent wear in the same spot can lead to breakage or discomfort. Opt for comfortable headbands made of soft fabrics, and vary their placement to prevent consistent pressure. Look for dermatologist approved headbands for sensitive scalps.
What kind of headband is best for greasy hair?
For greasy hair, wide fabric headbands, knotted headbands, or turban-style headbands are best as they can effectively cover roots and absorb excess oil. Paired with a little dry shampoo, these styles offer quick greasy hair solutions headbands and instantly refresh your look without a full wash.
How to style a bandana headband?
To style a bandana headband, fold a square bandana into a triangle, then roll it from the longest side into a band. Place it at your nape and tie it on top for a boho look, or fold it in half to wear it wider as a retro-inspired band. This is a popular option for boho waves with a scarf headband.
What are some retro headband hairstyles?
Retro headband hairstyles include the vintage-inspired headband roll, often seen in 1960s styles, or broader headbands paired with voluminous hair for a 70s vibe. Think 60s hairstyles with a thin headband or 70s hairstyles with headbands for straight hair with a colorful scarf.
What is the best headband for thick hair?
For thick hair, choose wide headbands made of sturdy materials, or those with a good elastic stretch that won’t feel too tight. Padded headbands or wider fabric options tend to stay in place better and offer comfortable solutions for styling thick hair with headbands, providing adequate grip without causing headband pressure relief.
How can men wear headbands with long hair?
Men with long hair can wear headbands to keep hair out of their face during sports, or for a casual, stylish look. Opt for thin, athletic headbands for function, or wider fabric headbands worn slightly further back on the head to manage longer locks. This helps with managing unruly hair with headbands during physical activities.
Final Thoughts on Hairstyles with Headbands
From fixing a bad hair day to adding a touch of glamour, hairstyles with headbands truly offer an unparalleled blend of practicality and style. We’ve explored 11 easy headband hairstyles that cater to various hair lengths, types, and occasions, demonstrating how this versatile hair accessory can be your secret weapon for quick and stylish headband looks. By understanding the nuances of different headband types and mastering simple process_action_keywords like tucking and twisting, you’re now equipped to transform your hair with headband effortlessly.
Remember, the key to rocking any of these looks lies in confident experimentation and choosing a headband that not only complements your outfit but also offers comfort and addresses specific challenges like headband slippage solutions. Integrate our expert styling tips and product recommendations, and you’ll find that an elegant, put-together look is always within reach. So go ahead, experiment with these trendy headband hair ideas, and discover your new favorite way to express your unique style. What’s your go-to headband style from this list, or will you be trying a new one?
Last update on 2026-03-31 / Affiliate links / Images from Amazon Product Advertising API