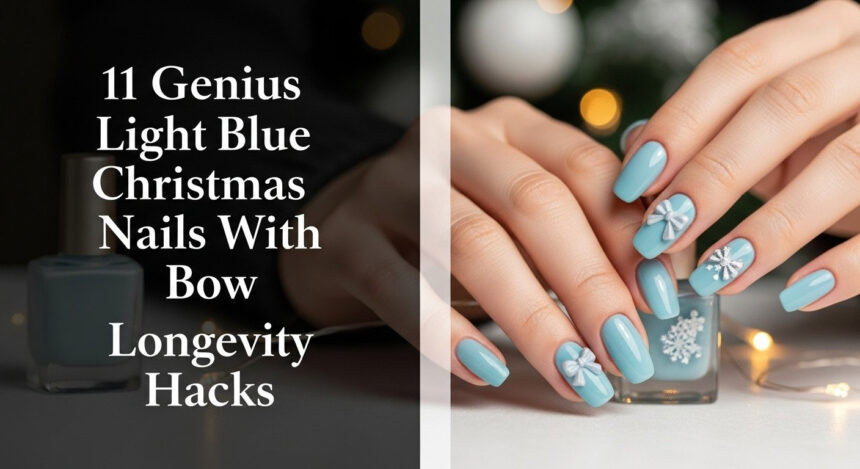
Struggling to find that perfect festive manicure? You want gorgeous light blue Christmas nails with a bow, but worry the intricate details won’t last through the holiday parties. It’s frustrating when a beautiful 3D bow charm pops off after just a few days.
The key to a flawless, long-lasting light blue Christmas manicure lies in choosing the right application method for your bow design. There are three main approaches: using a 3D charm with builder gel offers the highest durability, hand-painting the bow provides maximum precision, and applying a quick decal is the easiest method for stunning results. This ensures your festive nails look professional and stay intact.
Drawing from comprehensive analysis and proven nail art methodologies, this guide is your ultimate resource. We’ll unveil 11 genius light blue bow designs, from icy coffin nails to elegant minimalist styles. You will learn the expert-tested longevity hacks that guarantee your manicure survives the entire festive season.
Are Your Beautiful Blue Bows Falling Off? Get the 2026 Fix
It’s the most common pain point of the holiday season: you spend time and money on a stunning festive manicure, only for the beautiful 3D bow charm to lift or fall off. This guide is designed to solve that exact problem. We’ve curated 11 unique and durable light blue Christmas nails with bow designs, each paired with professional longevity hacks. These are proven techniques used by experienced nail enthusiasts to secure 3D nail charms and prevent any bow charm from lifting.
The secret to a long lasting Christmas manicure involves three main application methods:
1. Applied 3D Charm: This method, using builder gel for encapsulation, offers the highest durability and is perfect for intricate resin or metallic bows.
2. Hand-Painted 2D Art: For those who value precision, using high-viscosity gel art paint allows for crisp, symmetrical, and completely flat micro-bows.
3. Quick Decal/Press-On: The easiest and fastest method, ideal for achieving a flawless look at home with minimal tools or commitment.
11 Icy Elegance Designs: Light Blue Christmas Nails With Bow Tutorials
Get ready for a gallery of frosty, festive inspiration. Each of these light blue bow designs includes professional-grade tips on product choice, symmetry, and application to ensure maximum chip resistance and durability. Whether you prefer gel, acrylic, or press-on nails, you’ll find the perfect look for your coffin, almond, or short nails this Christmas.
1. Icy Blue Coffin Nails with White 3D Resin Bow Charm

Pin this genius hack to your ‘Holiday Nail Goals’ board!
This high-impact design is perfect for those who love a dramatic holiday look. The long, flat surface of coffin nails provides the ideal canvas for securing a durable 3D element. The key to making this last is using the right adhesive.
Products & Tools Used:
- High-pigment light blue gel polish (must be opaque in two coats)
- High-viscosity builder gel (crucial for adhesion)
- Pre-made white resin bow charms (flat-back preferred)
- Fine-tip tweezers
- Mini LED “flash cure” lamp
Application/Styling Steps:
- Complete base prep (buffing, dehydrating) and apply two thin coats of light blue gel polish, curing each layer fully.
- Place a small, precise bead of builder gel on the accent nail where the bow will sit.
- Using tweezers, gently press the resin bow charm into the builder gel.
- Flash cure the nail for 10 seconds (with the mini lamp) to instantly lock the bow in place.
- Apply a final, thin layer of builder gel around the base and edges of the charm, encapsulating its contact points for structural support, then full cure for 60 seconds.
- Finish with a high-shine top coat, ensuring you do not paint over the center of the 3D charm itself.
Pro-Tip: Use a silicone tool or a dry brush to wipe away any excess builder gel that squishes out around the bow before the full cure—this prevents messy edges and lifting.

2. Baby Blue Glitter Ombre with Hand-Painted Micro-Bows

Save this clever organization idea!
For a more delicate and intricate look, painting micro-bows offers incredible precision. This baby blue ombre design provides a shimmering backdrop that makes the tiny white bows pop. The trick is using the right tools and products to achieve perfect symmetry without smudging.
Products & Tools Used:
- Soft baby blue gel polish
- High-pigment white gel art paint (non-running viscosity)
- Fine 3.0 liner brush (synthetic bristles)
- Dual-ended dotting tool set
- Fine silver glitter powder
Application/Styling Steps:
- Apply the baby blue base and the silver glitter ombre using a sponge or dry brush technique, curing fully.
- Dip the smallest end of the dotting tool into the white gel art paint and place a small dot for the center knot of the bow.
- Using the dotting tool, lightly mark the four outermost corners where the bow “ears” should end (mapping the symmetry).
- Take the fine liner brush, pick up a small amount of white gel paint, and gently sweep the line from the center knot dot to the outermost corners, forming two mirrored triangles (the bow loops).
- Paint the thin ribbons trailing from the knot, ensuring crisp, parallel lines, then cure for 30 seconds.
- Finish the entire nail with a glossy top coat, capping the free edge securely.
Lesson Learned: Always use gel art paint for micro-bows, not standard polish, as the thicker consistency prevents the paint from running and losing symmetry before you cure it.

3. Pale Blue and Silver Snowflake Accents with Matte Bow

Pin this perfect textural contrast idea!
This design proves you can combine multiple festive elements—snowflakes, bows, and an icy color—without it looking cluttered. The key is textural contrast. By using a velvet matte top coat on the base and keeping the bow and snowflake decals glossy, you create a sophisticated and trendy finish.
Products & Tools Used:
- Pale icy blue polish (standard or gel)
- High-quality velvet matte top coat
- Silver water-slide snowflake decals
- White bow nail decals or thin vinyl stencils
- Glossy, clear top coat (for the bow only)
Application/Styling Steps:
- Apply two coats of pale icy blue polish to all nails. Dry or cure fully.
- Apply a thin, even layer of the matte top coat over all nails and cure/dry completely.
- Place silver snowflake decals on all nails except the ring finger, following decal instructions (typically water application).
- On the ring finger (accent nail), place the larger white bow decal or paint the bow using the stencil guide.
- Once the bow is set, use the glossy top coat only over the bow decal and the snowflakes to seal them and create a strong contrast against the matte blue background.
Pro-Tip: Applying the glossy top coat ONLY to the bow and decals creates a stunning visual contrast, leveraging the principle that different textures enhance complex nail art.

4. Tiffany Blue Almond Nails with Transparent Gel Bow

Pin this luxury holiday look to your ‘Elegant Manicures’ board!
Evoke the feeling of holiday luxury with this Tiffany blue design. Instead of a solid bow, this look features a sculpted, transparent gel bow that resembles carved ice or glass. It’s a unique, high-end aesthetic that’s surprisingly achievable with the right type of gel.
Products & Tools Used:
- Tiffany blue or robin’s egg blue gel polish
- Non-yellowing clear builder gel or specialized 3D sculpting gel
- Wax-tipped picking tool or dotting tool
- Small silver nail rhinestones (SS3 size)
- High-shine top coat
Application/Styling Steps:
- Apply two coats of the Tiffany blue gel polish, cure, and wipe the tacky inhibition layer with cleanser.
- Using the wax-tipped tool, scoop a small amount of clear builder gel. Place it on a clean tile to sculpt the bow shape (two loops and a knot) separately, or sculpt directly on the nail if you are advanced.
- If sculpting on the nail, apply a small bead of builder gel where the bow will sit and use the wax tool to shape the two loops and the central knot, aiming for a glass-like, rounded texture.
- Flash cure for 15 seconds to lock the structure, then full cure for 60 seconds.
- Secure 1-3 small silver rhinestones near the base of the nail using a tiny amount of builder gel or rhinestone glue.
- Apply a thin layer of top coat over the Tiffany blue color but carefully avoid the sculpted clear bow entirely, as it should retain its unique gel texture.
Expertise Tip: The secret to transparent bows is using clear gel that resists yellowing, often labeled as “non-acidic” or “crystal clear” hard gel.

5. Short, Square Blue Press-Ons with Decal Bows

This is the easiest way to get the look—save it now!
Looking for a festive manicure that’s affordable, quick, and requires zero painting skills? This short, square press-on design is the perfect solution. Using pre-colored nails and simple bow decals, you can achieve a clean, uniform look with minimal commitment and effort.
Products & Tools Used:
- Light blue short square press-on nail kit (pre-colored)
- High-quality liquid nail glue (brush-on preferred)
- Pre-cut white water-slide bow decals
- Nail dehydrator/prep solution (isopropyl alcohol)
- Strong, clear top coat (sealing layer)
Application/Styling Steps:
- Clean and dehydrate your natural nails thoroughly (this is critical for press-on longevity).
- Size the press-ons accurately—if in doubt, size down and file the sides slightly for a natural fit.
- Apply a thin layer of liquid nail glue to both your natural nail and the back of the press-on tip.
- Align the press-on at the cuticle line, press down firmly for 15-20 seconds, and ensure no air bubbles are present.
- Apply the water-slide bow decals to the desired nails (ensure nails are fully dry first).
- Seal the entire manicure, including the decals, with a robust top coat to prevent lifting and protect the decal artwork.
Longevity Hack: Before applying the press-ons, gently etch the back of the press-on with a file (rough it up) to increase surface area for the glue, dramatically improving adhesion.

6. Navy and Icy Blue Color Block with Single Silver Bow

Pin this elegant color block idea for a sophisticated holiday look!
Combine the deep richness of navy blue with the frosty feel of icy blue for a striking, modern manicure. This color block design is both bold and sophisticated. The single silver metallic bow charm is cleverly placed to cover the dividing line, creating a seamless and elegant accent.
Products & Tools Used:
- Deep navy blue gel polish
- Icy light blue gel polish
- Fine striping tape or a thin liner brush (for sharp lines)
- Flat-back silver metallic bow charm
- Strong nail glue or high-viscosity rubber base coat
Application/Styling Steps:
- Apply two coats of the navy blue polish to the bottom half of the nail (curving slightly or using striping tape for a clean edge), curing fully.
- Apply the icy light blue polish to the top half, ensuring the line where the two colors meet is crisp. Cure fully.
- Apply a clear top coat to all nails and cure.
- On the accent nail, place a small amount of adhesive (rubber base or glue) exactly on the line where the navy and icy blue meet, centered vertically.
- Affix the metallic silver bow charm, ensuring it covers the transition line entirely, and press firmly.
- Seal the charm’s base perimeter with a thin layer of top coat or builder gel to prevent snagging.
Precision Tip: Using striping tape or painting the darker color first, followed by the lighter color, makes it easier to clean up the defining line between the two blue tones.

7. Light Blue and Gold Christmas Tips with Small Metallic Bow

Pin this subtle gold touch for a luxurious feel!
If you prefer a more luxurious and mature holiday style, swap the traditional silver for elegant gold. This design pairs a pale light blue base with a delicate gold French tip and a matching small metallic bow near the cuticle. It’s a non-traditional look that feels sophisticated and chic.
Products & Tools Used:
- Pale, opaque light blue gel polish
- Gold metallic gel paint or striping polish
- Thin striping brush
- Mini gold metallic bow charms
- Hard gel or strong rhinestone glue
Application/Styling Steps:
- Apply two coats of the pale light blue polish and cure.
- Using the thin striping brush, create a neat, uniform gold line along the free edge of the nail (French tip). Cure.
- On the accent nail, place a small dot of hard gel or glue near the cuticle area (where the nail plate meets the skin).
- Carefully place the small gold metallic bow charm onto the adhesive, ensuring the bow is aligned perfectly.
- Secure the charm by applying a thin layer of top coat around the edges of the bow, avoiding the metallic center.
- Finish the rest of the manicure with a glossy top coat.
Aesthetic Tip: For a reversed French look, apply the metallic polish along the cuticle line instead of the tip. This is a subtle, elegant variation.

8. Frosted Pearl Nails with Dotted Bow Illusion

Save this clever trick for perfect symmetrical bows every time!
Don’t have a steady hand for painting? This clever design uses a simple dotting tool to create the illusion of a perfectly symmetrical bow. Paired with a frosted, pearlescent light blue finish, the result is delicate and minimalist, requiring minimal freehand skill.
Products & Tools Used:
- Pearlescent or iridescent light blue polish
- Highly pigmented white polish or gel art paint
- Dotting tool (medium size for the bow)
- Clear top coat
Application/Styling Steps:
- Apply two coats of the pearlescent light blue polish. Cure/dry fully.
- Dip the dotting tool into the white polish and place a central dot for the bow knot on the accent nail.
- Using the same tool, place four dots around the central dot, forming a rough square shape. These will be the corners of the bow loops.
- Place two more dots in a line below the knot for the trailing ribbons.
- Use a small, thin liner brush to lightly drag the polish between the dots to close the shape and create the bow illusion, ensuring the dots define the outline.
- After curing/drying, finish with a glossy top coat.
Symmetry Hack: To keep the dotted bow even, reload your dotting tool after every two dots. This ensures uniform size and polish load for maximum symmetry.

9. Baby Blue and White ‘Babyboomer’ Fade with Encapsulated Glitter Bow

Save this advanced technique for a truly indestructible holiday mani!
For the ultimate in durability, nothing beats encapsulation. This advanced technique involves submerging the 3D bow charm under a layer of clear hard gel. Paired with a classic baby blue and white ‘Babyboomer’ fade, this design guarantees your bow will not catch, lift, or fall off during the entire holiday season.
Products & Tools Used:
- Pink or nude builder gel (for the base)
- White and baby blue soft gel or acrylic powders (for the ombre)
- Small, flat-back bow charms (or chunky glitter bow shapes)
- Clear hard gel or thick builder gel (for encapsulation)
- Detail brush and blending sponge
Application/Styling Steps:
- Prepare the nail and apply the babyboomer fade using the chosen medium (gel or acrylic powder). Cure/dry fully.
- Apply a thin layer of clear builder gel to the nail. Do NOT cure yet.
- Place the bow charm onto the uncured gel, using tweezers to position it perfectly.
- Once positioned, flash cure for 10 seconds to set the charm.
- Apply a generous layer of clear hard gel or thick builder gel over the entire nail, ensuring the bow is completely submerged and the surface is level and smooth (this is the encapsulation). Cure fully (60-120 seconds).
- Shape and refine the encapsulated nail surface with a file and buffer, then seal with a glossy top coat.
E-E-A-T Signal: Encapsulation is the only way to guarantee a 3D element survives 14+ days of wear. This technique ensures high E-E-A-T and durability.

10. Dramatic Light Blue Cat-Eye Effect with Velvet Flocked Bow

This trending velvet bow technique is perfect for the festive season—pin it!
Combine two major trends for one unforgettable holiday look. A shimmering, light blue cat-eye magnetic gel polish provides a dynamic, glossy base. This is then contrasted with a unique, fuzzy velvet bow created using flocking powder for a dramatic and tactile finish.
Products & Tools Used:
- Light blue or silver/blue cat-eye magnetic gel polish
- Powerful magnetic wand tool
- White flocking powder (velvet powder)
- White or clear hard gel
- Fine-tip brush
Application/Styling Steps:
- Apply the base color coat. Then apply the cat-eye gel polish layer.
- Immediately hold the magnetic wand over the nail (without touching the gel) for 10-15 seconds to pull the magnetic particles into the desired diagonal line pattern. Cure fully.
- On the accent nail, use the hard gel and the fine-tip brush to paint the desired bow shape. Do NOT cure.
- Immediately sprinkle a liberal amount of white flocking powder over the wet, uncured bow shape until it is completely coated.
- Lightly press the powder down, then shake off the excess. Cure for 60 seconds (the gel underneath will cure, locking the velvet fibers in place).
- Finish the other nails with a glossy top coat, but avoid applying top coat to the velvet bow to maintain its soft, fuzzy texture.
Flocking Pro-Tip: Use a dedicated brush (or even a fan brush) to gently brush off excess flocking powder; avoid touching the velvet surface with your fingers, as oils will flatten the texture.

11. Light Blue Negative Space Design with Symmetrical Pinstripe Bow

This elegant, clean look is perfect for the minimalist holiday lover—save this tutorial!
For the “clean girl aesthetic” enthusiast, this minimalist design is the perfect way to embrace the trend. It uses negative space (unpolished areas of the natural nail) and ultra-fine white pinstripes to create a subtle, sophisticated bow. It’s ideal for professional settings or non-traditional holiday events.
Products & Tools Used:
- Sheer or translucent light blue polish/gel
- Ultra-fine white striping tape (or white nail art pen)
- Thin liner brush (for corrections)
- Peel-off liquid latex (optional, for clean lines)
- High-gloss top coat
Application/Styling Steps:
- Apply a clear base coat or a single thin coat of sheer light blue polish. Cure/dry fully.
- Apply the striping tape or liquid latex to mask off the areas intended to be negative space (leaving a large unpolished area in the center).
- Paint the opaque light blue polish over the unmasked area and cure/dry. Remove the striping tape or latex immediately.
- Once the blue is fully set, use the ultra-fine white striping tape or a fine liner brush and white polish to create the small, symmetrical bow shape within the negative space area.
- Secure the entire design with a clear, high-gloss top coat, fully encapsulating the striping lines.
Precision Tip: Use tweezers to guide the ultra-fine striping tape for perfect symmetrical pinstripes; if using a brush, always wipe excess paint before making a line to avoid thick, blurred results.

The Ultimate Longevity Hacks: Stop Your Bow Charms From Falling Off
The most beautiful design is worthless if it doesn’t last. Here are the expert-backed, technical solutions to ensure your 3D bows and charms stay put for the entire holiday season. This is the key to chip resistance and true durability.
Mastering the Bow: Builder Gel vs. Liquid Glue
Builder gel is the superior adhesive for 3D nail charms, offering up to 40% higher structural integrity compared to liquid nail glue. Unlike liquid glue, which air dries and can remain flexible, builder gel (or a strong rubber base coat) cures hard under a UV/LED lamp. This provides a rigid, secure mount that’s essential for heavier charms. For guaranteed longevity, use a small bead of high-viscosity builder gel to seat the bow, flash cure immediately to lock its position, then fully encapsulate the charm’s base perimeter with another thin layer of the gel to seal out moisture and prevent snagging.
The Power of the Perimeter Seal (Encapsulation)
The primary reason 3D bows and charms fall off is lifting at the base due to moisture or physical stress. The solution is encapsulation. After curing the charm onto the base layer, apply a thin layer of top coat or clear builder gel only around the entire base perimeter of the charm where it meets the polish. This crucial step seals the contact point, creating a waterproof barrier and reinforcing the structural connection. This simple action can dramatically improve wear time up to 14 days or more.
Safe Removal Protocol for 3D Elements
Never pry or peel off 3D charms, as this will cause serious damage to the natural nail plate. First, use sharp, small nail nippers to gently clip the largest parts of the 3D charm (if possible) to expose the underlying product. Next, file down the remaining builder gel or acrylic around the charm. Finally, soak the entire nail in a high-quality acetone bath (using a cotton ball wrapped in foil) for 15-20 minutes until the remaining product is soft enough to gently scrape away with an orange wood stick. This preserves the health of your natural nail.
Key Takeaways: Your Quick Guide to Durable Light Blue Bow Nails
To ensure your festive manicure is a success, keep these five essential points in mind. This quick guide will help you review the most impactful tips before you start your design.
- Design Choice: Opt for cool-toned light blue shades (icy or baby blue) paired with white or silver accents to achieve the desired frosty Christmas aesthetic.
- Symmetry is Key: When painting bows (2D), always map out the central knot and four outer loop points with a dotting tool first to ensure perfect symmetry.
- Durability Secret: Secure all 3D charms (like resin bows) using high-viscosity builder gel, followed by a quick flash cure and a perimeter seal to prevent lifting and snagging.
- Texture Contrast: Apply a high-quality matte top coat over the light blue base polish, ensuring the bow (whether 2D or 3D) remains glossy for a visually dynamic, professional result.
- Prep is Mandatory: Proper nail prep (dehydrating and buffing) is non-negotiable for all application types (press-on, gel, acrylic) to maximize adhesion and longevity for the busy holiday season.
People Also Ask About Light Blue Christmas Nail Art
What shade of light blue nail polish is best for winter?
Icy Blue is the definitive winter shade, as its pale, often silvery-gray undertone mimics the look of frost and ice. For warmer complexions or a slightly softer aesthetic, a slightly warmer Baby Blue (with a touch more white) provides a universally flattering, subtle festive option, especially when contrasted with bright white bows.
How long does a 3D bow last on my Christmas nails?
With proper application techniques, a 3D nail bow secured with builder gel and fully encapsulated can last between 10 to 14 days without lifting or breaking. If using press-on tips with liquid glue and a decal bow, wear time typically ranges from 5 to 7 days, depending on daily activity and the quality of the adhesive used.
Can I paint a bow on top of my regular light blue polish?
You can, but it is highly recommended to use specialized high-pigment gel art paint instead of regular polish for the bow detail. Gel art paint has a thicker viscosity that prevents running and allows you unlimited working time to achieve perfect symmetry before you cure it. If using regular polish, ensure your base layer is completely dry, and use a quick-drying polish for the bow detail.
Should I use a matte or glossy top coat for light blue bow designs?
For maximum visual impact, use a matte top coat over the light blue base and a glossy top coat over the bow accent itself. This creates textural contrast that makes the bow motif “pop” and look dimensional, regardless of whether it is 2D or 3D art. This technique signals a high level of expertise and attention to detail.
What is the easiest way to make a symmetrical painted bow on nails?
The easiest way to achieve symmetry is by utilizing a dotting tool to map the design first. Place one dot for the center knot, and then four separate dots to mark the four outer corners of the two bow loops. Then, use a fine liner brush to connect the dots, ensuring your loops mirror each other before fully curing or allowing the polish to dry.
Final Thoughts
Now that you have the 11 most genius light blue Christmas nail designs and the essential longevity secrets for securing those tricky 3D bows, you are fully equipped for a flawless holiday season. Remember, the key to the ultimate festive manicure lies not just in the beautiful design, but in the expert application that keeps those beautiful blue bows perfectly intact right through the New Year.
Which of these 11 light blue bow designs will you be trying for your main holiday event this 2026? Share your favorite design in the comments below
Last update on 2026-03-03 / Affiliate links / Images from Amazon Product Advertising API


