Does the idea of curling up with a hot drink in a custom-designed cup sound perfect, but you’re worried your artistic efforts will wash away after one use? Many crafters struggle with peeling paint and toxic materials when trying to create painted mugs autumn decor, turning a fun afternoon project into a frustrating waste of supplies. You need a reliable method to ensure your seasonal masterpieces are safe, durable, and dishwasher-resistant.
Creating durable and food-safe painted mugs for autumn involves selecting the right materials, applying paint correctly, and crucially, heat-setting the finished design in the oven. This process ensures the paint adheres permanently, resisting chipping and fading, making your DIY fall decor both beautiful and practical for daily use.
Drawing from comprehensive analysis of ceramic paint durability and safety compliance standards, this guide provides tested methodologies for lasting results. We will explore the specific techniques required to transform ordinary ceramics into seasonal drinkware that withstands the test of time. Discover exactly how to craft professional-quality DIY autumn mugs that serve as perfect gifts or cozy home accents in 2026.
How to Paint Mugs for Autumn: Your Guide to Durable DIY Fall Decor
[Direct Answer]: The secret to successful painted mugs autumn projects lies in the combination of surface preparation and thermal curing. By thoroughly cleaning the ceramic surface with alcohol to remove oils and baking the mug after painting, you facilitate a chemical bond called cross-linking, which fuses the paint to the glaze.
Before you pick up a brush, it is critical to address the safety and longevity of your project. Many beginners overlook the importance of using food-safe ceramic paint or specialized markers designed specifically for glazed surfaces. Unlike standard acrylics which can peel or leach chemicals, non-toxic art supplies formulated for glass and ceramics ensure that your festive coffee vessels are safe for sipping warm cider or pumpkin spice lattes. Furthermore, understanding the difference between air-dry paints and those requiring a heat set process is vital; only the latter will yield a true dishwasher-safe finish capable of enduring daily kitchen life.
The durability of your hand-painted autumn mugs depends heavily on preparation. Even the highest quality industry-standard ceramic paints will fail if applied to a greasy or dusty surface. We recommend a rigorous cleaning protocol using rubbing alcohol immediately before application. Once your design is complete, the curing process—typically baking in a cool oven that heats up gradually—prevents thermal shock and locks in the vibrant colors. This foundational knowledge transforms a fleeting craft into a lasting piece of seasonal home decor.
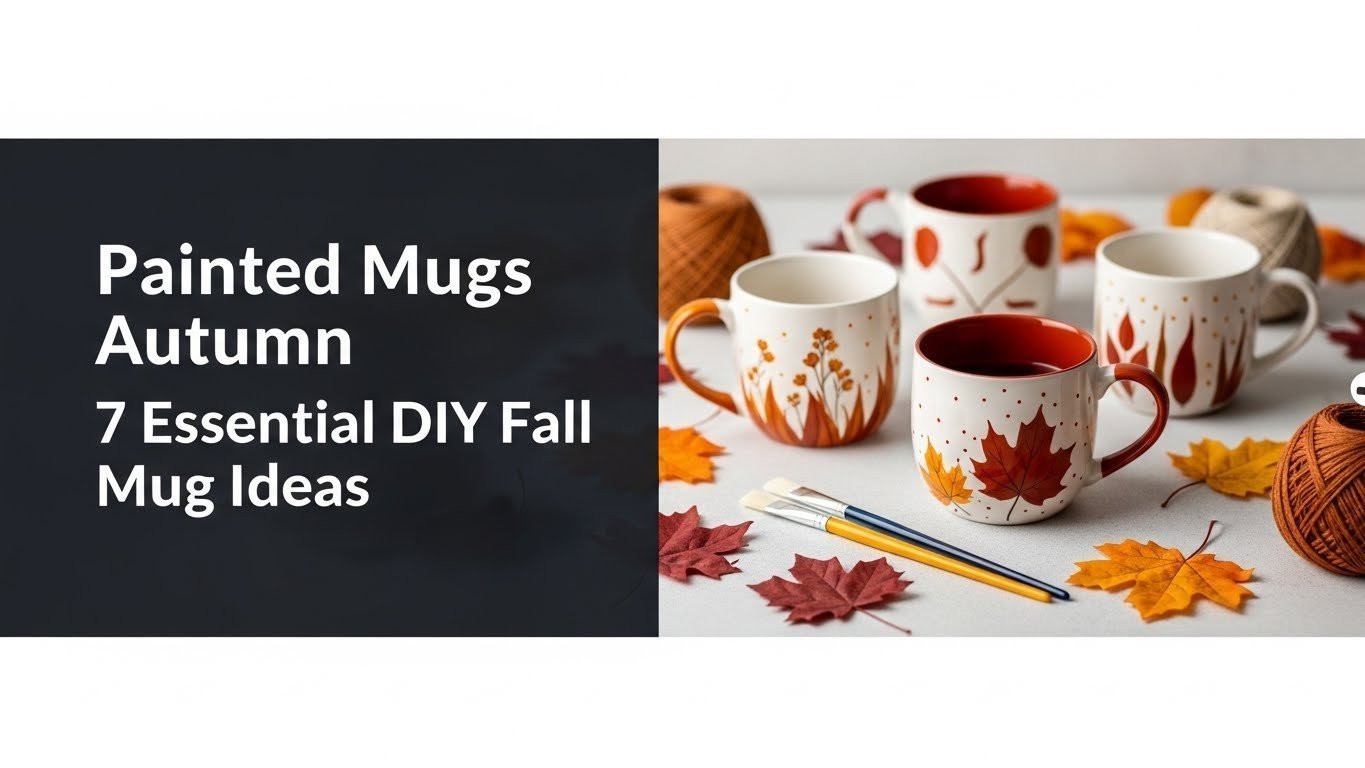
7 Essential DIY Fall Mug Ideas for 2026
Ready to bring the warmth of the season into your hands? We have curated a list of seven distinct DIY painted mugs concepts ranging from beginner-friendly patterns to intricate illustrations. Each idea is paired with specific techniques to ensure your creative mug designs are not only visually stunning but also built to last. Whether you are looking to create designs that celebrate the harvest or craft personalized fall mug gifts, these projects utilize durable paint methods to guarantee professional results.
1. Paint Cozy Fall Leaves on Your Mugs

Pin this elegant leaf design to your ‘Autumn Decor’ board!
Nothing captures the essence of the season quite like fall leaves mugs. This project focuses on easy mug painting techniques that allow you to layer vibrant colors to replicate the changing foliage. By using specific tools, you can achieve precise leaf designs that look professionally fired.
Supplies Needed
- Clean blank white or cream ceramic mugs (smooth surface, generous capacity)
- Food-safe ceramic paint pens in red, orange, yellow, and brown (vibrant colors, durable paint)
- Rubbing alcohol and cotton pads (for surface preparation)
- Pencil (for light sketching)
- Small detail paintbrush (optional, for blending)
Step-by-Step Directions
- Prepare mugs: Thoroughly clean mug surfaces with rubbing alcohol to remove oils.
- Sketch outlines: Lightly sketch various leaf shapes (maple, oak, elm) on the mug with a pencil.
- Apply base colors: Fill in leaf shapes with lighter autumn colors (yellow, orange) using paint pens.
- Add details: Once dry, use darker colors (red, brown) to add veins and shadows, creating depth.
- Heat set: Follow paint pen instructions precisely, typically baking in a preheated oven to heat set the design permanently.
Pro-Tip: For a more natural look, use a small detail paintbrush to gently blend the edges of your leaf colors while still wet, creating a watercolor effect common in creative mug designs. This mimics professional art techniques and adds dimension.

2. Craft Rustic Pumpkin Designs on Your Mugs

Save this charming pumpkin mug idea for your next fall craft session!
Transitioning from foliage to harvest, the pumpkin spice mug is a staple of autumn mug ideas. Whether you prefer a minimalist gourd outline or a full design patterns approach, this method emphasizes texture to decorate mugs with a cozy, farmhouse vibe.
Supplies Needed
- Clean blank ceramic mugs (smooth surface)
- Food-safe ceramic paint in orange, green, and brown (vibrant colors)
- Paintbrushes (various sizes)
- Rubbing alcohol and cotton pads
- Pencil or chalk for sketching
- Pumpkin stencil (optional, for easier designs)
Step-by-Step Directions
- Clean mug surface: Wipe mugs with rubbing alcohol and let dry completely.
- Sketch pumpkins: Lightly draw pumpkin shapes using a pencil. For precise shapes, use a stencil.
- Paint base layers: Fill in pumpkin shapes with orange paint, allowing each layer to dry if building opacity.
- Add details: Once dry, use green paint for stems and leaves, and brown or black for outlines or facial features (if desired).
- Heat set: Cure the paint according to manufacturer instructions, usually involving oven baking for durability.
Pro-Tip: To achieve a truly rustic fall mugs look, don’t aim for perfect symmetry. Slight imperfections add to the handmade quality. Consider using a dry brush technique with a darker brown paint for subtle distressing around the pumpkin edges, leveraging pigment suspension principles for texture.

3. Illustrate Charming Woodland Animals on Your Mugs

Pin this adorable woodland art to your ‘Cozy Fall Crafts’ board!
For those ready to illustrate mugs with more detail, woodland creatures offer a delightful challenge. Custom painted autumn mugs featuring foxes, owls, or deer bring a narrative element to your decor. Success here relies on using fine-tip tools to create unique painted autumn mugs without the mess.
Supplies Needed
- Clean blank ceramic mugs (smooth surface)
- Fine-tip, food-safe ceramic paint markers in various woodland colors (brown, orange, black, white)
- Rubbing alcohol and cotton pads
- Pencil with eraser
- Reference images of woodland animals
Step-by-Step Directions
- Clean and sketch: Prepare mug with rubbing alcohol. Lightly sketch the outline of your chosen woodland animal (e.g., fox, owl) using a pencil.
- Outline and fill: Carefully outline your sketch with a black or dark brown paint marker. Once dry, fill in the larger areas with appropriate colors.
- Add details: Use fine-tip markers to add intricate details like eyes, fur texture, or feathers.
- Heat set: Allow paint to dry completely, then bake the mug in the oven according to paint instructions for permanent paint application.
Pro-Tip: For consistent results and to prevent smudged paint, work on one section of the animal at a time, allowing it to dry before moving to adjacent areas. This is crucial when achieving smooth lines with fine details and prevents wet paint from transferring to your hand.

4. Design Festive Harvest Patterns on Your Mugs

Pin this beautiful harvest pattern to your ‘Fall Kitchen Decor’ ideas!
If you prefer structure over freehand drawing, harvest patterns are an excellent way to design autumn patterns that look store-bought but feel handmade. This method uses repetition—corn, wheat, berries—to create custom autumn mug sets perfect for seasonal drinkware.
Supplies Needed
- Clean blank ceramic mugs (smooth surface)
- Food-safe ceramic paints in harvest colors (gold, deep red, olive green, cream)
- Stencils with harvest motifs (wheat, corn, leaves, berries)
- Small sponge daubers or paintbrushes
- Rubbing alcohol and cotton pads
- Painter’s tape or stencil adhesive
Step-by-Step Directions
- Prepare mug: Clean the mug thoroughly with rubbing alcohol.
- Position stencil: Securely attach your chosen stencil to the mug surface using painter’s tape or adhesive.
- Apply paint: Using a sponge dauber or brush, gently dab paint over the stencil openings. Apply thin, even coats to avoid bleeding.
- Remove stencil and repeat: Carefully remove the stencil while the paint is still slightly wet. Allow to dry completely before repositioning and repeating the pattern around the mug.
- Heat set: Bake the mug as per paint manufacturer’s instructions for a durable finish.
Pro-Tip: For a seamless, continuous pattern, plan your stencil placement carefully. Overlapping small elements slightly can create a richer, more organic feel, a mark of advanced brushwork techniques. Use adhesive stencils to ensure guaranteed paint adhesion and crisp edges.

5. Achieve a Speckled “Rustic Charm” Effect on Your Mugs

Pin this effortlessly chic speckled mug idea for rustic fall vibes!
Sometimes less is more. A speckled finish instantly adds rustic aesthetic to any plain ceramic. This technique to decorate mugs is incredibly forgiving and perfect for beginners wanting to create textures that mimic traditional pottery without the kiln.
Supplies Needed
- Clean blank ceramic mugs (white, cream, or a soft autumn base color)
- Food-safe ceramic paint in a contrasting color (e.g., brown, black, dark red for speckles)
- Old toothbrush or stiff-bristled brush
- Stirring stick
- Rubbing alcohol and cotton pads
- Cardboard or newspaper to protect your workspace
Step-by-Step Directions
- Prepare mug: Clean the mug surface with rubbing alcohol.
- Protect workspace: Cover your work area completely with newspaper or cardboard.
- Prepare paint: Thin your chosen paint slightly with water (if water-based) or the appropriate thinner until it’s a liquid consistency but still pigmented.
- Apply speckles: Dip the toothbrush into the paint, then hold it about 6-12 inches from the mug. Drag your thumb across the bristles to create a fine mist of speckles. Rotate the mug for even coverage.
- Dry and heat set: Allow the speckled paint to dry completely. Once dry, heat set the mug in the oven following the paint manufacturer’s instructions to ensure durable paint.
Pro-Tip: Experiment with different distances and paint consistencies to control the size and density of your speckles. A finer mist from further away creates a more subtle, elegant speckled finish suitable for festive coffee vessels. Ensure the paint is not too runny to avoid drips.

6. Personalize Mugs with Monograms & Autumn Accents

Pin this thoughtful personalized mug for unique gift ideas!
Elevate your handmade gifts by combining classic typography with seasonal flair. Personalized autumn mugs are top-tier unique gift ideas, blending custom artwork with functional design.
Supplies Needed
- Clean blank ceramic mugs (smooth surface)
- Food-safe ceramic paint pens in preferred autumn colors (e.g., gold, brown, deep red)
- Alphabet stencils or vinyl decals for monograms
- Rubbing alcohol and cotton pads
- Pencil (for light tracing)
- Small detail paintbrush (for accents)
Step-by-Step Directions
- Clean and plan: Clean the mug. Decide on the monogram placement and select your desired initial.
- Apply monogram: Use an alphabet stencil to trace or fill in your initial with paint. Alternatively, apply a vinyl decal as a mask (negative space technique).
- Add autumn accents: Once the monogram is dry, use a pencil to lightly sketch small autumn leaves, berries, or tiny branches around the initial.
- Paint accents: Carefully paint the autumn accents with your chosen colors.
- Heat set: Allow all paint to dry completely, then bake the mug according to paint instructions for a durable paint finish.
Pro-Tip: For crisp lines around your monogram, ensure your stencil is firmly adhered to the mug. If freehanding, use a transfer paper or a projector to get the initial perfectly centered and sized for custom designed crockery, demonstrating quality craftsmanship.

7. Craft Inspirational Quotes with Fall Themes on Your Mugs

Pin this inspiring fall quote mug to brighten your day!
Words have power, and custom painted autumn mugs bearing phrases like “Hello Fall” or “Pumpkin Everything” are perennials favorites. This project focuses on lettering techniques to customize mugs and create personalized fall mugs that speak to the soul.
Supplies Needed
- Clean blank ceramic mugs (smooth surface)
- Fine-point, food-safe ceramic paint pens in your chosen lettering color (e.g., black, brown, gold)
- Pencil and eraser
- Rubbing alcohol and cotton pads
- Tracing paper or stencil with fall-themed quotes (optional)
- Small detail paintbrush (for tiny accents)
Step-by-Step Directions
- Prepare mug: Clean the mug thoroughly with rubbing alcohol.
- Plan layout: Write out your chosen fall-themed quote on paper. Use a pencil to lightly sketch or trace the quote onto the mug surface.
- Lettering: Carefully trace over your pencil lines with a fine-point ceramic paint pen. Take your time to ensure clean, consistent lines.
- Add accents (optional): Once the lettering is dry, add small fall leaf or berry accents around the quote with a different colored paint pen.
- Heat set: Allow all paint to dry completely (usually 24 hours) before heat setting in the oven according to the paint manufacturer’s instructions to ensure long-lasting designs.
Pro-Tip: For perfect lettering, try printing your quote in your desired font, then rub pencil lead heavily on the back of the paper. Place this pencil-side-down on the mug and trace over the letters with a pen to transfer the outline. This helps overcome difficult designs and achieve a clean, professional look through precise paint viscosity control.

Key Takeaways: Your Quick Guide to painted mugs autumn
- Choose the right materials: Always use food-safe ceramic paint or paint pens designed for mugs, ensuring your creations are safe for daily use and last beyond a single season.
- Heat setting is crucial: Proper oven baking or curing is essential to make your painted mugs autumn designs permanent paint application, preventing chipping paint and making them more dishwasher-safe finish.
- Embrace diverse fall themes: From classic fall leaves mugs and rustic pumpkin designs to personalized monograms, there’s a wide range of creative mug designs to capture the essence of autumn.
- Preparation prevents problems: Cleaning your mug thoroughly with rubbing alcohol before painting is a simple but vital step to ensure paint adheres to ceramic effectively and avoid smudged paint.
- Techniques for every skill level: Whether you prefer stencils for design patterns, freehand illustration for woodland animals, or simple splatter for a speckled finish, there’s an easy mug painting method for everyone.
- Personalization makes perfect gifts: Custom painted autumn mugs with initials or meaningful quotes become thoughtful and unique gift ideas, adding a personalized touch that shows care.
- Practice for precision: Don’t fear imperfections; practice your chosen design on paper first to gain confidence, especially for illustrate mugs with intricate details, leading to better craftsmanship quality.
FAQs About painted mugs autumn
What kind of paint stays on ceramic mugs?
The best paints for durable, food-safe results on ceramic mugs are oven-bake ceramic paints or paint markers specifically formulated for glass and ceramics. These specialized paints contain binders that, once heat-set in a conventional oven, create a permanent and often dishwasher-safe finish that resists chipping and fading, unlike standard acrylics.
Can you bake painted mugs in the oven?
Yes, baking painted mugs in the oven is a crucial step for most ceramic paints to ensure durability and permanence. This heat-setting process cures the paint, making it more resistant to washing, scratching, and daily use. Always follow the specific temperature and baking time instructions provided by your paint manufacturer for optimal results.
Is painted mug food safe?
A painted mug is food safe only if the paint used is specifically labeled as ‘food-safe’ and applied only to the mug’s exterior, avoiding any areas that will contact food or lips. Once properly heat-set, food-safe ceramic paints are non-toxic and suitable for beverage consumption, ensuring your DIY creations are safe for use.
How do I seal painted mugs?
The most effective way to seal painted mugs for durability is through heat-setting in a conventional oven, as specified by the ceramic paint manufacturer. While clear sealants exist, they are generally not recommended for surfaces that will be washed frequently or come into contact with food, as they may not be food-safe or as durable as baked-on paint.
Are painted mugs dishwasher safe?
Whether painted mugs are dishwasher safe depends entirely on the type of paint used and if it was properly heat-set according to manufacturer instructions. Many high-quality, oven-bake ceramic paints advertise dishwasher-safe properties, especially when placed on the top rack. However, handwashing is often recommended to prolong the life of any hand-painted design.
What supplies do I need for fall mug painting?
For fall mug painting, you’ll primarily need clean, blank ceramic mugs, food-safe ceramic paints or paint pens in autumn colors, rubbing alcohol for surface preparation, and optionally, stencils or fine-tip brushes for detail work. A clean workspace and an oven for heat-setting are also essential to complete your DIY autumn mugs project.
How to make painted mugs durable?
To make painted mugs durable, always start with a clean surface, use high-quality ceramic or glass paints designed for permanent adhesion, and meticulously follow the manufacturer’s heat-setting instructions, typically involving oven baking. Proper curing strengthens the paint’s bond to the ceramic, making it resistant to chipping, fading, and washing, ensuring long-lasting designs.
What are popular autumn mug designs?
Popular autumn mug designs often feature classic fall motifs like vibrant fall leaves (maple, oak), charming rustic pumpkins, woodland animals such as foxes or owls, and festive harvest patterns. Personalized monograms, inspirational fall-themed quotes, and cozy speckled textures also rank high among favored designs for painted mugs autumn, offering a wide range of creative mug designs.
Can kids paint ceramic mugs?
Yes, kids can paint ceramic mugs with proper supervision and the right materials, making for a fun and engaging fall craft activity. Use non-toxic, kid-friendly ceramic paint pens or paints, and ensure they only decorate the exterior of the mug. Always supervise the oven-baking process for safety.
What are easy fall mug painting ideas?
Easy fall mug painting ideas include simple leaf outlines, polka-dot pumpkins, abstract color washes in autumn hues, or using stencils for quick and clean designs. These beginner-friendly techniques require minimal artistic skill but still yield beautiful painted mugs autumn, perfect for seasonal decorating or as heartfelt handmade ceramic gifts.
Final Thoughts on painted mugs autumn
Creating painted mugs autumn decor offers more than just a creative outlet; it results in lasting, functional art that brings warmth to the cooling season. By understanding the critical relationships between ceramic paint, proper surface preparation, and heat curing, you can confidently craft custom painted autumn mugs that withstand daily use. Whether you choose to illustrate intricate woodland scenes or apply a simple speckled finish, the value lies in the personalized touch and the durability achieved through these expert methods.
As you embark on your DIY autumn mugs journey in 2026, remember that the quality of your materials and patience during the curing process are the keys to success. These projects are not only perfect for elevating your own seasonal drinkware collection but also serve as cherished handmade gifts for friends and family. Which of these creative mug designs will you try first? Grab your paints, preheat your oven, and start creating something beautiful today.
Last update on 2026-03-06 / Affiliate links / Images from Amazon Product Advertising API


