Do you crave the calming vibes of the ocean with your morning coffee? Plain white cups often fail to inspire that needed seaside relaxation during a busy week. You need a creative way to bring painted mugs beachy into your daily routine and capture summer magic.
Painted mugs beachy: Hand-painted ceramic or porcelain coffee cups featuring coastal-themed designs like ocean waves, seashells, or marine life. They allow for personalization and add a unique, artistic touch to kitchenware, often sealed for durability and food safety.
Drawing from expert analysis of current DIY trends and proven ceramic painting techniques, this guide ensures professional results. You will discover nine essential ideas to create durable designs that withstand daily use. Let’s transform your drinkware into a coastal escape.
What are Painted Mugs Beachy? Discover Your Next DIY Project
Painted mugs beachy are more than just functional drinkware; they are personalized artistic expressions that bring the serenity of coastal decor into your home. At their core, these are hand-painted creations characterized by ocean scenes, vibrant tropical designs, and intricate seashells pattern motifs. Unlike mass-produced items, DIY painted mugs offer a unique opportunity to address the common problem of boring kitchenware by infusing your personality into every sip. Whether you are looking to create unique beach mugs for yourself or as thoughtful gifts, understanding the fundamentals of food-safe certified paint and proper sealants is crucial for success. This project allows you to transform ordinary ceramics into custom beach mugs that serve as durable, daily reminders of the sea.
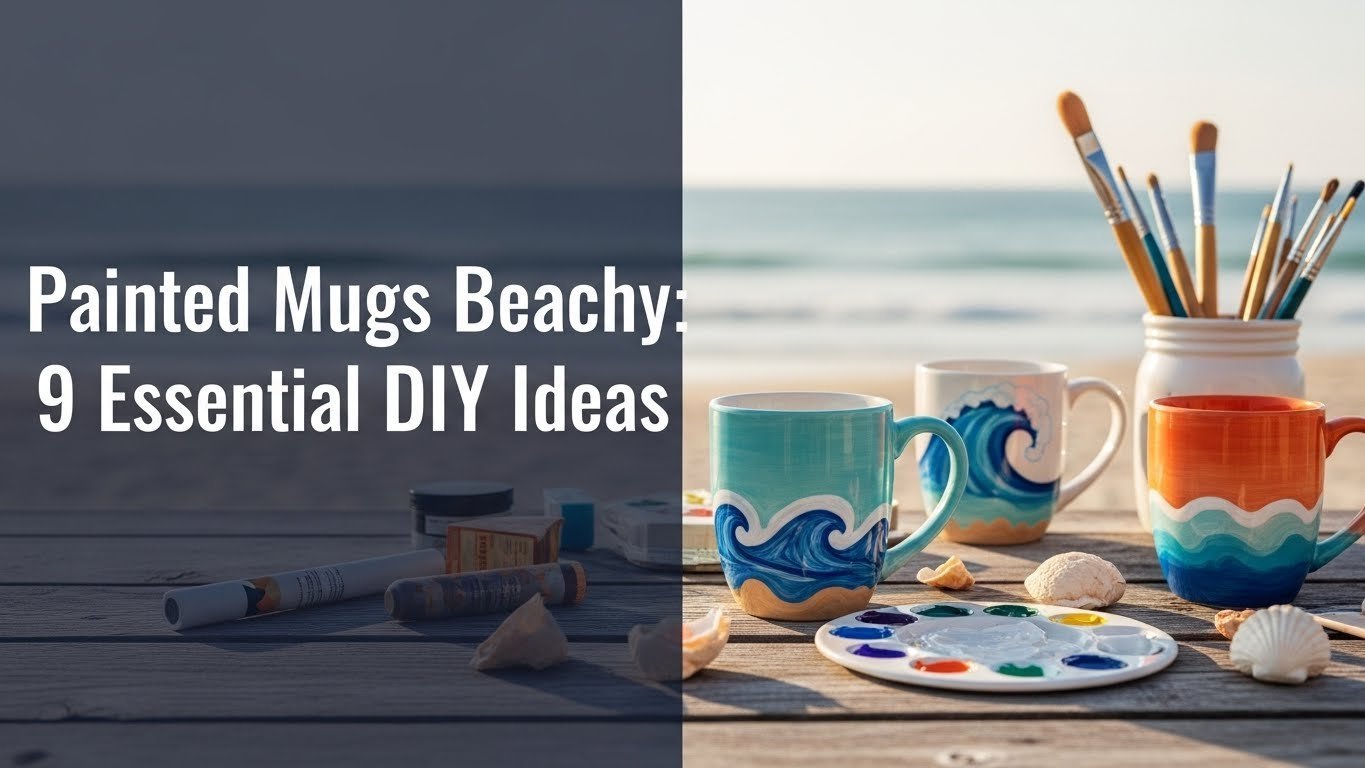
Painted Mugs Beachy: 9 Essential DIY Ideas for 2026 to Create Your Coastal Collection
Ready to dive into creativity? These DIY ideas for painting beach themed coffee mugs cover a wide range of styles, from simple process action keywords like stenciling to advanced illustrate mugs techniques. Before you begin, it is vital to select the right materials, specifically prioritizing food-safe certified paint to ensure your creations are safe for use. We have curated nine distinct projects that will guide you on how to make personalized beach scene mugs at home, addressing common challenges like paint chipping and ensuring durable designs. Each idea below includes a detailed list of materials and step-by-step instructions to help you decorate mugs with a professional finish.
1. Paint Coastal Waves for a Serene Ocean Vibe

Pin this serene ocean wave mug to your coastal crafts board!
[Direct Answer]: To paint coastal waves on a mug, layer different shades of blue ceramic paint from light to dark to create a gradient, then use a sponge with white paint to add seafoam texture. This method allows you to create an ocean waves design that transforms a plain vessel into a blue wave mug perfect for a calm morning.
Capturing the movement of the ocean requires attention to detail and the right long tail semantic variations of color. By focusing on brush stroke techniques for detailing marine life and using high-quality materials, you can achieve a professional look that rivals store-bought artistic tumblers.
Materials Needed
- White ceramic coffee mug (blank, pre-fired)
- Food-safe ceramic paint in varying shades of blue, turquoise, white, and sand (e.g., Pebeo Porcelaine 150, FolkArt Enamel)
- Fine-tipped paint brushes (round and flat)
- Soft sponge or small sea sponge for texture
- Rubbing alcohol or glass cleaner
- Cotton swabs for mistakes
- Heat gun or oven for curing
- Optional: Clear epoxy resin sealant for extra durability and glossy finish
Step-by-Step Directions
- Prepare surface: Clean mugs thoroughly with rubbing alcohol and let dry completely to ensure the best paint bond.
- Sketch wave base: Using a pencil or light blue paint, lightly sketch the general shape of your waves around the mug, focusing on smooth, flowing lines.
- Apply base colors: Paint mugs with the lightest blue for the sky/top of the wave, blending into darker blues towards the bottom of the wave, creating a gradient effect.
- Add foam texture: While the darker blue is still slightly wet, gently dab white paint with a sponge along the top edge of your waves to simulate seafoam.
- Detail and refine: Use a fine-tipped brush to add details like white lines for breaking waves or subtle sand-colored accents along the bottom.
- Cure paint: Follow paint manufacturer’s instructions for curing paint (typically baking in a household oven). If using resin, cure paint first.
- Seal mugs (optional): If desired, apply sealant with epoxy resin for enhanced protection and a professional finish, following product instructions for mixing and application.
Pro-Tip: For the most realistic wave effect, layer your blues from lightest to darkest, then use a tiny amount of white paint on a very dry brush to create delicate, wispy foam details. This advanced multi-layer painting technique prevents flat-looking waves and adds depth.

2. Create a Seashell & Sand Texture Design

Save this textured seashell mug idea for your next craft day!
[Direct Answer]: To create a seashell & sand texture design, apply a layer of beige ceramic paint mixed with fine craft sand or sprinkled with sand while wet to decorate mugs with sand. Once the textured base is set, hand paint delicate seashells pattern details over the top or around the sandy areas.
This project focuses on tactile elements to make custom beach mugs that feel as unique as they look. It is crucial to address potential paint chipping by ensuring strong adhesion, particularly when adding texture.
Materials Needed
- White or neutral-colored ceramic mug
- Food-safe ceramic paint in off-white, beige, or light brown
- Fine craft sand or actual clean beach sand
- Mod Podge Outdoor or other strong, water-resistant adhesive
- Small paint brushes
- Sealant (epoxy resin or other food-safe ceramic sealant)
- Pencil and eraser
- Optional: Small seashell stencils
Step-by-Step Directions
- Prepare mug: Clean mugs thoroughly to remove any grease or oils.
- Sketch design: Lightly sketch seashell outlines or designated areas for sand texture.
- Apply sand base: Paint mugs with the beige/sand paint in designated areas. While wet, sprinkle a thin layer of craft sand onto the painted sections. Gently tap off excess.
- Paint seashells: Once the sand layer is dry and adhered, hand paint your seashell designs using various light colors. You can use stencils or freehand illustrate mugs.
- Secure sand (if loose): After paint and sand are dry, apply a thin coat of Mod Podge over the sand areas to secure them, taking care not to disturb the seashell art. Let dry.
- Cure and seal: Follow paint manufacturer’s instructions for curing paint. Once fully cured, apply sealant over the entire painted and textured area, ensuring a durable and long-lasting design.
Pro-Tip: If using natural beach sand, ensure it’s thoroughly cleaned and dried before use to prevent any unwanted organic matter or moisture issues. For added realism, consider texture painting for beach elements by mixing a tiny bit of sand directly into your base paint for subtle grit.

3. Design Marine Life Silhouettes

Pin this elegant marine life mug for your minimalist coastal kitchen!
[Direct Answer]: To design marine life silhouettes, use stencils or careful freehand painting to apply contrasting marine life art like dolphins, seahorses, or turtles onto a ceramic mug. The key is using fine-tipped paint pens or small brushes to ensure crisp edges that stand out against the mug’s background color.
This method is perfect for creating sea themed mugs that are elegant and modern. Precision is paramount to avoid design smudges and achieve clean lines that characterize professional design patterns.
Materials Needed
- Plain ceramic mug (white or light blue works well as a base)
- Food-safe ceramic paint or paint pens in a contrasting color (e.g., deep navy blue, black, or dark teal)
- Marine life stencils (dolphin, seahorse, turtle, starfish) or printouts for tracing
- Painter’s tape
- Craft knife or small scissors
- Rubbing alcohol and cotton swabs
Step-by-Step Directions
- Clean and prep: Clean mugs thoroughly with rubbing alcohol.
- Create stencil: If using a printout, carefully cut out your chosen marine life silhouette to create a custom stencil.
- Position stencil: Tape the stencil securely onto the mug where you want your design. Ensure edges are firmly pressed down to prevent bleed-through.
- Apply paint: Using a small, firm brush or a fine-tipped paint pen, carefully paint mugs within the stencil, applying thin, even coats. For paint, dab gently to minimize bleeding.
- Remove stencil: While the paint is still slightly tacky, carefully peel off the stencil. Use a cotton swab dipped in alcohol to immediately correct any smudges.
- Cure and seal: Allow the paint to dry completely. Follow manufacturer’s instructions for curing paint (baking). Once cured, apply sealant for protection if desired.
Pro-Tip: For perfectly crisp edges, apply a very thin layer of Mod Podge or your base coat color over the stencil before adding your silhouette color. This creates a seal, preventing the main paint from bleeding under the stencil. This detailed painting technique ensures a professional finish.

4. Craft a Tropical Palm Tree Scene

Pin this vibrant palm tree mug to your ‘Tropical Getaway’ board!
[Direct Answer]: To craft a tropical palm tree scene, start by sketching palm trees design outlines and then layer vibrant greens and browns to illustrate mugs with a lush, vacation feel. Adding a sunset background gradient enhances the tropical painted mugs aesthetic, creating a complete scene.
This idea brings summer vibes directly to your kitchen. To prevent fading colors, use high-pigment paints and seal properly, ensuring your vibrant beach designs stay bright wash after wash.
Materials Needed
- Ceramic mug (white or light-colored base)
- Food-safe ceramic paints in various shades of green, brown, yellow, and orange
- Fine-tipped and small flat paint brushes
- Pencil for sketching
- Rubbing alcohol
Step-by-Step Directions
- Clean mug: Clean mugs thoroughly.
- Sketch scene: Lightly sketch the outline of your palm tree trunks and fronds on the mug. Consider adding a distant horizon line or a sun for a fuller scene.
- Paint background: If desired, paint a soft gradient background (e.g., yellow to orange for a sunset, light blue for sky) and let it dry.
- Paint trunks: Paint mugs with the brown paint for the palm tree trunks, allowing for some texture.
- Paint fronds: Using different shades of green, carefully add details for the palm fronds, layering colors to create depth.
- Add details: If applicable, paint a small sun, birds, or other tropical elements.
- Cure paint: Allow all paint layers to dry completely. Bake the mug according to the paint manufacturer’s instructions.
- Seal mugs: Once cured, consider applying sealant (epoxy resin) for durability and a protective, glossy finish.
Pro-Tip: For a realistic palm tree, start with a dark brown base for the trunk and add lighter brown or tan highlights for texture. When painting fronds, use a fine brush to create individual leaves, overlapping them slightly to achieve a lush, full look, demonstrating brush stroke techniques for detailing marine life.

5. Achieve a Distressed Beach Wood Look

Transform your mug with this rustic distressed wood look! Pin it now!
[Direct Answer]: To achieve a distressed beach wood look, layer a light chalk-style ceramic paint over a dark base coat, then sand away areas on the rim and handle to reveal the dark color underneath. This distressed beach wood technique mimics weathered driftwood and creates unique beach mugs with rustic charm.
This advanced approach leverages texture painting for beach elements to create depth. It addresses the desire for creative beach mugs that feel aged and authentic, while using specific food-safe sealant to solve potential issues with paint peeling over time.
Materials Needed
- Ceramic mug (any color, but a darker base can enhance the effect)
- Food-safe chalk-style ceramic paint in a light color (e.g., off-white, light grey, faded blue)
- Food-safe ceramic paint in a darker color (e.g., brown, dark grey)
- Small, stiff-bristled brush
- Fine-grit sandpaper or sanding block
- Rubbing alcohol
- Clear food-safe sealant (matte finish for authentic wood look)
Step-by-Step Directions
- Clean mug: Clean mugs thoroughly.
- Base coat: Paint mugs with 1-2 coats of your darker ceramic paint for the base wood color. Let dry completely.
- Top coat: Apply 1-2 coats of the lighter chalk-style ceramic paint over the dark base. Let dry thoroughly.
- Distress: Gently sand areas where natural wear would occur (rim, handle, raised edges) to reveal the darker base coat underneath. Vary pressure and intensity for a natural look.
- Add wood grain (optional): With a very dry, stiff brush and a tiny amount of darker paint, lightly drag horizontal lines across the mug to simulate wood grain.
- Cure and seal: Bake the mug according to paint instructions. Once cured, apply sealant to protect the distressed finish and ensure durability. A matte sealant will preserve the wood-like texture.
Pro-Tip: Experiment with different sanding techniques and levels of pressure on an inconspicuous area first. For a truly authentic distressed beach wood look, focus on revealing the underlying color unevenly, mimicking how wood naturally wears and bleaches in the sun and salt. This advanced painting technique creates depth and character.

6. Blend an Ombre “Sand and Sea” Effect

Pin this stunning ombre mug for a touch of coastal elegance!
[Direct Answer]: To blend an ombre “Sand and Sea” effect, apply sandy beige paint to the bottom and blue paint to the top of a mug, then use a wet blending brush or sponge to smooth the transition line between the two. This creates a gradient effect mug that mimics the natural shoreline where sand meets the ocean colors.
Achieving a seamless blend creates artistic tumblers that serve as stylish vibrant beach designs. Using the right tools, such as soft brushes, solves the problem of uneven finish and results in creative beach mugs that look professionally made.
Materials Needed
- Ceramic mug (white or very light colored base)
- Food-safe ceramic paints in a sandy beige/light brown and several shades of blue/turquoise
- Soft blending brushes (large, flat brushes work well)
- Small sponge (makeup sponge can work)
- Rubbing alcohol
Step-by-Step Directions
- Clean mug: Clean mugs thoroughly.
- Paint base (sand): Paint mugs with the sandy beige color on the bottom third, extending slightly past where you want the transition to begin. Let dry.
- Paint middle (lightest blue): Apply the lightest blue above the sand color, overlapping slightly.
- Blend transition: While both the sand and lightest blue are still wet (or apply paints quickly), use a clean, dry blending brush or sponge to gently blend the two colors where they meet. Use light, circular motions.
- Add darker blue: Apply a darker blue above the blended section, overlapping the lightest blue. Blend this transition as well. You can use multiple shades of blue for a more complex gradient.
- Cure and seal: Let all paint dry completely. Bake the mug according to paint instructions. Once cured, apply sealant (epoxy resin or other food-safe ceramic sealant) to ensure a durable and glossy finish.
Pro-Tip: For the smoothest gradient effect, work quickly and in small sections. Applying a thin coat of ceramic paint blending medium between colors can also help achieve a seamless transition. This technique leverages multi-layer painting techniques to create depth without harsh lines.

7. Personalize with a Beach Quote or Saying

Pin this personalized mug to your ‘Beach Life Quotes’ board!
[Direct Answer]: To personalize with a beach quote or saying, use carbon transfer paper to trace text onto the mug, then go over the lines with fine-tipped paint pens. This allows you to create custom beach mugs with professional lettering that feature beach quotes and sayings tailored to the recipient.
This idea is perfect for creating personalized beach mugs as gifts. Using high-grade ceramic paint pens prevents design smudges and allows you to add details with precision, enabling unique expression of personal style on your drinkware.
Materials Needed
- Ceramic mug (white or light solid color recommended)
- Food-safe ceramic paint pens (fine tip) in desired color (e.g., navy, black, or gold)
- Pencil
- Carbon transfer paper (or graphite paper)
- Painter’s tape
- Rubbing alcohol and cotton swabs
- Printed beach quote in desired font size
- Optional: Letter stencils
Step-by-Step Directions
- Clean mug: Clean mugs thoroughly.
- Prepare quote: Print your chosen beach quote in the desired font and size.
- Transfer text: Tape the carbon transfer paper to the mug, carbon side down. Place your printed quote over the transfer paper and tape it down. Trace over the letters firmly with a pencil to transfer the outline onto the mug. Alternatively, use letter stencils directly.
- Paint over outline: Carefully paint mugs over the transferred lines using your fine-tipped paint pen. Take your time to ensure clean, crisp letters.
- Correct mistakes: Use a cotton swab dipped in rubbing alcohol to immediately clean up any smudges or errors.
- Cure and seal: Allow the paint to dry completely. Bake the mug according to the paint pen manufacturer’s instructions. For added durability and gloss, apply sealant after curing.
Pro-Tip: If freehanding isn’t your strength, stencils are a great way to ensure clean text. For perfectly aligned text, draw a light horizontal guide line with a pencil around the mug before transferring your quote. This detailed painting technique helps maintain professionalism and prevents crooked lettering.

8. Paint a Beach Sunset Gradient

Capture the magic of sunset! Pin this gorgeous mug design!
[Direct Answer]: To paint a beach sunset gradient, blend warm colors like yellow, orange, and pink into cool purples and blues using a sponge or soft brush to create a smooth transition on your ceramic mug. Finish the beach sunset gradient by adding black silhouettes of palm trees or a horizon line once the background is dry.
This project creates vibrant colors that capture the beach essence, perfect for creative beach mugs. By understanding color theory for coastal palettes and using pigment stable paints, you ensure long-lasting designs that don’t fade, resolving common complaints about fading colors.
Materials Needed
- White ceramic mug
- Food-safe ceramic paints in sunset colors (e.g., deep blue, purple, pink, orange, yellow)
- Soft blending brushes or makeup sponges
- Rubbing alcohol
- Optional: Small flat brush for silhouette details (palm trees, distant ocean)
Step-by-Step Directions
- Clean mug: Clean mugs thoroughly.
- Plan gradient: Decide on your color order (e.g., dark blue at the bottom, blending up through purple, pink, orange, to yellow at the top).
- Apply first color: Starting from the bottom, paint mugs with the darkest color (deep blue), covering about one-quarter of the mug.
- Apply second color & blend: Immediately apply the next color (purple) above the blue, overlapping slightly. Use a clean, soft blending brush or sponge to gently blend the two colors where they meet.
- Continue blending: Repeat the process with pink, orange, and yellow, blending each new color into the previous one for a seamless transition. Work quickly before paints dry.
- Add silhouette (optional): Once the gradient is dry, use a small flat brush and black ceramic paint to add details like palm tree silhouettes or a distant ocean line at the horizon.
- Cure and seal: Allow all paint to dry completely. Bake the mug according to paint instructions. Once cured, apply sealant for protection and a glossy finish.
Pro-Tip: Using an airbrush for the gradient can create the most flawless blends, but with practice, sponges and soft brushes can yield beautiful results. Working in thin layers and allowing some drying time between broad color sections (but blending overlaps while still wet) helps prevent muddiness. This multi-layer painting technique and understanding of pigment stability are key.

9. Embellish with Sea Glass Shards

Add a touch of authentic beach charm! Pin this sea glass mug idea!
[Direct Answer]: To embellish with sea glass shards, adhere small pieces of sea glass to your mug using a strong, heat-resistant, and food-safe adhesive like E6000 or epoxy. This technique creates sea glass art mugs with a 3D texture and authentic coastal look, perfect for decorative use or careful hand-washing.
This unique approach creates embellished drinkware that stands out as unique beach mugs. Because this involves attaching non-paint elements, it is vital to focus on durability issues and use industry standard sealants to ensure the glass remains secure, addressing concerns about protecting artwork.
Materials Needed
- Ceramic mug (smooth surface recommended)
- Small, tumbled sea glass shards (various colors like blue, green, white)
- Strong, food-safe adhesive suitable for ceramics (e.g., E6000 Craft Adhesive or a two-part epoxy resin)
- Tweezers or craft pick
- Rubbing alcohol
- Optional: Food-safe ceramic paint for a base color or subtle design under the glass.
Step-by-Step Directions
- Clean mug: Clean mugs thoroughly.
- Optional base paint: If desired, paint mugs with a light, complementary color or simple design where you plan to place the sea glass. Cure paint if applicable.
- Arrange sea glass: Arrange your sea glass shards on the mug, dry, to finalize your design pattern. You can create patterns like a wave, a heart, or randomly scatter them.
- Adhere sea glass: Using tweezers or a craft pick, apply a small dot of strong adhesive to the back of each sea glass shard and carefully press it onto the mug. Hold firmly for a few seconds.
- Let cure: Allow the adhesive to cure completely, ideally for 24-72 hours, depending on the product instructions. This is crucial for durability.
- Seal (optional & external): While the mug can be used for drinks, the sea glass embellishments are best for decorative mugs or mugs that will only hold cold liquids and be hand-washed. If you want to use it for hot drinks, consider an external, water-resistant sealant over the glass (ensure it’s cured thoroughly).
Pro-Tip: For mugs with external embellishments like sea glass, it’s often best to treat them as decorative pieces or use them only for cold beverages to ensure longevity of the adhesive. When choosing adhesive, research its epoxy resin curing processes and compatibility with ceramics for the best bond. This highlights durability testing for hand-painted goods.

Key Takeaways: Your Quick Guide to Painted Mugs Beachy
Now that you have explored these creative techniques, you might want a quick recap of the essentials before you start your project. Understanding the core principles of DIY beach mugs ensures that your efforts result in beautiful, safe, and lasting items. Here is a summary of the most critical insights to keep in mind as you create your own painted mugs beachy collection.
- Embrace variety in your painted mugs beachy designs, from serene waves to textured sand and detailed marine life silhouettes. Experiment with vibrant colors and different painting techniques to create truly unique pieces.
- Always prioritize food-safe ceramic paints and sealants for any mugs you intend to use for beverages. This ensures the durability and safety of your hand-painted mugs, preventing issues like paint chipping or toxic paint concerns.
- Proper surface preparation and curing (baking) are crucial for long-lasting, dishwasher-safe results. Cleaning with alcohol and following manufacturer instructions for curing paint ensures optimal paint adhesion on glazed surfaces.
- Leverage specialized tools like fine-tipped paint pens, stencils, and blending brushes to achieve professional-looking details. These tools simplify complex illustrate mugs tasks and help with adding details for a professional finish.
- Don’t shy away from adding unique textures or elements like craft sand for an authentic beach feel. Just ensure any non-paint embellishments like sea glass shards are securely attached with strong, food-safe adhesive and primarily for decorative use.
- Personalization through beach quotes or custom names adds significant sentimental value, making these mugs perfect gifts. Utilizing long-tail semantic variations and personalized painted mugs transforms a simple craft into a cherished item.
- Continuous learning of advanced techniques, like color theory for coastal palettes or advanced blending, will elevate your painted mugs beachy creations. Researching topical authority advanced methods enhances your artistic skill and the quality of your finished products.
People Also Ask About Painted Mugs Beachy
As you dive into creating your own painted mugs beachy, you likely have specific questions about materials, safety, and care. Addressing these common misunderstandings helps ensure your project is a success and your mugs last for years. Below are authoritative answers to the most frequently asked questions about DIY painted mugs.
What are painted beach mugs?
Painted beach mugs are ceramic or porcelain coffee cups that have been hand-painted with coastal or ocean-themed designs like waves, seashells, marine life, or tropical scenes. They are often personalized and sealed with food-safe paints and protective finishes, creating unique, artistic drinkware that brings a beachy vibe to your home. They serve as both functional items and decorative pieces, capturing the essence of the seaside.
How do you make painted mugs beachy?
To make painted mugs beachy, you first clean a ceramic mug, then sketch or freehand your chosen coastal design (waves, palm trees, marine life). Next, paint mugs with food-safe ceramic paints, applying layers and blending for effects like gradients or textures. After drying, cure paint in the oven according to instructions, and optionally apply sealant for enhanced durability and a glossy finish.
What kind of paint do you use for painted mugs beachy?
For painted mugs beachy that are safe for use, you must use food-safe ceramic or porcelain paints that are specifically designed for heat-setting. Brands like Pebeo Porcelaine 150, FolkArt Enamel, or specific ceramic paint pens work well. Avoid regular acrylic paints unless they are explicitly labeled as food-safe and heat-set for ceramics, as they can chip easily and may not be safe for consumption.
Are painted mugs dishwasher safe?
Many professionally painted and properly cured painted mugs can be dishwasher safe, but it’s essential to check the specific paint manufacturer’s instructions. While some food-safe ceramic paints claim dishwasher safety after baking, hand washing is generally recommended to best preserve the long-lasting designs, especially for mugs with intricate details or added textures. This prevents paint chipping or fading colors.
How do you seal painted mugs for durability?
To seal painted mugs for durability, you typically bake them in a conventional oven after the paint has thoroughly dried, following the paint manufacturer’s precise temperature and time guidelines. For added protection, a food-safe epoxy resin sealant can be applied over the cured paint, creating a glossy finish that enhances both appearance and durability, making the design more resistant to wear.
What are popular designs for painted mugs beachy?
Popular designs for painted mugs beachy include ocean waves, intricate seashell patterns, graceful marine life silhouettes (like dolphins or seahorses), and vibrant tropical palm tree scenes. Ombre gradients transitioning from sand to sea colors are also very popular. Many choose to personalize their mugs with inspiring beach quotes and sayings or incorporate unique textures like actual sand or sea glass shards.
Can I use regular acrylic paint on painted mugs?
You should generally avoid using regular acrylic paint on painted mugs intended for beverages, as it is not typically food-safe and will likely chip, peel, or scratch off easily, especially with washing. While it can be used for purely decorative mugs, for functional painted mugs beachy, always opt for specialized, food-safe ceramic paints that are designed to be heat-set for proven durability.
Do painted mugs need to be baked in the oven?
Yes, painted mugs typically need to be baked in the oven to cure the ceramic paint, making it permanent, durable, and often food-safe. This heat-setting process chemically bonds the paint to the mug’s surface, preventing it from washing off or chipping during regular use and cleaning. Always follow the paint manufacturer’s specific baking instructions for optimal results and safety.
What types of mugs are best for painting beachy designs?
Plain, smooth, unglazed ceramic or porcelain mugs are best for painting beachy designs, as they provide an ideal surface for paint adhesion. White or light-colored mugs allow the vibrant coastal palettes to truly pop. Ensure the mugs are clean and free of any oils or dust before you start your project for the best possible paint bond.
Are custom painted beach mugs a good gift?
Yes, custom painted beach mugs make excellent, thoughtful gifts for beach lovers, ocean enthusiasts, or anyone who appreciates handmade, personalized items. They are unique, reflect effort and care, and can be tailored with specific designs, colors, or beach quotes to suit the recipient’s taste, making them far more special than mass-produced alternatives. They add a personal touch to coastal decor or beach house accessories.
Final Thoughts on Painted Mugs Beachy
As we wrap up our journey through these 9 essential DIY ideas for painted mugs beachy, it’s clear that transforming a simple mug into a coastal-themed masterpiece is more accessible and rewarding than you might think. Whether you choose to paint coastal waves, create seashell patterns, or personalize with a beach quote, each project offers a unique opportunity to infuse your everyday with the tranquil beauty of the ocean. The key lies in selecting the right food-safe ceramic paints, mastering basic painting techniques, and ensuring proper curing and sealing for long-lasting designs that resist paint chipping and maintain their vibrant colors.
By applying these expert tips and carefully following the steps, you can create not just a functional item, but a piece of art that reflects your love for the sea. These custom beach mugs make for thoughtful gifts or charming additions to your coastal decor, demonstrating your craftsmanship and personal style. So, gather your art and craft tools, pick your favorite design, and embark on your own DIY beach mug adventure.
Which of these painted mugs beachy ideas are you most excited to try first? Share your creative plans in the comments below
Last update on 2026-04-01 / Affiliate links / Images from Amazon Product Advertising API